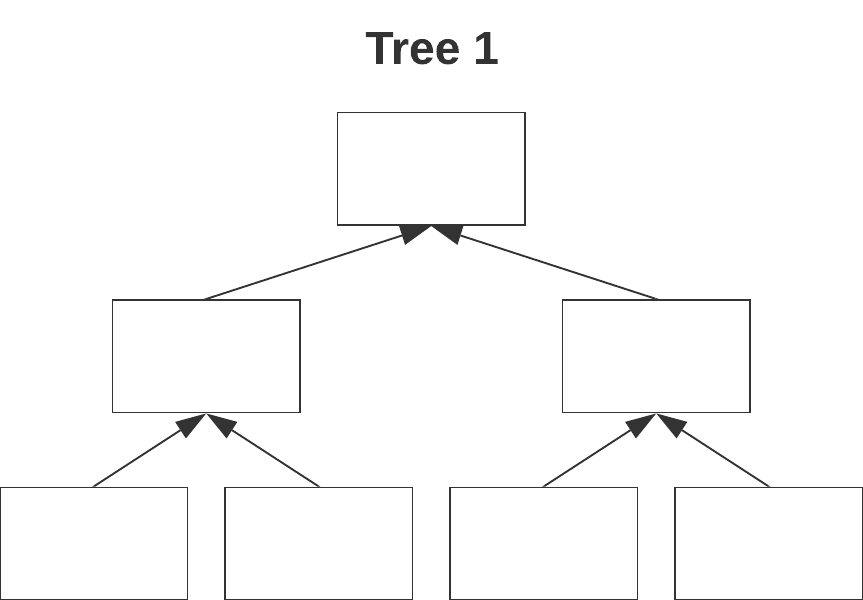
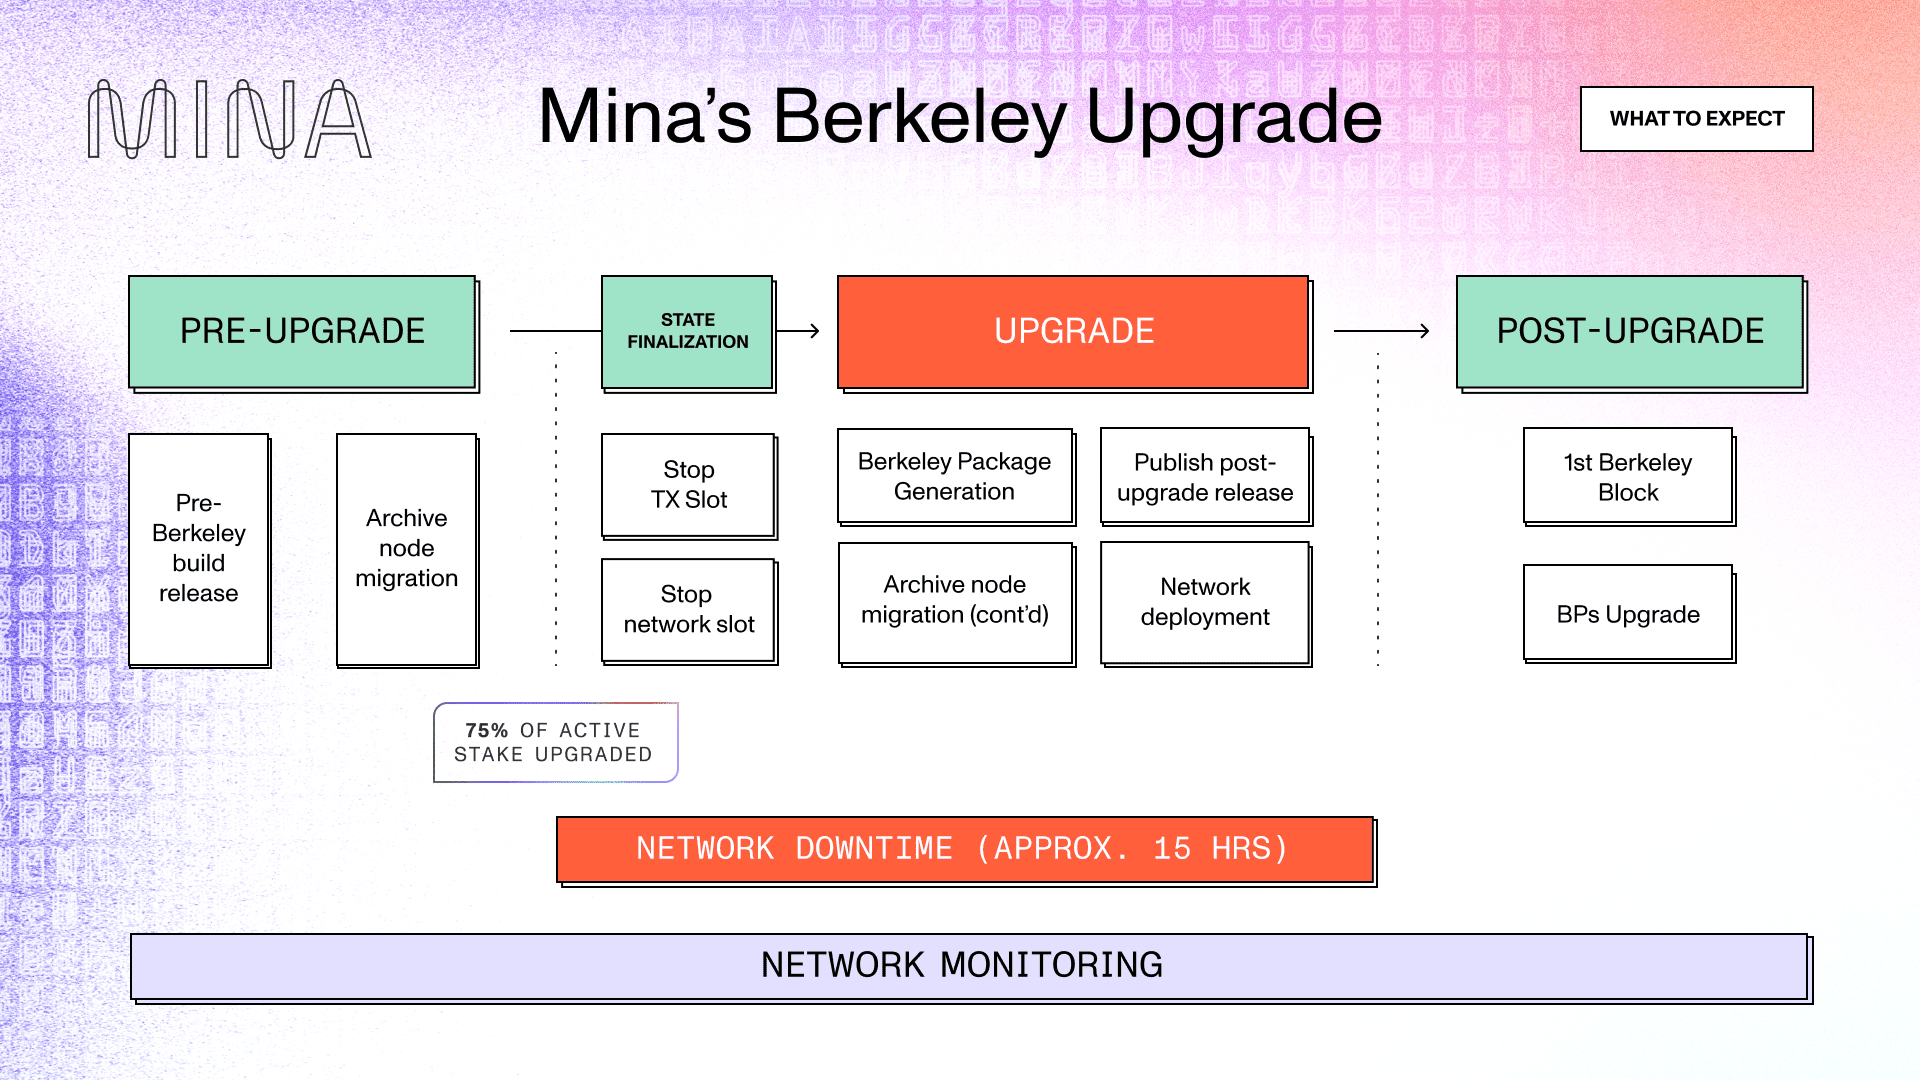
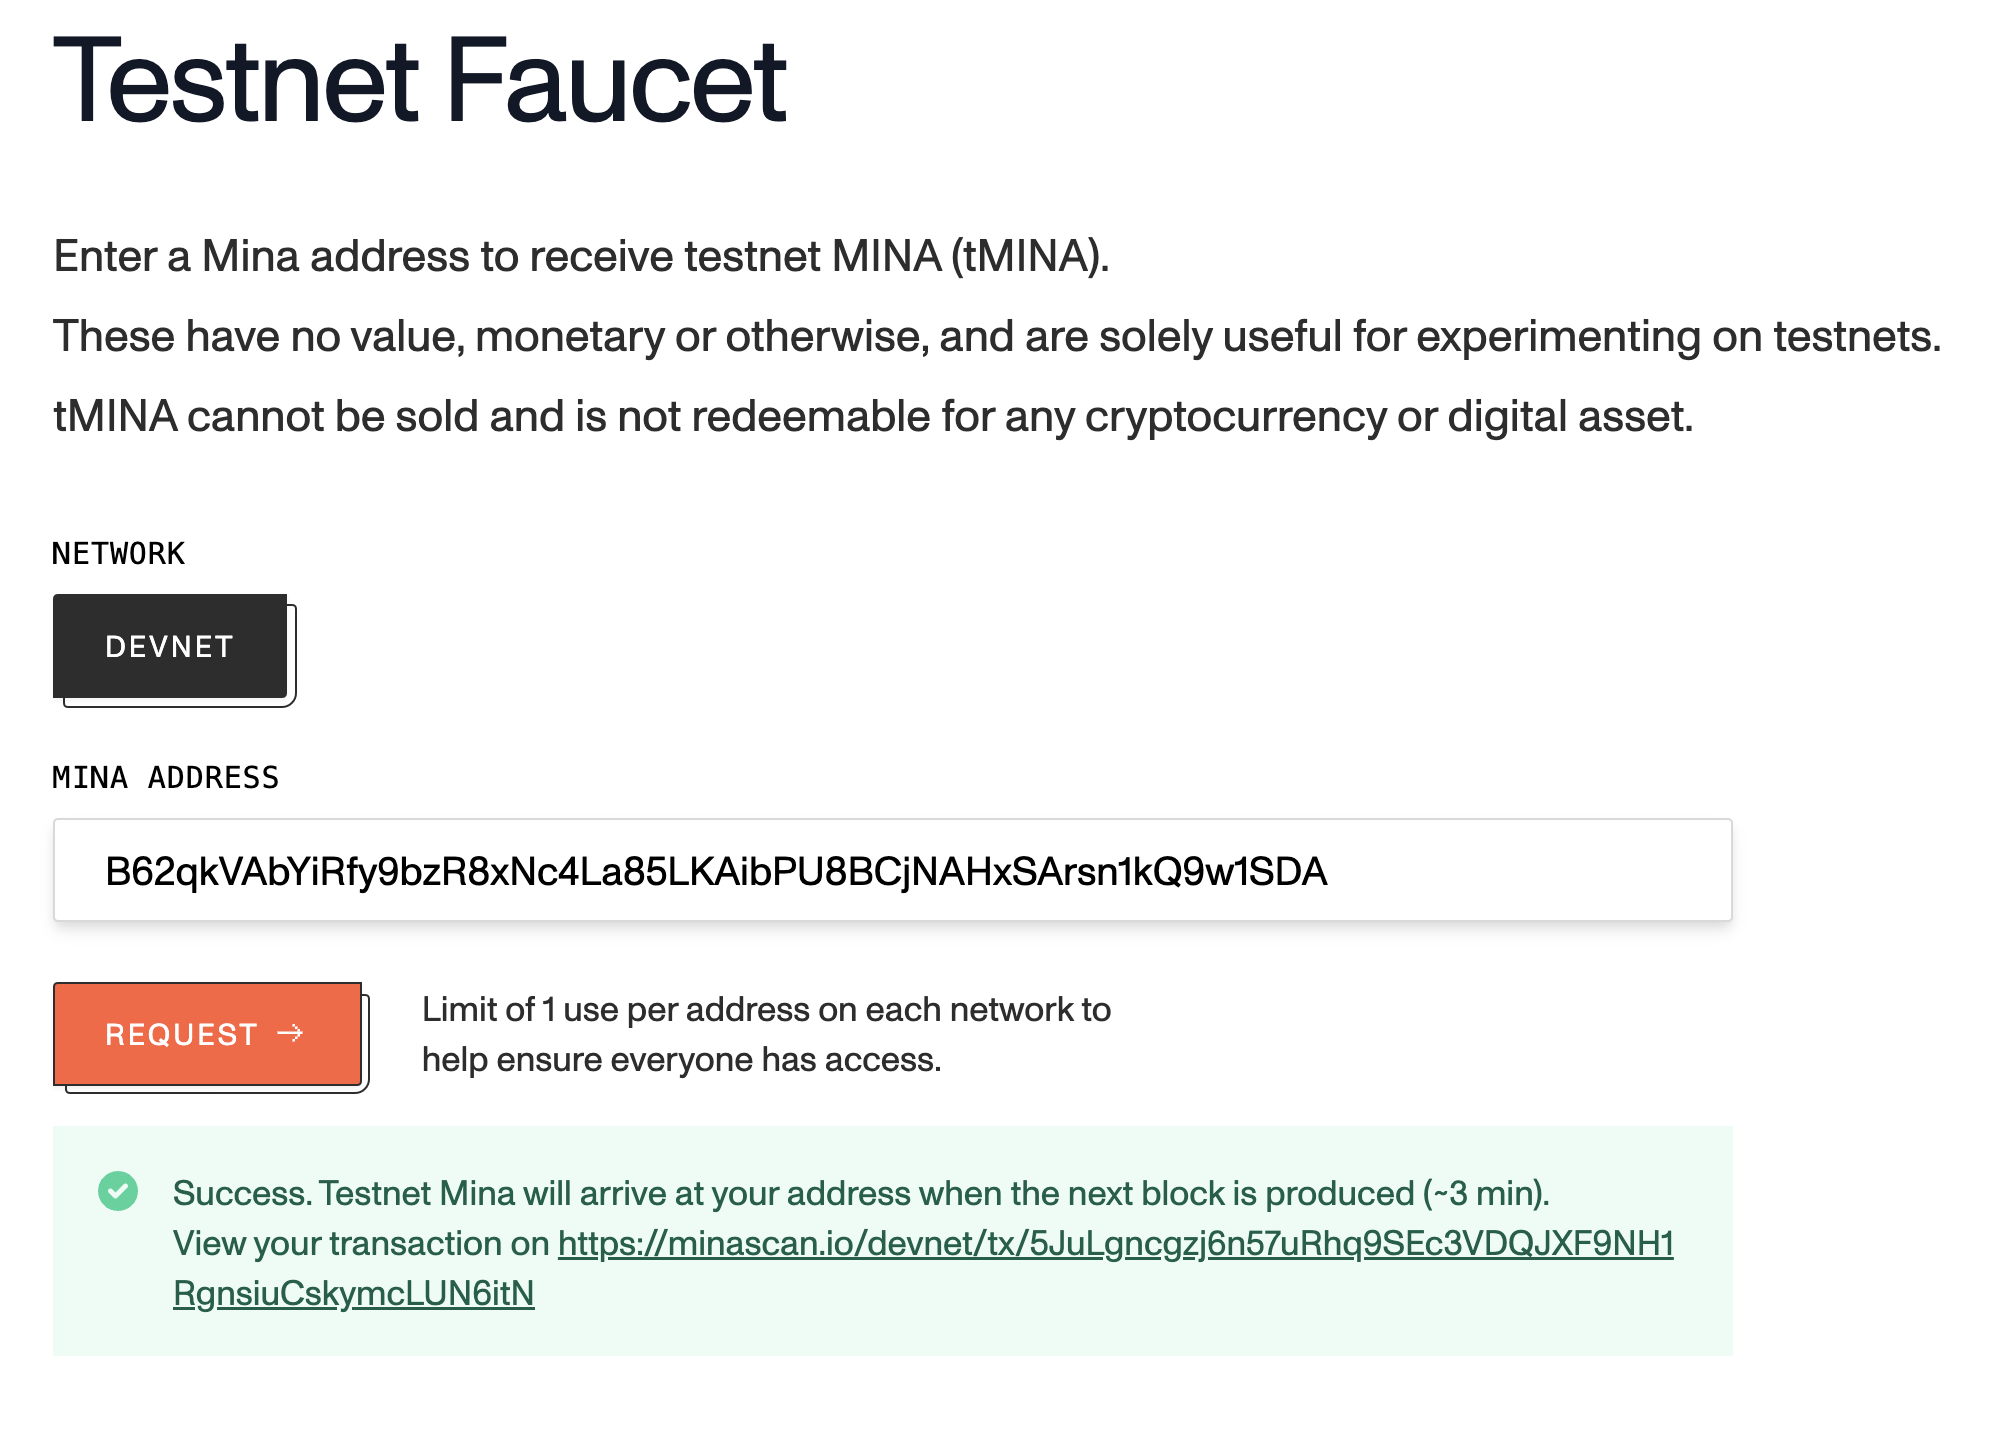
--- url: /glossary --- # Glossary [A](#a) [B](#b) [C](#c) [D](#d) [E](#e) [F](#f) G [H](#h) [I](#i) J [K](#k) [L](#l) [M](#m) [N](#n) [O](#o) [P](#p) Q [R](#r) [S](#s) [T](#t) [U](#u) [V](#v) W X Y [Z](#z) Are you looking for a zero knowledge or Mina term that isn't here yet? To let us know, please [create an issue](https://github.com/o1-labs/docs2/issues) or click **EDIT THIS PAGE** to submit a PR. ## A ### account Mina uses accounts to track each public key's state. This is distinct from Bitcoin's UTXO model of maintaining ledger state. ### archive node A Mina node that stores the historical chain data to a persistent data source so it can later be retrieved. A zkApp can retrieve events and actions from one or more Mina [archive nodes](/node-operators/archive-node/getting-started). ## B ### Base58 A group of encoding/decoding schemes used to switch data between binary format (hexadecimal) and alphanumeric text format (ASCII). The Base58 alphabet includes numbers (1 to 9) and English letters, except O (uppercase o), I (uppercase i), and l (lowercase L). These letters are omitted to avoid confusion. ### Base64 A binary-to-text encoding scheme that represents binary data in a human-readable ASCII string format string. For example, the zero knowledge proof is a Base64 string inside the `authorization` field of a transaction. ### best tip The blockchain's latest block with the highest [chain strength](#chain-strength) known to the mina daemon. ### bitwise operations Generally available in most programming languages, including TypeScript, [bitwise operations](/zkapps/o1js/bitwise-operations) manipulate individual bits within a binary representation of a number. o1js provides versions of bitwise operations that operate on Field elements and result in the necessary circuit constraints to generate a zero knowledge proof of the computation. ### block A set of transactions and consensus information that extend the state of the network. A block in Mina includes a proof that the current state of the network is fully valid. See also [extensional blocks](/glossary#extensional-blocks) and [precomputed blocks](/glossary#precomputed-blocks). See [What's in a Block?](/mina-protocol/whats-in-a-block) ### blockchain The data structure that is used in a cryptocurrency to maintain a shared state of all accounts in the network. ### block confirmations The number of blocks added after the reference block. As the number of confirmations increases, the likelihood of a [reorganization](/glossary#reorganization) decreases, thereby increasing the likelihood of all transactions in the reference block being confirmed. ### block explorer A web-based tool to extract, visualize, and review blockchain network metrics, including transaction histories, wallet balances, and details about individual blocks and transactions. Block explorers for Mina include: - https://minascan.io - https://minataur.net ### block fill rate The proportion of [slots](#slot) that should contain a block. Some slots are intentionally empty to ensure the network can [catch up](/glossary#catchup) in case of delay of messages. ### block header The portion of a block that contains information about the block itself (block metadata), typically includes a timestamp, a hash representation of the block data, the hash of the previous block's header, and a cryptographic nonce (if needed). ### block producer A node that participates in a process to determine what blocks it is allowed to produce and then produces blocks containing transactions that can be broadcast to the network. People who run [block producer](/mina-protocol/block-producers) nodes are also called block producers. ### bootstrap Part of the [syncing](#syncing) process of a node, bootstrapping gets the current [root](#root-of-transition-frontier) of the [transition frontier](#transition-frontier) from peers. Additional [transitions](#transition) obtained during the [catchup](#catchup) process are applied from this initial root state. ### breadcrumb A node in the [transition frontier](#transition-frontier) that contains the external transition, staged ledger, and pending coinbases and is generated by applying the transition to the prior state. ## C ### catch up {#catchup} The final stage of the [syncing](#syncing) process where the node attempts to catch up to the current [best tip](#best-tip) by determining and then downloading all [transitions](#transition) between the transition frontier [root](#root-of-transition-frontier) and the current best tip. First, a node requests the missing transition hashes and a transaction chain proof. This proof proves the path provided is valid, for example, that the provided transition hashes lead from the root to the best tip. After the node has all transition hashes, it requests the full external transition for each transition hash from peers. With each external transition, the node builds up its transition frontier by applying each to the prior state to construct a [breadcrumb](#breadcrumb). When the catch up stage is complete, the node's local best tip is the same as the network's best tip, and breadcrumbs have been constructed for all transitions from the transition frontier root (best tip - k) to the current tip, and each has been validated. At this point, the node is [synced](#syncing). A catch up can be triggered at any time if the node sees a disjoint transition in the same path that indicates there are missing transitions. ### chain strength Full history is not available in Mina, so a newly connected node to the network cannot sync from genesis by applying all prior transitions. To allow a node to determine the strongest chain, a minimum chain density is stored for a sliding window of time. As a result, honest nodes can choose the blockchain with the higher minimum density or chain strength. ### cold wallet A cold wallet is not, and never has been, available on the internet. Cold storage is safer for wallets associated with meaningful stake. ### compressing Generating a SNARK for a computation output can be thought of as compressing that output, as the proofs are fixed size. For example, Mina maintains a succinct blockchain by compressing all the historical data in a blockchain into a zk-SNARK. However, this is computationally different from lossy compression. The term _compress_ is used to more figuratively describe the process of reducing the size of required data. ### consensus A process through which all the peers of a blockchain network reach a common agreement about the present state of the distributed ledger. A consensus algorithm or set of rules that Mina nodes all agree upon when deciding to update the state of the network. Rules can include what data a new block can contain and how nodes are selected and rewarded for adding a block. Mina implements the [Ouroboros Samisika](/glossary#ouroboros-samisika) consensus mechanism. ### consensus node A participant in the Mina network that performs the consensus function, for example, a [block producer](#block-producer). ### cryptocurrency A digital asset or currency that uses cryptographic primitives to secure financial transactions and to verify ownership by using public/private key pairs. ## D ### daemon The Mina daemon is a background process that implements the Mina protocol and runs on a node locally so a local client or wallet can talk to the Mina network. For example, when a CLI is used to issue a command to send a transaction, this request is made to the Mina daemon, which then broadcasts it to the peer-to-peer network. The daemon also listens for events like new blocks and relays this to the client by using a publish-subcribe model. ### DAO A decentralized autonomous organization (DAO) operates based on rules that are encoded on a blockchain and executed through smart contracts. DAOs are an organizational structure built with blockchain technology. ### Dapp A decentralized application (Dapp) runs on a blockchain or decentralized network and offers benefits such as transparency, security, and censorship resistance. In the Mina ecosystem, Dapps are known as [zkApps](#zkapps). ### delegating Because staking MINA requires nodes to be online, some nodes delegate their MINA to another node that runs a staking service. This process is called delegating a stake. The service provider or staking pool operator can charge a fee that is deducted any time the delegator gets selected to be a block producer. ### deploy alias Created with the zkApp CLI, a [deploy alias](/zkapps/tutorials/deploying-to-a-network#deploy-alias) in your project `config.json` file contains the details to manage deployments. ### Devnet Dedicated for developers building on top of the Mina protocol, Devnet is designed for testing and experimentation so you can test tooling and integrations before going live on [Mainnet](#mainnet). See [Connect to Devnet](/node-operators/validator-node/connecting-to-the-network). ### distributed ledger technology (DLT) A digital system for recording the transaction of assets in which the transactions and their details are recorded in multiple places at the same time. In contrast to traditional databases, distributed ledgers have no central data store or administration functionality. ## E ## ECDSA Elliptic Curve Digital Signature Algorithm ([ECDSA](/zkapps/o1js/ecdsa)) a cryptographic algorithm used to sign and verify messages. It is used in many blockchains, including Ethereum, to sign transactions. ## elliptic curves Equations with a specific template, including: _y^2 = x^3 + ax^ + b_: [secp256k1](/glossary#secp256k1). ### elliptic-curve cryptography (ECC) An approach to public key cryptography based on the algebraic structure of elliptic curves over finite fields. ECC is the basis of how Ethereum and other cryptocurrencies use private keys and digital signatures. ### epoch A unit of time equal to 7140 slots at Mainnet. An epoch is divided into [slots](#slot) of 90 seconds each. ### extensional blocks Blocks extracted from the `mina-archive` database contain only the information required to restore data to the archive node and are more lightweight than [precomputed blocks](/glossary#precomputed-blocks). ### external port The port that the Mina daemon uses to connect to other nodes on the network. When starting the daemon, set using `-external-port`. ### external transition Also referred to as a [block](#block), an external transition is generated externally, for example, by another block producer, and gossiped to a node. ## F ## fee payer account A developer account that is funded and can always pay fees immediately. When you configure a zkApp, you can choose to use a stored account or create a new fee payer account. ### field element The basic unit of data in zero knowledge proof programming. Each field element can store a number up to almost 256 bits in size. You can think of a field element as a uint256 in Solidity. For the cryptography inclined, the exact max value that a field can store is 28,948,022,309,329,048,855,892,746,252,171,976,963,363,056,481,941,560,715,954,676,764,349,967,630,336. ### finality A consensus constant `k` is the point at which chain [reorganizations](#reorganization) are no longer possible. After a block has `k` [block confirmations](#block-confirmations) as defined by the consensus constants, it is considered final. ## foreign field A finite field different from the native field of the proof system. [Foreign Field Arithmetic](/zkapps/o1js/ecdsa) lets you perform algorithms that connect your zkApp with the outside world of cryptography. ### full node A Mina node that is able to verify the state of the network trustlessly. In Mina, every node is a full node since all nodes can receive and verify zk-SNARKs. # G ## gadgets Small, reusable, low-level building blocks that simplify the process of creating new cryptographic primitives. Most [gadgets](/zkapps/o1js/gadgets) build upon custom gates and act as low-level accelerators in the proof system. ## H ### hash A mathematical cryptographic function that converts an input of arbitrary length into an encrypted output of a fixed length. Hashing provides security through encryption and is an efficient store of data because the hash is of a fixed size. ### hot wallet A hot wallet has a private key that is available on a machine that is connected to the internet. To mitigate risk, avoid having hot wallets with substantial stake. ## I ### internal transition A [transition](#transition) that is produced locally, for example, by a block producer. The generated transition is applied locally and added to the [transition frontier](#transition-frontier) before being broadcast to peers. ## K ## Keccak [Keccak (SHA-3)](https://docs.o1labs.org/o1js/basic-types/hashing) is a flexible cryptographic hash function that provides more security than traditional SHA hash algorithms. ### key pair A combination of a [private key](#private-key) and [public key](#public-key). Key pairs can be generated by using a running daemon or using a dedicated keygen tool, see [Generating a Key Pair](/node-operators/validator-node/generating-a-keypair). In Mina, public keys start with `B62` and private keys start with `EK` for easy differentiability. ### Kimchi The proof system for Mina, Kimchi is the main machinery that generates the recursive proofs that keep the Mina blockchain small (about 22 KB). Kimchi is a zero knowledge proof system that's a variant of [PLONK](/glossary#plonk) and features a polynomial commitment scheme that supports verifiable computation using traditional Turing machine-based instruction sets. ## L ### layer 1 (L1) The fundamental, base-level chain in a network. An L1 blockchain provides the essential services to a network, like recording transactions on the public ledger and ensuring adequate security. Mina is a layer 1 blockchain. ### layer 2 (L2) An off-chain network, system, or technology built on top of a layer 1 blockchain that helps extend the capabilities of the underlying base layer network. ### ledger A cryptocurrency public record-keeping system. Mina has three types of ledgers: [staged ledger](/glossary#staged-ledger), [staking ledger](/glossary#staking-ledger), and [SNARKed ledger](/glossary#snarked-ledger). ### libp2p Mina uses this peer-to-peer networking library to provide things like message broadcast and file sharing. ### Lightnet A lightweight Mina network in a single Docker container. [Lightnet](zkapps/writing-a-zkapp/introduction-to-zkapps/testing-zkapps-lightnet) is a resource-efficient solution with fast startup and syncing times that lets you test your zkApp locally on an accurate representation of Mina blockchain before you test with a live network. ### lightweight Mina Explorer Provided in Lightnet, a lightweight Mina Explorer lets you monitor transactions on your local network. See [Testing zkApps with Lightnet](zkapps/writing-a-zkapp/introduction-to-zkapps/testing-zkapps-lightnet#lightweight-mina-explorer). ## M ### major upgrade Changes to the network that make the old chain incompatible with the new chain. A major upgrade to the Mina network requires all nodes or users to upgrade to the latest version of the protocol software. ### Mainnet The live version of the Mina blockchain network that is fully operational. On the Mina Mainnet public blockchain, real-world transactions are performed. See [Connect to the Mina Network](/node-operators/validator-node/connecting-to-the-network). A Mainnet is different from a [Testnet](#testnet) and [Devnet](#devnet) which are used for development and testing. ### MINA The unit of the cryptocurrency that is exchanged by participating nodes on the Mina network. MINA is the exclusive currency of the [snarketplace](#snarketplace). ### Mina The underlying protocol and the network infrastructure that the system depends on. ### Mina CLI The primary way for users to interact with the Mina network. The [Mina CLI](/node-operators/reference/mina-cli-reference) command line tool provides standard client functionality to create accounts, send transactions, and participate in consensus and advanced client and daemon commands for power users. The Mina CLI is installed when you [install Mina](/node-operators/validator-node/installing-on-ubuntu-and-debian). ### Mina nodes Mina nodes fulfill different roles within the network, including [block producers](#block-producer) and [SNARK coordinators](#snark-coordinator). ## N ### node A machine running the Mina daemon. ### node operators People who run Mina nodes. Node operators participate in consensus to create new blocks and help compress data by generating zk-SNARKs. ### non-consensus node A [full node](#full-node) in the Mina protocol that does not participate in consensus but can still fully verify the zero knowledge proof to trustlessly validate the state of the chain. The size of Mina as 22 KB is in reference to non-consensus nodes. ### non-upgradeable If the verification key cannot be changed, a zkApp smart contract is considered non-upgradeable. You can make a smart contract upgradeable or not upgradeable using [permissions](https://docs.o1labs.org/o1js/zkapps/permissions#upgradeability-of-smart-contracts). ### nonce An incrementing number attached to a transaction used to prevent a replay of a transaction on the network. Transactions are always included in blocks in the sequential order of the nonce. ## O ### o1js A TypeScript library for zk-SNARKs and zkApps. Use o1js to write zk smart contracts based on zero knowledge proofs for the Mina Protocol. ### off-chain A transfer of value or data, including transactions, that occurs outside a given blockchain network. These transfers do not need blockchain network confirmation, which speeds up the transaction process and reduces lag time. zkApps use an off-chain execution and mostly off-chain state model that allows for private computation and state that can be either private or public. ### off-chain state State stored anywhere other than the Mina blockchain. ### on-chain A transfer of value or data, including transactions, that exist on and have been verified to a blockchain network. All relevant information is timestamped and stored on the public ledger. On-chain transactions are recorded on the blockchain and need network confirmation before they are completed. ### on-chain state State that lives on the Mina blockchain. Each zkApp account provides 32 fields of 32 bytes each of arbitrary storage for the on-chain state. ### oracle Specialized software or services that act as intermediaries between blockchain smart contracts and external data sources. [Oracles](/zkapps/tutorials/oracle) connect zkApp smart contracts with the outside world to get data on-chain. ### Ouroboros Samisika Mina builds on this provably secure proof of stake (PoS) protocol that combines the best features of each iteration of Ouroboros to deliver a PoS consensus mechanism that can resolve long-range forks without requiring history or risking centralization by relying on trusted third parties to provide fork information. ## P ## pasta curves A collective term for the Pallas and Vesta elliptic curves that are used by the Mina Protocol to generate proofs. See [Pasta Curves](https://o1-labs.github.io/proof-systems/specs/pasta.html?highlight=curves#pasta-curves) in the Mina book. ### peer-to-peer networks Networking systems that rely on peer nodes to distribute information amongst each other, are often distributed, and do not rely on any centralized resource broker. ### Pickles Mina's inductive zk-SNARK composition system. See [Pickles](https://o1-labs.github.io/proof-systems/specs/pickles.html). ### Pickles SNARK A proof system and associated toolkit that is the first deployed [SNARK](#snark) capable of recursive composition with no trusted setup. Pickles serves as the basis for developers to build private, scalable smart contracts on Mina. [Meet Pickles SNARK: Enabling Smart Contracts on Mina Protocol](https://medium.com/minaprotocol/meet-pickles-snark-enabling-smart-contract-on-coda-protocol-7ede3b54c250). ### PLONK Permutations over Lagrange-bases for Oecumenical Noninteractive arguments of Knowledge (PLONK) is a general-purpose zero knowledge proof scheme. ### polynomial commitment A commitment scheme that allows a committer to commit to a polynomial with a short string that can be used by a verifier to confirm claimed evaluations of the committed polynomial. ### Poseidon A family of [hash](#hash) functions that can efficiently run in a zk circuit. Poseidon operates over the native [Pallas base field](https://electriccoin.co/blog/the-pasta-curves-for-halo-2-and-beyond/) and uses parameters generated specifically for Mina, which makes Poseidon the most efficient hash function available in o1js. See [Poseidon: ZK-friendly Hashing](https://www.poseidon-hash.info/). Poseidon is a sponge construction based on the Hades permutation, with a state composed of field elements and a permutation based on field element operation (addition and exponentiation). ### precomputed blocks Precomputed blocks are [blocks](/glossary#block) logged by mina to disk, log file, or to cloud storage. ### preconditions Conditions that must be true for the account update to be applied. Corresponds to assertions in an o1js method. ### private key A component of public key cryptography, private keys are held privately, while public keys can be issued publicly. Only the holder of the public key's corresponding private key can attest to ownership of the public key. This allows for signing transactions to prove that you are the honest holder of any funds associated with any given public key. In Mina, private keys start with `EK` for easy differentiability from [public keys](#public-key). ### protocol state The state of the network that comprises the previous protocol state hash to link blocks together and a body that contains the genesis state hash, blockchain state, consensus state, and consensus constants. ### protocol state hash The hash of hashes of the previous state and [protocol state](#protocol-state) body. Acts as a unique identifier for a block. ### proof of liabilities (PoL) A cryptographic primitive to prove the size of funds a bank, or centralized exchange (CEX), owes to its customers in a decentralized manner and can be used for solvency audits with better privacy guarantees. ### proof of stake (PoS) The Mina consensus algorithm that allows nodes to agree on the state of the network. PoS allows nodes to [stake](/node-operators/validator-node/staking-and-snarking) MINA on the network to increase their chance of being selected as the next block producer. The winning validators are compensated with a percentage yield of the crypto they have staked as an incentive for engaging in this process. See [Proof-of-Work vs Proof-of-Stake](https://minaprotocol.com/blog/proof-of-work-vs-proof-of-stake). ### proof of work (PoW) The original consensus process used by Bitcoin, the first cryptocurrency. PoW achieves the decentralized consensus needed to add new blocks to a blockchain by using machines to compete against one another by guessing the answer to math problems that have no feasible faster solution. Computational power is a requirement for the PoW protocol success and assumes that those contributing more resources (energy, supercomputers, and infrastructure) to a problem are less likely to want to destroy the protocol. As an incentive to participate in this consensus process, miners are rewarded with tokens. ### prover function The function that generates a zero knowledge proof from the smart contract logic. ### public key A component of public key cryptography, public keys can be widely shared with the world and can be thought of as _addresses_ or identifiers for the person who holds the corresponding private key. In Mina, public keys start with `B62` for easy differentiability from [private keys](#private-key). ### publish-subscribe (pub-sub) A messaging pattern where message senders broadcast messages and notifies any listeners that have previously subscribed to that sender's messages. Mina utilizes pub-sub as a way to notify clients when a new block has been added to the chain. This event can be heard by all listeners, so each listener does not need to independently poll for new data. ## R ### recursion The layer 1 architecture of Mina Protocol is based on recursive composition, which means that each block in the blockchain is a tiny snapshot of the entire state of the network. This approach enables Mina to maintain a constant blockchain size of only 22KB regardless of the number of transactions processed. With recursion, you can realize composability between zero knowledge proofs to unlock many powerful technical abilities, such as creating high-throughput applications, creating proofs of large computations, and constructing multi-party proofs. ### reorganization When a competing fork of the blockchain increases in length relative to the main branch, the blockchain undergoes a reorganization to reflect the stronger fork as the main branch. After a reorganization, the transactions on the dropped branch are no longer guaranteed inclusion into the blockchain and must be added to new blocks on the longest branch. ### root of transition frontier The root of the [transition frontier](#transition-frontier) is the block `k` blocks from the [best tip](#best-tip). The root is obtained from peers during [bootstrap](#bootstrap). After a new best tip is seen, the root is moved, so only `k` blocks are persisted. The root is the point where the block has been [finalized](#finality) due to consensus. ### remote procedure call (RPC) An [RPC](https://en.wikipedia.org/wiki/Remote_procedure_call) is used to communicate between nodes on the network and to interact with the running [daemon](#daemon). ## S ### scan state A data structure that allows decoupling the production of transaction SNARKs from block producers to [SNARK workers](#snark-worker). See [Scan State](/mina-protocol/scan-state). ### secp256k1 The elliptic curve using this equation _y²=x³+7, a=0 b=7_, constructed in a special non-random way to allow for especially efficient computation. secp256k1 can have a key size of up to 256 bits. All points on this curve are valid public keys. ### seed nodes A Mina node that keeps a record of nodes in the network and enables nodes that are joining the network to connect to peer nodes. ### SHA-2 Secure Hash Algorithm 2 (SHA-2) is a family of two similar hash functions with different block sizes known as SHA-256 and SHA-512 that differ in word size. SHA-256 uses 32-bit words and SHA-512 uses 64-bit words. ### SHA-256 SHA-256, a part of the SHA-2 family, is a cryptographic hash function that generates a 256-bit (32-byte) hash output and is widely used for traditional Web2 applications and protocols as well as blockchain technology. ### SHA-3 Secure Hash Algorithm 3 (SHA-3) is the latest member of the Secure Hash Algorithm family of standards, released by NIST on August 5, 2015. [Keccak](#keccak) was standardized as SHA-3. ### signature Short for digital signature, a way to establish authenticity or ownership of digitally signed messages. ### simulated local blockchain The local testing blockchain you use in the first phase of testing. Using a simulated local blockchain speeds up development and tests the behavior of your smart contract locally. See [Testing zkApps Locally](https://docs.o1labs.org/o1js/zkapps/local-development) and get step-by-steps guidance in [Tutorial 1: Hello World](/zkapps/tutorials/hello-world#simulated-local-blockchain). ### slot A unit of time in the Mina network. A slot in Mina is 90 seconds long. An [epoch](#epoch) is divided into slots. Block producers can find eligible slots to produce blocks in to earn rewards. ### smart contract A tamper-proof program that runs on a blockchain network when certain predefined conditions are satisfied. On Mina, smart contracts (zkApps) are written with [o1js](#o1js). ### SNARK An acronym for succinct non-interactive argument of knowledge. See [zk-SNARK](/glossary#zk-snark). ### SNARK coordinator A role on a mina node in the Mina network. SNARK coordinators generate proofs of transactions by distributing work to a series of [SNARK workers](/node-operators/snark-workers). SNARK coordinators then submit that work to the network, and the proofs are sold to block producers. ### SNARK pool Referred to as the _snarketplace_, the pool that contains work completed by [SNARK workers](#snark-worker) for required work in the [scan state](#scan-state). The SNARK pool contains only the cheapest work offered by SNARK workers for each work bundle. Multiple SNARK workers compete for the same SNARK work, with only the lowest fee for each being included in the SNARK pool to be bought by block producers. ### SNARK worker External processes that connect to a Mina node on the network and create zk-SNARK proofs of transactions to compress the transactions so they can be folded into the tiny blockchain proof. The SNARK worker is incentivized with MINA as compensation to help compress transactions. See [What are SNARK Workers and the Snarketplace?](https://minaprotocol.com/blog/what-are-snark-workers-and-the-snarketplace). ### SNARKed ledger The ledger that contains only the transactions that have an associated proof. The SNARKed ledger is updated after a proof has been emitted from the [scan state](#scan-state). ### snarketplace Similar to a marketplace where people, or nodes, exchange services for a fee. It revolves around a fixed-size buffer like a queue or shelf of work to do. Block producers add work to this shelf in the form of transactions that need to be SNARKed, and then SNARK workers take the work off the shelf and create SNARKs out of them to process the transactions. Block producers purchase SNARK work for the lowest price from the snarketplace. Conversely, the SNARK workers want to maximize their profit while also being able to sell their SNARK work. These two roles act as the two sides of the marketplace and, over time, establish an equilibrium at a market price for SNARK work. ### soft fork An upgrade to the network that is backward-compatible. ### staged ledger The current account state that contains a pending accounts ledger and also a pending queue of un-SNARKed transactions known as the [scan state](#scan-state). ### staking Staking MINA allows nodes on the network to increase their chances of being selected as a block producer in accordance with the consensus mechanism. ### staking ledger The ledger used to determine block producers for a slot, as the probability of finding eligible slots to produce blocks in is proportional to the amount of stake. ### staking pool A pool of delegated funds that is run by a staking pool owner. To avoid the requirement of being online, other nodes can choose to delegate funds to a staking pool. ### state The current status or snapshot of all data stored within the blockchain. ### syncing To successfully produce a block that extends the Mina blockchain, a node requires the current state. To achieve this, a node initializes to connect to peers, [bootstrap](#bootstrap), and then performs a [catchup](#catchup). The syncing process builds the node's [transition frontier](#transition-frontier) by creating [breadcrumbs](#breadcrumb) for all transitions between the transition frontier's [root](#root-of-transition-frontier) to the current [best tip](#best-tip). When complete, the node is synced. ## T ### Testnet An instance of a blockchain used for testing and experimenting where MINA tokens have no real value. For example, for [zkApp Developer Tutorials](/zkapps/tutorials) and other development, you can request tMINA funds from the Testnet Faucet to fund your [fee payer account](#fee-payer-account). Mina's public Testnet is feature-complete and is called the `Devnet`. ### time-locked accounts An account with a non-vested amount of tokens that cannot be moved until a specific condition has been met, like a number of blocks that has been produced. See [Time-Locked Accounts](/zkapps/writing-a-zkapp/feature-overview/time-locked-accounts). ### tMINA MINA tokens that have no real-world value. You can request tMINA funds from the Testnet Faucet to fund your [fee payer account](#fee-payer-account) during development. ### tokens A digital asset that typically represents an asset, utility, or value in a particular blockchain ecosystem. The native cryptocurrency of the Mina blockchain is MINA. Tokens can serve a variety of purposes, including accessing platform features (utility tokens), representing ownership of assets (security tokens), or facilitating smart contracts and decentralized applications (Dapps). ### transaction pool An in-memory store of all the transactions that peer has heard on the network. Sometimes referred to as the mempool, each node has a local list of all pending transactions that have been gossiped to the node and validated. ### transition A transition in Mina is synonymous with a [block](#block). ### transition frontier A local data store that contains the last `k` blocks of the network. With a rose tree-type data structure, each node of the tree is a [breadcrumb](#breadcrumb) and can have multiple children (forks). ### TypeScript A superset of JavaScript that adds compile-time type safety. [o1js](https://www.npmjs.com/package/o1js) is a TypeScript library for zk-SNARKs and zkApps. See the official [TypeScript docs](https://www.typescriptlang.org). ## U ### user transaction A transaction that is issued by a user, like a payment or a delegation change. ## V ### verification key A piece of data that is generated by the smart contract build process. When a smart contract is deployed, a transaction that contains the verification key is sent to an address on the Mina blockchain. Sending a verification key to a zkApp account allows Mina to verify zero knowledge proofs that were generated by a smart contract's prover function. ### verifier function The function that verifies a zero knowledge proof using the [verification key](#verification-key). ### verifiable random function (VRF) A function that generates an output that can be cryptographically verified as random. Mina uses VRF to select a block producer for a slot, taking as input a random seed that is derived from the previous epoch's VRF outputs, a public key, and the current staking ledger. VRF is deterministic, so the same output is returned regardless of how often it is run. ## Z ### zero knowledge proof A proof by which one party (a prover) can prove to another party (a verifier) that they have knowledge of something, without giving away that specific knowledge. Mina uses zero knowledge proofs, specifically zk-SNARKs, to generate a proof attesting to the blockchain's validity and allows any node on the network to verify the validity. ### zkApps Zero knowledge apps ([zkApps](/zkapps/writing-a-zkapp)) are Mina Protocol's smart contracts powered by zero-knowledge proofs, specifically using zk-SNARKs. zkApps provide powerful and unique characteristics such as unlimited off-chain execution, privacy for private data inputs that are never seen by the blockchain, the ability to write smart contracts in TypeScript, and more. The easiest way to write zk programs is using [o1js](https://www.npmjs.com/package/o1js). ### zkApp CLI A command line tool that zkApp developers use to scaffold and deploy smart contracts. Install the [zkApp CLI](https://www.npmjs.com/package/zkapp-cli). ### zkApp account A smart contract account. Each zkApp account provides 32 fields of 32 bytes each of arbitrary storage. When a Mina address contains a verification key, it acts as a zkApp account. ### zkApp manager account A specific type of smart contract that manages a particular thing. For example, the zkApp manager account for a token controls all properties of token accounts and determines rules for token minting, burning, and transfer. ### zkBridge Technology that the Mina network uses to connect to other chains. ### zk-SNARK A zero knowledge proof. zk-SNARK is the acronym for zero knowledge succinct non-interactive argument of knowledge. Specific properties of interest in Mina's implementation of SNARKs are succinctness and non-interactivity, which allow for any node to quickly verify the state of the network. SNARK workers create [zk-SNARKs](https://minaprotocol.com/blog/what-are-zk-snarks) for each transaction. zk-SNARKs are used to create recursive zk-SNARKs that prove the correctness of a block, and in turn, these zk-SNARKs are used to create recursive zk-SNARKs that prove the correctness of the network. [A](#a) [B](#b) [C](#c) [D](#d) [E](#e) [F](#f) G [H](#h) [I](#i) J [K](#k) [L](#l) [M](#m) [N](#n) [O](#o) [P](#p) Q [R](#r) [S](#s) [T](#t) [U](#u) [V](#v) W X Y [Z](#z) --- url: /mina-protocol/block-producers --- # Block Producers The role of a block producer in Mina is to achieve [consensus](https://minaprotocol.com/blog/what-is-ouroboros-samasika) and provide security to the blockchain. The block producer is responsible for creating new blocks that include recent transactions broadcast on the network and a blockchain proof that proves the current state of the chain is valid. In Mina, anyone can become a block producer. There is an unbounded number of participants with the chance of producing a block proportional to the funds staked. Funds are not locked and are not subject to slashing. In return for staking funds and generating the required blockchain proofs, blocks that are produced and included in the canonical chain are rewarded in the form of a coinbase and transaction fees, less any fees paid to purchase required [transaction SNARK work](./snark-workers). To successfully produce a block, a block producer must have the current state of the blockchain. A block producer must have enough available compute to produce a blockchain SNARK within the slot time and be connected to peers to broadcast the generated block within an acceptable delay as defined by the network consensus parameters. ### Select a block producer The opportunity to produce a block for a slot is determined by a [verifiable random function](/glossary#verifiable-random-function-vrf) (VRF). Think of this function as a lottery. Each block producer independently runs this VRF for each slot and if the output is greater than a threshold proportional to the producer's stake, they have the chance to produce a block at the designated slot. This process is secret so that only the private key holder can determine the VRF output and only they know when they are to produce a block. This selection process aids security as it is impossible for an adversary to target a known block producer at a certain slot, e.g., by a denial of service or targeted attack. As a result, multiple producers can be selected for the same slot. When multiple producers produce a valid block for the same slot, a short-range fork is produced where the consensus rules select the longest chain. The stake distribution is determined from the SNARKed ledger at the last block of `current epoch-2`, so there is a delay for any recently acquired or [delegated stake](#stake-delegation). For example, if the current epoch is 10, the staking distribution is determined from the SNARKed ledger of the last block of the 8th epoch. To view the output of the VRF in the logs, look for `Checking VRF evaluations`. ### Generating a block When a block producer is selected to produce a block for a slot, they perform the following actions: - Choose the current best tip from their transition frontier (local store of blocks) on which to build the new block. - Select transactions and any SNARK work required from the transaction and SNARK pools. A block producer must purchase SNARK work at least in equal quantity to the transactions they add to a block. In addition to any user transactions, a block producer must also add a coinbase transaction as a reward for producing the block and any fee transfers to pay the SNARK workers. - Generate the proposed next state of the blockchain. - Create a diff of the staged ledger that includes the account ledger and scan state (a queue of transactions yet to have proofs). - Apply this diff to the existing staged ledger to produce the new state. - Create a blockchain proof to prove that the new state is valid. This SNARK additionally validates the prior protocol state proof. - Create a delta transition chain proof that proves the validity of the block if it is received within an acceptable network delay as defined by the network consensus parameters. - Apply this newly generated state locally and add it into the existing transition frontier. - Broadcast the block (call an external transition) to its peers. ### Stake delegation Delegated funds are not spendable and can be undelegated at any time by re-delegating the stake back to the original account. --- url: /mina-protocol --- # Introduction The Mina Protocol is a layer one protocol designed to deliver on the original promise of blockchain, true decentralization, scale and security. Mina offers an elegant solution: replacing the blockchain with an easily verifiable, consistent-sized cryptographic proof. Mina dramatically reduces the amount of data each user needs to download. Instead of verifying the entire chain from the beginning of time, participants fully verify the network and transactions using recursive zero knowledge proofs (or zk-SNARKs). Nodes can then store the small proof, as opposed to the entire chain. Because it’s a consistent size, Mina stays accessible even as it scales to many users and accumulates years of transaction data. ## The Mina Protocol There are three public Mina Protocol networks: 1. `mainnet` - the production network 2. `devnet` - the test network based on the same software versions as the Mainnet 3. `berkeley` - a development network where new features are trialed You check the identity of the network with this graphQL query: ``` query MyQuery { networkID } ``` This section describes how the Mina Protocol works. - [Proof Of Stake](/mina-protocol/proof-of-stake) - [What's in a Block](/mina-protocol/whats-in-a-block) - [Block Producers](/mina-protocol/block-producers) - [SNARK Workers](/mina-protocol/snark-workers) - [Scan State](/mina-protocol/scan-state) - [Time-Locked Accounts](/mina-protocol/time-locked-accounts) - [Sending a Payment](/mina-protocol/sending-a-payment) - [Lifecycle of a Payment](/mina-protocol/lifecycle-of-a-payment) ## Node Operators [Node Operators](../node-operators) describe how to run Mina nodes on a Mina network. Mina nodes fulfill different roles within the network. ## Node Developers [Node Developers](../node-developers) describes how developers can add to and improve Mina nodes. ## Exchange Integration [Exchange Operators](/node-operators/exchange-operators) describes how exchanges can integrate with the Mina blockchain using Rosetta API, archive nodes, and validator nodes. --- url: /mina-protocol/lifecycle-of-a-payment --- # Lifecycle of a Payment In Mina, payments pass through several steps before they are considered verified and complete. This document walks through what happens to a single payment in a simplified overview to help you understand how Mina payments work. It it not a comprehensive technical overview, but instead a simplified walkthrough for users. ## Gossip Protocol Mina uses a gossip protocol to ensure that messages can be reliably transmitted to all other members of the network in a timely manner. ## Payments A payment is a type of transaction, requesting to transfer value from one account to another account, and the associated fee the sender is willing to pay for the payment to go through. This scenario walks through a scenario where a sender, Bob, wants to send some MINA to a receiver, Alice. ### Step 1: To create a payment, Bob clicks send Any member of the network can create a payment and share it with the Mina network. The payment is cryptographically signed with a private key so that the sender's account can be verified. The payment is then sent out to peers on the network to be processed. The payment, when received by a peer, exists in their local `transaction pool`, which is an in-memory store of all the transactions that peer has heard on the network. ### Step 2: To produce a block, Bob's payment gets put in a todo list A block producer node is chosen on the network for a given time slot. The currently active producer chooses in-flight payments based on payment fees and places them in a list to be processed called a transition block. Block producers earn mina for building these blocks. The producer generates a SNARK defining the structure of the transition block as compared to the previous block (but not yet verifying these new payments). The producer transmits this new information for SNARK workers to process. ### Step 3: To prove a SNARK transaction, Bob's payment gets SNARK-signed SNARK worker nodes on the network begin performing SNARK calculations on each step of the new transition block. These are individual proofs of each payment and then merge proofs of neighboring payments. Eventually, all the payments are verified. SNARK workers can earn currency by generating these proofs, paid for by block producers from their block rewards. These proofs are transmitted out over the network. ### Step 4: To verify a payment, Alice and Bob's accounts show the result of the transfer After the whole block has been proven, the block producer sends out a confirmation of the transition block. Then member nodes on the network apply the changes to their local account balances to reflect these changes. ### Step 5: To achieve a payment confidence level, Alice is confident the transfer is complete With each subsequent block, a recipient has a higher degree of confidence that the payment is actually complete and that the network has consensus about that block. However, like in most blockchains, payments are said to be confirmed after a certain number of blocks, also known as transaction finality. In the Bitcoin network, a transaction is confirmed after [6 blocks](https://en.bitcoin.it/wiki/Confirmation) (60 mins) with an assumption that an attacker is unlikely to amass more than 10% of the hashrate. With a slot duration of 90 seconds and assuming 90% honest stake, the following table shows the finality in blocks, the average time it takes to produce the corresponding number of blocks, and the confidence that payment will be confirmed. | Finality (in blocks) | Average time for finality | Finality confidence (%) | | -------------------- | ------------------------- | ----------------------- | | 8 | 16 mins | 98.6709 | | 15 | 30 mins | 99.9231 | | 23 | 46 mins | 99.9965 | | 30 | 60 mins | 99.9998 | | 38 | 1hr 16mins | 100 | Average time is calculated based on consensus constants that determine the number of slots filled per epoch. This is currently set to 75%. The recommended wait time for a transaction to be confirmed is 15 blocks which provides a 99.9% confidence that the transaction will not be reversed. ## Failure Scenarios Payments can fail for several reasons. ### Transaction is not accepted by the network Several reasons why a transaction shared with peer nodes might not get accepted: - The transaction is not fundamentally valid. For example, the sender's account doesn't exist, the account doesn't have sufficient funds, the signature doesn't match with the account, or the nonce in the transaction was not incremented. - There could be adversarial nodes in the network that collude to deny service to specific senders in the network. However, this behavior is highly disincentivized and one honest node is enough to prevent this issue. ### Transaction is not included in a block If a transaction is valid and the network is honest, then in all likelihood, a transaction will make it into a block. However, there is one case where a transaction can be dumped from a transaction pool: - If the transaction pool hits its capacity, or `max_txpool_size`, then it evicts the transaction with the lowest fee in the pool, causing it to be dumped from memory. If this happens, the sender needs to resend the transaction with a higher fee, according to market dynamics at the time. --- url: /mina-protocol/proof-of-stake --- # Proof of Stake The proof of stake consensus mechanism implemented in Mina is a version of the [Ouroboros Praos](https://iohk.io/research/papers/#XJ6MHFXX) protocol, extended and modified slightly for our succinct blockchain. This document will provide an high level overview of how Ouroboros proof of stake works with detailed sections on our changes and additions. For a full description of the Ouroboros protocol, please refer to the original Ouroboros papers: [the original](https://eprint.iacr.org/2016/889.pdf) and [Praos](https://eprint.iacr.org/2017/573.pdf). ### A note on Praos, Genesis, and Mina Formally, our implementation of Ouroboros is an extension of Praos. There is, however, a newer paper which extends Praos, called Ouroboros Genesis. This extension fixes a vulnerability involving long fork attacks, but this cannot be implemented in a succinct blockchain protocol as described in that paper. Instead, we introduce a new, succinct method for protecting against long fork attacks. ## Additions to Praos ### Epoch Ledger Optimization In Ouroboros, nodes need to materialize/keep a ledger at the beginning of the previous epoch in order to VRF evaluations. This is because just having a VRF output is not enough to know that a block was proposed honestly. In order to know that a block was won by the node that proposed it, the VRF output must be such that it is underneath a threshold determined by the proposer's stake, proportional to the total currency in the ledger. In a succinct protocol, such as Mina, materializing/keeping such a ledger in the past is not an easy task. Unlike a non succinct blockchain, nodes cannot arbitrarily request pieces of the chain in the past in order to reconstruct the information they are interested in. This means if we were to implement this feature in a naive manner, we would need to keep in total 3 copies of the entire ledger at any point in time, as well as wait online for at least 2 whole epochs before we could access that information. With some thought, though, we can do much better. There is a big difference between how Ouroboros proves block winners and how Mina proves them. In Ouroboros, every node needs to validate that a block proposer actually won a block when they receive it, meaning they must look up the balance for the public key that evaluated the VRF themselves. In Mina, however, the correctness of the VRF evaluation can be calculated in the SNARK, so other nodes only need to verify the SNARK to know that the block was proposed by a winner. Since a proposer proves this itself, it can limit the information it needs to store about epoch ledgers to only the account record and the merkle path for any account it can propose for (itself and all of its delegated accounts). Furthermore, since Ouroboros guarantees us that the point of finality will be reached before two epochs, the proposer can wait to capture this information after finalization, further limiting the information it needs to store. This information is then fed into the SNARK, which proves that: 1) the VRF evaluation is accurate for the provided public key, and 2) the account for the public key exists in the epoch ledger with a balance that creates a VRF threshold greater than the VRF output (using the merkle path to prove the epoch ledger's merkle root from the account). This does not immediately address the issue of a proposer node needing to be online long enough in order to store this necessary information, but it does open up other avenues of the proposer acquiring that information. Mainly, the proposer could request an account record and merkle path proving it's existence at a given epoch ledger. In the current implementation, no nodes store this information and make it available for access, but one could imagine in the future a service being built that would allow proposers to get online and active quicker by providing this information, possibly for some sort of fee. --- url: /mina-protocol/scan-state --- # Scan State The scan state is a data structure that allows decoupling the production of transaction SNARKs from block producers to SNARK workers. [Block producers](/mina-protocol/block-producers) do not have to produce transaction SNARKs, so the block production time can remain constant regardless of the transaction throughput. The scan state data structure allows the transaction SNARK proof generation to be parallelized and completed by multiple competing [SNARK workers](/mina-protocol/snark-workers). The scan state is comprised of a forest of full [binary trees](https://en.wikipedia.org/wiki/Binary_tree), where each node in the tree is a job to be completed by a SNARK worker. The scan state periodically returns a single proof from the top of a tree that attests to the correctness of all transactions at the base of the tree. The block producers include the emitted ledger proof in the blockchain SNARK they generate that proves both the chain's current state is valid and attests to the validity of all transactions included in the SNARKed ledger. As a result, block times can remain constant regardless of the transaction throughput. The scan state is capable of adjusting to match a desired transaction throughput. :::tip In a steady state, when all slots are filled and all the required proofs are completed, a ledger proof is emitted every block. ::: ### Including transactions When constructing a block, a [block producer](/mina-protocol/block-producers) can include transactions up to the maximum defined by the [scan state constants](#scan-state-constants). Block producers can pick up any available transaction fees and pay themselves a coinbase reward by including transactions. Each transaction they add is transformed into new base jobs and added to the scan state. For every transaction added, a block producer must include an equivalent amount of completed SNARK work corresponding to a sequence of jobs already existing in the scan state. When added to the scan state, these completed jobs create new merge jobs, except for the root node, in which case the proof is returned as a result. The block producer, rather than completing the work themselves, can purchase the completed work from any SNARK workers from bids available in the SNARK pool (snarketplace). ### Scan state constants The following constants dictate the structure and behavior of the scan state: - `transaction_capacity_log_2` - `work_delay` The `transaction_capacity_log_2` constant defines the maximum number of transactions that can be included in a block: ``` max_no_of_transactions = 2^{transaction_capacity_log_2} ``` The work delay ensures there is enough time for the SNARK work to be completed by the SNARK workers. The block producer cannot include any transactions if no completed proofs are available. With the work delay, the maximum number of trees that can exist in the scan state is defined by: ``` max_number_of_trees = (transaction_capacity_log_2 + 1) * (work_delay + 1) + 1 ``` The maximum number of proofs that can be included per block is defined by: ``` max_number_of_proofs = 2^{transaction\_capacity_log_2 + 1} - 1 ``` These scan state constraints ensure that: - Only a single proof can be emitted per block - The merge node to be updated after adding proofs corresponding to its children is always empty. While the maximum number of transactions can be fixed, this number can dynamically adjust to the transaction throughput. As such, the scan state can handle an unlimited transaction throughput, albeit at the cost of increasing (logarithmically) the transaction proof latency. ### Example Consider a scan state with `max_no_of_transactions = 4`, and `work_delay = 1`. Accordingly, this means there can be a maximum amount of work to complete equal to 7 and a maximum of 7 trees. At **genesis**, the scan state is empty. Block 0 **Block 1**: A block producer includes four transactions into the scan state labeled `B1`. These transactions fill the base of the first tree. Block 1 **Block 2**: At the second block, a block producer adds another four transactions (`B2`). These are added to a second tree, once again filling the base. There are no proofs required due to the work delay of 1 block. Block 2 **Block 3**: At the third block, a block producer adds four `B3` transactions to the third tree but must include four proofs for the first tree. As a result of including these completed base proofs, two new `M3` merge jobs are created. Block 3 :::tip `B` or `M` indicates a base or merge job, with the number indicating the sequence order of being added to the scan state. ::: **Block 4**: For the fourth block, a block producer adds another four transactions (`B4`) to the base of the fourth tree. They must include four proofs corresponding to the work added in block 2. Again, two `M4` merge jobs are created as a result. Block 4 :::tip Any pending work (displayed in orange) is work for the SNARK workers to complete. The SNARK workers submit completed work to the SNARK pool. Multiple SNARK workers can complete the work, but only the lowest fee remains in the SNARK pool that can be purchased by the block producers. ::: **Block 5**: In the fifth block, another four transactions are included to fill the base of tree five (`B5`), and six proofs must be included (`B3`s and `M3`s). The `M3` merge jobs result in a final pending merge job for the first tree (`M5`). Block 5 **Block 6**: In the sixth block, another four transactions (`B6`) are added, filling the base of the sixth tree. Six proofs are included (`B4` and `M4`), and three new merge jobs are created (`M6`). Block 6 **Block 7**: In the seventh block, the block producer adds a further four transactions (`B7`), filling the base of the seventh tree. Seven trees are the maximum number of trees according to the specified scan state constants. The maximum number of proofs (7) are included (`B5` and `M5`). These included proofs create three new merge jobs (`M7`);additionally, the top `M5` proof is emitted from the scan state. Block 7 The proof that is emitted from the first tree is the ledger proof corresponding to the transactions added in block 1. The contents of the tree are then removed to create space for additional transactions. Emit proof **Block 8**: In the eighth block, the block producer adds two transactions (`B8`) and includes 4 (`B6`) proofs. These included proofs result in two new merge jobs (`M8`). Note that only four proofs are required for adding two transactions. Block 8 :::tip SNARK work is bundled into a work package typically containing two _workIds_, except for the final root proof of a tree. Prorated work for a transaction is two proofs, ensuring the equality of transactions included and SNARK work to be purchased. ::: **Block 9**: The block producer adds three transactions (`B9`) in the ninth block. Three proofs (`M6`) are required to occupy the slots in the currently unfilled tree. Four proofs were added in the previous block, so only three more proofs need to be done (given the maximum work is 7). The `M6` proof from tree two is returned as the ledger proof. The third `B9` transaction goes into the now empty tree, and two `B7` proofs are added. Block 9 **Block 10**: In block ten, the block producer adds four transactions and, as a result, includes seven proofs (`B7`, `M7`, and two `B8`s). Block 10 **Block 11**: In the eleventh block, the block producer adds three transactions (`B11`) and completes five proofs (`B9`, `B9`, `M8`, `M8`, `M9`) in that order. In addition, the `M9` ledger proof is returned from the fourth tree. Block 11 :::tip To view the contents of the scan state, run the `mina advanced snark-job-list` command. ::: ### Integration with the SNARK Pool Newly added jobs to the scan state are pending jobs for SNARK workers to complete. SNARK workers complete the required transaction SNARKs, submitting bids for their completed work. When a node receives and validates the completed work, SNARK workers add the completed work to the local SNARK pool if it is valid and has the lowest fee for the required work. The work is also gossiped to other peers in the network. :::tip While multiple SNARK workers can complete the same work, only the lowest fee is included in the SNARK pool. ::: When a block producer includes completed proofs into a block to offset any transactions they add, they may purchase the corresponding work from the SNARK pool. Continuing the previous example, consider the next block (12). If the block producer wants to add three transactions, comprising a coinbase, a user payment, and a fee transfer to the SNARK worker, the block producer must purchase three completed SNARK works. This corresponds to the six `B9`, `B10`s, `M9`, and `M10` (from the seventh tree) proofs, as each SNARK work includes two _workIds_. During the time the block is generated, the SNARK pool can include completed work and the best bids for the required jobs (0.025, 0.165, 0.1, and 0.5) respectively, in the example. Submitted work A block producer considers the price of available work before selecting transactions. - The first transaction a block producer adds is the coinbase transaction for which there is the coinbase reward. - If transaction fees do not cover the SNARK work fees required for them to be included, the transaction is not added. A block producer never purchases work if it is not economical. If completed SNARK work is not available to purchase in the order required, then the corresponding transactions are not included in a block. This situation can result in an empty block, but also, for the case where no transactions can be added (including a coinbase transaction), there is no reward for the block producer. To view the current SNARK pool, use: - [GraphQL API](/node-developers/graphql-api) - Mina CLI `mina advanced snark-pool` command --- url: /mina-protocol/sending-a-payment --- # Sending a Payment How to send a MINA payment using the Mina CLI. :::info Reminder that this section is intended for node operators. If you want to store, send, and receive MINA without running a node, please see the [Install a Wallet](../using-mina/install-a-wallet) page for links to various user-friendly wallets available for Mina. ::: In this section, we'll give a brief overview on how to send a transaction with the Mina client and how to get started with interacting with the blockchain. ## Using an offline signed-transaction If you want to send a transaction without running a node yourself, but by delegating to someone else running a node, keep following along here. If you wish to send the transaction directly with a running node, skip to [using a connected node](#using-a-connected-node). ### Using a Ledger device To generate a signed transaction offline if your private key is on a Ledger device, see [Ledger Hardware Wallet](/using-mina/ledger-hardware-wallet). ### Using a keypair generated with the generate-keypair tool A better tool is coming soon: https://github.com/MinaProtocol/mina/issues/8928. For now, please use the [workaround](https://github.com/MinaProtocol/mina/issues/8928#issuecomment-857095846) provided in a comment on that issue. ### Using a keypair generated with the offline client-sdk Use the [Mina Signer](/mina-signer). See the [Mina Signer documentation](/mina-signer) for installation and usage instructions. ### Send the transaction You can use a hosted service to broadcast your signed transaction. Sending your signed transaction _does not_ leak your private key. Transactions signed with the Mina Signer can use: [https://minascan.io/mainnet/broadcast/payment](https://minascan.io/mainnet/broadcast/payment) Transactions signed with the Ledger hardware wallet can use: [https://minascan.io/mainnet/broadcast/ledger-payment](https://minascan.io/mainnet/broadcast/ledger-payment) ## Using a connected node We are assuming in the rest of section that you have the Mina client installed on your system, if you do not have Mina installed please see the [Getting Started](/node-operators/block-producer-node/getting-started). ## Import your account Once our node is synced, we'll need to import our public/private keypair so that we can sign transactions and generate an address to receive payments. For security reasons, we'll want to put the keys under a directory that is harder for attackers to access. Run the following command to import your [previously generated](/node-operators/validator-node/generating-a-keypair) keypair file: mina accounts import --privkey-path ~/keys/my-wallet You will be prompted for the password you entered when the account was created. :::caution The public key can be shared freely with anyone, but be very careful with your private key file. Never share this private key with anyone, as it is the equivalent of a password for your funds. ::: The response from this command will look like this: 😄 Imported account! Public key: B62qjaA4N9843FKM5FZk1HmeuDiojG42cbCDyZeUDQVjycULte9PFkC Additionally you can use the `mina accounts create` command to generate new accounts to send and receive transactions. Since the public key is quite long and difficult to remember, let's save it as an environment variable. Use the following command but replace `` with the public key output from the previous command: export MINA_PUBLIC_KEY=`` Now we can access this everywhere as `$MINA_PUBLIC_KEY` -- check if it saved properly by trying `echo $MINA_PUBLIC_KEY`. Note that these environment variables will only be saved for the current shell session, so if you want to save them for future use, you can add them to `~/.profile` or `~/.bash_profile`. :::tip If you are running the node on a cloud virtual machine, make sure to export and save the key file. You can export the key with: mina accounts export --public-key `` --privkey-path `` Then save it to your local machine, maybe using [scp](https://linux.die.net/man/1/scp): scp `` `` Later, when starting up a new VM, you can upload the key and then import it: mina accounts import --privkey-path `` ::: If you ever forget what keypairs you've already created, you can see them all with: mina accounts list ## Check account balance We can check the balance of all our accounts using this command: mina accounts list You might see `Balance: 0 mina` for your account. Depending on the traffic in the network, it may take a few blocks before your transaction goes through. :::tip You can run `mina client status` to see the current block height updating. ::: ## Make a payment Finally, we get to the good stuff–sending our first transaction! Before you send a payment, you'll need to unlock your account: mina accounts unlock --public-key $MINA_PUBLIC_KEY For testing purposes, we will specify your public key as the receiver and sender. This just means that we are sending a transaction to ourselves, you can see your public key by issuing the following command: ``` echo $MINA_PUBLIC_KEY ``` :::caution If the receiving account has not received any transactions, there will be an additional Account Creation Fee of `1 MINA` that will be deducted from the transaction amount. ::: Let's send some of our Mina to ourselves to see what a payment looks like: mina client send-payment \ --amount 1.5 \ --receiver $MINA_PUBLIC_KEY \ --fee 0.1 \ --sender $MINA_PUBLIC_KEY If you're wondering what we passed in to the commands above: - For `amount`, we're sending a test value of `1.5` mina which is enough to cover the Account Creation Fee - The `receiver` is the public key of the account receiving the transaction, eg. `B62qjaA4N9843FKM5FZk...` - For `fee`, let's use 0.1 mina - The `sender` is the public key of the account sending the transaction, eg. `B62qjaA4N9843FKM5FZk...` If this command is formatted properly, we should get a response that looks like the following: Dispatched payment with ID 3XCgvAHLAqz9VVbU7an7f2L5ffJtZoFega7jZpVJrPCYA4j5HEmUAx51BCeMc232eBWVz6q9t62Kp2cNvQZoNCSGqJ1rrJpXFqMN6NQe7x987sAC2Sd6wu9Vbs9xSr8g1AkjJoB65v3suPsaCcvvCjyUvUs8c3eVRucH4doa2onGj41pjxT53y5ZkmGaPmPnpWzdJt4YJBnDRW1GcJeyqj61GKWcvvrV6KcGD25VEeHQBfhGppZc7ewVwi3vcUQR7QFFs15bMwA4oZDEfzSbnr1ECoiZGy61m5LX7afwFaviyUwjphtrzoPbQ2QAZ2w2ypnVUrcJ9oUT4y4dvDJ5vkUDazRdGxjAA6Cz86bJqqgfMHdMFqpkmLxCdLbj2Nq3Ar2VpPVvfn2kdKoxwmAGqWCiVhqYbTvHkyZSc4n3siGTEpTGAK9usPnBnqLi53Z2bPPaJ3PuZTMgmdZYrRv4UPxztRtmyBz2HdQSnH8vbxurLkyxK6yEwS23JSZWToccM83sx2hAAABNynBVuxagL8aNZF99k3LKX6E581uSVSw5DAJ2S198DvZHXD53QvjcDGpvB9jYUpofkk1aPvtW7QZkcofBYruePM7kCHjKvbDXSw2CV5brHVv5ZBV9DuUcuFHfcYAA2TVuDtFeNLBjxDumiBASgaLvcdzGiFvSqqnzmS9MBXxYybQcmmz1WuKZHjgqph99XVEapwTsYfZGi1T8ApahcWc5EX9 Receipt chain hash is now A3gpLyBJGvcpMXny2DsHjvE5GaNFn2bbpLLQqTCHuY3Nd7sqy8vDbM6qHTwHt8tcfqqBkd36LuV4CC6hVH6YsmRqRp4Lzx77WnN9gnRX7ceeXdCQUVB7B2uMo3oCYxfdpU5Q2f2KzJQ46 You may not see the `Receipt chain hash` on the first transaction from the account, but in following transactions, this will show you the head of the receipt chain hash list. ## Staking and Snarking Once you feel comfortable with the basics of creating an address, and sending & receiving mina, we can move on to the truly unique parts of the Mina network like [participating in consensus and helping compress the blockchain](/node-operators/validator-node/staking-and-snarking). ## Advanced ### Sending Many Transactions Sometimes you may wish to send many transactions: for example, to payout rewards to those delegating to you if you're running a staking pool. All information here is relevant as of the 3.0.3 build: ### Rate limiting Currently, nodes on the network will rate limit receiving messages from a given node. As of the 3.0.3 build, your node will also follow this rate limit when sending transactions. Specifically, the limit is currently set at 10 transactions every 15 seconds computed over a 5 minute window. If you attempt to send transactions faster than this rate, your node will queue them up and flush them as older transactions expire from the window upon which the rate limit is computed. You do not need to throttle sending these transactions yourself. Note that older releases of the mina daemon do not perform this rate limiting; if you are running an older version, you should manually limit the number of transactions. Due to overheads from rebroadcasting transactions, we do not recommend sending more than 50 transactions every 5 minutes if you need to manually rate limit. ### My node crashed or disconnected before I could finish sending transactions The Mina daemon does _not_ currently persist the transaction pool. This means that the transactions that your node will be unaware of any transactions that you've sent so far if your node crashes in the middle of this process. As of the 3.0.3 build, you can resend all transactions (exactly in the same manner as before) and they will be rebroadcasted on the network. If you believe you were temporarily disconnected from the network, but your node stayed online (i.e. the gossip network may have missed one or more of your transactions), as of the 3.0.3 build, you can resend any of the transactions locally and they will be broadcasted again to the network even if your node thinks they've already been shared. ### Cancelling a transaction and setting a new fee To cancel a transaction, you'll need to have all the transactions that haven't been committed to the chain yet before in your local transaction mempool. This means if your node crashed (see above) you'll need to resend those earlier transactions. Finally, to cancel a transaction, all you need to do is send a transaction with the same nonce of the one you want to cancel with a larger fee. There is no minimum increment, it just needs to be slightly larger (and large enough such that a block producer will choose your transaction). --- url: /mina-protocol/snark-workers --- # SNARK Workers While most protocols have just one primary group of node operators (often called miners, validators, or block producers), Mina has a second group — the **SNARK worker**. SNARK workers are integral to the Mina network's health because these nodes are responsible for snarking, or producing SNARK proofs, of transactions in the network. By producing these proofs, snark workers help maintain the succinctness of the Mina blockchain. Read on to learn why SNARK workers are needed, how the economic incentives align, and operational details of performing SNARK work. Feel free to click through to any of the sections that are most relevant to your needs. Note: The theory of zk-SNARKs is not covered. Deep knowledge of SNARKs is not required to read this section, but it is helpful to understand in general how SNARKs work and what they are useful for. To learn more, check out this [What are zk-SNARKs?](https://minaprotocol.com/blog/what-are-zk-snarks) primer first. ## How Mina Compresses the Blockchain The Mina protocol is unique because nodes are not required to maintain the full history of the blockchain like other cryptocurrency protocols. By recursively using cryptographic proofs, the Mina protocol effectively compresses the blockchain to constant size. This compression reduces terabytes of data to a few kilobytes. However, this isn't data encoding or compression in the traditional sense. Mina nodes _compress_ data in the network by generating cryptographic proofs. Node operators play a crucial role in this process by designating themselves as [SNARK workers](/glossary#snark-worker) that generate [zk-SNARKs](/glossary#zk-snark) for transactions that have been added to blocks. You can connect a SNARK worker to the network or use a SNARK coordinator. [SNARK coordinators](/glossary#snark-coordinator) can be used to coordinate and distribute work to any [SNARK workers](/glossary#snark-worker) that you are running. If you are running a SNARK coordinator, connect the SNARK coordinator to the network, then connect SNARK workers to the SNARK coordinator. ## Why SNARK Workers? Mina's unique property is the succinct blockchain. Each block producer, when they propose a new block to the network, must also include a zk-SNARK along with that block. This allows nodes to discard all historical data that's been finalized, and retain just the SNARK. If you are unfamiliar with the Mina protocol, [this video is a good start](https://www.youtube.com/watch?v=eWVGATxEB6M). However, it is not only sufficient for the block producers in Mina to generate SNARK proofs of blocks. Transactions also need to be SNARKed. The reason is because the blockchain SNARK does not make any statements of the validity of the transactions included in the block. For example — let's say the current head of the blockchain has a state hash `a6f8792226...` , and we receive a new block with a state hash `0ffdcf284f...` . This block will contain all the transactions that the block producer has chosen to include in this block, and associated metadata. We will also receive an accompanying SNARK that verifies the statement: > "There exists a block with a state hash 0ffdcf284f which extends the blockchain > with a previous best tip with state hash a6f8792226." Notice that this statement says nothing about the validity of the transactions included in the new block. If we were to believe this SNARK, and do nothing else, we may be tricked by a malicious block producer sending this block. Luckily, we have the raw block and we can check each transaction to ensure it is valid. But what about nodes in the network that may just want to receive the proof and not verify each block? ## Snarking Transactions In order to ensure that nodes can operate without trust on the Mina blockchain, it is important that each node can verify the state of the chain without needing to replay the transactions. In order for this to work, the blockchain SNARK is not enough. We need to know that the transactions are also valid. Well, since SNARKs are good for exactly that, the naive suggestion might be to generate a SNARK of each transaction as they come in, and then combine them. However, generating SNARK proofs is computationally expensive — if we had to compute SNARKs serially for each transaction, throughput would be very low and block times would skyrocket. Furthermore, transactions in a real world environment arrive asynchronously, so it would be very tough to predict when to perform the next item of work. Lucky for us, we can leverage two properties about SNARKs: 1. proofs can be merged - two proofs can be combined to form a _merge proof_ 2. merges are associative - merge proofs are identical, regardless of the order merged SNARK Workers What these two properties essentially allow us to do is take advantage of parallelism. If proofs can be merged, and it doesn't matter how they're combined, then SNARK proofs can be generated in parallel. Whichever proof is finished first can be combined later with the proofs in progress. This can be envisioned as a binary tree, where the bottom row (the leaves) consists of the individual transaction proofs, and each parent row, the set of respective merge proofs. We can combine these all the way to the root, which represents a state update performed by applying all the transactions. In addition, because the SNARK proofs don't depend on each other and we can exploit parallelism, this means anyone can do the work! The end result is that the distributed work pool is permission-less. Anyone with spare compute can join the network as SNARK workers, observe transactions that need to be SNARKed, and contribute their compute. And of course, they will be compensated for their work in what we affectionately call **the snarketplace**. Note: To learn more about the details of how this SNARK work scheme evolved, it is highly recommended to watch this video: [High Throughput with Slow Snarks](https://www.youtube.com/watch?v=NZmq1V-Te0E). If you're interested in functional programming and the details of the scan state (the tree structure described above), we have [a video](https://www.youtube.com/watch?v=ztH_Z5TCe9I) covering the technical details. ## The Snarketplace The key dynamic to understand about SNARK work is: _Block producers use their block rewards to purchase SNARK work from SNARK workers._ As a SNARK worker, you get to share some of the block rewards for each block that includes your compressed transactions. The block producer is responsible for gathering compressed transactions before including them into a block and is incentivized by the protocol to reward SNARK workers. There is no protocol involvement in pricing snarks, nor are there any protocol level rewards for SNARK workers to produce snarks. The incentives are purely peer-to-peer, and dynamically established in a public marketplace, aka the snarketplace. You may ask, why does a block producer need to buy SNARKs? Fair question — the reason is because of what we mentioned earlier. In order to know for sure the state at the head of the Mina blockchain is valid, the transactions need to be SNARKed. But if we keep adding more transactions without snarking them at an equal rate, then over time we accumulate work that never gets finished. In order to reach a steady state equilibrium, we need work to be processed at roughly the same rate that work is added. Since block producers profit from including transactions in a block (through transaction fees and the coinbase transaction), they are responsible for offsetting the transactions by purchasing an equal number of completed SNARK work, thereby creating demand for SNARK work. However, their imperative is to purchase SNARK work for the lowest price from the snarketplace. Conversely, the SNARK workers want to maximize their profit while also being able to sell their SNARK work. These two roles act as the two sides of the marketplace, and over time establish an equilibrium at a market price for SNARK work. ### How to price SNARK work We anticipate the snarketplace to dynamically rebalance — eg. follow the simple laws of [supply and demand](https://en.wikipedia.org/wiki/Supply_and_demand). While each SNARK work applies to a different transaction, seen from a larger perspective, SNARK work is largely a commodity (meaning it doesn't matter which SNARK worker produces the good — it will be the same). However, there are some nuances, so it may help to have some heuristics for pricing strategy: - if market price is X, it is likely effective to sell SNARK work for any price below X (eg. X - 1), provided it is profitable after operating expenses. - block producers are incentivized to purchase more units of SNARK work from the same SNARK worker because there will only be one _fee transfer_ transaction they have to include in the block. - Basically, the way a block producer pays a SNARK worker is through a special type of transaction called a fee transfer. The BP's incentive is to minimize the number of fee transfers, as each is a discrete transaction that needs to be added to a block (and consequently offset by more SNARK work). Thus, the best case scenario is to buy a bundle of SNARK work from the same SNARK worker. - some SNARK work will be more important to complete ahead of other work, as it would free up an entire tree worth of memory (see the video above for more details). This is made possible by different work selection methods. Currently, the three methods supported natively are sequential, random and sequential with a random offset. Neither of these however takes advantage of dynamic markets, which is an area of improvement that the Mina community can develop solutions for. Since all the data around snarks and prices are public, there are several ways to inspect the snarketplace. One example is [using the GraphQL API](https://youtu.be/XQlfX-LnK_A), and other options include using the CLI, or rolling a custom solution that tracks snarks in the SNARK mempool. Stay tuned for more detailed analysis on snarketplace dynamics. We will also be releasing an economic whitepaper shortly that will provide more context. See also: [SNARKs and SNARK Workers FAQ](/node-operators/faq#snarks-and-snark-workers) --- url: /mina-protocol/time-locked-accounts --- # Time-Locked Accounts A time-locked account disallows payments that would reduce the balance below a minimum, which depends on the block height. To create a time-lock, you must provide the configuration when creating a new account. This can happen only in the genesis ledger at the beginning of a network. In this section, we'll explore the mechanism behind time-locks and see how to interact with time-locked accounts. :::tip For the current release, values for time-locked accounts were assigned based on the order in which you signed up. ::: ## Understanding time-locks A time-lock consists of the following fields `initial_minimum_balance`, `cliff` time, a `vesting_period` time, and a `vesting_increment`. You can still use an account if it has a time-lock, as long as the account holds enough funds. The amount of funds that are time-locked starts off as `initial_minimum_balance` at the beginning of the network. Once the network reaches a block height equal to the `cliff`, the time-locked amount begins to decrease by the `vesting_increment` amount every `vesting_period`. For a more technical explanaition of this process, please see [RFC-0025](https://github.com/MinaProtocol/mina/blob/master/rfcs/0025-time-locked-accounts.md) which has a more in-depth overview. ### Liquid Balance Details: If you'd like to expose liquid balances for vesting accounts at some particular time period it is governed by the following function (Note: this computes the locked portion of an account): ``` (* * uint32 global_slot -- the "clock" it starts at 0 at the genesis block and ticks up every 90 seconds. * uint32 cliff_time -- the slot where the cliff is (similar to startup equity vesting) * uint32 cliff_amount -- the amount that unlocks at the cliff * amount vesting_increment -- unlock this amount every "period" * uint32 vesting_period -- the period that we increment the unlocked amount * balance initial_minimum_balance -- the total locked amount until the cliff *) let min_balance_at_slot ~global_slot ~cliff_time ~cliff_amount ~vesting_period ~vesting_increment ~initial_minimum_balance = let open Unsigned in if Global_slot.(global_slot < cliff_time) then initial_minimum_balance else match Balance.(initial_minimum_balance - cliff_amount) with | None -> Balance.zero | Some min_balance_past_cliff -> ( (* take advantage of fact that global slots are uint32's *) let num_periods = UInt32.( Infix.((global_slot - cliff_time) / vesting_period) |> to_int64 |> UInt64.of_int64) in let vesting_decrement = UInt64.Infix.(num_periods * Amount.to_uint64 vesting_increment) |> Amount.of_uint64 in match Balance.(min_balance_past_cliff - vesting_decrement) with | None -> Balance.zero | Some amt -> amt ) ``` ## Creating a time-locked account As of the current release, the only way to create a time-locked account is with the genesis ledger. In future releases we may add commands to `mina client` and the GraphQL API that will allow you to create a new time-locked account. --- url: /mina-protocol/whats-in-a-block --- # What's in a Block? A block is a set of transactions and consensus information that extend the state of the network. A block in Mina includes a proof that the current state of the network is fully valid. A block in Mina is constituted of: * [Protocol state](#protocol-state) * [Protocol state proof](#protocol-state-proof) * [Staged ledger diff](#staged-ledger-diff) * [Delta transition chain proof](#delta-transition-chain-proof) * Current protocol version * Proposed protocol version When a node receives a block from a peer, it is first validated, applied to the existing state, and added to the node's transition frontier. If, according to the [consensus](https://minaprotocol.com/blog/what-is-ouroboros-samasika) rules, it results in increasing the length of the blockchain, the node's best tip is updated, and the root of the transition frontier is moved up to only maintain `k` blocks in the transition frontier. :::tip In Mina, blocks are synonymous with "transitions". When this transition (block) is received from a peer, it is referenced as an external transition, whereas one generated and applied locally is referred to as an internal transition. ::: ### Protocol State The protocol state is comprised of the **previous protocol state hash** and a body that contains: * [Genesis state hash](#genesis-state-hash) * [Blockchain state](#blockchain-state) * [Consensus state](#consensus-state) * [Consensus constants](#consensus-constants) Each block contains the protocol state hash of the previous block, such that blocks may be linked together to form an immutable chain. The protocol state hash is determined from the hash of hashes of the previous state and body and acts as a unique identifier for each block. #### Genesis State Hash The genesis state hash is the protocol state hash for the genesis protocol state. #### Blockchain State The blockchain state is comprised of: * Staged ledger hash * Genesis ledger hash * Ledger proof statement * Timestamp * Body reference ##### Ledger proof statement The ledger proof statement is comprised of: * Snarked ledger hash * Signed amount * Pending coinbase stack * Fee excess * Sok digest * Local state #### Consensus State The consensus state is comprised of: * Blockchain length * Epoch count * Min window density * Sub window density * Last VRF output * Total currency * Current global slot * Global slot since genesis * Staking epoch data * Next epoch data * Has ancestor in same checkpoint window * Block stake winner * Block creator * Coinbase receiver * Superchage coinbase #### Consensus Constants Constants define the consensus parameters: * k * delta * slots_per_sub_window * slots_per_window * sub_windows_per_window * slots_per_epoch * grace period slots * grace period end * checkpoint_window_slots_per_year * checkpoint_window_size_in_slots * block_window_duration_ms * slot_duration_ms * epoch_duration * delta_duration * genesis_state_timestamp ### Protocol State Proof The protocol state proof is a blockchain proof proving that the new protocol state generated by the block producer is valid. Due to the use of recursive SNARKs, this protocol state proof proves the entire history of the chain is valid. ### Staged Ledger Diff When a [block producer](/mina-protocol/block-producers) wins a slot to produce a block, they select transactions and any SNARK work required from the transaction and SNARK pools. They create the proposed next state of the blockchain, which comprises creating a diff of the staged ledger. A diff consists of: * Transactions included in the block * A list of SNARK proofs generated by [SNARK workers](/mina-protocol/snark-workers) for prior transactions added * Pending coinbase A staged ledger can be regarded as a pending accounts database that has transactions(payments, coinbase, and proof fee payments) applied for which there are no SNARKs available yet. A staged ledger consists of the accounts state (a ledger) and a transaction queue for transactions without SNARK proofs, which is the [scan state](/mina-protocol/scan-state). ### Delta Transition Chain Proof There is an allowed network delay when broadcasting or gossiping newly produced blocks around the network to allow for adverse network conditions. The delta transition chain proof proves that the block was produced within the allotted slot time. ### Example Block ``` { "external_transition": { "protocol_state": { "previous_state_hash": "3NLKJLNbD7rBAbGdjZz3tfNBPYxUJJaLmwCP9jMKR65KSz4RKV6b", "body": { "genesis_state_hash": "3NLxYrjb7zmHdoFgBrubCN8ijM8v7eT8kvLiPLc9DHt3M8XrDDEG", "blockchain_state": { "staged_ledger_hash": { "non_snark": { "ledger_hash": "jxV4SS44wHUVrGEucCsfxLisZyUC5QddsiokGH3kz5xm2hJWZ25", "aux_hash": "UmosfM82dH5xzqdckXgA1JoAvJ5tLxch2wsty4sXmiEPKnPTPq", "pending_coinbase_aux": "WLo8mDN6oBUTSyBkFCy7Fky7Na5fN4R6oGq4HMf3YoHCAj4cwY" }, "pending_coinbase_hash": "2mze7iXKwA9JAqVDC1MVvgWfJDgvbgSexKtuShdkgqMfv1tjATQQ" }, "ledger_proof_statement": { "connecting_ledger_right": "jwbhUympjiAFLPi7w3Cg9GEeNCfACEpPxrTp45XZt3BDA5UNV8S", "sok_digest": null, "target": { "local_state": { "full_transaction_commitment": "0x0000000000000000000000000000000000000000000000000000000000000000", "call_stack": "0x0000000000000000000000000000000000000000000000000000000000000000", "token_id": "wSHV2S4qX9jFsLjQo8r1BsMLH2ZRKsZx6EJd1sbozGPieEC4Jf", "excess": { "sgn": [ "Pos" ], "magnitude": "0" }, "success": true, "stack_frame": "0x0641662E94D68EC970D0AFC059D02729BBF4A2CD88C548CCD9FB1E26E570C66C", "will_succeed": true, "account_update_index": "0", "supply_increase": { "sgn": [ "Pos" ], "magnitude": "0" }, "ledger": "jw6bz2wud1N6itRUHZ5ypo3267stk4UgzkiuWtAMPRZo9g4Udyd", "failure_status_tbl": [], "transaction_commitment": "0x0000000000000000000000000000000000000000000000000000000000000000" }, "pending_coinbase_stack": { "state": { "init": "4Yx5U3t3EYQycZ91yj4478bHkLwGkhDHnPbCY9TxgUk69SQityej", "curr": "4Yx5U3t3EYQycZ91yj4478bHkLwGkhDHnPbCY9TxgUk69SQityej" }, "data": "4QNrZFBTDQCPfEZqBZsaPYx8qdaNFv1nebUyCUsQW9QUJqyuD3un" }, "first_pass_ledger": "jwbhUympjiAFLPi7w3Cg9GEeNCfACEpPxrTp45XZt3BDA5UNV8S", "second_pass_ledger": "jwbhUympjiAFLPi7w3Cg9GEeNCfACEpPxrTp45XZt3BDA5UNV8S" }, "fee_excess": [ { "token": "wSHV2S4qX9jFsLjQo8r1BsMLH2ZRKsZx6EJd1sbozGPieEC4Jf", "amount": { "sgn": [ "Pos" ], "magnitude": "0" } }, { "amount": { "sgn": [ "Pos" ], "magnitude": "0" }, "token": "wSHV2S4qX9jFsLjQo8r1BsMLH2ZRKsZx6EJd1sbozGPieEC4Jf" } ], "source": { "second_pass_ledger": "jwbhUympjiAFLPi7w3Cg9GEeNCfACEpPxrTp45XZt3BDA5UNV8S", "local_state": { "account_update_index": "0", "supply_increase": { "sgn": [ "Pos" ], "magnitude": "0" }, "stack_frame": "0x0641662E94D68EC970D0AFC059D02729BBF4A2CD88C548CCD9FB1E26E570C66C", "ledger": "jw6bz2wud1N6itRUHZ5ypo3267stk4UgzkiuWtAMPRZo9g4Udyd", "transaction_commitment": "0x0000000000000000000000000000000000000000000000000000000000000000", "token_id": "wSHV2S4qX9jFsLjQo8r1BsMLH2ZRKsZx6EJd1sbozGPieEC4Jf", "excess": { "sgn": [ "Pos" ], "magnitude": "0" }, "call_stack": "0x0000000000000000000000000000000000000000000000000000000000000000", "will_succeed": true, "full_transaction_commitment": "0x0000000000000000000000000000000000000000000000000000000000000000", "failure_status_tbl": [], "success": true }, "first_pass_ledger": "jwbhUympjiAFLPi7w3Cg9GEeNCfACEpPxrTp45XZt3BDA5UNV8S", "pending_coinbase_stack": { "data": "4QNrZFBTDQCPfEZqBZsaPYx8qdaNFv1nebUyCUsQW9QUJqyuD3un", "state": { "curr": "4Yx5U3t3EYQycZ91yj4478bHkLwGkhDHnPbCY9TxgUk69SQityej", "init": "4Yx5U3t3EYQycZ91yj4478bHkLwGkhDHnPbCY9TxgUk69SQityej" } } }, "supply_increase": { "sgn": [ "Pos" ], "magnitude": "0" }, "connecting_ledger_left": "jwbhUympjiAFLPi7w3Cg9GEeNCfACEpPxrTp45XZt3BDA5UNV8S" }, "body_reference": "b94b2580ca80f27c9655289579a0d71df0b7604dfa7c404e6c309cccf7730d2f", "snarked_ledger_hash": "jx9171AbMApHNG1guAcKct1E6nyUFweA7M4ZPCjBZpgNNrE21Nj", "genesis_ledger_hash": "jxX6VJ84HaafrKozFRA4qjnni4aPXqXC2H5vQLKSryNpKTXuz1R", "snarked_next_available_token": "2", "timestamp": "1611691710000" }, "consensus_state": { "blockchain_length": "3852", "epoch_count": "1", "min_window_density": "1", "sub_window_densities": [ "3", "1", "3", "1", "4", "2", "1", "2", "2", "4", "5" ], "last_vrf_output": "g_1vrXSXLhvn1e4Ap1Ey5e8yh3PFMJT0vZyhZLlTBAA=", "total_currency": "167255800000001000", "curr_global_slot": { "slot_number": "12978", "slots_per_epoch": "7140" }, "global_slot_since_genesis": "12978", "staking_epoch_data": { "ledger": { "hash": "jxX6VJ84HaafrKozFRA4qjnni4aPXqXC2H5vQLKSryNpKTXuz1R", "total_currency": "165950000000001000" }, "seed": "2vb1Mjvydod6sEwn7qpbejKCfRqugMgyG3MHXXRKcAkwQLRs9fj8", "start_checkpoint": "3NK2tkzqqK5spR2sZ7tujjqPksL45M3UUrcA4WhCkeiPtnugyE2x", "lock_checkpoint": "3NK5G8Xqn1Prh3XoTyZ2tqntJC6X2nVwruv5mEJCL3GaTk7jKUNo", "epoch_length": "1769" }, "next_epoch_data": { "ledger": { "hash": "jx7XXjRfJj2mGXmiHQmpm6ZgTxz14udpugyFtw4DefJFpie7apN", "total_currency": "166537000000001000" }, "seed": "2vavBR2GfJWvWkpC7yGJQFnts18nHaFjdVEr84r1Y9DQXvnJRhmd", "start_checkpoint": "3NLdAqxtBRYxYbCWMXxGu6j1hGDrpQwGkBDF9QvGxmtpziXQDADu", "lock_checkpoint": "3NL4Eis1pS1yrPdfCbiJcpCCYsHuXY3ZgEzHojPnFWfMK9gKmhZh", "epoch_length": "2084" }, "has_ancestor_in_same_checkpoint_window": true, "block_stake_winner": "B62qpBrUYW8SHcKTFWLbHKD7d3FqYFvGRBaWRLQCgsr3V9pwsPSd7Ms", "block_creator": "B62qpBrUYW8SHcKTFWLbHKD7d3FqYFvGRBaWRLQCgsr3V9pwsPSd7Ms", "coinbase_receiver": "B62qpBrUYW8SHcKTFWLbHKD7d3FqYFvGRBaWRLQCgsr3V9pwsPSd7Ms", "supercharge_coinbase": true }, "constants": { "k": "290", "slots_per_epoch": "7140", "slots_per_sub_window": "7", "delta": "0", "genesis_state_timestamp": "1609355670000" } } }, "protocol_state_proof": "", "staged_ledger_diff": "", "delta_transition_chain_proof": "", "current_protocol_version": "1.1.0", "proposed_protocol_version": "" } } ``` --- url: /mina-security --- # Mina Security Mina Protocol is built with ZK from the ground up so anyone can quickly sync and verify the network, exponentially increasing participation, true decentralization, censorship resistance, and network security. However it doesn't stop there. Check out some other resources to see what measures are in place to keep Mina secure. ## Audits ### Protocol - [August 27, 2024 o1js](https://github.com/o1-labs/o1js/blob/a09c5167c4df64f879684e5af14c59cf7a6fce11/audits/VAR_o1js_240318_o1js_V3.pdf) by Veridise - [December 12, 2023 Pickles](https://minaprotocol.com/wp-content/uploads/Least-Authority-Pickles-Final-Audit-Report.pdf) by Least Authority - [August 28, 2023 Transaction Logic and Transaction Pool](https://minaprotocol.com/blog/least-authority-concludes-security-audit-of-mina-protocols-transaction-logic-and-transaction-pool) by Least Authority - [October 16, 2022 Mina codebase, ecosystem projects](https://minaprotocol.com/wp-content/uploads/Mina-Security-Assessment-2022.pdf) by Mo Ashouri - [February 22, 2022 Mina Client SDK, Signature Library and Base Components](https://www.nccgroup.com/us/research-blog/public-report-o-1-labs-mina-client-sdk-signature-library-and-base-components-cryptography-and-implementation-review/?sq=mina) by NCC Group - [December 2020 Mina Protocol and Staking Economics](https://gauntlet.network/reports/mina) by Gauntlet Network - [May 14, 2020 Coda Protocol ](https://minaprotocol.com/blog/ncc-group-security-audit-results-of-coda-protocol) by NCC Group ### Tools - [Feb 4, 2022 Mina Ledger Application](https://minaprotocol.com/blog/ledger-nanox-nanos-developer-mode) by Least Authority - [Sept 28, 2021 StakingPower Wallet ](https://minaprotocol.com/blog/least-authority-concludes-security-audit-on-stakingpower-wallet) by Least Authority - [August 9, 2021 Auro Wallet](https://minaprotocol.com/blog/least-authority-concludes-security-audit-on-auro-wallet) by Least Authority - [July 16, 2021 Clor.io Wallet](https://minaprotocol.com/blog/clorio-wallet-audit) by Least Authority ### Auditors - [Veridise](https://veridise.com/) - [Least Authority](https://leastauthority.com/) - [NCC Group](https://www.nccgroup.com/us/) - [Gauntlet Network](https://www.gauntlet.xyz/) ## Current Community Security Programs - [Bug Bounty Program](https://minaprotocol.com/blog/re-launching-the-mina-ecosystem-bug-bounty-program) - [Testworld Mission 2.0](https://minaprotocol.com/blog/testworld-2-protocol-performance-testing-program) ## Learn - [Solving for Blockchain’s Security Flaw — Accessible Nodes](https://minaprotocol.com/blog/solving-for-blockchains-security-flaw?utm_medium=gitHub&utm_source=social&utm_campaign=evergreen) - [What is Ouroboros Samisika?](https://minaprotocol.com/blog/how-ouroboros-samasika-upholds-minas-goals-of-decentralization?utm_medium=github&utm_source=social&utm_campaign=updates) - [How Ouroboros Samasika Upholds Mina’s Goals of Decentralization](https://minaprotocol.com/blog/how-ouroboros-samasika-upholds-minas-goals-of-decentralization?utm_medium=github&utm_source=social&utm_campaign=updates) - [Mina’s Mainnet Launch Marks a New Era for Internet Privacy and Data Security](https://minaprotocol.com/blog/minas-mainnet-launch-marks-a-new-era-for-internet-privacy-and-data-security?utm_medium=github&utm_source=social&utm_campaign=updates) --- url: /mina-signer --- # Mina Signer Mina Signer is a NodeJS/Browser compatible JavaScript library tailored for the Mina Protocol. This library aids developers in seamlessly signing transactions and generating keys. A noteworthy feature is the ability to sign transactions offline, allowing for their broadcasting to the network whenever required. It also supports functionalities such as signing zkApp transactions, verifying these transactions, generating nullifiers, and more. ## Installation To incorporate Mina Signer into your project: ```sh npm install mina-signer ``` ## Mina Protocol Usage Mina Signer offers a wide range of features for the Mina Protocol: - Generate keys - Sign transactions - Verify transactions Additionally, it ensures compatibility across various networks, like mainnet and testnet. ### Specifying the network When importing and initializing Mina Signer, it's imperative to designate the desired network. Different networks may employ varying cryptographic methods. This specification is executed by supplying the network parameter during the constructor's invocation. Possible values are `mainnet` and `testnet`. :::tip By default, if no network is explicitly chosen, `mainnet` is the default choice. For the Berkeley network, use `testnet`. ::: ```js const MainnetClient = new Client({ network: 'mainnet' }); // Specify mainnet const TestnetClient = new Client({ network: 'testnet' }); // Specify testnet (Berkeley) ``` ### Generating keys With Mina Signer, generating keypairs is straightforward. ```js const client = new Client({ network: 'mainnet' }); // Specify mainnet const keypair = client.genKeys(); // Generates a public and private keypair ``` ### Signing & Verifying Transactions Mina Signer facilitates both transaction and stake delegation signing and verification. To sign a transaction, the sender's private must be provided. Conversely, for verification, the sender's public key must be provided. Post-signing, the Mina Daemon can be utilized to broadcast the payment or delegation. #### Payments Payments are transactions that transfer funds from one account to another. To sign a payment, the following parameters must be provided: ```js const client = new Client({ network: 'mainnet' }); const keypair = client.genKeys(); const payment = client.signPayment( { to: keypair.publicKey, // Public key of the recipient from: keypair.publicKey, // Public key of the sender amount: '1', // Amount to be sent (in nano MINA) fee: '1', // Fee to be paid (in nano MINA) nonce: '0', // Nonce of the sender }, keypair.privateKey ); const verifiedPayment = client.verifyPayment(payment); ``` #### Delegations Stake delegations are a way for users to delegate their stake to a validator. This allows the validator to produce blocks on behalf of the delegator. To sign a stake delegation, the following parameters must be provided: ```js const client = new Client({ network: 'mainnet' }); const keypair = client.genKeys(); const delegation = client.signStakeDelegation( { to: keypair.publicKey, // Public key of the validator from: keypair.publicKey, // Public key of the delegator fee: '1', // Fee to be paid (in nano MINA) nonce: '0', // Nonce of the delegator }, keypair.privateKey ); const verifiedDelegation = client.verifyStakeDelegation(delegation); ``` #### Generic Signing Mina Signer can accept a generic payload and determine the most apt signing approach via `signTransaction()`. This functionality is especially beneficial for applications that support different types of transactions. ```js const client = new Client({ network: 'mainnet' }); const keypair = client.genKeys(); // Sign a payment client.signTransaction( { to: keypair.publicKey, from: keypair.publicKey, amount: '1', fee: '1', nonce: '0', }, keypair.privateKey ); // Sign a delegation client.signTransaction( { to: keypair.publicKey, from: keypair.publicKey, fee: '1', nonce: '0', }, keypair.privateKey ); // Sign a zkApp transaction client.signTransaction( { zkappCommand: ..., feePayer: ... }, keypair.privateKey ); // Sign a simple string payload client.signTransaction('Hello World', keypair.privateKey); ``` ### Broadcasting a Signed Payment After signing a payment, you can broadcast it to the network via a Mina Node GraphQL endpoint: ```javascript const client = new Client({ network: 'mainnet' }); const senderPrivateKey = 'EKFd1Gx...'; const senderPublicKey = 'B62qrDM...'; let payment = { from: senderPublicKey, to: 'B62qkBw...', amount: 100, nonce: 1, fee: 1000000, }; const signedPayment = client.signPayment(payment, senderPrivateKey); const url = 'https://your-mina-node/graphql'; const sendPaymentMutationQuery = ` mutation SendPayment($input: SendPaymentInput!, $signature: SignatureInput!) { sendPayment(input: $input, signature: $signature) { payment { hash } } } `; const graphQlVariables = { input: signedPayment.data, signature: signedPayment.signature, }; const body = JSON.stringify({ query: sendPaymentMutationQuery, variables: graphQlVariables, operationName: 'SendPayment', }); const paymentResponse = await fetch(url, { method: 'POST', headers: { 'Content-Type': 'application/json' }, body, }); const paymentResponseJson = await paymentResponse.json(); if (paymentResponse.ok) { console.log( `Transaction hash: ${paymentResponseJson.data.sendPayment.payment.hash}` ); } else { console.error(JSON.stringify(paymentResponseJson)); } ``` ### Payment & Delegation Transaction Hashes In addition to signing/verifying payments/delegations for the Mina Protocol, Mina Signer allows you to compute the hash that will be used to identify the transaction on the blockchain. This is useful for applications that require the transaction hash before the transaction is broadcasted to the network. ```js const client = new Client({ network: 'mainnet' }); const keypair = client.genKeys(); const payment = client.signTransaction( { to: keypair.publicKey, from: keypair.publicKey, amount: '1', fee: '1', nonce: '0', }, keypair.privateKey ); const hashedPayment = client.hashPayment(payment); const delegation = client.signTransaction( { to: keypair.publicKey, from: keypair.publicKey, fee: '1', nonce: '0', }, keypair.privateKey ); const hashedDelegation = client.hashStakeDelegation(delegation); ``` ### Rosetta Integration For those developing with [Rosetta](https://www.rosetta-api.org/), Mina Signer provides an avenue to transform a signed Rosetta transaction into a Mina-compliant transaction, ready for broadcasting through the Mina Daemon. ```js const client = new Client({ network: 'mainnet' }); const signedRosettaTx = '...'; const signedGraphQLCommand = client.signedRosettaTransactionToSignedCommand(signedRosettaTx); ``` For detailed Rosetta usage including the offline signer CLI tool and `signRosettaTransaction`, see the [Mina Signer for Node Operators](/node-operators/mina-signer) documentation. ## o1js Integration Mina Signer can seamlessly integrate with [o1js](/zkapps/o1js), delivering an array of features for zkApps like: - zkApp transaction signing and verification - Field payload signing and verification - Nullifier generation ### Signing & Verifying zkApp transactions Mina Signer supports signing and verifying zkApp transactions. o1js itself can be used to sign zkApp transactions, but Mina Signer offers the ability to sign a zkApp transaction that can easily be broadcasted with a Mina Daemon. This can be very useful for wallet applications that want to support zkApps. ```js const client = new Client({ network: 'testnet' }); const keypair = client.genKeys(); const zkAppTransaction = await Mina.transaction(feePayerAddress, () => { // ... Interact with a zkApp inside this block to produce a zkApp transaction }); // Sign the zkApp transaction with Mina Signer const signedZkAppTransaction = client.signZkappCommand( { zkappCommand: JSON.parse(JSON.stringify(txn.transaction)), feePayer: { feePayer: keypair.publicKey, fee: '1', nonce: '0', memo: 'memo', }, }, keypair.privateKey ); // Verify the zkApp transaction with Mina Signer const verifiedZkAppTransaction = client.verifyZkappCommand( signedZkAppTransaction ); ``` Firstly, when supplying the input parameters for `signZkappCommand()`, we must first parse the zkApp transaction into a string and then into a JSON object. This is because the types generated from `Mina.transaction()` are not compatible with the types used by Mina Signer. Secondly, we specify the `feePayer` object which contains the public key of the fee payer, the fee to be paid, the nonce of the fee payer, and the memo of the transaction. The `feePayer` object is used to sign the zkApp transaction. :::tip Use o1js to sign zkApp transactions if you can, as it's more ergonomic and easier to use. Only use `Mina Signer` if you need to sign zkApp transactions offline and broadcast at a later time (e.g. wallet software). ::: ### Signing/Verifying Field payloads Mina Signer can sign and validate Field payloads. This is invaluable when ensuring a Field payload's authenticity, as it confirms the payload remains untampered by external parties. ```js const client = new Client({ network: 'testnet' }); const keypair = client.genKeys(); const fields = [10n, 20n, 30n, 340817401n, 2091283n, 1n, 0n]; const signedFields = client.signFields(fields, keypair.privateKey); const verifiedFields = client.verifyFields(signedFields); ``` If you are using o1js to generate Field payloads, you must convert the Fields to BigInts before signing/verifying them. In Mina Signer, the Field type is a BigInt (while in o1js they are a separate data structure), so you must convert the fields from o1js to BigInts before signing/verifying them. ```js const client = new Client({ network: 'testnet' }); const keypair = client.genKeys(); const fields = [Field(10), Field(20)].map((f) => f.toBigInt()); const signedFields = client.signFields(fields, keypair.privateKey); const verifiedFields = client.verifyFields(signedFields); ``` ### Nullifiers Mina Signer supports generating nullifiers for zkApp transactions. In the world of cryptography, nullifiers play a pivotal role. They stand as unique markers, maintaining anonymity yet ensuring account reliability, and staving off illicit undertakings like double-spends. To generate a nullifier, provide a message (an array of BigInts) and the sender's private key. ```js const client = new Client({ network: 'testnet' }); const keypair = client.genKeys(); const message = [10n, 20n, 30n, 340817401n, 2091283n, 1n, 0n]; const nullifier = client.createNullifier(message, keypair.privateKey); ``` --- url: /network-upgrades/berkeley/appendix --- # Appendix ## Migration from o1labs/client-sdk to mina-signer The signing library `o1labs/client-sdk` was deprecated some time ago and will stop working after the Mina mainnet upgrade. All users should upgrade to use the [mina-signer](https://www.npmjs.com/package/mina-signer) library. Below you will find an example of how to use the `mina-signer` library. Please keep in mind the following: 1. Make sure to adjust the `nonce` to the correct nonce on the account you want to use as "sender" 1. Update the `url` variable with an existing Mina Node GraphQL endpoint ```javascript // create the client and define the keypair const client = new Client({ network: 'testnet' }); // Mind the `network` client configuration option const senderPrivateKey = 'EKFd1Gx...'; // Sender's private key const senderPublicKey = 'B62qrDM...'; // Sender's public key, perhaps derived from the private key using `client.derivePublicKey(senderPrivateKey)`; // define and sign payment let payment = { from: senderPublicKey, to: 'B62qkBw...', // Recipient public key amount: 100, nonce: 1, fee: 1000000, }; const signedPayment = client.signPayment(payment, senderPrivateKey); // send payment to graphql endpoint const url = 'https://qanet.minaprotocol.network/graphql'; const sendPaymentMutationQuery = ` mutation SendPayment($input: SendPaymentInput!, $signature: SignatureInput!) { sendPayment(input: $input, signature: $signature) { payment { hash } } } `; const graphQlVariables = { input: signedPayment.data, signature: signedPayment.signature, }; const body = JSON.stringify({ query: sendPaymentMutationQuery, variables: graphQlVariables, operationName: 'SendPayment', }); const paymentResponse = await fetch(url, { method: 'POST', headers: { 'Content-Type': 'application/json' }, body }); const paymentResponseJson = await paymentResponse.json(); if (paymentResponse.ok) { console.log(`Transaction hash: ${paymentResponseJson.data.sendPayment.payment.hash}`); } else { console.error(JSON.stringify(paymentResponseJson)); } ``` --- url: /network-upgrades/berkeley/archive-migration/appendix --- # Appendix ## Archive node schema changes If you are using the Archive Node database directly for your system integrations, then you should understand all the changes that might impact your applications. The most important change is that the `balances` table in the Berkeley schema will no longer exist. In the new schema, it is replaced with the table `accounts_accessed` - from an application semantics point of view, the data in `accounts_accessed` is still the same. In the Berkeley protocol, accounts can now have the same public key but a different token_id. This means accounts are identified by both their public key and token_id, not just the public key. Consequently, the foreign key for the account in all tables is account_identifier_id instead of public_key_id. ### Schema differences - **Removed Types** - The options `create_token`, `create_account`, and `mint_tokens` have been removed from the user_command_type enumeration. - Indexes Dropped - We've removed several indexes from tables, this may affect how you search and organize data: - `idx_public_keys_id` - `idx_public_keys_value` - `idx_snarked_ledger_hashes_value` - `idx_blocks_id` - `idx_blocks_state_hash` - **Table Removed** - The `balances` table is no longer available. - **New Tables Added** - We've introduced the following new tables: - `tokens` - `token_symbols` - `account_identifiers` - `voting_for` - `protocol_versions` - `accounts_accessed` - `accounts_created` - `zkapp_commands` - `blocks_zkapp_commands` - `zkapp_field` - `zkapp_field_array` - `zkapp_states_nullable` - `zkapp_states` - `zkapp_action_states` - `zkapp_events` - `zkapp_verification_key_hashes` - `zkapp_verification_keys` - `zkapp_permissions` - `zkapp_timing_info` - `zkapp_uris` - `zkapp_updates` - `zkapp_balance_bounds` - `zkapp_nonce_bounds` - `zkapp_account_precondition` - `zkapp_accounts` - `zkapp_token_id_bounds` - `zkapp_length_bounds` - `zkapp_amount_bounds` - `zkapp_global_slot_bounds` - `zkapp_epoch_ledger` - `zkapp_epoch_data` - `zkapp_network_precondition` - `zkapp_fee_payer_body` - `zkapp_account_update_body` - `zkapp_account_update` - `zkapp_account_update_failures` - **Updated Tables** - The following tables have been updated - `timing_info` - `user_commands` - `internal_commands` - `epoch_data` - `blocks` - `blocks_user_commands` - `blocks_internal_commands` ### Differences per table - **`timing_info`** - Removed columns: - `token` - `initial_balance` - **`user_commands`** - Removed columns: - `fee_token` - `token` - **`internal_commands`** - Removed columns: - `token` - Renamed column - `command_type` to `type` - **`epoch_data`** - Added columns: - `total_currency` - `start_checkpoint` - `lock_checkpoint` - `epoch_length` - **`blocks`** - Added columns: - `last_vrf_output` - `min_window_density` - `sub_window_densities` - `total_currency` - `global_slot_since_hard_fork` - `global_slot_since_genesis` - `protocol_version_id` - `proposed_protocol_version_id` - Removed column: - `global_slot` - **`blocks_user_commands`** - Removed columns: - `fee_payer_account_creation_fee_paid` - `receiver_account_creation_fee_paid` - `created_token` - `fee_payer_balance` - `source_balance` - `receiver_balance` - Added index: - `idx_blocks_user_commands_sequence_no` - **`blocks_internal_commands`** - Removed columns: - `receiver_account_creation_fee_paid` - `receiver_balance` - Added indexes: - `idx_blocks_internal_commands_sequence_no` - `idx_blocks_internal_commands_secondary_sequence_no` ### Rosetta API new operations The Berkeley upgrade introduces two new operation types: - `zkapp_fee_payer_dec` - `zkapp_balance_change` --- url: /network-upgrades/berkeley/archive-migration/archive-migration-installation --- The archive node Berkeley migration package is sufficient for satisfying the migration from Devnet/Mainnet to Berkeley. However, it has some limitations. For example, the migration package does not migrate a non-canonical chain and it skips orphaned blocks that are not part of a canonical chain. To mitigate these limitations, the archive node maintenance package is available for use by archive node operators who want to maintain a copy of their Devnet and Mainnet databases for historical reasons. ## Install with Google Cloud SDK The Google Cloud SDK installer does not always register a `google-cloud-sdk` apt package. The best way to install the Google Cloud CLI is using the apt repostory: ```sh curl https://packages.cloud.google.com/apt/doc/apt-key.gpg | sudo gpg --dearmor -o /usr/share/keyrings/cloud.google.gpg echo "deb [signed-by=/usr/share/keyrings/cloud.google.gpg] https://packages.cloud.google.com/apt cloud-sdk main" | sudo tee -a /etc/apt/sources.list.d/google-cloud-sdk.list sudo apt-get update && sudo apt-get install google-cloud-sdk ``` ## Download the o1labs Mainnet archive database We strongly encourage you to perform the migration on your own data to preserve the benefits of decentralization. However, if you want to use the archive data that o1labs runs (for example, to bootstrap a new archive from SQL without waiting all day for the chain to download and replay), you can use the following steps: 1. Download the Devnet/Mainnet archive data using cURL or gcloud storage: - cURL: For Devnet: ```sh curl https://storage.googleapis.com/mina-archive-dumps/devnet-archive-dump-{date}_0000.sql.tar.gz ``` For Mainnet: ```sh curl https://storage.googleapis.com/mina-archive-dumps/mainnet-archive-dump-{date}_0000.sql.tar.gz ``` To filter the dumps by date, replace `{date}` using the required `yyyy-dd-mm` format. For example, for March 15, 2024, use `2024-03-15`. :warning: The majority of backups have the `0000` suffix. If a download with that name suffix is not available, try incrementing it. For example, `0001`, `0002`, and so on. - gcloud storage: ```sh gcloud storage cp gs://mina-archive-dumps/mainnet-archive-dump-2024-01-15* . ``` 2. Extract the tar package. ```sh tar -xvzf {network}-archive-dump-{date}_0000.sql.tar.gz {network}-archive-dump-{date}_0000.sql ``` 3. Import the Devnet/Mainnet archive dump into the Berkeley database. Run this command at the database server: ```sh psql -U {user} -f {network}-archive-dump-{date}_0000.sql ``` The database in the dump **archive_balances_migrated** is created with the Devnet/Mainnet archive schema. Note: This database does not have any Berkeley changes. ## Ensure the location of Google Cloud bucket with the Devnet/Mainnet precomputed blocks The recommended method is to perform migration on your own data to preserve the benefits of decentralization. `gcloud storage cp gs://mina_network_block_data/{network}-*.json .` :warning: Precomputed blocks for the Mainnet network take ~800 GB of disk space. Plan for adequate time to download these blocks. The Berkeley migration app downloads them incrementally only when needed. ## Validate the Devnet/Mainnet database The correct Devnet/Mainnet database state is crucial for a successful migration. [Missing blocks](/network-upgrades/berkeley/archive-migration/mainnet-database-maintenance#missing-blocks) is one the most frequent issues when dealing with the Devnet/Mainnet archive. Although this step is optional, it is strongly recommended that you verify the archive condition before you start the migration process. To learn how to maintain archive data, see [Devnet/Mainnet database maintenance](/network-upgrades/berkeley/archive-migration/mainnet-database-maintenance). ## Download the migration applications Migration applications are distributed as part of the archive migration Docker and Debian packages. Choose the packages that are appropriate for your environment. ### Debian packages To get the Debian packages: ``` CODENAME=bullseye CHANNEL=stable VERSION=3.0.1-e848ecb echo "deb [trusted=yes] http://packages.o1test.net $CODENAME $CHANNEL" | tee /etc/apt/sources.list.d/mina.list apt-get update apt-get install --allow-downgrades -y "mina-archive-migration=$VERSION" ``` ### Docker image To get the Docker image: ``` docker pull minaprotocol/mina-archive-migration:3.0.1-e848ecb-{codename} ``` Where supported codenames are: - bullseye - focal - buster ## Devnet/Mainnet genesis ledger The Mina Devnet/Mainnet genesis ledger is stored in GitHub in the `mina` repository under the `genesis_ledgers` subfolder. However, if you are already running a daemon that is connected to the Mina Mainnet or the Devnet network, you already have the genesis ledger locally. ## Berkeley database schema files You can get the Berkeley schema files from different locations: - GitHub repository from the `berkeley` branch. Note: The `berkeley` branch can contain new updates regarding schema files, so always get the latest schema files instead of using an already downloaded schema. - Archive/Rosetta Docker from `berkeley` version ### Example: Downloading schema sources from GitHub ```sh wget https://raw.githubusercontent.com/MinaProtocol/mina/berkeley/src/app/archive/zkapp_tables.sql wget https://raw.githubusercontent.com/MinaProtocol/mina/berkeley/src/app/archive/create_schema.sql ``` ## Next steps Congratulations on completing the essential preparation and verification steps. You are now ready to perform the migration steps in [Migrating Devnet/Mainnet Archive to Berkeley Archive](/network-upgrades/berkeley/archive-migration/migrating-archive-database-to-berkeley). --- url: /network-upgrades/berkeley/archive-migration/archive-migration-prerequisites --- To successfully migrate the archive database into the Berkeley version of the Mina network, you must ensure that your environment meets the foundational requirements. ## Migration host - PostgreSQL database for database server - If you use Docker, then any of the supported OS by Mina (bullseye, focal, or buster) with at least 32 GB of RAM - Google Cloud CLI (`gcloud`), which provides the `gcloud storage` commands - (Optional) Docker in version 23.0 or later ## (Optional) Devnet/Mainnet database One of the most obvious prerequisites is a Mainnet database. If you don't have an existing database with Devnet/Mainnet archive data, you can always download it from the Google Cloud bucket. However, we strongly encourage you to perform migration on your own data to preserve the benefits of decentralization. You can use any gsutil-compatible alternative to Google Cloud or a gsutil wrapper program. ## (Optional) Google Cloud bucket with Devnet/Mainnet precomputed blocks Precomputed blocks are the JSON files that a correctly configured node updloads to the Google Cloud bucket. The Devnet/Mainnet to Berkeley archive data migration requires access to precomputed blocks that are uploaded by daemons that are connected to the Devnet or Mainnet networks. The **berkeley-migration** app uses the gsutil app to download blocks. If you didn't store precomputed blocks during the first phase of migration, you can use the precomputed blocks provided by Mina Foundation. However, it is strongly recommended that you perform migration on your own data to preserve the benefits of decentralization. For Devnet blocks: ```sh gcloud storage cp gs://mina_network_block_data/devnet-*.json . ``` For Mainnet blocks: ```sh gcloud storage cp gs://mina_network_block_data/mainnet-*.json . ``` :warning: Precomputed blocks for the Mainnet network take ~800 GB of disk space. Plan for adequate time to download these blocks. The Berkeley migration app downloads them incrementally only when needed. You can instead download a 100 GB bundle of only the canonical Mainnet blocks that unpacks into ~220 GB: ```sh gcloud storage cp gs://mina_network_block_data/mainnet-bundle-2024-03-20.tar.zst . ; tar -xf mainnet-bundle-2024-03-20.tar.zst ``` Or, without the Google Cloud CLI, over HTTPS: ```sh wget https://storage.googleapis.com/mina_network_block_data/mainnet-bundle-2024-03-20.tar.zst ; tar -xf mainnet-bundle-2024-03-20.tar.zst ``` :warning: Precomputed blocks for the Devnet network take several hundred GBs. Plan for adequate time to download these blocks. Instead, you can download a ~50 GB bundle of only the canonical Devnet blocks that unpacks into ~90 GB: ```sh gcloud storage cp gs://mina_network_block_data/devnet-bundle-3NKRsRWBzmPR8Z8ZmJb4u8FLpnSkjRitUpKZzVkHp11QuwP5i839.tar.gz . ; tar -xf devnet-bundle-3NKRsRWBzmPR8Z8ZmJb4u8FLpnSkjRitUpKZzVkHp11QuwP5i839.tar.gz ``` Or, without the Google Cloud CLI, over HTTPS: ```sh wget https://storage.googleapis.com/mina_network_block_data/devnet-bundle-3NKRsRWBzmPR8Z8ZmJb4u8FLpnSkjRitUpKZzVkHp11QuwP5i839.tar.gz ; tar -xf devnet-bundle-3NKRsRWBzmPR8Z8ZmJb4u8FLpnSkjRitUpKZzVkHp11QuwP5i839.tar.gz ``` These bundles are partial. Updated documentation with the new links and final data will be provided _after_ the Berkeley major upgrade is completed. The best practice is to collect precomputed blocks by yourself or by other third parties to preserve the benefits of decentralization. --- url: /network-upgrades/berkeley/archive-migration/debian-example --- # Debian example You can follow these steps that can be copy-pasted directly into a fresh Debian 11. This example uses an altered two-step version of the [full simplified workflow](/network-upgrades/berkeley/archive-migration/migrating-archive-database-to-berkeley#simplified-approach). If you would rather not install the Google Cloud CLI, every `gcloud storage cp gs:/// .` below can be replaced with `wget https://storage.googleapis.com//`. ```sh apt update && apt install lsb-release sudo postgresql curl wget gpg # debian:11 is surprisingly light curl https://packages.cloud.google.com/apt/doc/apt-key.gpg | sudo gpg --dearmor -o /usr/share/keyrings/cloud.google.gpg echo "deb [signed-by=/usr/share/keyrings/cloud.google.gpg] https://packages.cloud.google.com/apt cloud-sdk main" | sudo tee -a /etc/apt/sources.list.d/google-cloud-sdk.list sudo apt-get update && sudo apt-get install google-cloud-sdk sudo rm /etc/apt/sources.list.d/mina*.list sudo echo "deb [trusted=yes] http://packages.o1test.net $(lsb_release -cs) unstable" | sudo tee /etc/apt/sources.list.d/mina.list sudo apt-get update && sudo apt-get install --allow-downgrades -y mina-archive-migration=3.0.0-rc1-4277e73 mkdir -p mina-migration-workdir cd mina-migration-workdir gcloud storage cp gs://mina_network_block_data/devnet-bundle-3NKRsRWBzmPR8Z8ZmJb4u8FLpnSkjRitUpKZzVkHp11QuwP5i839.tar.gz . tar -xf devnet-bundle-3NKRsRWBzmPR8Z8ZmJb4u8FLpnSkjRitUpKZzVkHp11QuwP5i839.tar.gz wget https://raw.githubusercontent.com/MinaProtocol/mina/berkeley/src/app/archive/create_schema.sql wget https://raw.githubusercontent.com/MinaProtocol/mina/berkeley/src/app/archive/zkapp_tables.sql # this next step is required only if you don't have an archive yet createdb devnet_balances_migrated createdb devnet_really_migrated psql -d devnet_really_migrated -f create_schema.sql gcloud storage cp gs://mina-archive-dumps/devnet-archive-dump-2024-03-22_0000.sql.tar.gz . tar -xf devnet-archive-dump-2024-03-22_0000.sql.tar.gz # the next step ensures you don't accidentally merge mainnet and devnet data sed -i -e s/archive_balances_migrated/devnet_balances_migrated/g devnet-archive-dump-2024-03-22_0000.sql psql -d devnet_balances_migrated -f devnet-archive-dump-2024-03-22_0000.sql mina-berkeley-migration-script initial \ --genesis-ledger /var/lib/coda/devnet.json \ --source-db postgres:///devnet_balances_migrated \ --target-db postgres:///devnet_really_migrated \ --blocks-batch-size 100 --blocks-bucket mina_network_block_data \ --network devnet # now, do a final migration gcloud storage cp gs://mina-archive-dumps/devnet-archive-dump-2024-03-22_2050.sql.tar.gz . tar -xf devnet-archive-dump-2024-03-22_2050.sql.tar.gz # the next step ensures you don't accidentally merge mainnet and devnet data sed -i -e s/archive_balances_migrated/devnet_balances_migrated/g devnet-archive-dump-2024-03-22_2050.sql psql -d devnet_balances_migrated -f devnet-archive-dump-2024-03-22_2050.sql curl -O https://gist.githubusercontent.com/ghost-not-in-the-shell/cfe629a15702e7bae7b0c1415fe0d85e/raw/8d8bff2814c1d0c15deb70b388dea8a28a485184/genesis.json mina-berkeley-migration-script final \ --genesis-ledger /var/lib/coda/devnet.json \ --source-db postgres:///devnet_balances_migrated \ --target-db postgres:///devnet_really_migrated \ --blocks-batch-size 100 --blocks-bucket mina_network_block_data \ --network devnet \ --replayer-checkpoint migration-checkpoint-437195.json \ --fork-state-hash 3NKoUJX87VrfmNAoUdqoWUykVvt66ztm5rzruDQR7ihwYaWsdJKq \ --fork-config genesis.json \ --prefetch-blocks ``` --- url: /network-upgrades/berkeley/archive-migration/docker-example --- # Docker example You can follow these steps that can be copy-pasted directly into a OS running Docker. This example performs a Mainnet initial migration following the [debian-example](/network-upgrades/berkeley/archive-migration/debian-example) ```sh # Create a new directory for the migration data mkdir $(pwd)/mainnet-migration && cd $(pwd)/mainnet-migration # Create Network docker network create mainnet # Launch Local Postgres Database docker run --name postgres -d -p 5432:5432 --network mainnet -v $(pwd)/mainnet-migration/postgresql/data:/var/lib/postgresql/data -e POSTGRES_USER=mina -e POSTGRES_PASSWORD=minamina -d postgres:13-bullseye export PGHOST="localhost" export PGPORT=5432 export PGUSER="mina" export PGPASSWORD="minamina" # Drop DBs if they exist psql -c "DROP DATABASE IF EXISTS mainnet_balances_migrated;" psql -c "DROP DATABASE IF EXISTS mainnet_really_migrated;" # Create DBs psql -c "CREATE DATABASE mainnet_balances_migrated;" psql -c "CREATE DATABASE mainnet_really_migrated;" # Retrieve Archive Node Backup wget https://storage.googleapis.com/mina-archive-dumps/mainnet-archive-dump-2024-04-29_0000.sql.tar.gz tar -xf mainnet-archive-dump-2024-04-29_0000.sql.tar.gz # Replace the database name in the dump sed -i -e s/archive_balances_migrated/mainnet_balances_migrated/g mainnet-archive-dump-2024-04-29_0000.sql psql mainnet_balances_migrated -f mainnet-archive-dump-2024-04-29_0000.sql # Prepare target wget https://raw.githubusercontent.com/MinaProtocol/mina/berkeley/src/app/archive/create_schema.sql wget https://raw.githubusercontent.com/MinaProtocol/mina/berkeley/src/app/archive/zkapp_tables.sql psql mainnet_really_migrated -f create_schema.sql # Start migration docker create --name mainnet-db-migration \ -v $(pwd)/mainnet-migration:/data \ --network mainnet minaprotocol/mina-archive-migration:3.0.1-e848ecb-bullseye -- bash -c ' wget http://673156464838-mina-genesis-ledgers.s3-website-us-west-2.amazonaws.com/mainnet/genesis_ledger.json; mina-berkeley-migration-script initial \ --genesis-ledger genesis_ledger.json \ --source-db postgres://mina:minamina@postgres:5432/mainnet_balances_migrated \ --target-db postgres://mina:minamina@postgres:5432/mainnet_really_migrated \ --blocks-batch-size 5000 \ --blocks-bucket mina_network_block_data \ --checkpoint-output-path /data/checkpoints/. \ --precomputed-blocks-local-path /data/precomputed_blocks/. \ --network mainnet' docker start mainnet-db-migration docker logs -f mainnet-db-migration ``` --- url: /network-upgrades/berkeley/archive-migration --- # Archive Migration The Berkeley upgrade is a major upgrade that requires all nodes in a network to upgrade to a newer version. It is not backward compatible. A major upgrade occurs when there are major changes to the core protocol that require all nodes on the network to update to the latest software. ## How to prepare for the Berkeley upgrade The Berkeley upgrade requires upgrading all nodes, including archive nodes. One of the required steps is to migrate archive databases from the current Mainnet format to Berkeley. This migration requires actions and efforts from node operators and exchanges. Learn about the archive data migration: - [Understanding the migration process](/network-upgrades/berkeley/archive-migration/understanding-archive-migration) - [Prerequisites before migration](/network-upgrades/berkeley/archive-migration/archive-migration-prerequisites) - [Suggested installation procedure](/network-upgrades/berkeley/archive-migration/archive-migration-installation) - [How to perform archive migration](/network-upgrades/berkeley/archive-migration/migrating-archive-database-to-berkeley) Finally, see the shell script example that is compatible with a stock Debian 11 container: - [Worked Devnet Debian example using March 22 data](/network-upgrades/berkeley/archive-migration/debian-example) - [Worked Mainnet Docker example using April 29 data](/network-upgrades/berkeley/archive-migration/docker-example) ## What will happen with original Devnet/Mainnet data After the migration, you will have two databases: - The original Devnet/Mainnet database with small data adjustments (all pending blocks from last canoncial block until the fork block are converted to canoncial blocks) - A new Berkeley database based on Devnet/Mainnet data, but: - Without Devnet/Mainnet orphaned blocks - Without pending blocks that are not in the canonical chain - With all pending blocks on the canonical chain converted to canonical blocks There is no requirement to preserve the original Devnet/Mainnet database after migration. However, if for some reason you want to keep the Mainnet orphaned or non-canonical pending blocks, you can download the archive maintenance package for the Devnet/Mainnet database. To learn about maintaining archive data, see [Devnet/Mainnet database maintenance](/network-upgrades/berkeley/archive-migration/mainnet-database-maintenance). --- url: /network-upgrades/berkeley/archive-migration/mainnet-database-maintenance --- # Devnet/Mainnet database maintenance After the Berkeley migration, the original Devnet/Mainnet database is not required unless you are interested in preserving some aspect of the database that is lost during the migration process. Two databases exist after the successful migration: - The original Devnet/Mainnet database with small data adjustments: - All pending blocks from last canoncial block until the fork block are converted to canonical blocks - A new Berkeley database based on Devnet/Mainnet data with these differences: - Without Devnet/Mainnet orphaned blocks - Without pending blocks that are not in the canonical chain - With all pending blocks on the canonical chain converted to canonical blocks The o1Labs and Mina Foundation teams have consistently prioritized rigorous testing and the delivery of high-quality software products. However, being human entails the possibility of making mistakes. ## Known issues Recently, a few mistakes were identified while working on a version of Mina used on Mainnet. These issues were promptly addressed; however, within the decentralized environment, archive nodes can retain historical issues despite our best efforts. Fixes are available for the following known issues: - **Missing or invalid nonces** - a historical issue skewed nonces in the `balances` table. Although the issue was resolved, you might still have nonces that are missing or invalid. - **Incorrect ledger hashes** - a historical issue with the same root cause as 'Missing or invalid nonces'. However, the outcome is that a 'replayer run' operation of validating archive node against daemon ledger shows ledger mismatches and cannot pass problematic blocks. - **Missing blocks** - This recurring missing blocks issue consistently poses challenges and is a source of concern for all archive node operators. This persistent challenge from disruptions in daemon node operations can potentially lead to incomplete block reception by archive nodes. This situation can compromise chain continuity within the archive database. To address these issues, install and use the special archive node maintenance package that includes fixes. ## Installing the archive node maintenance package The package provides support for codenames: - bullseye - buster - focal The following steps describe only the bullseye package installation. Modify the steps as appropriate for your environment. ### Debian packages To get the Debian package: ```sh CODENAME=bullseye CHANNEL=stable VERSION=1.4.1 echo "deb [trusted=yes] http://packages.o1test.net $CODENAME $CHANNEL" | tee /etc/apt/sources.list.d/mina.list apt-get update apt-get install --allow-downgrades -y "mina-archive-maintenance=$VERSION" ``` ### Docker image To get the Docker image: ```sh docker pull minaprotocol/mina-archive-maintenance:1.4.1-060f0a5-bullseye ``` ## Usage for missing or invalid nonces The replayer application was developed to verify the Devnet/Mainnet archive data. You must run the replayer application against your existing Devnet/Mainnet database to verify the blockchain state. To run the replayer application: ```sh mina-replayer \ --archive-uri {db_connection_string} \ --input-file reference_replayer_input.json \ --output-file replayer_input_file.json \ --checkpoint-interval 10000 \ --fix-nonces \ --set-nonces \ --dump-repair-script ``` where: - `archive-uri` - connection string to the archive database - `input-file` - JSON file that holds the archive database - `output-file` - JSON file that will hold the ledger with auxiliary information, like global slot and blockchain height, which will be dumped on the last block - `checkpoint-interval` - frequency of checkpoints expressed in blocks count - `replayer_input_file.json` - JSON file constructed from the Devnet/Mainnet genesis ledger: ```sh jq '.ledger.accounts' genesis_ledger.json | jq '{genesis_ledger: {accounts: .}}' > replayer_input_config.json ``` - `--fix-nonces` - adjust nonces values while replaying transactions - `--set-nonces` - set missing nonces while replaying transactions - `--dump-repair-script` - path to the output SQL script that will contain all updates to nonces made during the replayer run that can be directly applied to other database instances that contain the same data with invalid nonces Running a replayer from scratch on a Devnet/Mainnet database can take up to a couple of days. The recommended best practice is to break the replayer into smaller parts by using the checkpoint capabilities of the replayer. Additionally, running the replayer can exert significant demands on system resources that potentially affect the performance of the archive node. Because of the large resource requirements, we recommend that you execute the replayer in isolation from network connections, preferably within an isolated environment where the Devnet/Mainnet dumps can be imported. ## Bad ledger hashes There is no ultimate fix for this issue because preserving historical ledger hashes is essential to the overall security of the Mina network. Even with this issue, you can validate archive data integrity. The replayer application has a built-in mechanism to skip errors when the `--continue-on-error` flag is enabled. However, instead of skipping only blocks with bad ledger hashes, this mode skipped all of the problems with integrity. With the new archive node maintenance package, you can run the replayer application without a special flag and to correctly handle the bad ledger hashes issue. To run replayer: ```sh mina-replayer --archive-uri {db_connection_string} --input-file reference_replayer_input.json --output-file reference_replayer_output.json --checkpoint-interval 10000 ``` where: - `archive-uri` - connection string to the archive database - `input-file` - JSON file that holds the archive database - `output-file` - JSON file that will hold the ledger with auxiliary information, like global slot and blockchain height, which will be dumped on the last block - `checkpoint-interval` - frequency of checkpoints expressed in blocks count - `replayer_input_file.json` - JSON file constructed from the Devnet/Mainnet genesis ledger: ``` jq '.ledger.accounts' genesis_ledger.json | jq '{genesis_ledger: {accounts: .}}' > replayer_input_config.json ``` :warning: Running a replayer from scratch on a Devnet/Mainnet database can take up to a couple of days. The recommended best practice is to break the replayer into smaller parts by using the checkpoint capabilities of the replayer. :warning: You must run the replayer using the Mainnet version. You can run it from the Docker image at `minaprotocol/mina-archive:3.1.0-ae112d3-bullseye`. ## Missing blocks The daemon node unavailability can cause the archive node to miss some of the blocks. This recurring missing blocks issue consistently poses challenges. To address this issue, you can reapply missing blocks. If you uploaded the missing blocks to Google Cloud, the missing blocks can be reapplied from precomputed blocks to preserve chain continuity. 1. To automatically verify and patch missing blocks, use the [download-missing-blocks.sh](https://github.com/MinaProtocol/mina/blob/berkeley/scripts/archive/download-missing-blocks.sh) script. The `download-missing-blocks` script uses `localhost` as the database host so the script assumes that psql is running on localhost on port 5432. Modify `PG_CONN` in `download_missing_block.sh` for your environment. 1. Install the required `mina-archive-blocks` and `mina-missing-blocks-auditor` scripts that are packed in the `minaprotocol/mina-archive:3.1.0-ae112d3-bullseye` Docker image. 1. Export the `BLOCKS_BUCKET`: ```sh export BLOCKS_BUCKET="https://storage.googleapis.com/my_bucket_with_precomputed_blocks" ``` 1. Run the `mina-missing-blocks-auditor` script from the database host: For Devnet: ```sh download-missing-blocks.sh devnet {db_user} {db_password} ``` For Mainnet: ```sh download-missing-blocks.sh mainnet {db_user} {db_password} ``` ### Using precomputed blocks from O1labs bucket O1labs maintains a Google bucket containing precomputed blocks from Devnet and Mainnet, accessible at https://storage.googleapis.com/mina_network_block_data/. Note: It's important to highlight that precomputed blocks for **Devnet** between heights `2` and `1582` have missing fields or incorrect transaction data. Utilizing these blocks to patch your Devnet archive database will result in failure. For those who rely on precomputed blocks from this bucket, please follow the outlined steps: 1. Download additional blocks from `gs://mina_network_block_data/devnet-extensional-bundle.tar.gz`. 2. Install the necessary `mina-archive-blocks` script contained within the `minaprotocol/mina-archive:3.1.0-ae112d3-bullseye` Docker image. 3. Execute mina-archive-blocks to import the extracted blocks from step 1 using the provided command: ```sh mina-archive-blocks --archive-uri --extensional ./extensional/* ``` 4. Proceed with patching your Devnet database with blocks having heights other than `2` to `1582` using the available precomputed blocks. ## Next steps Now that you have completed the steps to properly maintain the correctness of the archive database, you are ready to perform the archive [migration process](/network-upgrades/berkeley/archive-migration/migrating-archive-database-to-berkeley). --- url: /network-upgrades/berkeley/archive-migration/migrating-archive-database-to-berkeley --- # Migrating Devnet/Mainnet Archive to Berkeley Archive Before you start the process to migrate your archive database from the current Mainnet or Devnet format to Berkeley, be sure that you: - [Understand the Archive Migration](/network-upgrades/berkeley/archive-migration/understanding-archive-migration) - Meet the foundational requirements in [Archive migration prerequisites](/network-upgrades/berkeley/archive-migration/archive-migration-prerequisites) - Have successfully installed the [archive migration package](/network-upgrades/berkeley/archive-migration/archive-migration-installation) ## Migration process The Devnet/Mainnet migration can take up to a couple of days. Therefore, you can achieve a successful migration by using three stages: - **Stage 1:** Initial migration - **Stage 2:** Incremental migration - **Stage 3:** Remainder migration Each stage has three migration phases: - **Phase 1:** Copying data and precomputed blocks from Devnet/Mainnet database using the **berkeley_migration** app. - **Phase 2:** Populating new Berkeley tables using the **replayer app in migration mode** - **Phase 3:** Additional validation for migrated database Review these phases and stages before you start the migration. ## Simplified approach For convenience, use the `mina-berkeley-migration-script` app if you do not need to delve into the details of migration or if your environment does not require a special approach to migration. ### Stage 1: Initial migration ``` mina-berkeley-migration-script \ initial \ --genesis-ledger ledger.json \ --source-db postgres://postgres:postgres@localhost:5432/source \ --target-db postgres://postgres:postgres@localhost:5432/migrated \ --blocks-bucket mina_network_block_data \ --blocks-batch-size 500 \ --checkpoint-interval 10000 \ --checkpoint-output-path . \ --precomputed-blocks-local-path . \ --network NETWORK ``` where: `-g | --genesis-ledger`: path to the genesis ledger file `-s | --source-db`: connection string to the database to be migrated `-t | --target-db`: connection string to the database that will hold the migrated data `-b | --blocks-bucket`: name of the precomputed blocks bucket. Precomputed blocks are assumed to be named with format: `{network}-{height}-{state_hash}.json` `-bs | --blocks-batch-size`: number of precomputed blocks to be fetched at one time from Google Cloud. A larger number, like 1000, can help speed up the migration process. `-n | --network`: network name (`devnet` or `mainnet`) when determining precomputed blocks. Precomputed blocks are assumed to be named with format: `{network}-{height}-{state_hash}.json`. `-c | --checkpoint-output-path`: path to folder for replayer checkpoint files `-i | --checkpoint-interval`: frequency of dumping checkpoint expressed in blocks count `-l | --precomputed-blocks-local-path`: path to folder for on-disk precomputed blocks location The command output is the `migration-replayer-XXX.json` file required for the next run. ### Stage 2: Incremental migration ``` mina-berkeley-migration-script \ incremental \ --genesis-ledger ledger.json \ --source-db postgres://postgres:postgres@localhost:5432/source \ --target-db postgres://postgres:postgres@localhost:5432/migrated \ --blocks-bucket mina_network_block_data \ --blocks-batch-size 500 \ --network NETWORK \ --checkpoint-output-path . \ --checkpoint-interval 10000 \ --precomputed-blocks-local-path . \ --replayer-checkpoint migration-checkpoint-XXX.json ``` where: `-g | --genesis-ledger`: path to the genesis ledger file `-s | --source-db`: connection string to the database to be migrated `-t | --target-db`: connection string to the database that will hold the migrated data `-b | --blocks-bucket`: name of the precomputed blocks bucket. Precomputed blocks are assumed to be named with format: `{network}-{height}-{state_hash}.json` `-bs | --blocks-batch-size`: number of precomputed blocks to be fetched at one time from Google Cloud. A larger number, like 1000, can help speed up migration process. `-n | --network`: network name (`devnet` or `mainnet`) when determining precomputed blocks. Precomputed blocks are assumed to be named with format: `{network}-{height}-{state_hash}.json`. `-r | --replayer-checkpoint`: path to the latest checkpoint file `migration-checkpoint-XXX.json` `-c | --checkpoint-output-path`: path to folder for replayer checkpoint files `-i | --checkpoint-interval`: frequency of dumping checkpoint expressed in blocks count `-l | --precomputed-blocks-local-path`: path to folder for on-disk precomputed blocks location ### Stage 3: Remainder migration ``` mina-berkeley-migration-script \ final \ --genesis-ledger ledger.json \ --source-db postgres://postgres:postgres@localhost:5432/source \ --target-db postgres://postgres:postgres@localhost:5432/migrated \ --blocks-bucket mina_network_block_data \ --blocks-batch-size 500 \ --network NETWORK \ --checkpoint-output-path . \ --checkpoint-interval 10000 \ --precomputed-blocks-local-path . \ --replayer-checkpoint migration-checkpoint-XXX.json \ -fc fork-genesis-config.json ``` where: `-g | --genesis-ledger`: path to the genesis ledger file `-s | --source-db`: connection string to the database to be migrated `-t | --target-db`: connection string to the database that will hold the migrated data `-b | --blocks-bucket`: name of the precomputed blocks bucket. Precomputed blocks are assumed to be named with format: `{network}-{height}-{state_hash}.json` `-bs | --blocks-batch-size`: number of precomputed blocks to be fetched at one time from Google Cloud. A larger number, like 1000, can help speed up the migration process. `-n | --network`: network name (`devnet` or `mainnet`) when determining precomputed blocks. Precomputed blocks are assumed to be named with format: `{network}-{height}-{state_hash}.json`. `-r | --replayer-checkpoint`: path to the latest checkpoint file `migration-checkpoint-XXX.json` `-c | --checkpoint-output-path`: path to folder for replayer checkpoint files `-i | --checkpoint-interval`: frequency of dumping checkpoint expressed in blocks count `-l | --precomputed-blocks-local-path`: path to folder for on-disk precomputed blocks location `-fc | --fork-config`: fork genesis config file is the new genesis config that is distributed with the new daemon and is published after the fork block is announced ## Advanced approach If the simplified berkeley migration script is, for some reason, not suitable for you, it is possible to run the migration using the **berkeley_migration** and **replayer** apps without an interface the script provides. ### Stage 1: Initial migration This first stage requires only the initial Berkeley schema, which is the foundation for the next migration stage. This schema populates the migrated database and creates an initial checkpoint for further incremental migration. - Inputs - Unmigrated Devnet/Mainnet database - Devnet/Mainnet genesis ledger - Empty target Berkeley database with the schema created, but without any content - Outputs - Migrated Devnet/Mainnet database to the Berkeley format from genesis up to the last canonical block in the original database - Replayer checkpoint that can be used for incremental migration #### Phase 1: Berkeley migration app run ``` mina-berkeley-migration \ --batch-size 1000 \ --config-file ledger.json \ --mainnet-archive-uri postgres://postgres:postgres@localhost:5432/source \ --migrated-archive-uri postgres://postgres:postgres@localhost:5432/migrated \ --blocks-bucket mina_network_block_data \ --precomputed-blocks-local-path . \ --keep-precomputed-blocks \ --network NETWORK ``` where: `--batch-size`: number of precomputed blocks to be fetched at one time from Google Cloud. A larger number, like 1000, can help speed up migration process. `--config-file`: path to the genesis ledger file `--mainnet-archive-uri`: connection string to the database to be migrated `--migrated-archive-uri`: connection string to the database that will hold the migrated data `--blocks-bucket`: name of the precomputed blocks bucket. Precomputed blocks are assumed to be named with format: `{network}-{height}-{state_hash}.json` `--precomputed-blocks-local-path`: path to folder for on-disk precomputed blocks location `--keep-precomputed-blocks`: keep the precomputed blocks on-disk after the migration is complete `--network`: the network name (`devnet` or `mainnet`) when determining precomputed blocks. Precomputed blocks are assumed to be named with format: `{network}-{height}-{state_hash}.json` #### Phase 2: Replayer in migration mode run Replayer config must contain the Devnet/Mainnet ledger as the starting point. So first, you must prepare the replayer config file: ``` jq '.ledger.accounts' genesis_ledger.json | jq '{genesis_ledger: {accounts: .}}' > replayer_input_config.json ``` where: `genesis_ledger.json` is the genesis file from a daemon bootstrap on a particular network Then: ``` mina-migration-replayer \ --migration-mode \ --archive-uri postgres://postgres:postgres@localhost:5432/migrated \ --input-file replayer_input_config.json \ --checkpoint-interval 10000 \ --checkpoint-output-folder . ``` where: `--migration-mode`: flag for migration `--archive-uri`: connection string to the database that will hold the migrated data `--input-file`: path to the replayer input file, see below on how's created `replayer_input_config.json`: is a file constructed out of network genesis ledger: ``` jq '.ledger.accounts' genesis_ledger.json | jq '{genesis_ledger: {accounts: .}}' > replayer_input_config.json ``` `--checkpoint-interval`: frequency of checkpoints file expressed in blocks count `--checkpoint-output-folder`: path to folder for replayer checkpoint files #### Phase 3: Validations Use the **berkeley_migration_verifier** app to perform checks for both the fully migrated and partially migrated databases. ``` mina-berkeley-migration-verifier \ pre-fork \ --mainnet-archive-uri postgres://postgres:postgres@localhost:5432/source \ --migrated-archive-uri postgres://postgres:postgres@localhost:5432/migrated ``` where: `--mainnet-archive-uri`: connection string to the database to be migrated `--migrated-archive-uri`: connection string to the database that will hold the migrated data ### Stage 2: Incremental migration After the initial migration, the data is migrated data up to the last canonical block. However, Devnet/Mainnet data is progressing with new blocks that must also be migrated again and again until the fork block is announced. :::info Incremental migration can, and probably must, be repeated a couple of times until the fork block is announced by Mina Foundation. Run the incremental migration multiple times with the latest Devnet/Mainnet database and the latest replayer checkpoint file. ::: - Inputs - Latest Devnet/Mainnet database - Devnet/Mainnet genesis ledger - Replayer checkpoint from last run - Migrated berkeley database from initial migration - Outputs - Migrated Devnet/Mainnet database to the Berkeley format up to the last canonical block - Replayer checkpoint which can be used for the next incremental migration ### Phase 1: Berkeley migration app run ``` mina-berkeley-migration \ --batch-size 1000 \ --config-file ledger.json \ --mainnet-archive-uri postgres://postgres:postgres@localhost:5432/source \ --migrated-archive-uri postgres://postgres:postgres@localhost:5432/migrated \ --blocks-bucket mina_network_block_data \ --precomputed-blocks-local-path . \ --keep-precomputed-blocks \ --network NETWORK ``` where: `--batch-size`: number of precomputed blocks to be fetched at one time from Google Cloud. A larger number, like 1000, can help speed up migration process. `--config-file`: path to the genesis ledger file `--mainnet-archive-uri`: connection string to the database to be migrated `--migrated-archive-uri`: connection string to the database that will hold the migrated data `--blocks-bucket`: name of the precomputed blocks bucket. Precomputed blocks are assumed to be named with format: `{network}-{height}-{state_hash}.json` `--precomputed-blocks-local-path`: path to folder for on-disk precomputed blocks location `--keep-precomputed-blocks`: keep the precomputed blocks on-disk after the migration is complete `--network`: the network name (`devnet` or `mainnet`) when determining precomputed blocks. Precomputed blocks are assumed to be named with format: `{network}-{height}-{state_hash}.json` #### Phase 2: Replayer in migration mode run ``` mina-migration-replayer \ --migration-mode \ --archive-uri postgres://postgres:postgres@localhost:5432/migrated \ --input-file replayer-checkpoint-XXX.json \ --checkpoint-interval 10000 \ --checkpoint-output-folder . ``` where: `--migration-mode`: flag for migration `--archive-uri`: connection string to the database that will hold the migrated data `--input-file`: path to the latest checkpoint file `replayer-checkpoint-XXX.json` `replayer-checkpoint-XXX.json`: the latest checkpoint generated from the previous migration `--checkpoint-interval`: frequency of checkpoints file expressed in blocks count `--checkpoint-output-folder`: path to folder for replayer checkpoint files Incremental migration can be run continuously on top of the initial migration or last incremental until the fork block is announced. #### Phase 3: Validations Use the **berkeley_migration_verifier** app to perform checks for both the fully migrated and partially migrated database. ``` mina-berkeley-migration-verifier \ pre-fork \ --mainnet-archive-uri postgres://postgres:postgres@localhost:5432/source \ --migrated-archive-uri postgres://postgres:postgres@localhost:5432/migrated ``` where: `--mainnet-archive-uri`: connection string to the database to be migrated `--migrated-archive-uri`: connection string to the database that will hold the migrated data Note that: you can run incremental migration continuously on top of the initial migration or the last incremental until the fork block is announced. ### Stage 3: Remainder migration When the fork block is announced, you must tackle the remainder migration. This is the last migration run you need to perform. In this stage, you close the migration cycle with the last migration of the remainder blocks between the current last canonical block and the fork block (which can be pending, so you don't need to wait 290 blocks until it would become canonical). You must use `--fork-state-hash` as an additional parameter to the **berkeley-migration** app. - Inputs - Latest Devnet/Mainnet database - Devnet/Mainnet genesis ledger - Replayer checkpoint from last run - Migrated Berkeley database from last run - Fork block state hash - Outputs - Migrated devnet/mainnet database to berkeley up to fork point - Replayer checkpoint which can be used for the next incremental migration :::info The migrated database output from this stage of the final migration is required to initialize your archive nodes on the upgraded network. ::: #### Phase 1: Berkeley migration app run ``` mina-berkeley-migration \ --batch-size 1000 \ --config-file ledger.json \ --mainnet-archive-uri postgres://postgres:postgres@localhost:5432/source \ --migrated-archive-uri postgres://postgres:postgres@localhost:5432/migrated \ --blocks-bucket mina_network_block_data \ --precomputed-blocks-local-path \ --keep-precomputed-blocks \ --network NETWORK \ --fork-state-hash {fork-state-hash} ``` where: `--batch-size`: number of precomputed blocks to be fetched at one time from Google Cloud. A larger number, like 1000, can help speed up migration process. `--config-file`: path to the genesis ledger file `--mainnet-archive-uri`: connection string to the database to be migrated `--migrated-archive-uri`: connection string to the database that will hold the migrated data `--blocks-bucket`: name of the precomputed blocks bucket. Precomputed blocks are assumed to be named with format: `{network}-{height}-{state_hash}.json` `--precomputed-blocks-local-path`: path to folder for on-disk precomputed blocks location `--keep-precomputed-blocks`: keep the precomputed blocks on-disk after the migration is complete `--network`: the network name (`devnet` or `mainnet`) when determining precomputed blocks. Precomputed blocks are assumed to be named with format: `{network}-{height}-{state_hash}.json` `--fork-state-hash`: fork state hash :::info When you run the **berkeley-migration** app with fork-state-hash, there is no requirement for the fork state block to be canonical. The tool automatically converts all pending blocks in the subchain, including the fork block, to canonical blocks. ::: #### Phase 2: Replayer in migration mode run ``` mina-migration-replayer \ --migration-mode \ --archive-uri postgres://postgres:postgres@localhost:5432/migrated \ --input-file replayer-checkpoint-XXX.json \ --checkpoint-interval 10000 \ --checkpoint-output-folder . ``` where: `--migration-mode`: flag for migration `--archive-uri`: connection string to the database that will hold the migrated data `--input-file`: path to the latest checkpoint file `replayer-checkpoint-XXX.json` from stage 1 `replayer-checkpoint-XXX.json`: the latest checkpoint generated from the previous migration `--checkpoint-interval`: frequency of checkpoints file expressed in blocks count `--checkpoint-output-folder`: path to folder for replayer checkpoint files #### Phase 3: Validations Use the **berkeley_migration_verifier** app to perform checks for both the fully migrated and partially migrated databases. ``` mina-berkeley-migration-verifier \ post-fork \ --mainnet-archive-uri postgres://postgres:postgres@localhost:5432/source \ --migrated-archive-uri postgres://postgres:postgres@localhost:5432/migrated \ --fork-config-file fork_genesis_config.json \ --migrated-replayer-output replayer-checkpoint-XXXX.json ``` where: `--mainnet-archive-uri`: connection string to the database to be migrated `--migrated-archive-uri`: connection string to the database that will hold the migrated data `--migrated-replayer-output`: path to the latest checkpoint file `replayer-checkpoint-XXX.json` `--fork-config`: fork genesis config file is the new genesis config that is distributed with the new daemon and is published after the fork block is announced ### Example migration steps using Mina Foundation data for Devnet using Debian See: [Worked example using March 22 data](/network-upgrades/berkeley/archive-migration/debian-example) ### Example migration steps using Mina Foundation data for Mainnet using Docker See: [Worked example using March 22 data](/network-upgrades/berkeley/archive-migration/docker-example) ## How to verify a successful migration o1Labs and Mina Foundation make every effort to provide reliable tools of high quality. However, it is not possible to eliminate all errors and test all possible Mainnet archive variations. All important checks are implemented in the `mina-berkeley-migration-verifier` application. However, you can use the following checklist if you want to perform the checks manually: 1. All transaction (user command and internal command) hashes are left intact. Verify that the `user_command` and `internal_command` tables have the Devnet/Mainnet format of hashes. For example, `CkpZirFuoLVV...`. 2. Parent-child block relationship is preserved Verify that a given block in the migrated archive has the same parent in the Devnet/Mainnet archive (`state_hash` and `parent_hash` columns) that was used as input. 3. Account balances remain the same Verify the same balance exists for a given block in Mainnet and the migrated databases. ## Tips and tricks We are aware that the migration process can be very long (a couple of days). Therefore, we encourage you to use cron jobs that migrate data incrementally. The cron job requires access to Google Cloud buckets (or other storage): - A bucket to store migrated-so-far database dumps - A bucket to store checkpoint files We are tightly coupled with Google Cloud infrastructure due to the precomputed block upload mechanism. This is why we are using also buckets for storing dumps and checkpoint. However, you do not have to use Google Cloud for other things than precomputed blocks. With configuration, you can use any gsutil-compatible storage backend (for example, S3). Before running the cron job, upload an initial database dump and an initial checkpoint file. To create the files, run these steps locally: 1. Download a Devnet/Mainnet archive dump and load it into PostgreSQL. 2. Create an empty database using the new archive schema. 3. Run the **berkeley-migration** app against the Devnet/Mainnet and new databases. 4. Run the **replayer app in migration mode** with the `--checkpoint-interval` set to a suitable value (perhaps 100) and start with the original Devnet/Mainnet ledger in the input file. 5. Use pg_dump to dump the migrated database and upload it. 6. Upload the most recent checkpoint file. The cron job performs the same steps in an automated fashion: 1. Pulls the latest Devnet/Mainnet archive dump and loads it into PostgresQL. 2. Pulls the latest migrated database and loads it into PostgreSQL. 3. Pulls the latest checkpoint file. 4. Runs the **berkeley-migration** app against the two databases. 5. Runs the **replayer app in migration mode** using the downloaded checkpoint file; set the checkpoint interval to be smaller (perhaps 50) because there are typically only 200 or so blocks in a day. 7. Uploads the migrated database. 8. Uploads the most recent checkpoint file. Be sure to monitor the cron job for errors. Just before the Berkeley upgrade, migrate the last few blocks by running locally: 1. Download the Devnet/Mainnet archive data directly from the k8s PostgreSQL node (not from the archive dump), and load it into PostgreSQL. 2. Download the most recent migrated database and load it into PostgresQL. 3. Download the most recent checkpoint file. 4. Run the **berkeley-migration** app against the two databases. 5. Run the **replayer app in migration mode** using the most recent checkpoint file. It is worthwhile to perform these last steps as a dry run to make sure all goes well. You can run these steps as many times as needed. ## Known migration problems Please remember that rerunning after crash is always possible. After solving any of below issues you can rerun process and migration will continue form last position #### Async was unable to add a file descriptor to its table of open file descriptors For example: ``` ("Async was unable to add a file descriptor to its table of open file descriptors" (file_descr 18) (error "Attempt to register a file descriptor with Async that Async believes it is already managing.") (backtrace ...... ``` A remedy is to lower `--block-batch-size` parameter to values up to 500. #### Map.find_exn: not found For example: ``` (monitor.ml.Error (Not_found_s ("Map.find_exn: not found" .... ``` Usually this error means that there is a gap in canonical chain. In order to fix it please ensure that missing-block-auditor run is successful #### Yojson.Json_error .. Unexpected end of input For example: ``` (monitor.ml.Error ("Yojson.Json_error(\"Line 1, bytes 1003519-1003520:\\nUnexpected end of input\")") ("Raised at Yojson.json_error in file \"common.ml\", line 5, characters 19-39" "Called from Yojson.Safe.__ocaml_lex_read_json_rec in file \"lib/read.mll\", line 215, characters 28-52" ... ``` This issue is caused by invalid precomputed block. Deleting the downloaded precomputed blocks should resolve this issue. #### Error querying db, error: Request to ... failed: ERROR: column \"type\" does not exist You provided the migrated schema as source one when invoking script or berkeley-migration app #### Poor performance of migration when accessing remote database We conducted migration tests with both a local database and a distant database (RDS). The migration using the local database appears to process significantly faster. We strongly suggest to use offline database installed locally #### ERROR: out of shared memory ``` (monitor.ml.Error (Failure "Error querying for user commands with id 1686617, error Request to postgresql://user:pwd@host:port/db failed: ERROR: out of shared memory \nHINT: You might need to increase max_pred_locks_per_transaction ``` Solution is either to increase `max_pred_locks_per_transaction` setting in postgres database. Alternative is to isolate database from mainnet traffic (for example by exporting dump from live database and import it on isolated environment) #### Berkeley migration app is consuming all of my resources When running a full migration, you can stumble on memory leaks that prevent you from cleanly performing the migration in one pass. A machine with 64 GB of RAM can be frozen after ~40k migrated blocks. Each 200 blocks inserted into the database increases the memory leak by 4-10 MB. A potential workaround is to split the migration into smaller parts using cron jobs or automation scripts. ## FAQ ### Migrated database is missing orphaned blocks By design, Berkeley migration omits orphaned blocks and, by default, migrates only canonical (and pending, if setup correctly) blocks. ### Replayer in migration mode overrides my old checkpoints By default, the replayer dumps the checkpoint to the current folder. All checkpoint files have a similar format: `replayer-checkpoint-{number}.json.` To prevent override of old checkpoints, use the `--checkpoint-output-folder` and `--checkpoint-file-prefix` parameters to modify the output folder and prefix. --- url: /network-upgrades/berkeley/archive-migration/understanding-archive-migration --- # Understanding the Archive Migration You can reduce risks and effort by reading all of the archive documentation in entirety. ## Archive node migration overview Archive node migration is a crucial part of the Berkeley upgrade. The current Devnet and Mainnet database format must be converted to the Berkeley format to preserve historical data and assure archive node chain continuity. For this purpose, the o1Labs and Mina Foundation teams prepared a migration package. ### Archive node Berkeley migration package This package contains the required applications to migrate existing Devnet and Mainnet databases into the new Berkeley schema and a usability script: 1. **berkeley-migration** Use the **berkeley-migration** app to migrate as much data as possible from the Devnet/Mainnet database and download precomputed blocks to get the window density data. This app runs against the Devnet/Mainnet database and the new Berkeley database. 2. **replayer app in migration mode** The existing replayer application is enhanced with a new migration mode. Use the **replayer app in migration mode** to analyze the transactions in the partially migrated database (resulting from running berkeley-migration app) and populate the `accounts_accessed` and `accounts_created` tables. This app also does the checks performed by the standard replayer, but does not check ledger hashes because the Berkeley ledger has greater depth that results in different hashes. This app runs only against the new archive database. 3. **berkeley-migration-verifier** Use the **berkeley-migration-verifier** verification software to determine if the migration (even incomplete) was successful. The app uses SQL validations on the migrated database. 4. **end-to-end migration script** This shell script wraps all phases and stages of migration into a single script. It is provided purely for node operators usability and is equivalent of running the **berkely-migration** app, the **replayer app in migration mode**, and the **berkeley-migration-verifier** apps in the correct order. ### Incrementality Use the **berkeley-migration** and **replayer** apps incrementally so that you can migrate part of the Devnet/Mainnet database, and, as new blocks are added to the Devnet/Mainnet databases, the new data can be migrated. To obtain that incrementality, the **berkeley-migration** app looks at the migrated database and determines the most recent migrated block. It continues migration starting at the next block in the Devnet/Mainnet data. The **replayer app in migration mode** uses the checkpoint mechanism already in place for the replayer. A checkpoint file indicates the global slot since genesis for starting the replay and the ledger to use for that replay. New checkpoint files are written as it proceeds. To take advantage of the incrementality, run a cron job that migrates a day's worth of data at a time (or some other interval). With the cron job in place, at the time of the actual Berkeley upgrade, you will need to migrate only a small amount of data. --- url: /network-upgrades/berkeley/flags-configs --- # Post-Upgrade Flags and Configurations for Mainnet Please refer to the Berkeley node release notes [here](https://github.com/MinaProtocol/mina/releases/tag/3.0.3). ### Network details ``` Chain ID a7351abc7ddf2ea92d1b38cc8e636c271c1dfd2c081c637f62ebc2af34eb7cc1 Git SHA-1 ae112d3a96fe71b4ccccf3c54e7b7494db4898a4 Seed List https://bootnodes.minaprotocol.com/networks/mainnet.txt Node build https://github.com/MinaProtocol/mina/releases/tag/3.0.3 ``` ### Block Producer's Start your node post-upgrade in Mainnet with the flags and environment variables listed below. ``` mina daemon --block-producer-key --config-directory --file-log-rotations 500 --generate-genesis-proof true --libp2p-keypair --log-json --peer-list-url https://bootnodes.minaprotocol.com/networks/mainnet.txt ENVIRONMENT VARIABLES RAYON_NUM_THREADS=6 MINA_LIBP2P_PASS MINA_PRIVKEY_PASS ``` ### SNARK Coordinator Configure your node post-upgrade in Mainnet with specific flags and environment variables as listed. ``` mina daemon --config-directory --enable-peer-exchange true --file-log-rotations 500 --libp2p-keypair --log-json --peer-list-url https://bootnodes.minaprotocol.com/networks/mainnet.txt --run-snark-coordinator --snark-worker-fee 0.001 --work-selection [seq|rand|roffset] ENVIRONMENT VARIABLES MINA_LIBP2P_PASS ``` ### SNARK Workers Connect to a SNARK Coordinator node if required and run the following flags. ``` mina internal snark-worker --proof-level full --shutdown-on-disconnect false --daemon-address ENVIRONMENT VARIABLES RAYON_NUM_THREADS:8 ``` ### Archive Node Running an Archive Node involves setting up a non-block-producing node and a PostgreSQL database configured with specific flags and environment variables. For more information about running archive nodes, see [Archive Node](/node-operators/archive-node). The PostgreSQL database requires two schemas: 1. The PostgreSQL schema used by the Mina archive database: in the [release notes](https://github.com/MinaProtocol/mina/releases/tag/3.0.3) 2. The PostgreSQL schema extensions to support zkApp commands: in the [release notes](https://github.com/MinaProtocol/mina/releases/tag/3.0.3) The non-block-producing node must be configured with the following flags: ``` mina daemon --archive-address : --config-directory --enable-peer-exchange true --file-log-rotations 500 --generate-genesis-proof true --libp2p-keypair --log-json --peer-list-url https://bootnodes.minaprotocol.com/networks/mainnet.txt ENVIRONMENT VARIABLES MINA_LIBP2P_PASS ``` This non-block-producing node connects to the archive node with the addresses and port specified in the `--archive-address` flag. The **archive node** command looks like this: ``` mina-archive run --metrics-port --postgres-uri postgres://:@
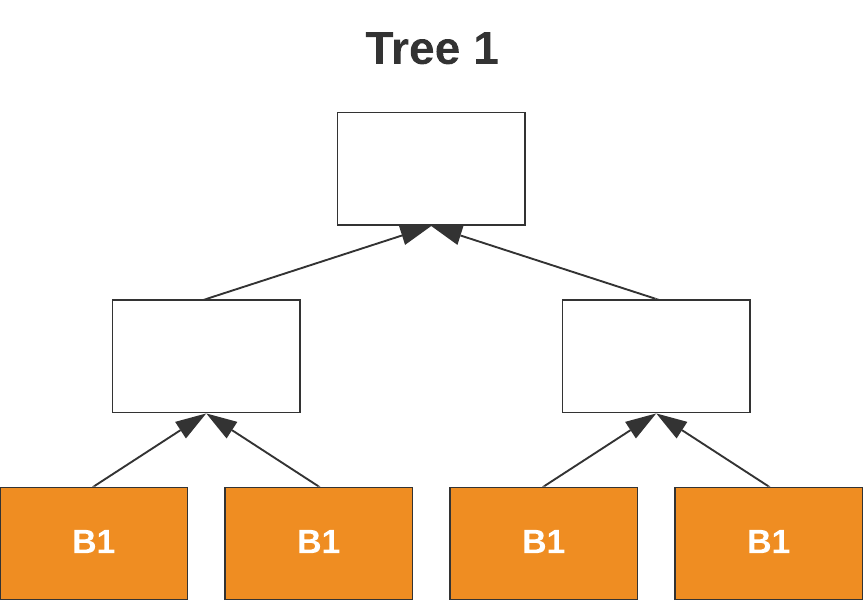
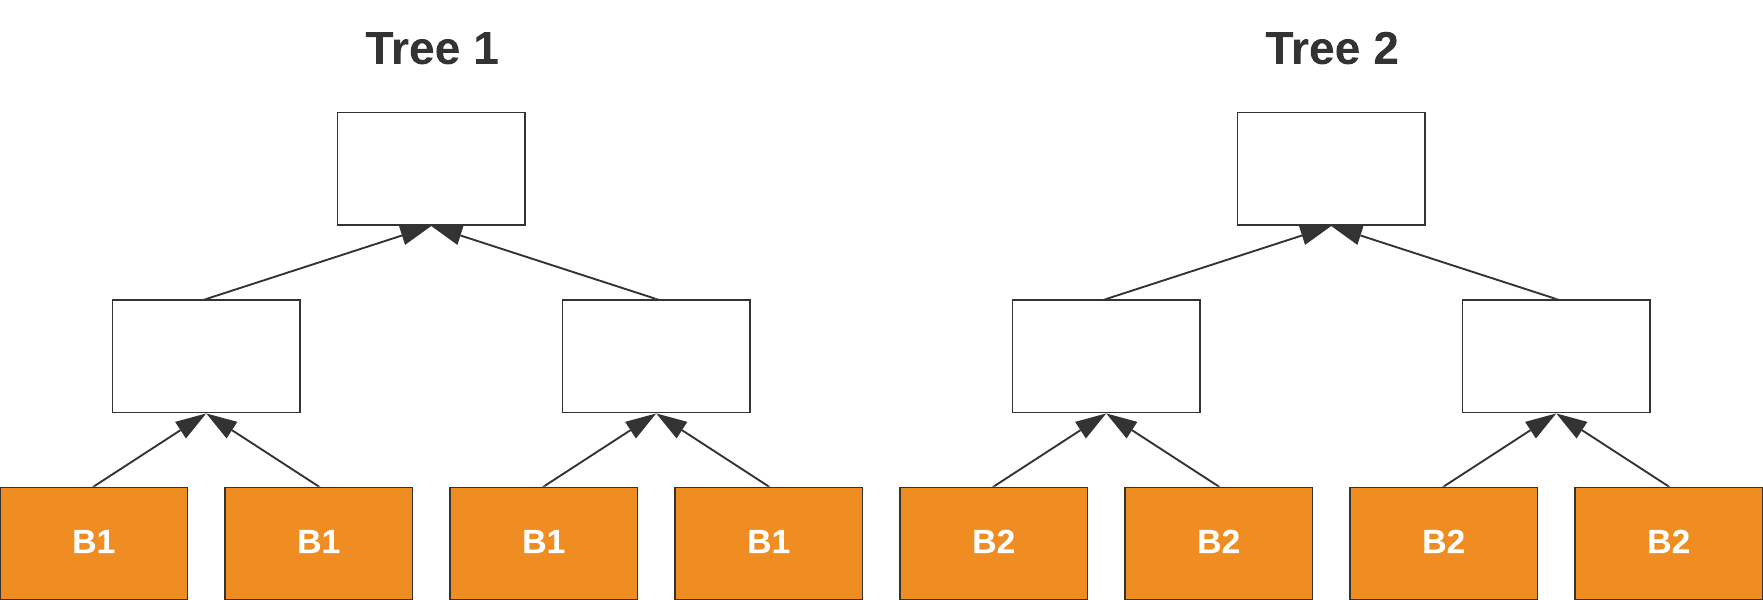
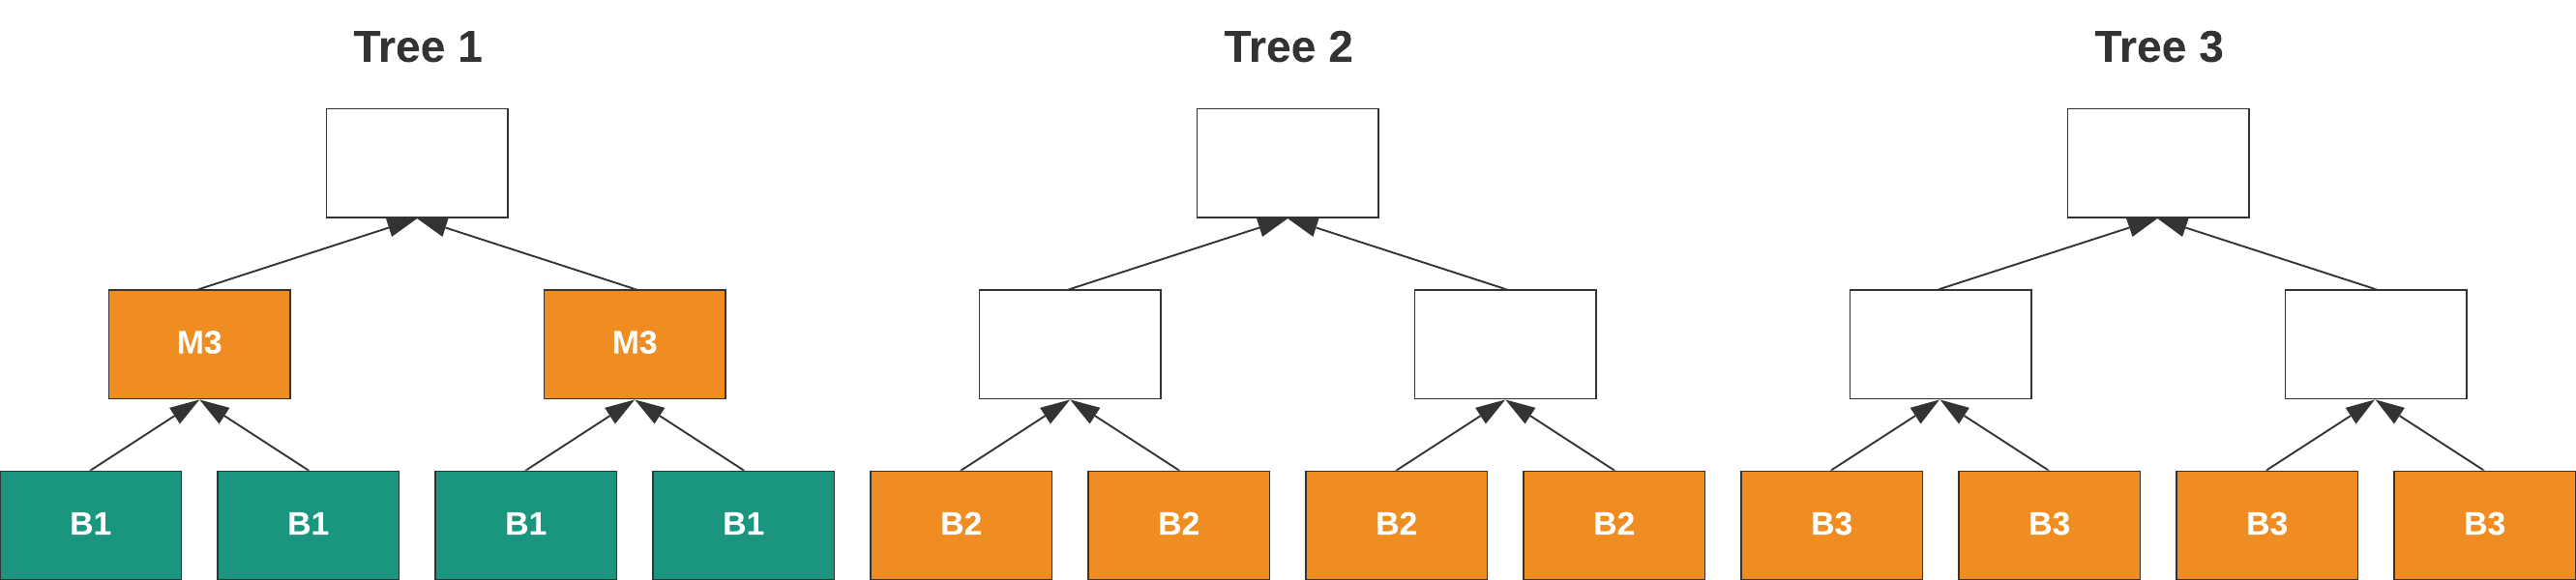
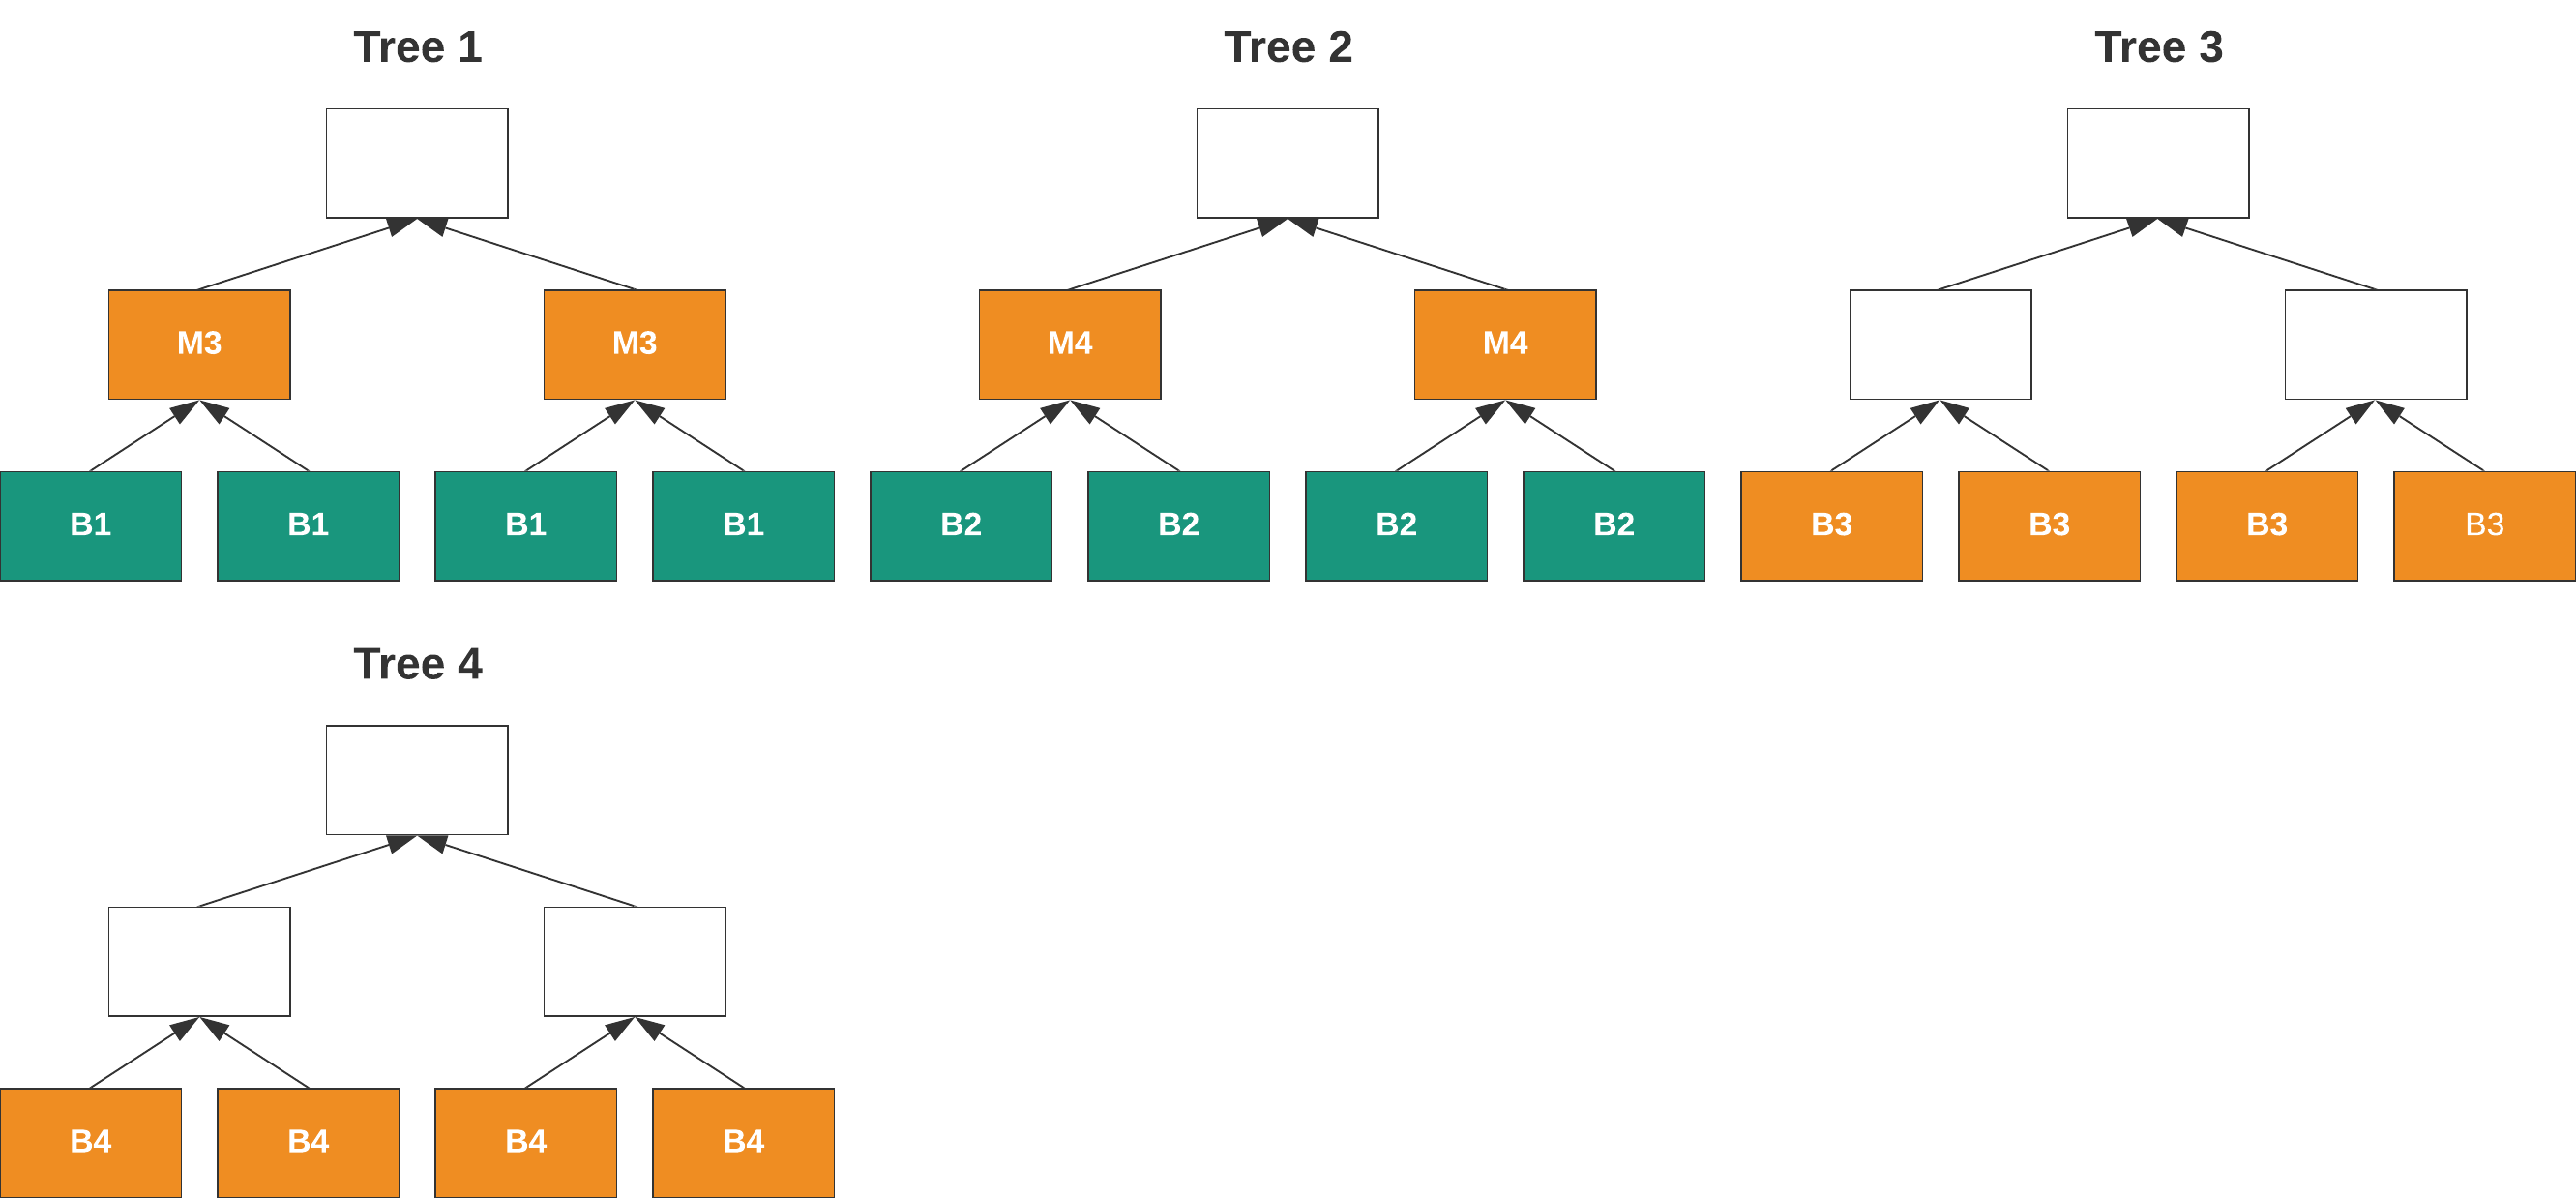
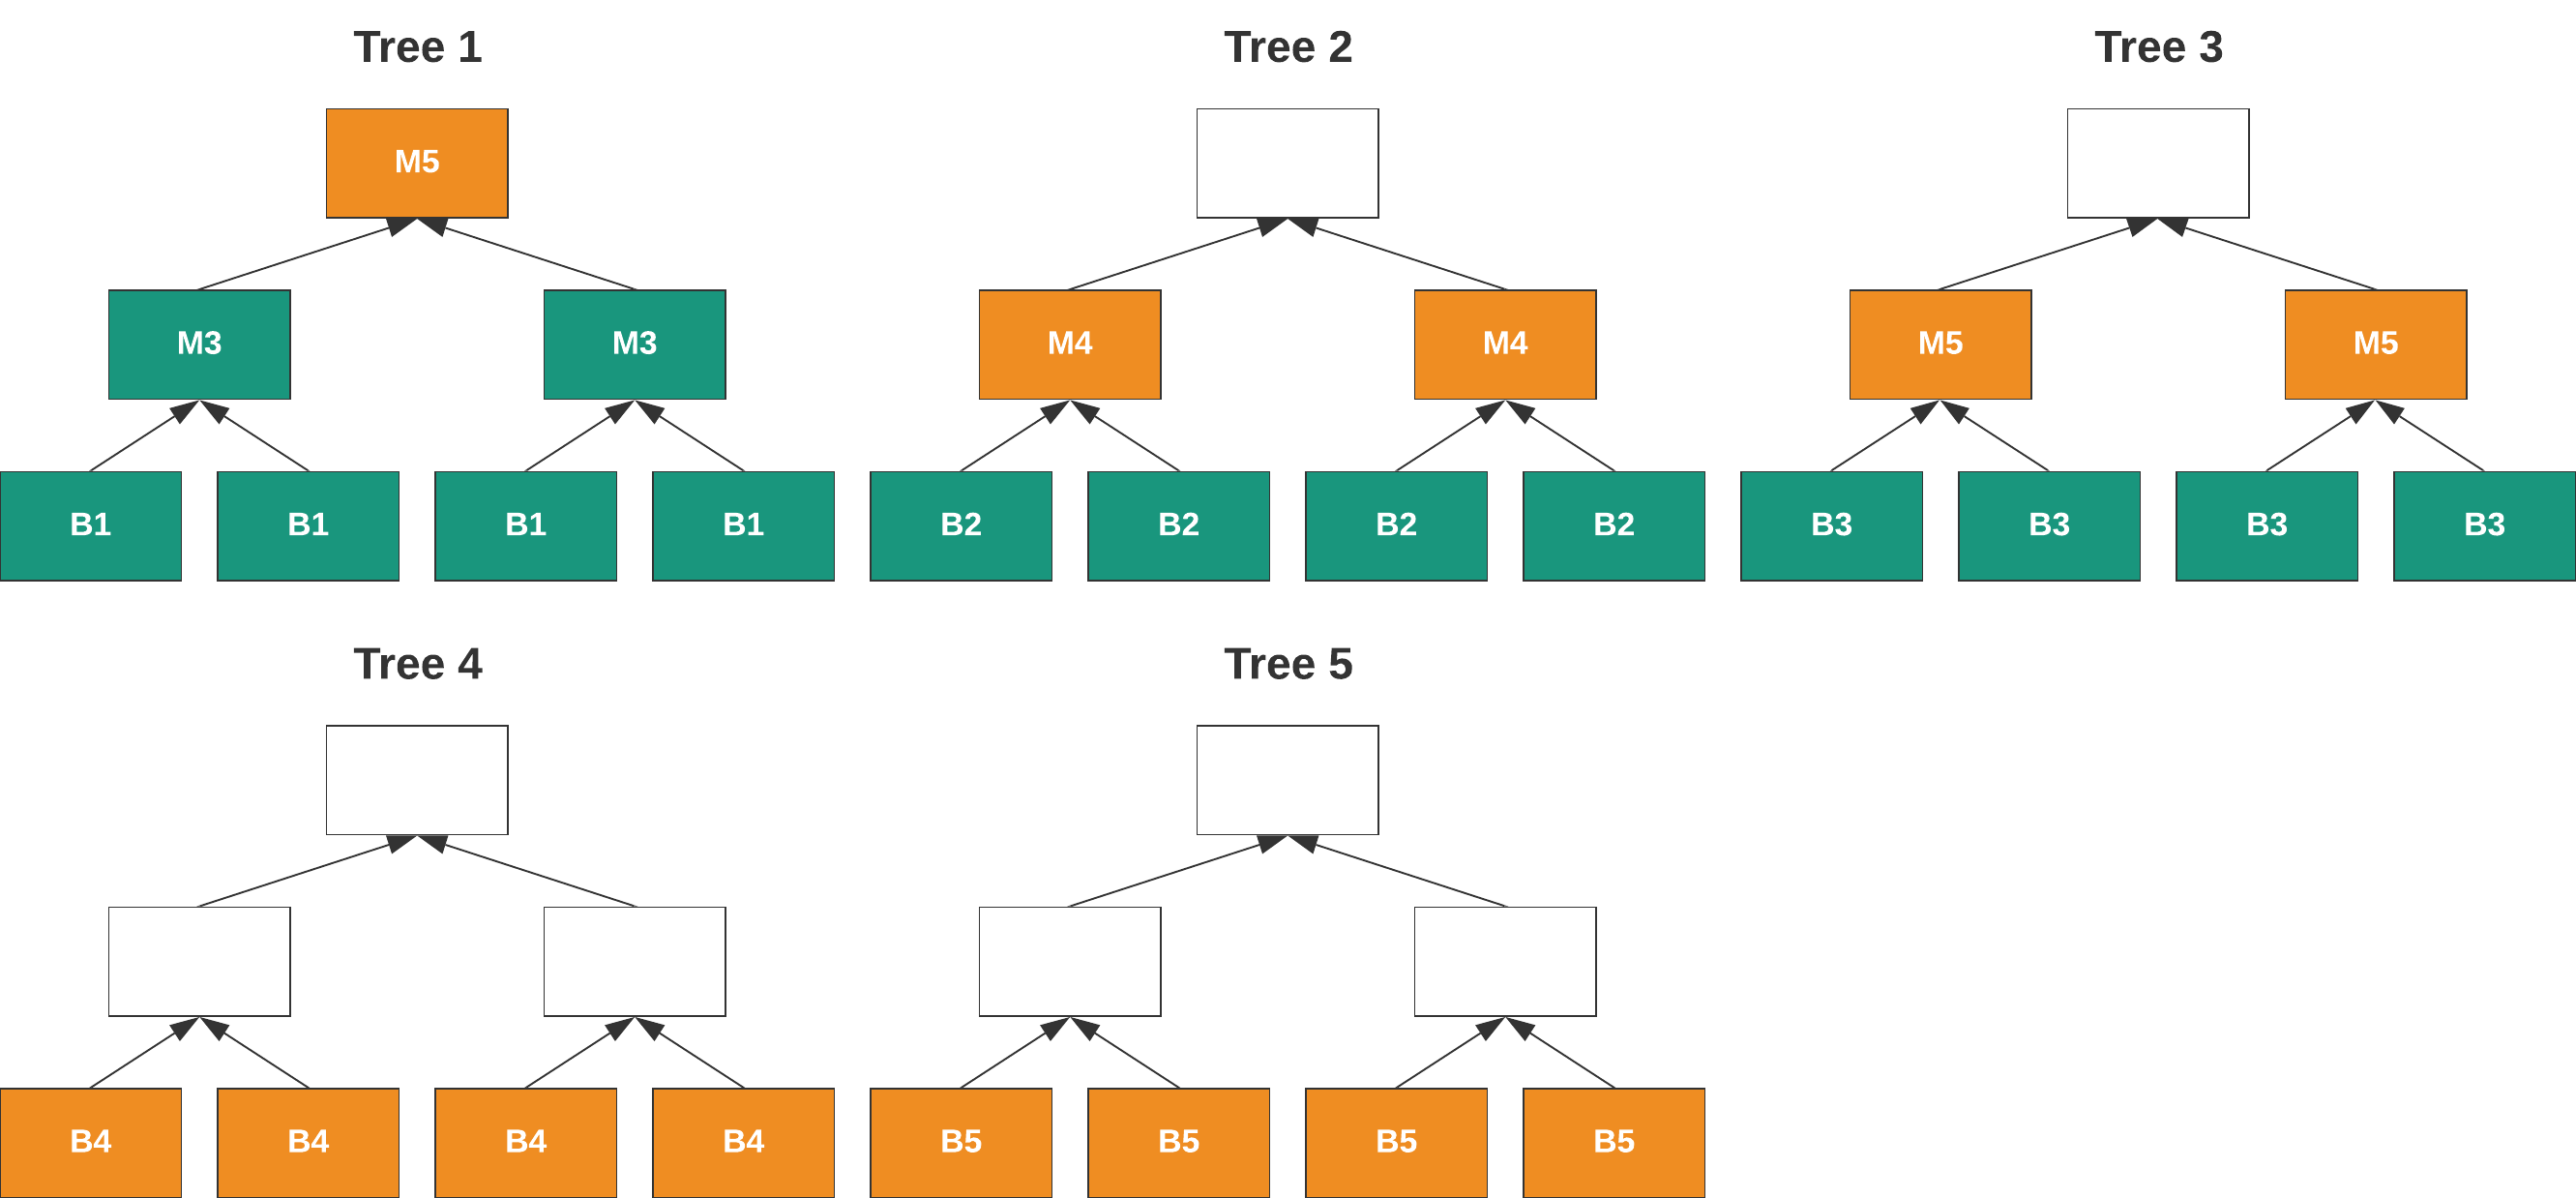
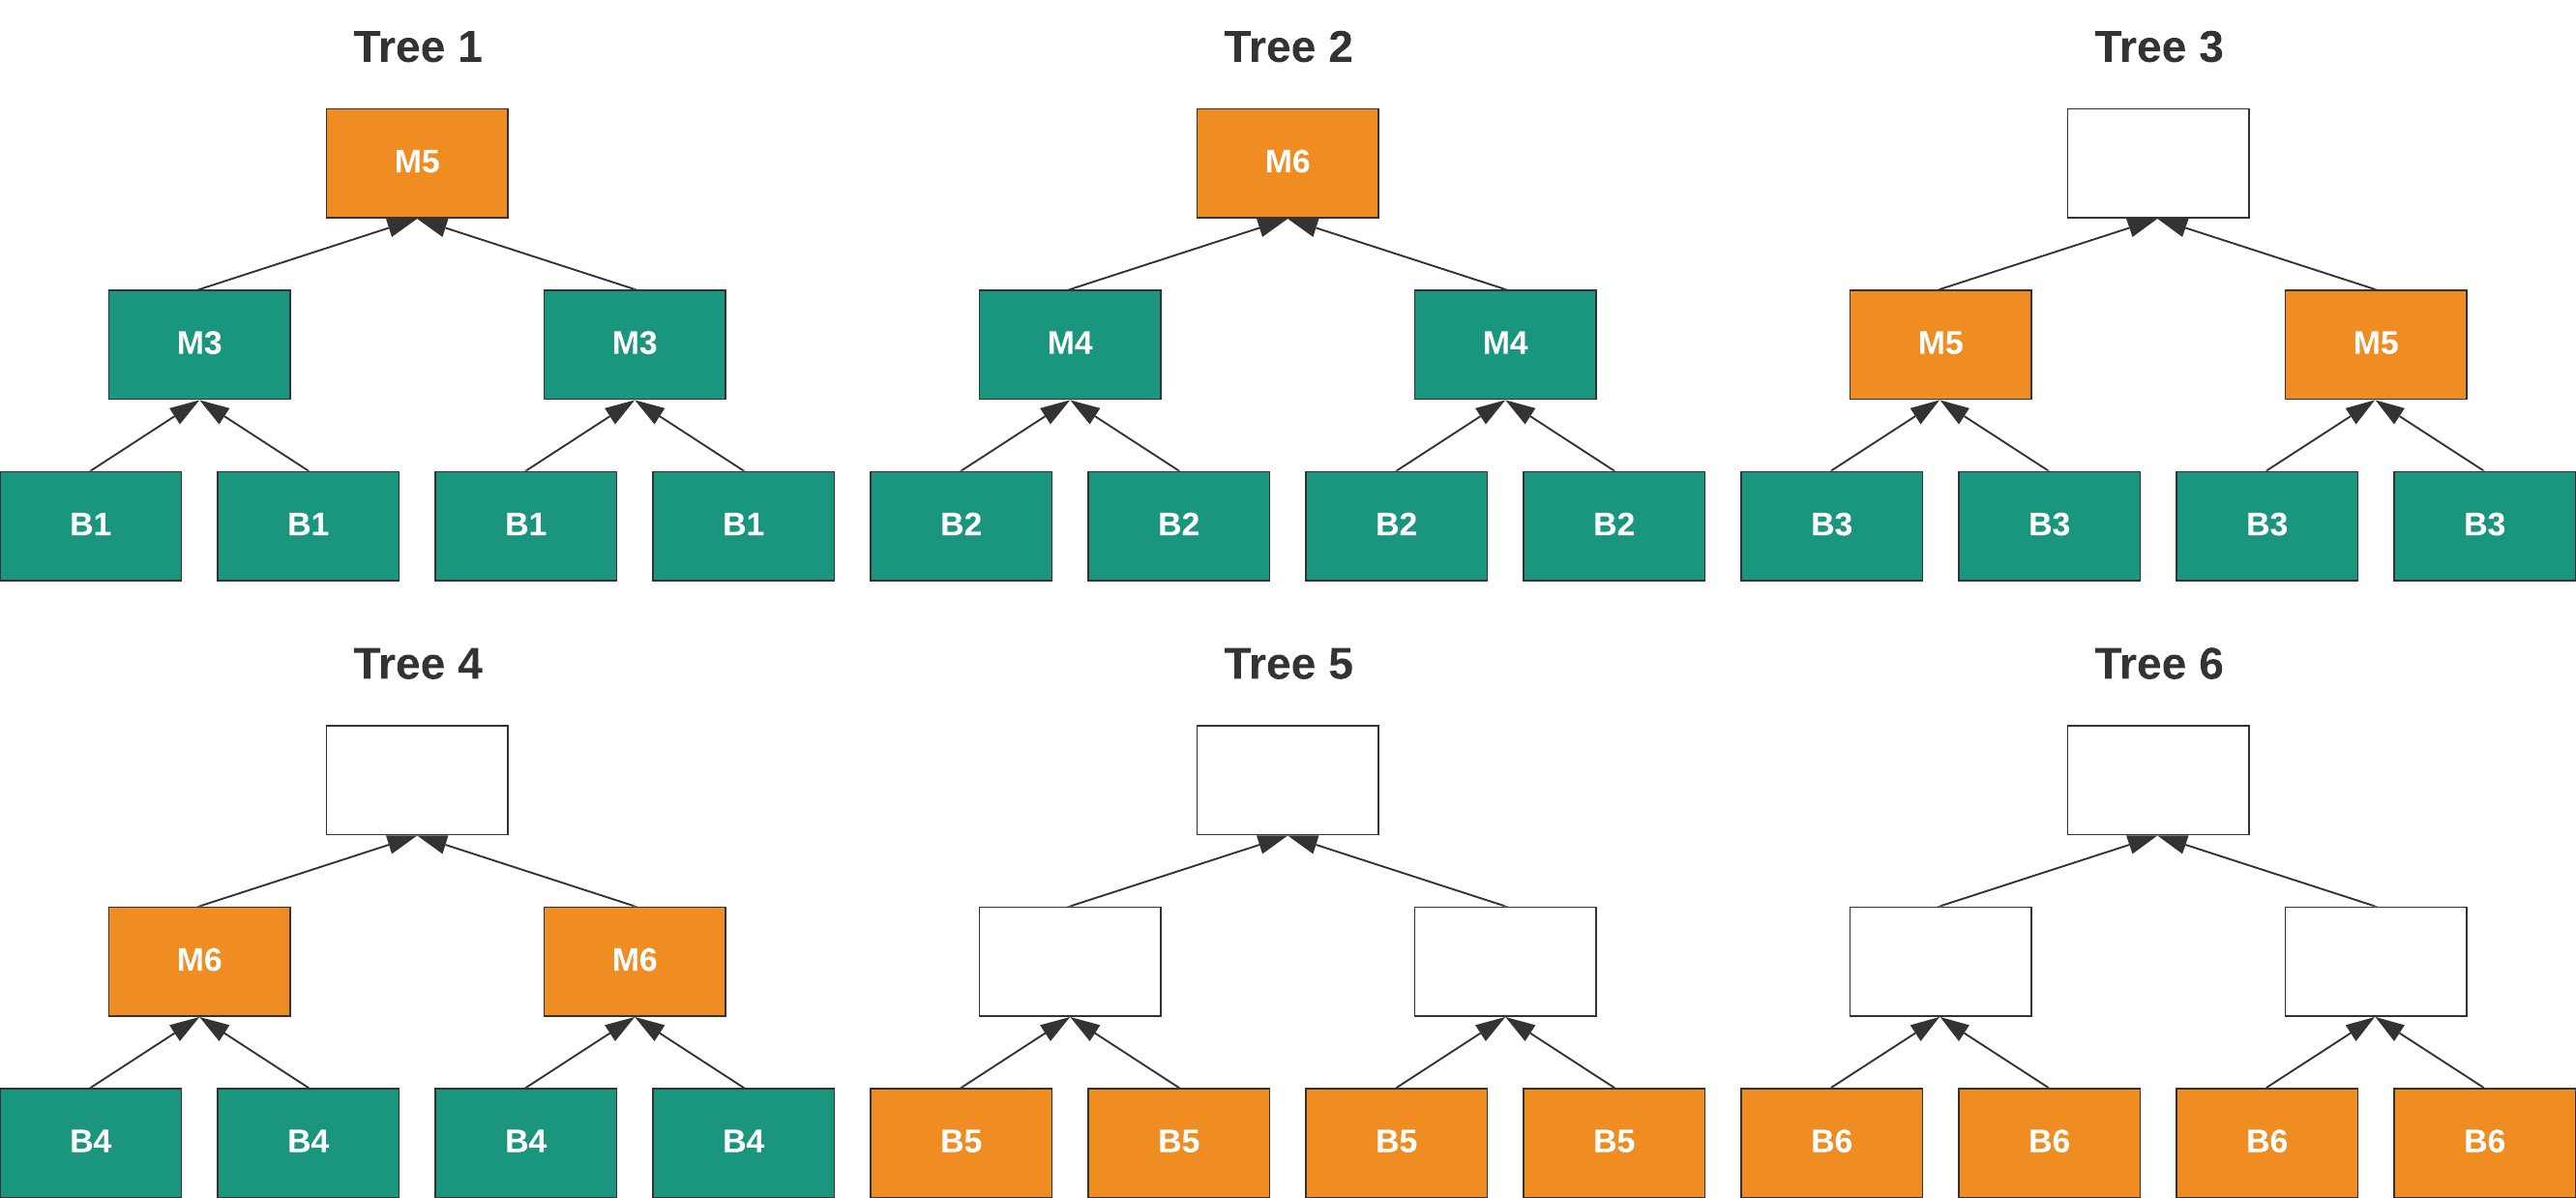
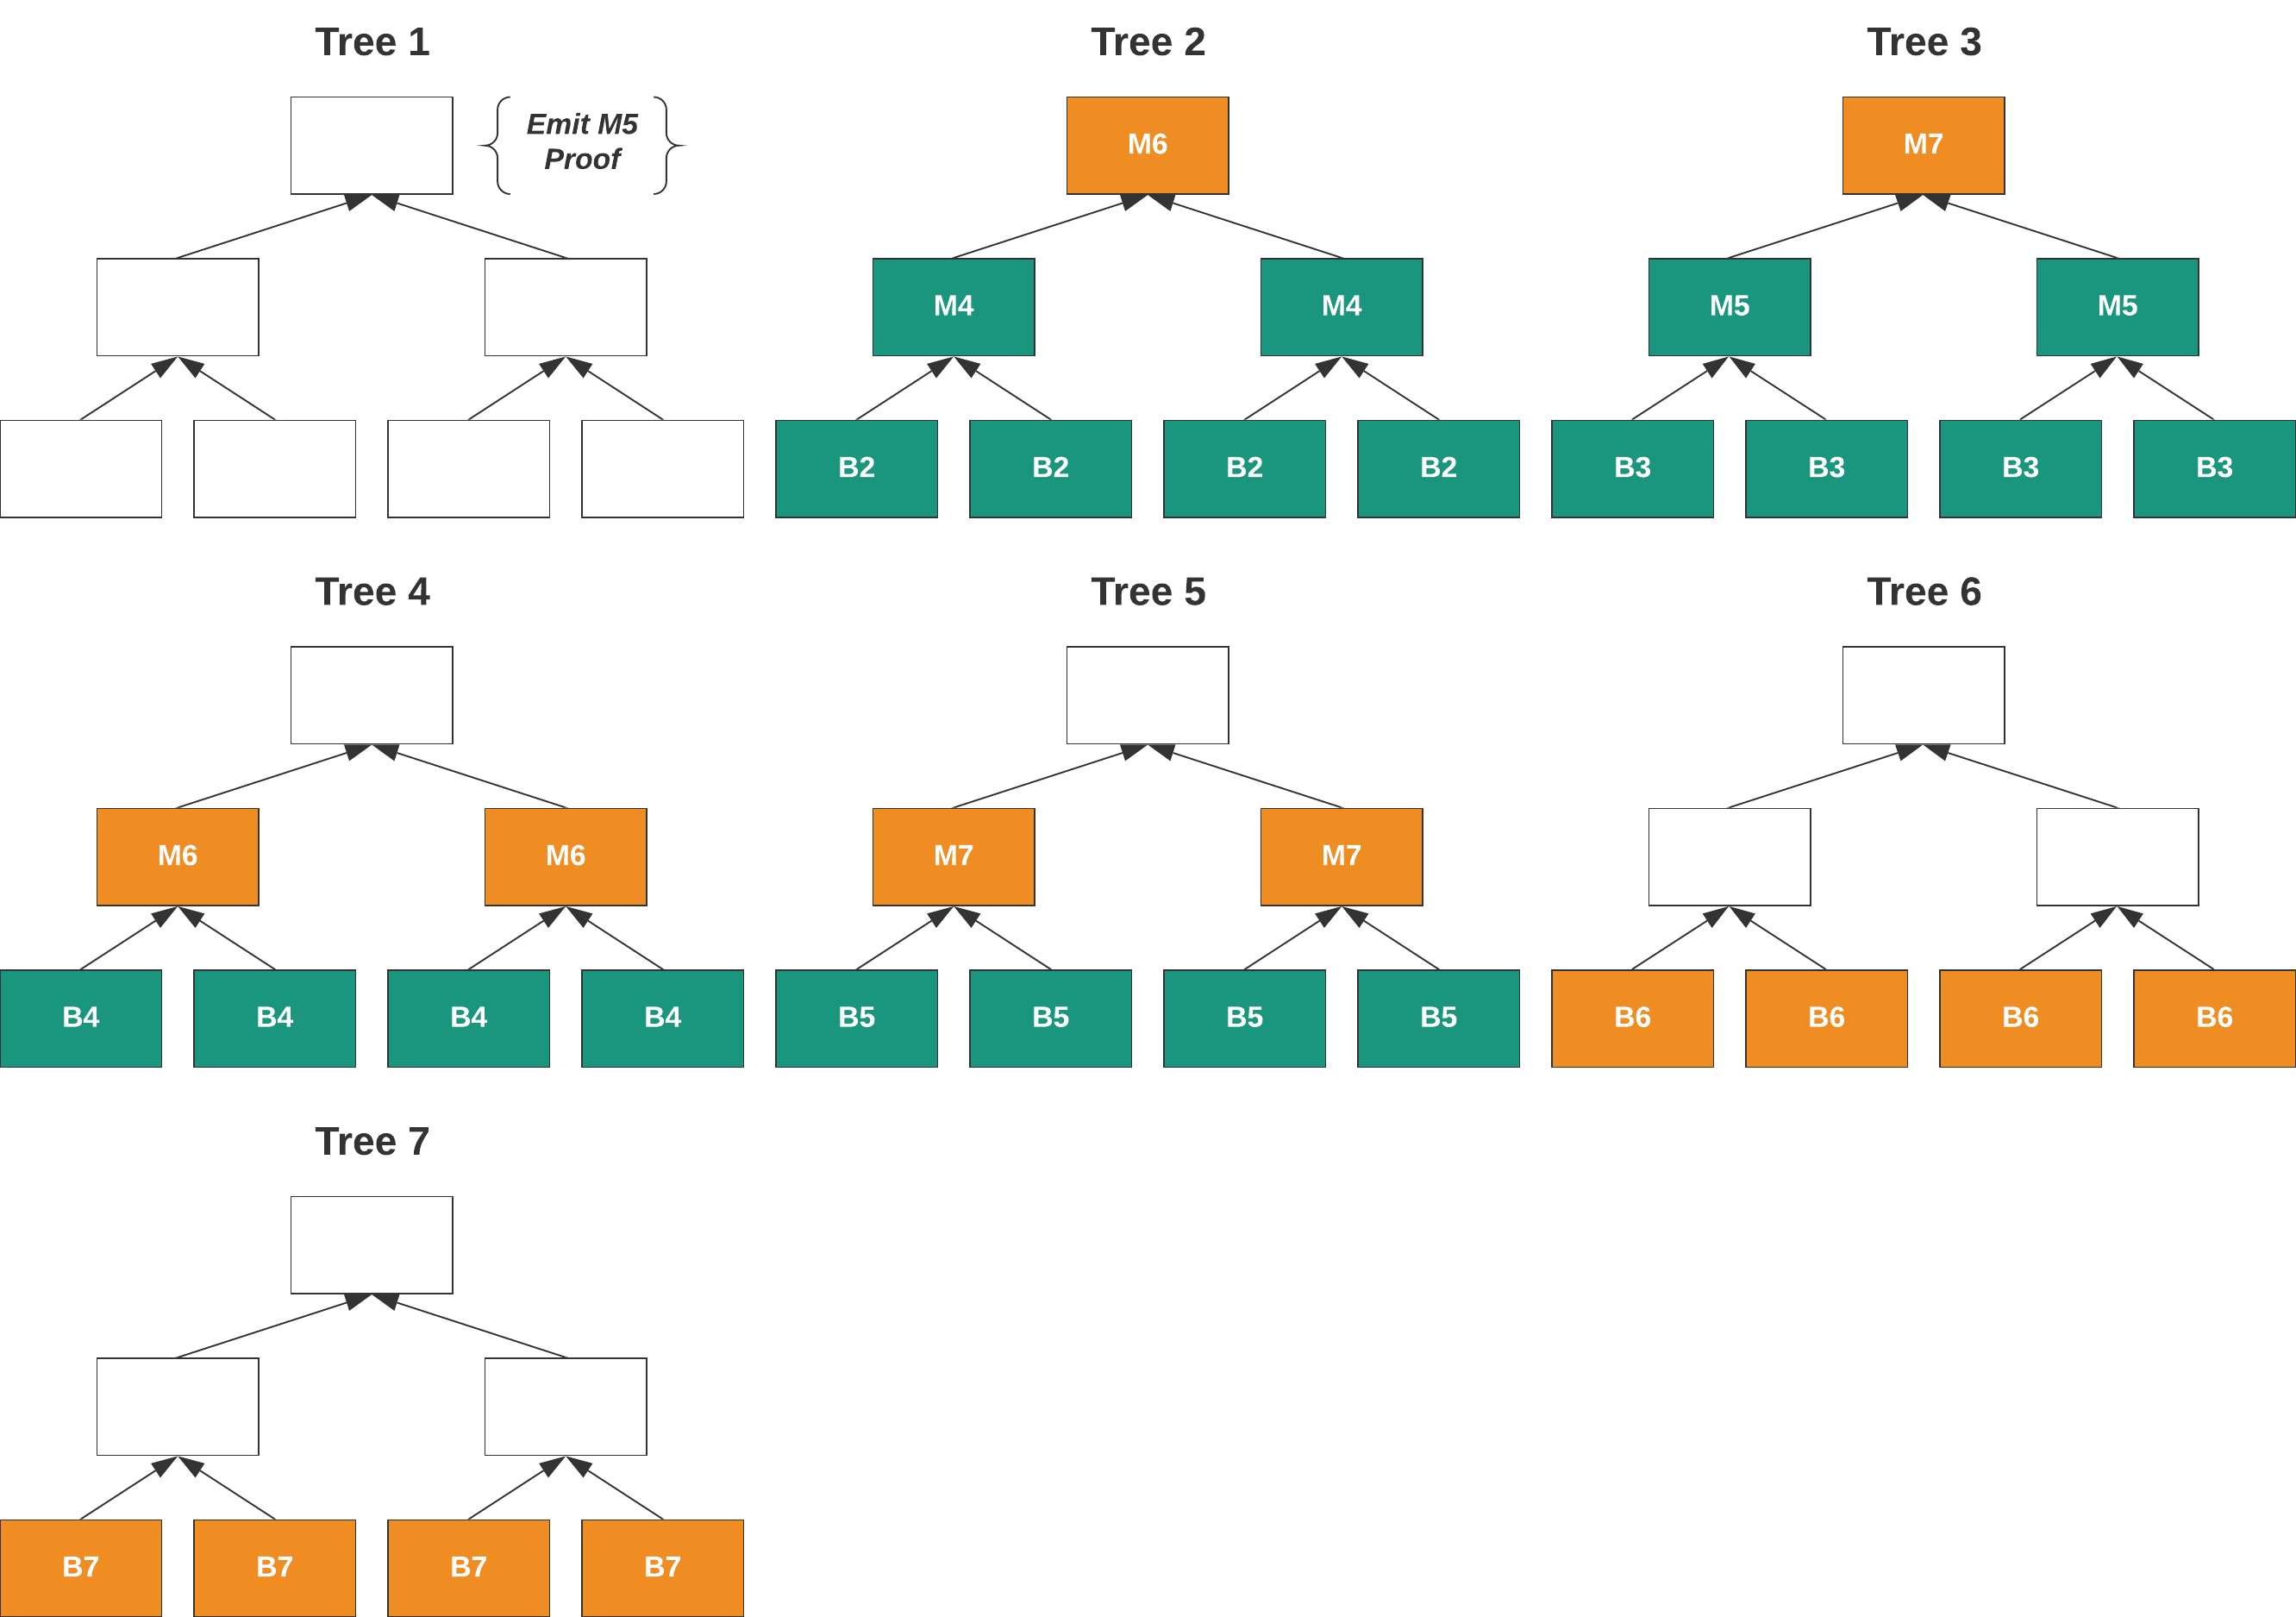
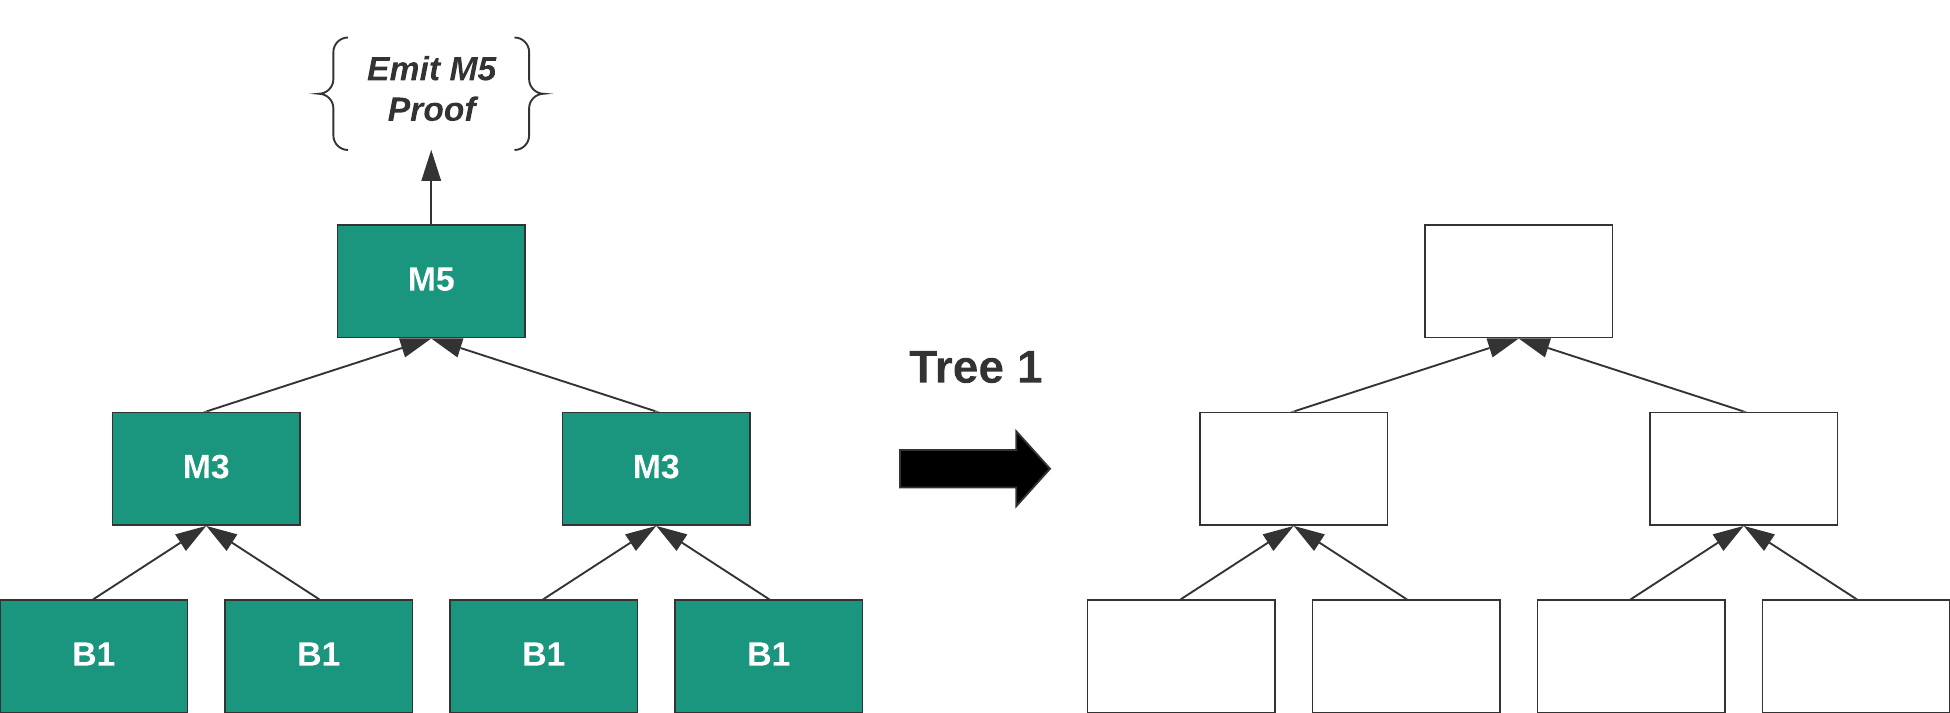
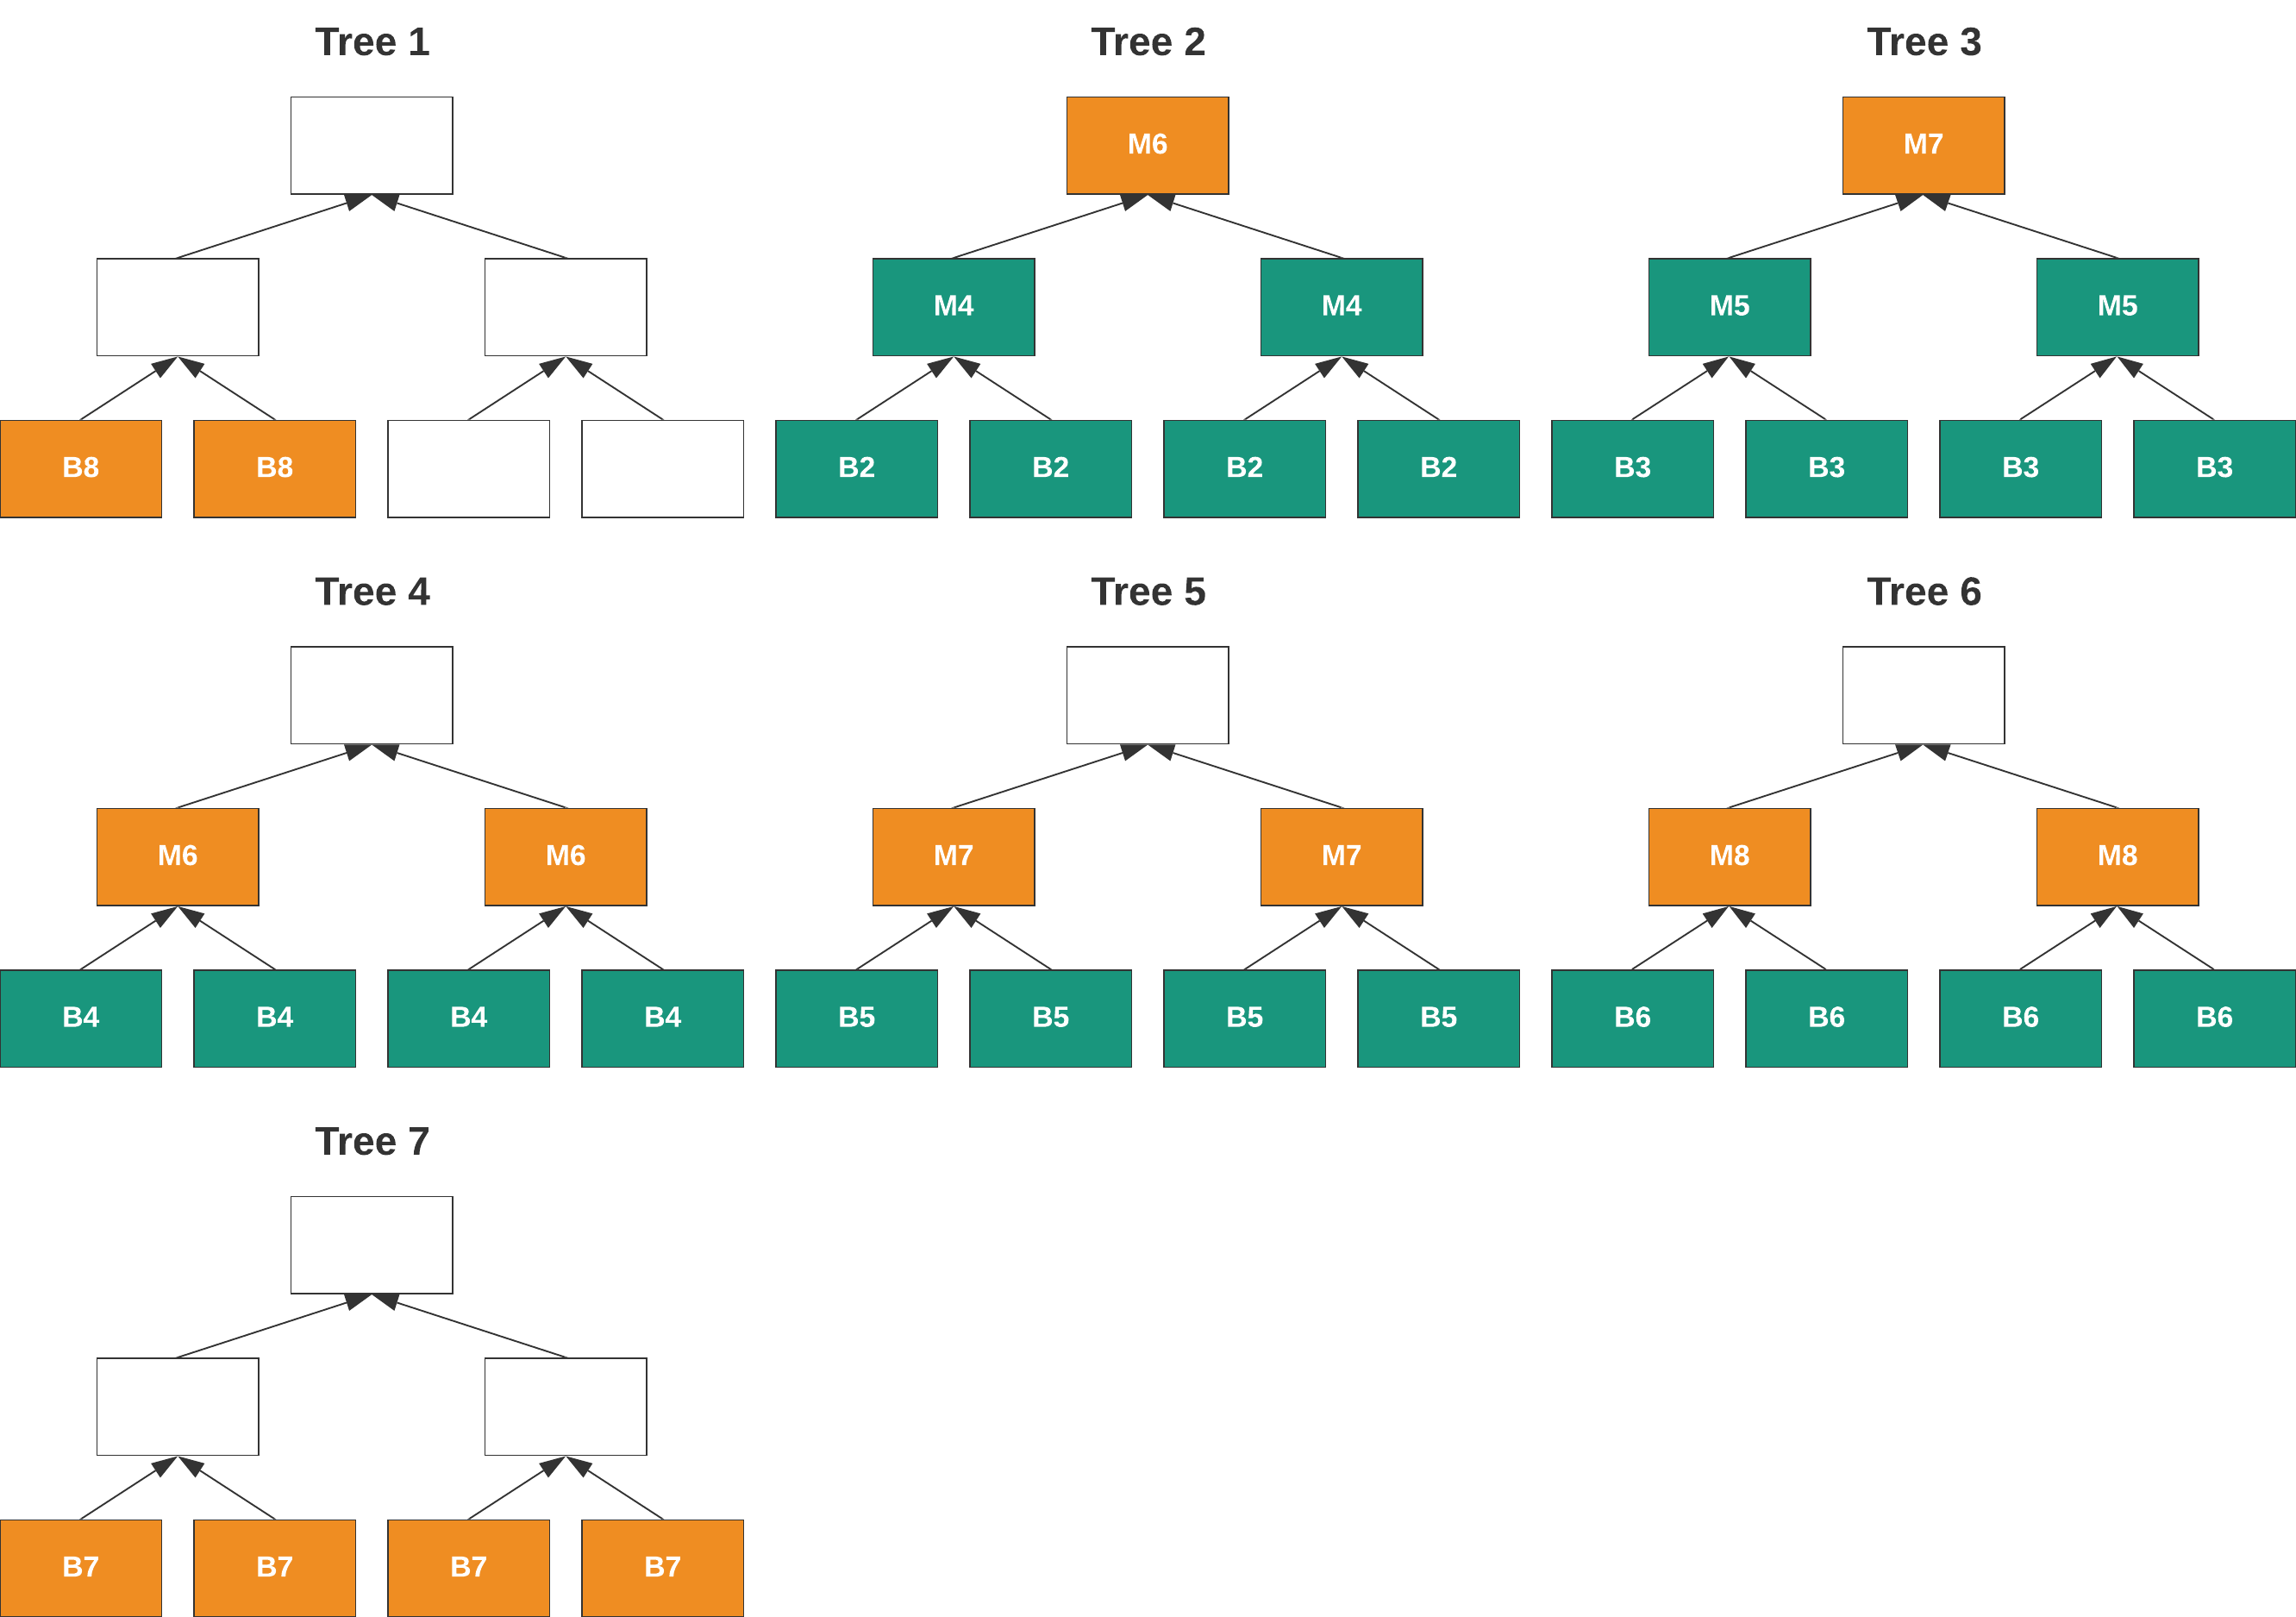
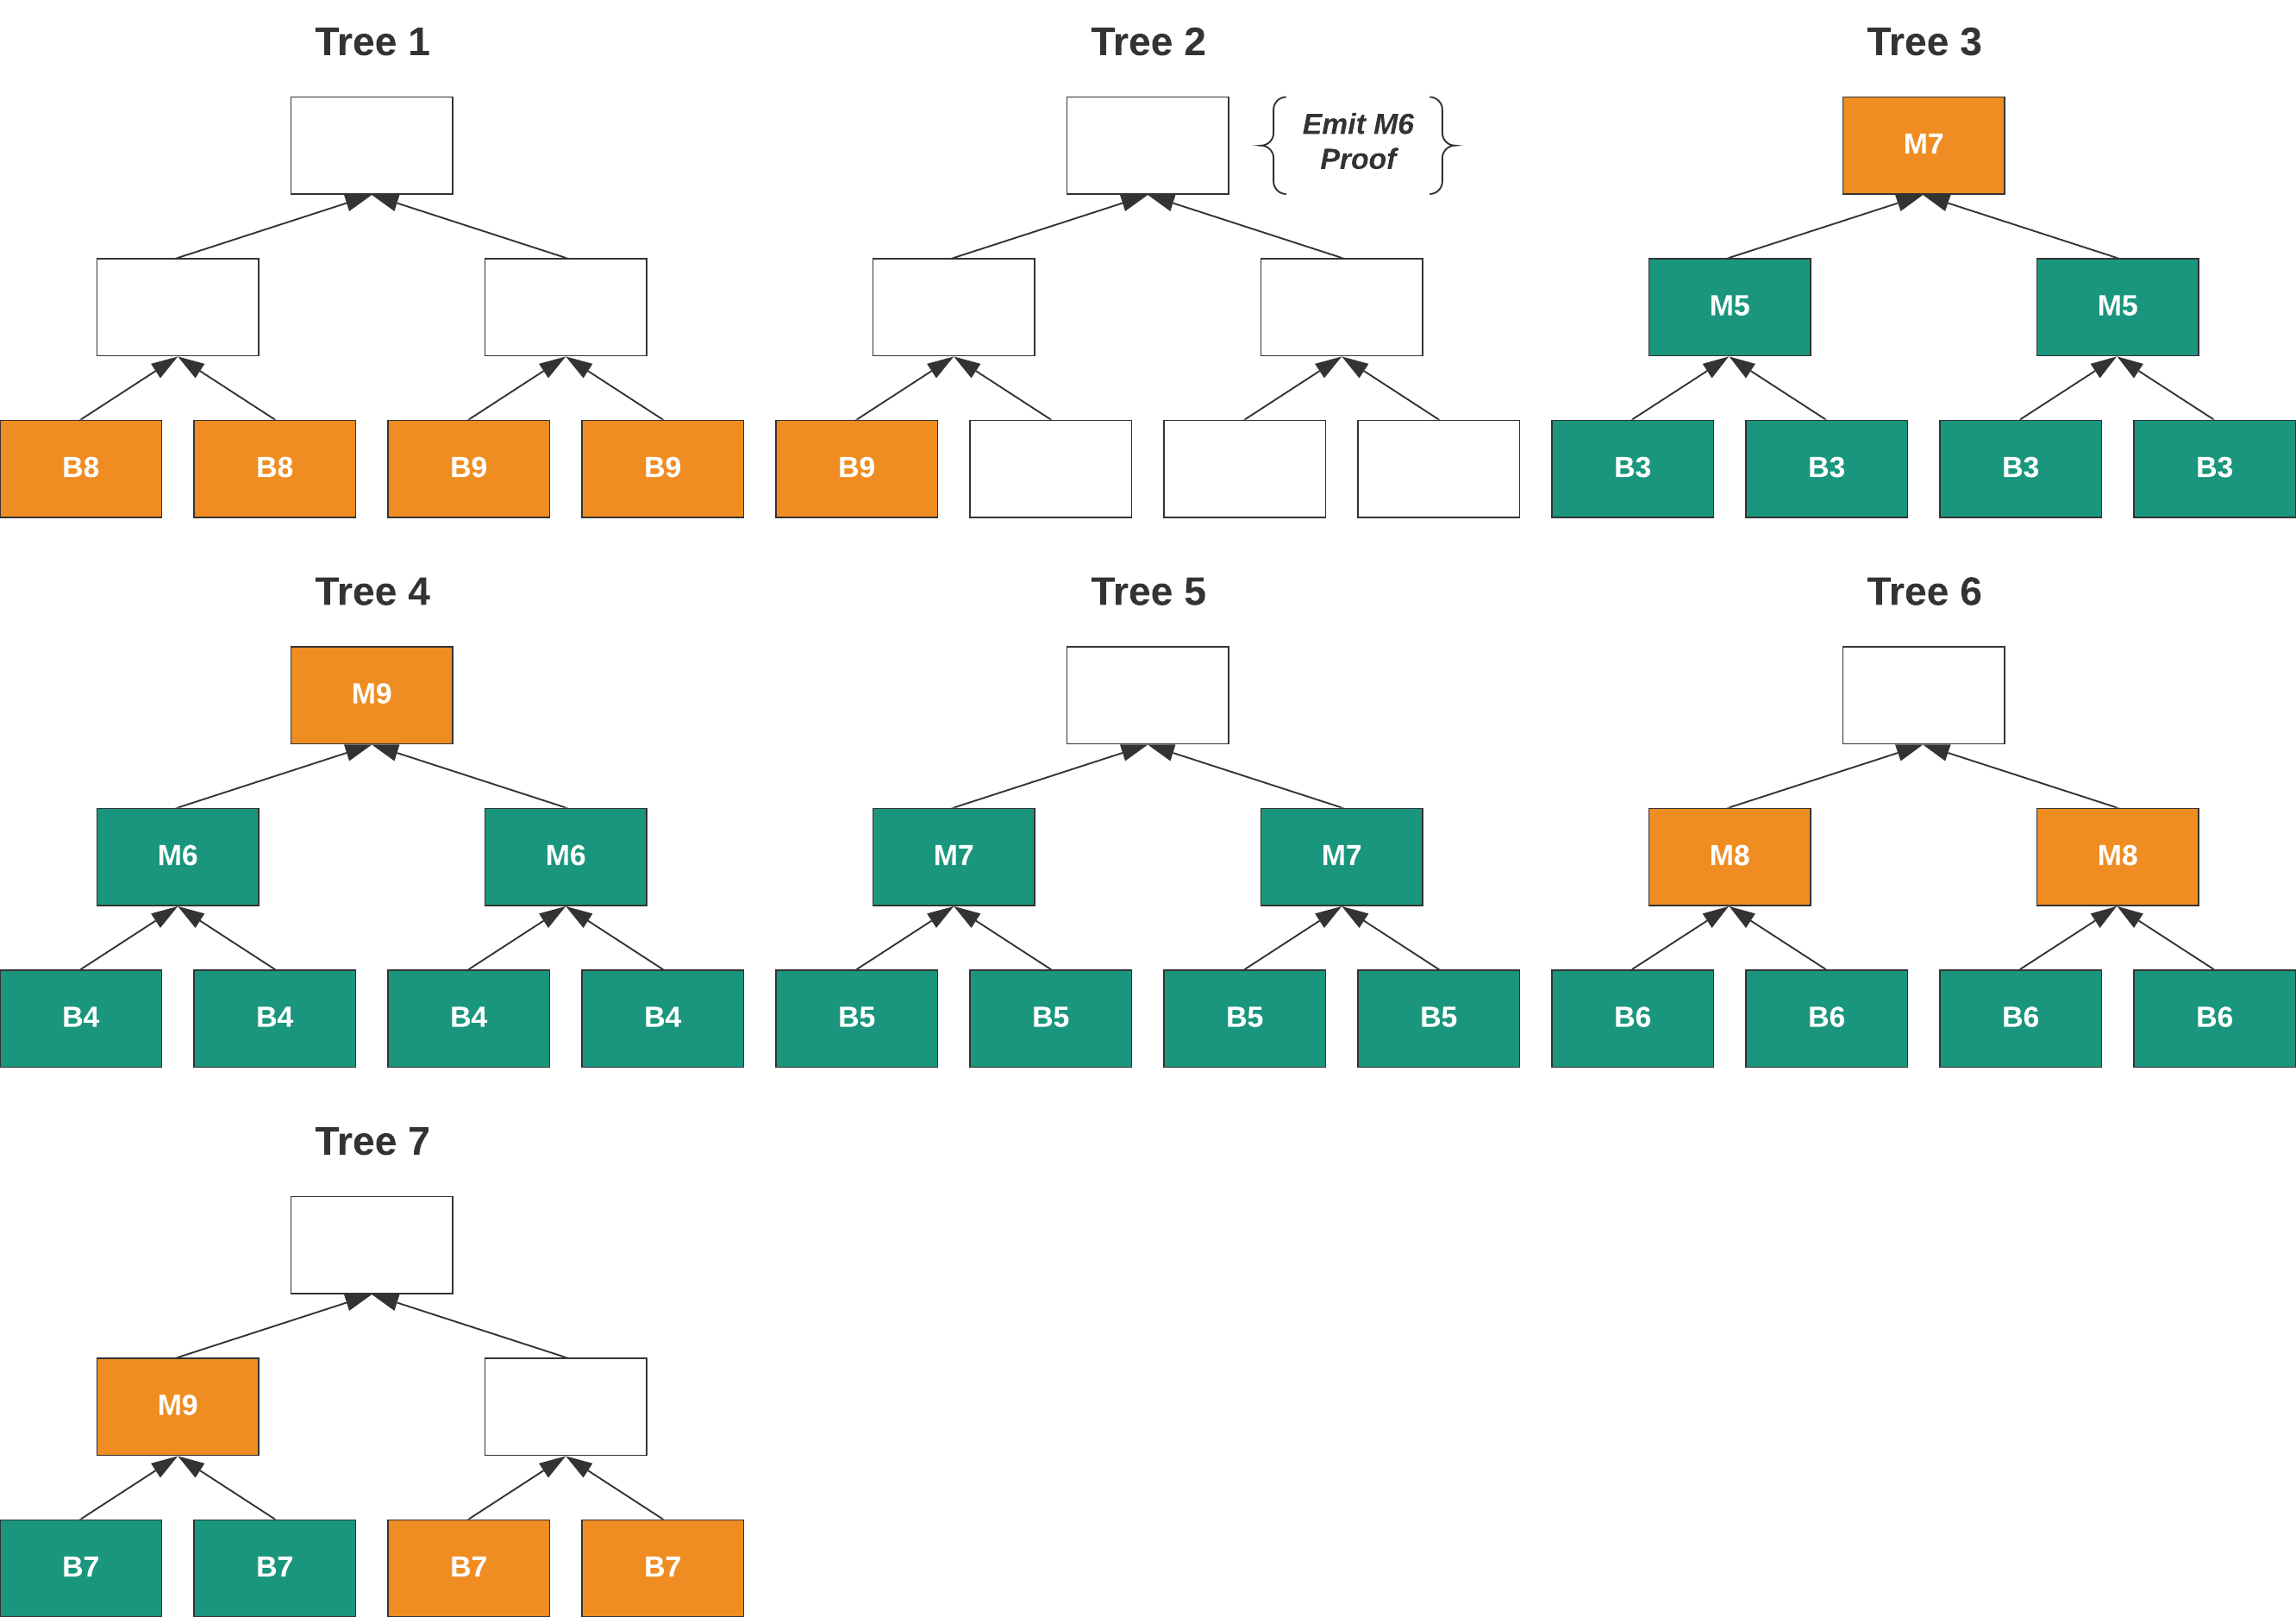
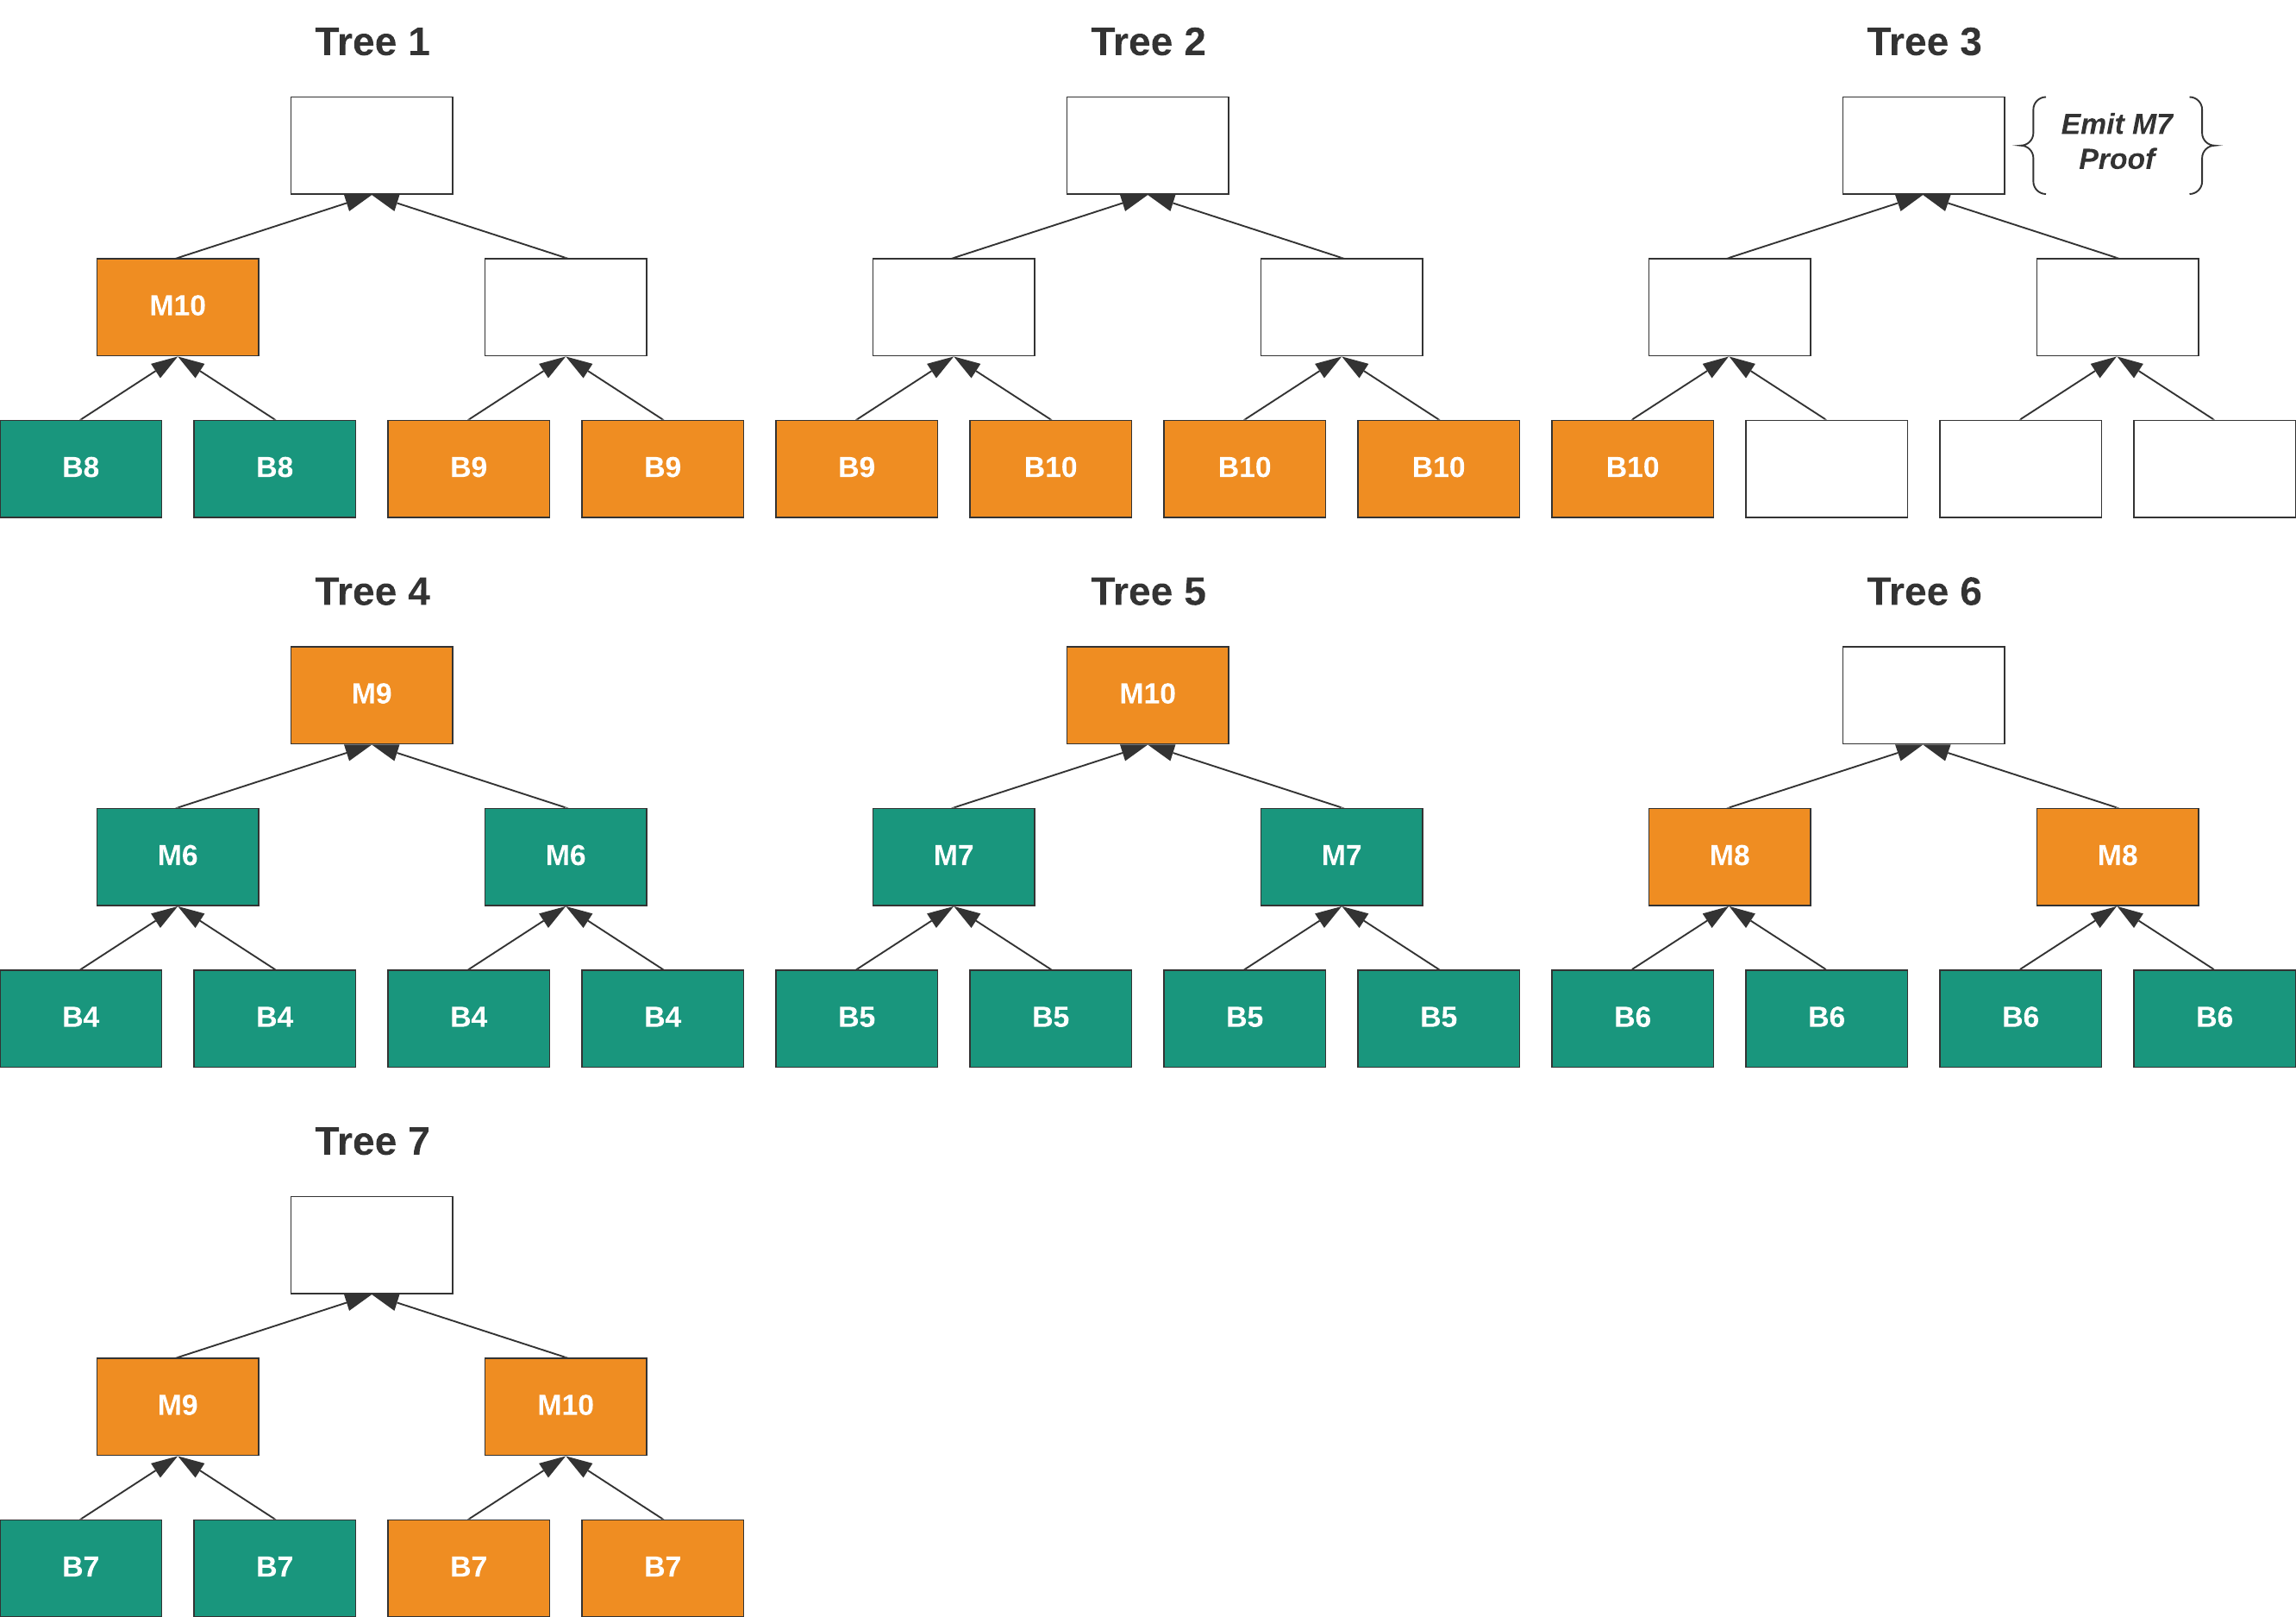
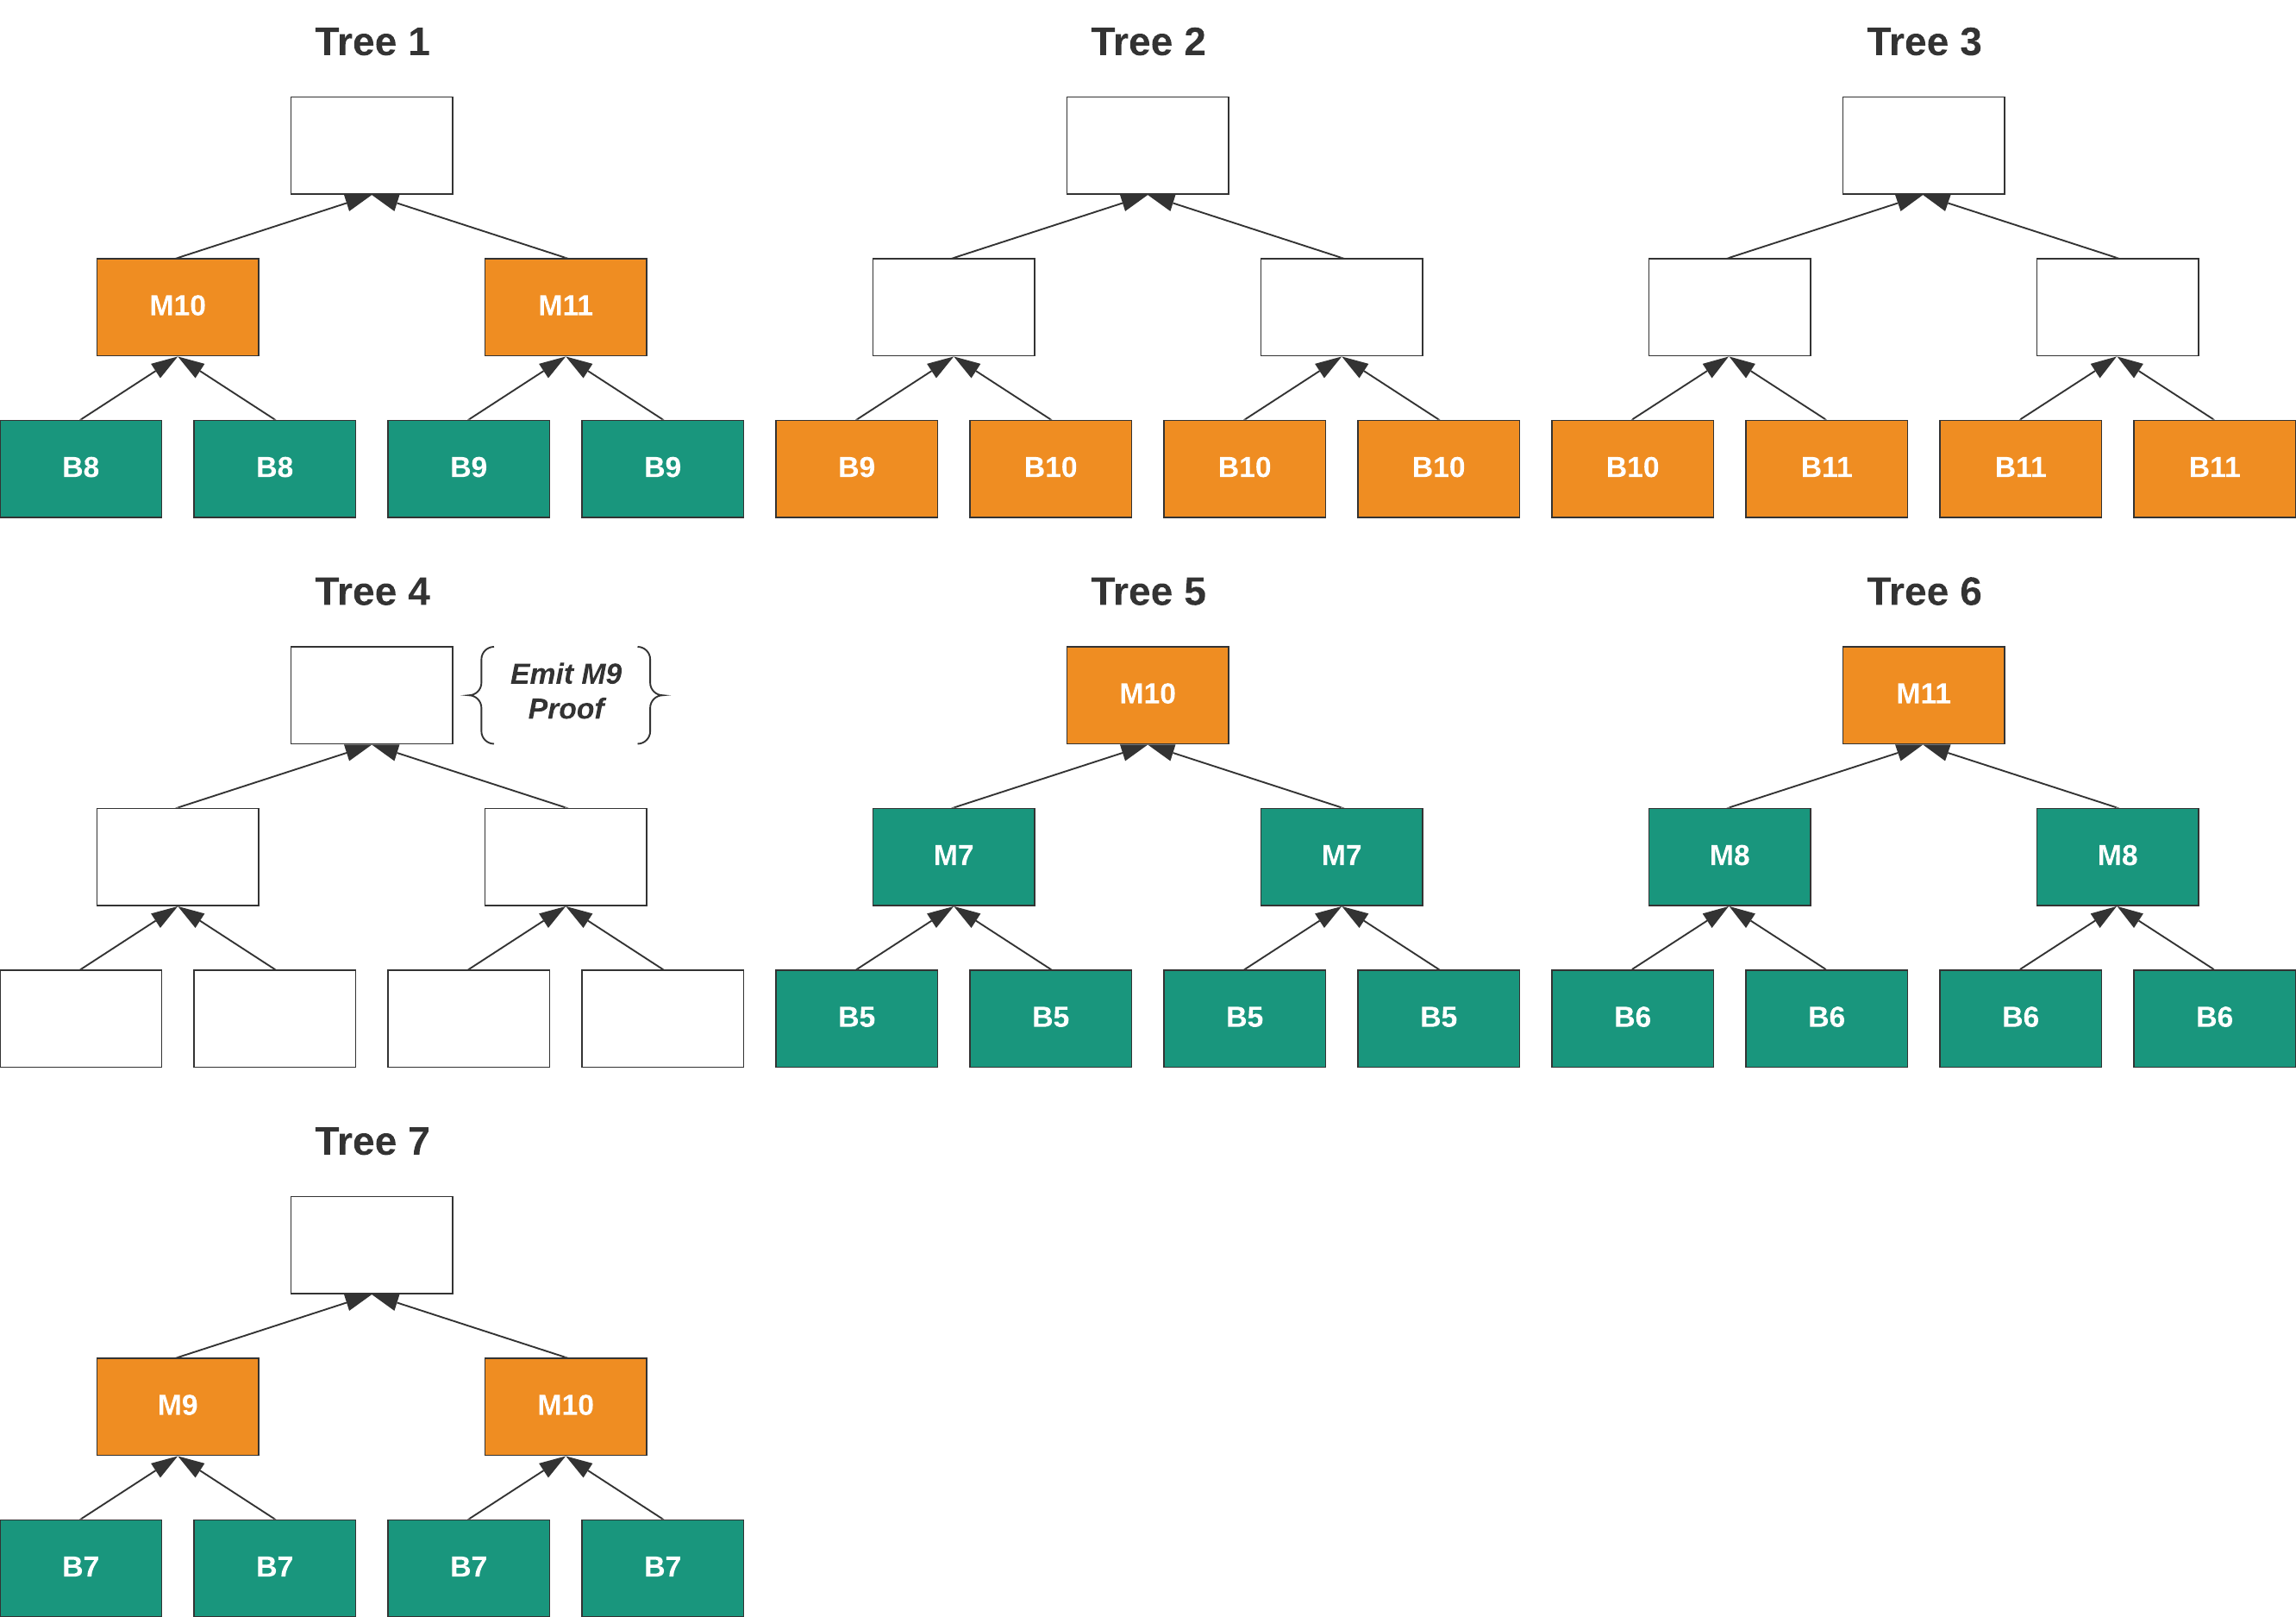
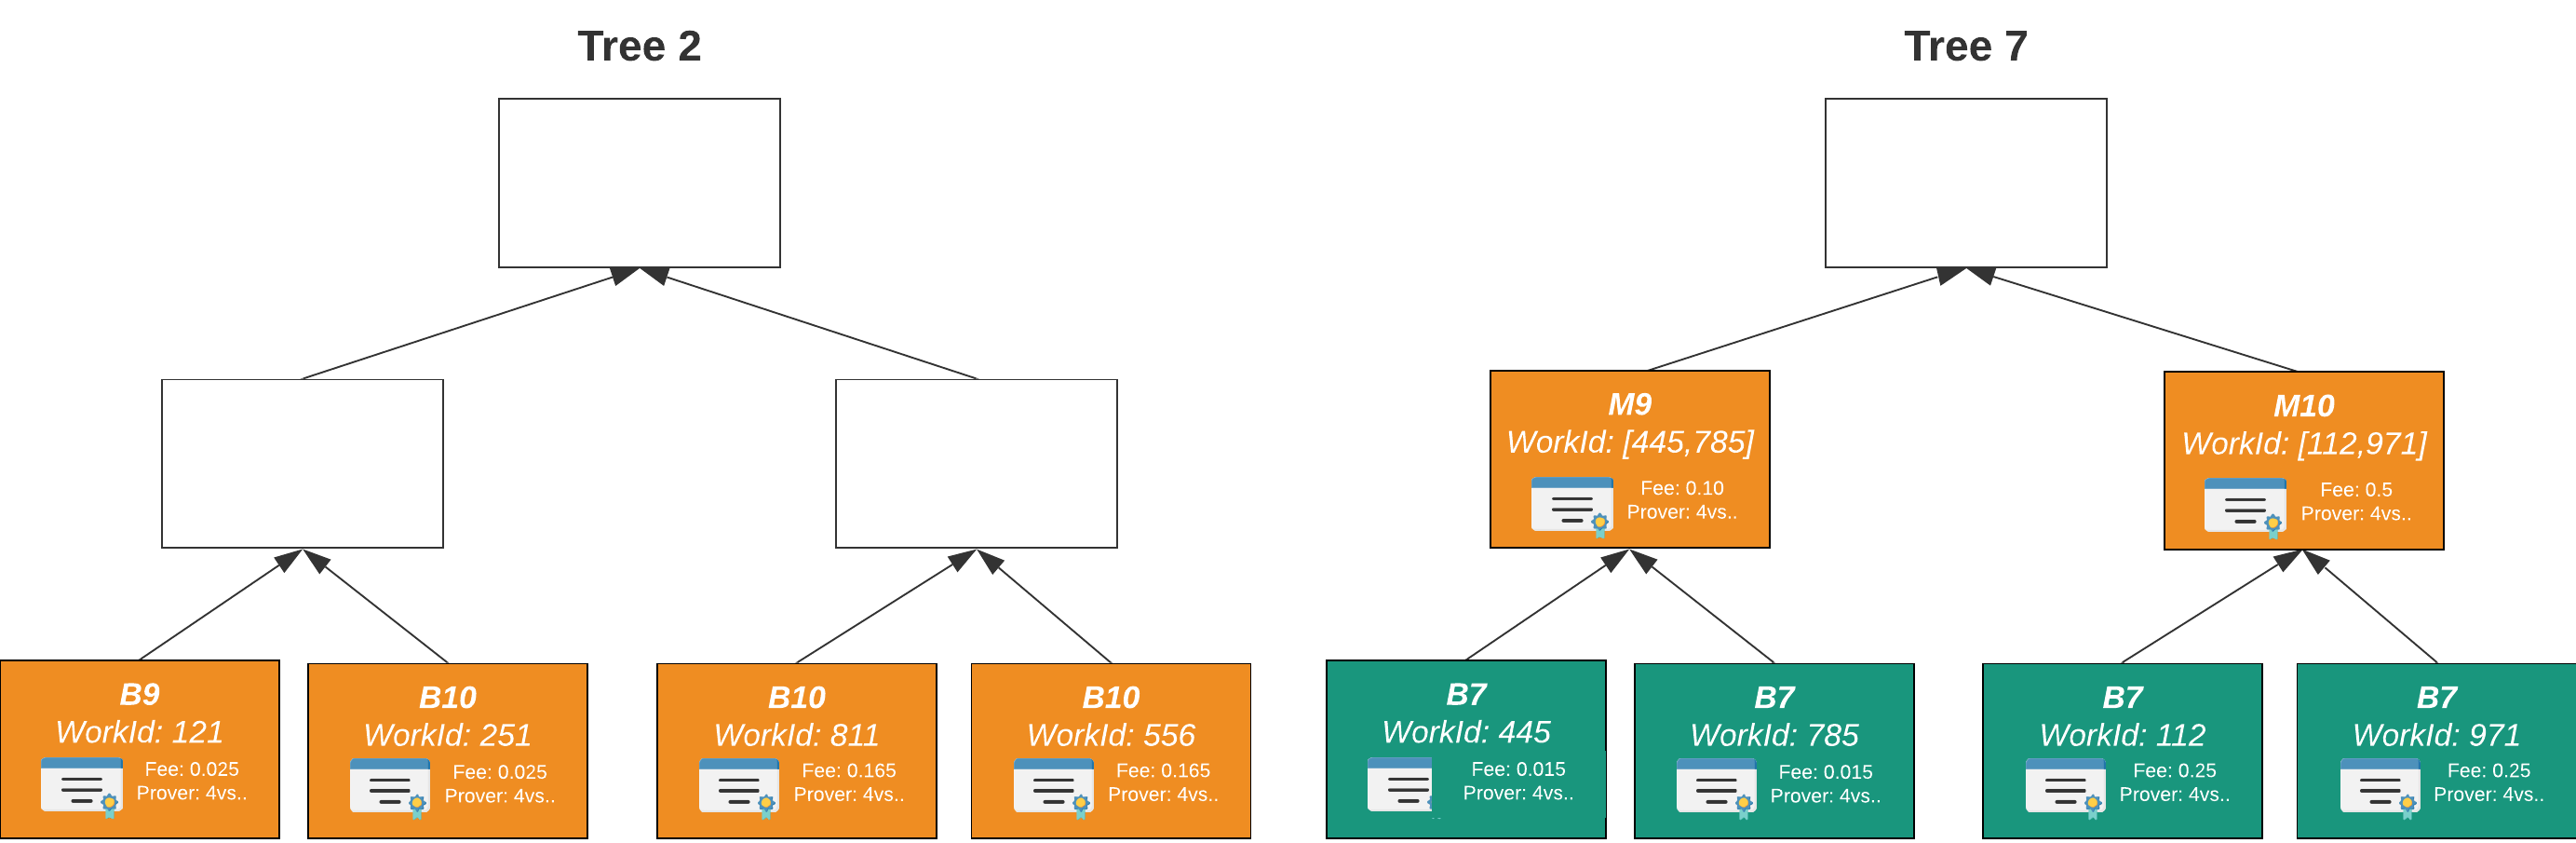
:/ --server-port 3086 --log-json --log-level DEBUG ``` ### Rosetta API Once you have the Archive Node stack up and running, start the Rosetta API Docker image with the following command: ``` docker run --name rosetta --rm \ -p 3088:3088 \ --entrypoint '' \ minaprotocol/mina-rosetta:3.1.0-ae112d3-bullseye-mainnet \ /usr/local/bin/mina-rosetta \ --archive-uri "${PG_CONNECTION_STRING}" \ --graphql-uri "${GRAPHQL_URL}" \ --log-json \ --log-level ${LOG_LEVEL} \ --port 3088 ``` --- url: /network-upgrades/berkeley --- # Berkeley Upgrade The Berkeley upgrade was the most significant network upgrade in Mina's history, transitioning mainnet from the legacy proof system to the Berkeley proof system. It was completed in June 2024. ## What Berkeley Introduced ### zkApp Programmability Berkeley brought full zkApp (zero-knowledge application) support to mainnet. Developers can deploy smart contracts that execute off-chain computation and generate zero-knowledge proofs verified on-chain, enabling privacy-preserving applications with minimal on-chain footprint. ### Recursive Proofs The upgrade enabled recursive proof composition, allowing proofs to verify other proofs. This is foundational to Mina's constant-size blockchain — the entire chain state can be verified with a single proof regardless of history length. ### New Transaction Model Berkeley introduced a new transaction format supporting zkApp commands alongside traditional payment and delegation transactions. This included on-chain state storage for smart contracts, events, and actions. ### Archive Database Migration The upgrade required a full archive database migration from the legacy schema to the Berkeley schema. This was the most operationally intensive part of the upgrade for archive node operators, taking up to 48 hours for the trustless migration path. ## Upgrade Details - **Release**: [3.0.0](https://github.com/MinaProtocol/mina/releases/tag/3.0.0) (Berkeley mainnet release) - **Upgrade mode**: Manual only (automode was not available for Berkeley) - **Archive migration**: Trustless (48h) or trustful (o1Labs database export) For the operational details of the Berkeley upgrade, see the sub-pages below. These are preserved for historical reference. --- url: /network-upgrades/berkeley/requirements --- # Requirements ## Hardware Requirements Please note the following are the hardware requirements for each node type after the upgrade: | Node Type | Memory | CPU | Storage | Network | |--|--|--|--|--| | Mina Daemon Node | 32 GB RAM | 8 core processor with BMI2 and AVX CPU instruction set are required | 64 GB | 1 Mbps Internet Connection | | SNARK Coordinator | 32 GB RAM | 8 core processor | 64 GB | 1 Mbps Internet Connection | | SNARK Worker | 32 GB RAM | 4 core/8 threads per worker with BMI2 and AVX CPU instruction set are required | 64 GB | 1 Mbps Internet Connection | | Archive Node | 32 GB RAM | 8 core processor | 64 GB | 1 Mbps Internet Connection | | Rosetta API standalone Docker image | 32 GB RAM | 8 core processor | 64 GB | 1 Mbps Internet Connection | | Mina Seed Node | 64 GB RAM | 8 core processor | 64 GB | 1 Mbps Internet Connection | ## Mina Daemon Requirements ### Installation :::caution If you have `mina-generate-keypair` installed, you will need to first `sudo apt remove mina-generate-keypair` before installing `mina-mainnet=3.1.0-ae112d3`. The `mina-generate-keypair` binary is now installed as part of the mina-mainnet package. ::: ### IP and Port configuration **IP:** By default, the Mina Daemon will attempt to retrieve its public IP address from the system. If you are running the node behind a NAT or firewall, you can set the `--external-ip` flag to specify the public IP address. **Port:** Nodes must expose a port publicly to communicate with other peers. Mina uses by default the port `8302` which is the default libp2p port. You can use a different port by setting the `--external-port` flag. ### Node Auto-restart Ensure your nodes are set to restart automatically after a crash. For guidance, refer to the [auto-restart instructions](/node-operators/validator-node/connecting-to-the-network#running-mina-node-as-a-service) ## Seed Peer Requirements ### Generation of libp2p keypair To ensure connectivity across the network, it is essential that all seed nodes start with the **same** `libp2p` keypair. This consistency allows other nodes in the network to reliably connect. Although the same libp2p keys can be reused from before the upgrade, if you need to manually generate new libp2p keys, use the following command: ``` mina libp2p generate-keypair --privkey-path ``` Further information on [generating key pairs](/node-operators/validator-node/generating-a-keypair) on Mina Protocol. --- url: /network-upgrades/berkeley/upgrade-steps --- # Upgrade Steps Mainnet Upgrade steps Below it's the description in detail of all the upgrade steps and what which node operator type should do to in each step. ## Pre-Upgrade - During the Pre-Upgrade phase, node operators should prepare for the upcoming upgrade. The most important steps are: - Review the [upgrade readiness checklist](https://docs.google.com/document/d/1rTmJvyaK33dWjJXMOSiUIGgf8z7turxolGHUpVHNxEU/edit#heading=h.2hqz0ixwjk3f) to confirm they have covered the required steps. - Upgrade their nodes to the 1.4.1 stable version - Ensure servers are provisioned to run Berkeley nodes, meeting the new hardware requirements - Upgrade their nodes to the node version [3.0.3](https://github.com/MinaProtocol/mina/releases/tag/3.0.3), with stop-slots, when this version becomes available - Start the archive node initial migration if they run archive nodes and wish to perform the migration in a decentralized manner **Please note:** a simplified Node Status service will be part of the upgrade tooling and enabled by default in Pre-Upgrade release with the stop-slots ([3.0.3](https://github.com/MinaProtocol/mina/releases/tag/3.0.3)). This feature will allow for a safe upgrade by monitoring the amount of upgraded active stake. Only non-sensitive data will be reported. If operators are not comfortable sharing their node version, they will have the option to disable the node version reports by using the appropriate node flag `--node-stats-type none` ### Block Producers and SNARK Workers 1. Review the [upgrade readiness checklist](https://docs.google.com/document/d/1rTmJvyaK33dWjJXMOSiUIGgf8z7turxolGHUpVHNxEU). 1. Provision servers that meet the minimum hardware requirements, including the new 32GB RAM requirement and support for _AVX_ and _BMI2_ CPU instructions. 1. Upgrade nodes to node version [3.0.3](https://github.com/MinaProtocol/mina/releases/tag/3.0.3) ([3.0.3](https://github.com/MinaProtocol/mina/releases/tag/3.0.3) has built-in stop slots). ### Archive Node Operators and Rosetta Operators - Two migration processes will be available to archive node operators: _trustless_ and _trustful_. If the archive node operator wants to perform the _trustless_ migration, they should follow these steps; otherwise, proceed to the Upgrade phase. The _trustful_ migration will rely on o1Labs database exports and Docker images to migrate the archive node database and doesn’t require any actions at this stage. 1. Trustless migration: - Perform the initial archive node migration. Since Mainnet is a long-lived network, the initial migration process can take up to 48 hours, depending on your server specification and infrastructure. - If your Mina Daemon, archive node, or PostgreSQL database runs on different machines, the migration performance will be greatly impacted. - For more information on the archive node migration process, please refer to the [Archive Migration](/network-upgrades/berkeley/archive-migration) section. 2. Upgrade all nodes to the latest stable version [3.0.3](https://github.com/MinaProtocol/mina/releases/tag/3.0.3). 3. Provision servers that meet the minimum hardware requirements, primarily the new 32GB RAM requirement. 4. Upgrade their nodes to the version that includes built-in stop slots before the pre-defined _stop-transaction-slot_. ### Exchanges 1. Make sure to test your system integration with Berkeley's new features. Pay special attention to: - If you use the **o1labs/client-sdk** library to sign transactions, you should switch to **[mina-signer](https://www.npmjs.com/package/mina-signer)**. o1labs/client-sdk was **deprecated** some time ago and will be **unusable** once the network has been upgraded. Please review the migration instructions in [Appendix](/network-upgrades/berkeley/appendix). - If you rely on the archive node SQL database tables, please review the schema changes in Appendix 1 of this document. 2. Upgrade all nodes to the latest stable version [3.0.3](https://github.com/MinaProtocol/mina/releases/tag/3.0.3). 3. Provision servers that meet the minimum hardware requirements, particularly the new 32GB RAM requirement. 4. Upgrade your nodes to the version that includes built-in stop slots before the pre-defined _stop-transaction-slot_. *** ## State Finalization - Between the predefined _stop-transaction-slot_ and _stop-network-slot_, a stabilization period of 100 slots will occur. During this phase, the network consensus will not accept new blocks with transactions on them, including coinbase transactions. The state finalization period ensures all nodes reach a consensus on the latest network state before the upgrade. - During the state finalization slots, it is crucial to maintain a high block density. Therefore, block producers and SNARK workers shall continue running their nodes to support the network's stability and security. - Archive nodes should also continue to execute to ensure finalized blocks are in the database and can be migrated, preserving the integrity and accessibility of the network's history. ### Block Producers and SNARK Workers 1. It is crucial for the network's successful upgrade that all block producers and SNARK workers maintain their block-producing nodes up and running throughout the state finalization phase. 2. If you are running multiple daemons like is common with many operators, you can run one single node at this stage. 3. If you are a Delegation Program operator, remember that your uptime data will continue to be tracked during the state finalization phase and will be considered for the delegation grant in the following epoch. ### Archive Node Operators and Rosetta Operators **If you plan to do the _trustful_ migration, you can skip this step.** If you are doing the trustless migration, then: 1. Continue to execute the archive node to ensure finalized blocks are in the database and can be migrated. 2. Continue to run incremental archive node migrations until after the network stops at the stop-network slot. 3. For more information on the archive node migration process, please refer to the [Archive Migration](/network-upgrades/berkeley/archive-migration) section ### Exchanges Exchanges shall disable MINA deposits and withdrawals during the state finalization period (the period between _stop-transaction-slot_ and _stop-network-slot_) since any transactions after the _stop-transaction-slot_ will not be part of the upgraded chain. Remember that although you might be able to submit transactions, the majority of the block producers will be running a node that discards any blocks with transactions. *** ## Upgrade - Starting at the _stop-network-slot_ the network will not produce nor accept new blocks, resulting in halting the network. During the upgrade period, o1Labs will use automated tooling to export the network state based on the block at the slot just before the _stop-transaction-slot_. The exported state will then be baked into the new Berkeley build, which will be used to initiate the upgraded network. It is during the upgrade windows that the Berkeley network infrastructure will be bootstrapped, and seed nodes will become available. o1Labs will also finalize the archive node migration and publish the PostgreSQL database dumps for import by the archive node operators who wish to bootstrap their archives in a trustful manner. - There is a tool available to validate that the Berkeley node was built from the pre-upgrade network state. To validate, follow the instructions provided in this [location](https://github.com/MinaProtocol/mina/blob/berkeley/docs/upgrading-to-berkeley.md) ### Block Producers and SNARK Workers 1. During the upgrade phase (between _stop-network-slot_ and the publishing of the Berkeley release), block producers can shut down their nodes. 2. After the publication of the Berkeley node release, block producers and SNARK workers should upgrade their nodes and be prepared for block production at the genesis timestamp, which is the slot when the first Berkeley block will be produced. 3. It is possible to continue using the same libp2p key after the upgrade. Remember to adjust the new flag to pass the libp2p key to the node. ### Archive Node Operators and Rosetta Operators 1. Upon publishing the archive node Berkeley release, archive node operators and Rosetta operators should upgrade their systems. There will be both Docker images and archive node releases available to choose from. 2. Depending on the chosen migration method: - _Trustless_ - Operators should direct their Berkeley archive process to the previously migrated database. - _Trustful_ - Operators shall import the SQL dump file provided by o1Labs to a freshly created database. - Operators should direct their Berkeley archive process to the newly created database. **Please note:** both the _trustless_ and _trustful_ migration processes will discard all Mainnet blocks that are not canonical. If you wish to preserve the entire block history, i.e. including non-canonical blocks, you should maintain the Mainnet archive node database for posterior querying needs. ### Exchanges 1. Exchanges shall disable MINA deposits and withdrawals during the entirety of the upgrade downtime, since the _stop-transaction-slot_ until the Mainnet Berkeley network is operational. 2. After the Berkeley releases are published, exchanges should upgrade their nodes and prepare for the new network to start block production. *** ## Post-Upgrade - At approximately 1 hour after the publishing of the Berkeley node release, at a predefined slot (Berkeley genesis timestamp), block production will start, and the network is successfully upgraded. - Node operators can monitor their nodes and provide feedback to the technical team in case of any issues. Builders can start deploying zkApps. - **Please note:** The Node Status service will not be enabled by default in the Berkeley release. If you wish to provide Node Status and Error metrics and reports to Mina Foundation, helping monitor the network in the initial phase, please use the following flags when running your nodes: - `--node-stats-type [full|simple]` - `--node-status-url https://nodestats.minaprotocol.com/submit/stats` - `--node-error-url https://nodestats.minaprotocol.com/submit/stats` - The error collection service tries to report any node crashes before the node process is terminated ### Block Producers and SNARK Workers 1. Ensure that all systems have been upgraded and prepared for the start of block production. 2. Monitor nodes and network health, and provide feedback to the engineering team in case of any issues. ### Archive Node Operators and Rosetta Operators 1. Ensure that all systems have been upgraded and prepared for the start of block production. 2. Monitor nodes and network health, and provide feedback to the engineering team in case of any issues. ### Exchange and Builders 1. After the predefined Berkeley genesis timestamp, block production will commence, and MINA deposits and withdrawals can be resumed. 2. Ensure that all systems have been upgraded and prepared for the start of block production. 3. Monitor nodes and network health, and provide feedback to the engineering team in case of any issues. --- url: /network-upgrades --- # Network Upgrades Mina Protocol evolves through network upgrades (hard forks). Each upgrade introduces new protocol features, performance improvements, or governance changes. Hard forks are not backward compatible — all node operators must upgrade before the fork activates. :::tip Mesa test network update **Mesa Trail** is the current Mesa test network. The earlier preflight and MUT networks are [archived](/network-upgrades/mesa/archived-networks). See [Mesa Trail Network](/network-upgrades/mesa/mesa-trail) for the current build versions and upgrade path. ::: | Upgrade | Status | Date | Key Changes | |---------|--------|------|-------------| | [Berkeley](/network-upgrades/berkeley/requirements) | Completed | June 2024 | zkApp programmability, recursive proofs, new transaction model, archive database migration | | [Mesa](/network-upgrades/mesa/mesa-trail) | Testing on Mesa Trail | Mainnet date TBD | Transaction protocol v5.0.0, automode upgrades, simplified archive migration | --- url: /network-upgrades/mesa/appendix/archive-node-schema-changes --- # Archive Node Schema Changes ## Upgrading archive nodes from Berkeley to Mesa Below we present details of what changed in the archive node database schema between Berkeley and Mesa versions. ### Extended zkApp State Fields Both zkApp state tables have been modified to support additional state elements: **zkapp_states_nullable table** - Added columns `element8` through `element31` (nullable integer fields) - Each new column references `zkapp_field(id)` - These fields allow zkApps to store additional state information beyond the original 8 elements ```sql ALTER TABLE zkapp_states_nullable ADD COLUMN IF NOT EXISTS element8 INT REFERENCES zkapp_field(id); ... ALTER TABLE zkapp_states_nullable ADD COLUMN IF NOT EXISTS element31 INT REFERENCES zkapp_field(id); ``` **zkapp_states table** - Added columns `element8` through `element31` (non-nullable integer fields) - Each new column references `zkapp_field(id)` with a default value pointing to the zero field - Unlike the nullable version, these fields are required and default to the zero field ID ```sql ALTER TABLE zkapp_states ADD COLUMN IF NOT EXISTS element8 INT DEFAULT NOT NULL REFERENCES zkapp_field(id); ... ALTER TABLE zkapp_states ADD COLUMN IF NOT EXISTS element31 INT DEFAULT NOT NULL REFERENCES zkapp_field(id); ``` This expansion allows zkApps to store up to 32 state elements instead of the previous 8, significantly increasing the state storage capacity for complex smart contracts. ### Dropped `element_ids` Uniqueness (events and actions) The `zkapp_events` and `zkapp_field_array` tables store their contents in an unbounded `int[]` `element_ids` column. Mesa **drops the `UNIQUE` constraint and the standalone btree index** on that column. A btree key over a large array (a max-cost zkApp can produce ~1024 elements) exceeds PostgreSQL's 2704-byte index-row limit, which previously caused inserts to fail for such zkApps. As a consequence, these rows are **no longer content-deduplicated**. ```sql ALTER TABLE zkapp_field_array DROP CONSTRAINT IF EXISTS zkapp_field_array_element_ids_key; DROP INDEX IF EXISTS idx_zkapp_field_array_element_ids; ALTER TABLE zkapp_events DROP CONSTRAINT IF EXISTS zkapp_events_element_ids_key; DROP INDEX IF EXISTS idx_zkapp_events_element_ids; ``` ### Nullable `events_id` / `actions_id` The `events_id` and `actions_id` columns on `zkapp_account_update_body` become **nullable**. After the upgrade, an empty events or actions list is stored as `NULL` (no `zkapp_events` row is created) instead of referencing an empty-array row. ```sql ALTER TABLE zkapp_account_update_body ALTER COLUMN events_id DROP NOT NULL; ALTER TABLE zkapp_account_update_body ALTER COLUMN actions_id DROP NOT NULL; ``` ### Version Tracking The upgrade introduces a new `migration_history` table to keep track of the database schema version. The purpose of this table is to help with future database migrations. The table tracks which migration scripts were applied and when. **migration_history table** ```sql CREATE TABLE IF NOT EXISTS migration_history ( commit_start_at timestamptz NOT NULL DEFAULT now() PRIMARY KEY, protocol_version text NOT NULL, migration_version text NOT NULL, description text NOT NULL, status migration_status NOT NULL ); ``` The migration_history table provides: - **Migration tracking**: Records which migrations have been applied - **Timestamp tracking**: Shows when each migration was executed - **Idempotency**: Prevents duplicate migration runs - **Version identification**: Easily identify the current database schema version The table is created if it does not exist already. Rollback and upgrade scripts will insert a new row with the version number and timestamp when the script was applied. --- url: /network-upgrades/mesa/appendix/automode-docker-compose-quickstart --- # Automode Docker Compose Quickstart ```yaml services: mina_node: image: 'minaprotocol/mina-daemon-auto-hardfork:-noble-mainnet' restart: always environment: MINA_CLIENT_TRUSTLIST: "0.0.0.0/0" entrypoint: [] command: > bash -c ' mina daemon \ --peer-list-url https://bootnodes.minaprotocol.com/networks/mainnet.txt \ --insecure-rest-server \ --rest-port 3085 \ --hardfork-handling migrate-exit ' volumes: - './mina-config:/root/.mina-config' ports: - '3085:3085' - '8302:8302' ``` Replace `` with the published stop-slot release from the [Mina releases page](https://github.com/MinaProtocol/mina/releases). :::tip About `--hardfork-handling` The automode image still expects `--hardfork-handling migrate-exit`, so you always pass it here. The automode dispatcher consumes the flag and routes to the correct binary, so you do not need any conditional logic around it. Remove it only when you switch off the automode image (see [Switching back to normal Docker](#switching-back-to-normal-docker)). ::: :::tip Docker image tag Use the stop-slot release image for your target network. For devnet, replace the image tag suffix `mainnet` with `devnet` and use the corresponding devnet release tag. ::: :::tip Peer list URL The `--peer-list-url` above points to the mainnet bootnodes. For devnet, replace it with `https://bootnodes.minaprotocol.com/networks/devnet.txt`. ::: :::tip Additional environment variables Add any extra configuration (e.g. `MINA_PRIVKEY_PASS`) under the `environment` section. ::: ## Switching back to normal Docker After your node has completed the Mesa transition and you want to move off `mina-daemon-auto-hardfork`, update your Compose config as follows: - Remove `--hardfork-handling migrate-exit`. - Set the Docker image to the post-fork artifact, for example `minaprotocol/mina-daemon:-noble-mainnet`. ```bash docker compose up -d ``` :::caution `restart: always` and the persistent `mina-config` volume are required for automode. If the volume is wiped between restarts, the node cannot transition to Mesa. See [Upgrade Modes](/network-upgrades/mesa/upgrade-modes) for details. ::: --- url: /network-upgrades/mesa/appendix/upgrade-modes-details --- # Upgrade Modes - Details This page explains **how the two upgrade modes work under the hood**. If you just want to know which mode to pick and what to do, see [Upgrade Modes](/network-upgrades/mesa/upgrade-modes). This page is for operators who want to understand the mechanism before trusting it with their nodes. ## The Big Picture During the Mesa hard fork, the network transitions from the current chain (referred to internally as "berkeley") to the new Mesa chain. Both upgrade modes use the same **stop-slot mechanism** to halt the old chain at a predetermined slot. The difference is what happens next: - **Automode**: the node automatically switches to the Mesa binary and resumes. No operator action needed. - **Manual mode**: the operator stops the old node, installs the Mesa release, and starts it themselves. Both modes reach the same end state — a node running on the Mesa network, producing blocks after the Mesa genesis timestamp. ## Stop-Slot Mechanism Both modes rely on two critical slot numbers baked into the stop-slot release (3.x.x): | Slot | What happens | |---|---| | **stop-transaction-slot** | The network stops accepting transactions. Blocks produced after this slot are empty — no user commands, no coinbase rewards, no fee transfers. This begins the State Finalization period. | | **stop-network-slot** | The network stops producing and accepting blocks entirely. The chain halts. This is the point where the fork happens. | The gap between these two slots is exactly 100 slots (5 hours) — the **State Finalization** period. It ensures all nodes converge on the same final state before the fork. :::tip For block producers You **will not earn block rewards** during State Finalization (no coinbase), but you **must keep your node running** to maintain network stability and block density. If you are in the Delegation Program, uptime tracking continues during this phase. ::: ## Automode — How It Works Internally ### Dual-Binary Architecture The automode release ships **two complete sets of Mina binaries plus the dispatcher** in a single `mina-{network}-automode` Debian package: | Component | Path | Purpose | |---|---|---| | **Pre-fork binary** | `/usr/lib/mina/berkeley/mina` | Runs the current chain up to the stop-network-slot | | **Post-fork binary** | `/usr/lib/mina/mesa/mina` | Runs the Mesa chain after the fork | | **Dispatcher** (`mina-dispatch`) | `/usr/local/bin/mina-dispatch` | Routes your commands to the correct binary | When you install the automode package (or use the [automode Docker image](/network-upgrades/mesa/glossary#automode-image)), all three components are installed together. ### The Dispatcher The dispatcher (`mina-dispatch`) is a shell script that acts as a transparent wrapper around the real `mina` binary. When you run a `mina` command, the dispatcher decides which binary to execute: - **`daemon` subcommand** — routes based on the activation state file: ``` Does the activation state file exist? → NO: route to the pre-fork (berkeley) binary → YES: route to the post-fork (mesa) binary ``` - **`client` subcommand** — always routes to the post-fork (mesa) binary, regardless of activation state. This works because the GraphQL schema did not change between Berkeley and Mesa. - **`--version`** — passed through without processing. The **activation state file** is located at `{MINA_HARDFORK_STATE_DIR}/auto-fork-mesa-{network_id}/activated` (e.g., `~/.mina-config/auto-fork-mesa-mainnet/activated` on the host, or `/root/.mina-config/auto-fork-mesa-mainnet/activated` in Docker). This file is created by the daemon itself when it detects that the network has reached the stop-network-slot. ### Dispatcher Limitations :::info Current implementation — may change in future releases This limitation exists because, for most subcommands, the dispatcher does not receive the config directory location as an argument. Without access to the config directory, it cannot check for the `activated` state file and therefore cannot determine whether the node is running Berkeley or Mesa. ::: The dispatcher supports the following subcommands: | Subcommand | Routing behavior | |---|---| | `daemon` | Routes to pre-fork or post-fork binary based on activation state | | `client` | Always routes to the post-fork (mesa) binary | | `--version` | Passed through without processing | Any other subcommand (e.g., `accounts list`, `ledger export`) will fail with an error: ``` mina-dispatch ERROR: unsupported subcommand 'accounts' for automatic hardfork handling ``` For unsupported subcommands, invoke the correct version-specific binary directly: | Binary | When to use | Path | |---|---|---| | Pre-fork (Berkeley) | Before the fork (or to query pre-fork state) | `/usr/lib/mina/berkeley/mina` | | Post-fork (Mesa) | After the fork | `/usr/lib/mina/mesa/mina` | ```bash # These work at any time — they bypass the dispatcher /usr/lib/mina/berkeley/mina client status /usr/lib/mina/mesa/mina accounts list /usr/lib/mina/mesa/mina ledger export ``` :::note About `client` routing The `client` subcommand (e.g., `mina client status`) is always routed to the mesa binary because it communicates with the running daemon over GraphQL, and the GraphQL schema did not change between Berkeley and Mesa. This means `mina client status` works through the dispatcher at any point — before or after the fork — as long as a daemon is running. ::: ### What the Dispatcher Does for `daemon` Commands When the dispatcher routes a `daemon` command to the Mesa binary, it automatically adjusts your command-line arguments: 1. **Config files**: Your existing `-config-file` arguments are kept, and the Mesa-specific configuration is **appended as the last** `-config-file` entry. This ensures Mesa settings take precedence. 2. **Genesis ledger directory**: Any `--genesis-ledger-dir` argument is rewritten to point to the Mesa ledger directory. 3. **Hardfork handling flag**: The `--hardfork-handling` argument is **removed** (it is not supported on the Mesa chain). ### Automode Timeline Here is what happens from a block producer's perspective when using automode: Automode upgrade flow diagram showing four phases: pre-upgrade, state finalization, automatic upgrade with process restart, and post-upgrade ### Restart and Filesystem Requirements The automode transition involves a **process restart**. When the daemon reaches the stop-network-slot, it: 1. Generates the Mesa configuration (`daemon.json`) and genesis ledger tarballs in the config directory 2. Writes an `activated` sentinel file to mark the fork as complete 3. **Exits with code 0** (clean shutdown) The daemon does **not** restart itself. Your process manager must detect the exit and restart the process. On restart, the dispatcher sees the `activated` file and launches the Mesa binary with the auto-generated config. **This means two things are critical:** **Persistent config directory** — The config directory (typically `~/.mina-config` or `/root/.mina-config` in Docker) **must survive across restarts**. It contains the `activated` file and the generated Mesa configuration. If this directory is ephemeral or gets wiped on restart, the node will restart into the Berkeley binary and fail to join the Mesa network. **Automatic restart on clean exit** — Your process manager must be configured to restart the daemon after exit code 0: | Platform | Configuration | Notes | |---|---|---| | **systemd** | `Restart=always` | Default in the Mina systemd unit (`mina.service`). Restarts after 30 seconds. | | **Docker** | `--restart=always` or `--restart=unless-stopped` | Set when creating the container. The default (`no`) will **not** restart. | | **Kubernetes** | `restartPolicy: Always` | The k8s default for pods. Ensure your liveness probes and Helm chart configuration do not treat exit code 0 as a failure that triggers a volume wipe or full pod replacement. The config directory volume **must** be a `PersistentVolumeClaim`, not `emptyDir`. | :::danger For Kubernetes / Helm users If your Helm chart or pod spec uses `emptyDir` for the config directory, the `activated` file and generated Mesa config will be lost when the pod restarts. Use a `PersistentVolumeClaim` instead. Also verify that your restart logic does not re-initialize the config directory from scratch — the auto-generated Mesa config must be preserved. ::: ### How automode is packaged Operator install instructions (Debian packages, Docker image) live on [Upgrade Modes — Installing automode](/network-upgrades/mesa/upgrade-modes#installing-automode). The detail worth keeping here is what each artifact contributes to the mechanism described above: - The `mina-{network}-automode` Debian package is an umbrella package whose dependencies pull in the pre-fork binary, post-fork binary, dispatcher, and dispatcher configuration. Internally it depends on `mina-{network}-prefork-mesa` (supplies `/usr/lib/mina/berkeley/mina`) and `mina-{network}-postfork-mesa` (supplies `/usr/lib/mina/mesa/mina`, plus `/usr/local/bin/mina-dispatch` and `/etc/default/mina-dispatch`). Operators only need to install `mina-{network}-automode`; apt resolves the rest. - The `minaprotocol/mina-daemon-auto-hardfork` Docker image bundles the same artifacts and sets `MINA_APP=/usr/local/bin/mina-dispatch` and `MINA_HARDFORK_STATE_DIR=/root/.mina-config` in the entrypoint. :::caution The dispatcher reads its configuration from `/etc/default/mina-dispatch`. This file must exist and be owned by root. Do not modify it unless you know what you are doing. ::: ## Manual Mode — How It Works Manual mode is the traditional upgrade approach, similar to the Berkeley upgrade. You are in full control of every step. ### Manual Mode Timeline Manual mode upgrade flow diagram showing four phases: pre-upgrade, state finalization, manual upgrade with 5 operator steps, and post-upgrade ### Manual Mode — What Gets Installed When you install the Mesa release manually, the package includes: - The Mesa `mina` binary - A new runtime configuration JSON for the Mesa network - New genesis and epoch ledger tarballs These replace the pre-fork components. There is no dispatcher involved — you are running the Mesa binary directly. ### Manual Mode — Updating Your Flags When switching from the pre-fork to the Mesa binary, you need to update your startup flags: 1. **Remove** `--hardfork-handling` if you were using it 2. **Update** your `--genesis-ledger-dir` to point to the Mesa ledger directory (included in the package) 3. **Update** your `-config-file` to use the Mesa configuration 4. **Keep** your existing `--block-producer-key`, `--libp2p-keypair`, and other operator-specific flags See [Post-Upgrade Flags](/network-upgrades/mesa/upgrade-steps/post-upgrade) for exact flag values. ### Docker (Manual Mode) For manual mode with Docker, use the **hardfork** image (not auto-hardfork): ``` minaprotocol/mina-daemon-hardfork:{version}-{codename}-{network} ``` This image includes both pre-fork and post-fork packages but uses a dedicated hardfork entrypoint that requires manual intervention to complete the transition. ## Which mode should I pick? The "who should use" criteria for each mode and the side-by-side comparison live on [Upgrade Modes](/network-upgrades/mesa/upgrade-modes#comparison) — this page intentionally stays focused on the underlying mechanism so the two documents do not drift. ## Operator troubleshooting Operator-facing troubleshooting (how to tell which binary is active, dispatcher debug mode, when to invoke the pre-fork vs post-fork binary by its full path) has moved to its own page: [Troubleshooting](/network-upgrades/mesa/troubleshooting). --- url: /network-upgrades/mesa/archive-upgrade --- # Archive Upgrade This guide describes the general procedure for upgrading a Mina archive database from Berkeley to Mesa. The same steps apply to every Mesa deployment (Mesa Trail, devnet, mainnet) — only the archive package version differs. :::tip Test-network version info **Mesa Trail** is the current Mesa test network. See [Mesa Trail Network](/network-upgrades/mesa/mesa-trail) for the current build versions and transaction protocol details. ::: The Mesa Trail archive version is **`4.0.0-rc2-3418329`**. Docker tag: `gcr.io/o1labs-192920/mina-archive:4.0.0-rc2-3418329-bullseye-devnet`. See [Mesa Trail Network](./mesa-trail) for the full release matrix. ```bash # Substitute this version wherever appears below MESA_VERSION=4.0.0-rc2-3418329 ``` The devnet Mesa archive version will be published when the devnet fork is scheduled. Check [Mina releases](https://github.com/MinaProtocol/mina/releases?q=mesa) for the latest tag. ```bash # Substitute this version wherever appears below MESA_VERSION= ``` The mainnet Mesa archive version will be published in the Mesa release announcement. Check [Mina releases](https://github.com/MinaProtocol/mina/releases?q=mesa) for the `4.x.x` tag. ```bash # Substitute this version wherever appears below MESA_VERSION= ``` To successfully upgrade the archive database to Mesa, you must ensure that your environment meets the foundational requirements. ## Upgrade host - PostgreSQL database for database server - If you use Docker, then any of the supported OS by Mina (bullseye, focal, noble, bookworm or jammy) with at least 32 GB of RAM - Google Cloud CLI (`gcloud`), which provides the `gcloud storage` commands - (Optional) Docker in version 23.0 or later ## Archive database One of the most obvious prerequisites is an archive database with Berkeley-era data. If you don't have an existing database with Devnet or Mainnet archive data, you can always download it from the O1Labs Google Cloud bucket. ## Upgrade process ### Upgrade script Assuming that you have a PostgreSQL database with Mainnet archive data, in order to upgrade it to Mesa version, you need to run SQL upgrade script. The script can be run on an archive node that is either online or offline. Script can be run multiple times, it will skip steps that were already completed. It also performs sanity checks before each step to ensure that the upgrade process is successful. Finally it creates a new table (`migration_history`) in the database to keep track of the upgrade process. #### Getting the script The upgrade script ships **inside the Mina archive Debian package and Docker image**, so the recommended way to get it is straight from the release you install — that copy is guaranteed to match your archive version. **From the Debian package (recommended)** — the `mina-archive-{network}` package installs the script at `/etc/mina/archive/upgrade_to_mesa.sql`: ```bash # Setup the Mina repository and install the archive package. # Repository setup (apt sources, GPG key, channel) is network-specific — # see Mesa Trail Network for the test-network pin, or your network's release notes. apt-get install mina-archive-mainnet= # View the upgrade and downgrade scripts cat /etc/mina/archive/upgrade_to_mesa.sql cat /etc/mina/archive/downgrade_to_berkeley.sql ``` **From the Docker image** — extract it from the archive image: ```bash docker run --rm gcr.io/o1labs-192920/mina-archive:-bookworm-mainnet cat /etc/mina/archive/upgrade_to_mesa.sql > upgrade_to_mesa.sql ``` **From GitHub (alternative)** — only if you are not installing the package; make sure to match the script to your release: ```bash curl -O https://raw.githubusercontent.com/MinaProtocol/mina/refs/heads/mesa/src/app/archive/upgrade_to_mesa.sql ``` #### Running the script :::caution Database Backup Before running the upgrade script, **backup your archive database**. The upgrade modifies the database schema. ```bash pg_dump -U > berkeley-archive-backup.sql ``` ::: To run the upgrade script, execute the following command: ```bash psql -U -d -f /etc/mina/archive/upgrade_to_mesa.sql ``` Make sure to replace `` and `` with your actual PostgreSQL username and database name. #### Rollback You can rollback the upgrade process by restoring the database from a backup taken before running the upgrade script. Another alternative is to run the rollback script, which is part of the upgrade script. It will drop all tables and other database objects created by the upgrade script. It will also update the `migration_history` table to reflect the rollback. ##### Running the rollback script To run the rollback script, you need to execute the following command: ```bash psql -U -d -f /etc/mina/archive/downgrade_to_berkeley.sql ``` Make sure to replace `` and `` with your actual PostgreSQL username and database name. ### Post-upgrade steps After successfully running the upgrade script, you DO NOT need to restart your archive node or Rosetta API. Changes in upgrade script are backward compatible and will be picked up by the archive node and Rosetta API automatically. ### Verification with the Archive Hardfork Toolbox The `mina-archive-hardfork-toolbox` is a dedicated CLI tool for verifying the integrity of archive database upgrades and fork transitions. It is shipped with the Mina archive package and available as a standalone binary. For full details, see the [toolbox README](https://github.com/MinaProtocol/mina/blob/release/mesa/src/app/archive_hardfork_toolbox/README.md). All commands below require a `--postgres-uri` flag in the format: ``` postgresql://:@:/ ``` #### Step 1: Pre-fork validation (before the fork) Verify the fork block candidate is valid before the network halts. **Check that the fork block is in the best chain:** ```bash mina-archive-hardfork-toolbox fork-candidate is-in-best-chain \ --postgres-uri \ --fork-state-hash \ --fork-height \ --fork-slot ``` **Verify the fork block has enough confirmations:** ```bash mina-archive-hardfork-toolbox fork-candidate confirmations \ --postgres-uri \ --latest-state-hash \ --fork-slot \ --required-confirmations ``` **Verify no commands were executed after the fork block** (ensures a clean fork point): ```bash mina-archive-hardfork-toolbox fork-candidate no-commands-after \ --postgres-uri \ --fork-state-hash \ --fork-slot ``` **Find the last block with transactions** (useful for identifying the fork point): ```bash mina-archive-hardfork-toolbox fork-candidate last-filled-block \ --postgres-uri ``` #### Step 2: Verify the schema upgrade After running `upgrade_to_mesa.sql`, verify the database schema was upgraded correctly: ```bash mina-archive-hardfork-toolbox verify-upgrade \ --postgres-uri \ --protocol-version \ --migration-version ``` You can also verify manually by checking the `migration_history` table: ```bash psql -U -d -c "SELECT * FROM migration_history;" ``` If the upgrade was successful, the `migration_history` table will contain an entry with the expected migration version and a recent timestamp. #### Step 3: Post-fork finalization After the fork activates, a hardfork archive needs **two repair actions** before its data is coherent. Neither self-heals — you must run both once the Mesa chain is live. Run each with `--dry-run` first to preview the changes. **Run these before the Step 4 validation** — `validate-fork` checks data that these repairs put right. ##### 3a. Finalize the stranded pre-fork chain — `convert-chain-to-canonical` When the pre-fork chain halts, its final _k_ blocks (the pruned-frontier depth, `k = 290`) can never reach _k_-depth: no consensus is left to bury them, so they stay `pending` and never become `canonical`. The result is incoherent — the fork genesis can be `canonical` while its own parent is still `pending`, and the canonical walk from the tip terminates early. The live Mesa chain passing `fork genesis + k` does **not** fix this. This is expected for every hardforked archive, and `convert-chain-to-canonical` is the intended finalization path, not a workaround. With no target flags, the tool auto-detects the latest hard-fork boundary and marks the chain leading to the fork block canonical: ```bash mina-archive-hardfork-toolbox convert-chain-to-canonical \ --postgres-uri \ --dry-run ``` To target an explicit fork block and protect the live chain, pass the fork block's state hash and stop at the Mesa genesis slot so post-fork blocks stay untouched: ```bash mina-archive-hardfork-toolbox convert-chain-to-canonical \ --postgres-uri \ --target-block-hash \ --stop-at-slot \ --protocol-version .. ``` - `--target-block-hash` — state hash of the block that should remain canonical (the fork block). Defaults to the parent of the latest hard-fork block. `--fork-height ` is an alternative. - `--stop-at-slot` — blocks at or beyond this global slot stay untouched, protecting the live Mesa tip. - `--protocol-version` — defaults to the target block's own protocol version. ##### 3b. Backfill the fork-genesis accounts — `populate-genesis-accounts` The Mesa fork-genesis block can land with **zero** rows in `accounts_accessed`. Rosetta resolves balances by reading that table at the genesis block; finding an empty set, it reports **zero balances** for every account. This is an operational gap (the accounts were never written), not a code defect. Backfill them from the runtime config's genesis ledger: ```bash mina-archive-hardfork-toolbox populate-genesis-accounts \ --postgres-uri \ --config-file /var/lib/coda/mainnet.json ``` - `--config-file` (required) — the runtime config containing the (fork) genesis ledger. In the Mesa package this is `/var/lib/coda/mainnet.json` (or the hash-suffixed `config_.json`). - `--chunks-length` — accounts inserted per transaction (default `100`); lower it if a large ledger risks a Postgres OOM. After this runs, Rosetta `/account/balance` at the fork-genesis block returns the real migrated balance (with the carried-over nonce) instead of zero. Confirm the count matches expectations: ```sql SELECT COUNT(*) FROM accounts_accessed aa JOIN blocks b ON b.id = aa.block_id WHERE b.height = ; ``` #### Step 4: Post-fork validation Once the fork is active and the archive has been finalized (Step 3), validate the fork block and its ancestry: ```bash mina-archive-hardfork-toolbox validate-fork \ --postgres-uri \ --fork-state-hash \ --fork-slot ``` :::tip Typical workflow 1. **Before the fork**: run `fork-candidate` commands to validate the fork block 2. **After running the upgrade script**: run `verify-upgrade` to confirm the schema upgrade 3. **After the fork activates — finalize the archive** (required): run `convert-chain-to-canonical` and `populate-genesis-accounts` (Step 3) 4. **Then validate**: run `validate-fork` to confirm data integrity (Step 4) 5. **For full archive verification**: run the [Archive Replayer](/node-operators/archive-node/replayer) to replay all transactions and compare the resulting ledger against the official fork config ::: :::caution Passing the fork slot The runtime config's `fork.global_slot_since_genesis` is the **new chain's genesis slot**, not the fork block's slot. The fork block sits one `hard_fork_genesis_slot_delta` earlier. Toolbox flags that want the fork block's slot (for example `--fork-slot`) expect that earlier value — copying the config value directly produces a spurious failure. ::: If you encounter any issues, reach out to the Mina community on [Discord](https://discord.gg/minaprotocol) or [GitHub Discussions](https://github.com/MinaProtocol/mina/discussions). ## Full Archive Verification with the Replayer The toolbox commands above verify the schema and fork block integrity, but they do not verify every transaction in the archive. For complete end-to-end verification, use the **[Archive Replayer](/node-operators/archive-node/replayer)** — a tool that replays all transactions from genesis (or a checkpoint) through the fork point, recomputing the ledger state and comparing it against the official fork config. The replayer is not limited to upgrade-time use. It is an **ongoing verification tool** that can be run at any time to confirm your archive database faithfully represents the canonical chain. After the Mesa upgrade, you can continue running it against Mesa blocks to detect any data corruption or missing blocks. See [Archive Replayer](/node-operators/archive-node/replayer) for usage, flags, and examples. ## Database Schema Changes For the full schema diff (new columns, modified tables, applied SQL), see [Archive Node Schema Changes](/network-upgrades/mesa/appendix/archive-node-schema-changes). --- url: /network-upgrades/mesa/archived-networks --- # Archived Networks The Mesa test networks on this page are **archived**: they are no longer running, their builds are no longer supported, and the versions listed are historical. They are kept here as a reference for operators tracing old logs, images, or package pins. For all current testing, use [Mesa Trail](/network-upgrades/mesa/mesa-trail). ## Preflight An early Mesa test network, used to validate the upgrade before Mesa Trail. | Field | Value | | --- | --- | | Pre-fork release | `4.0.0-preflight1-b649c79` | | Stop-slot release | `4.0.0-preflight-stop-2967b39` | | Post-fork (Mesa) release | `4.0.0-preflight-3f038cb` | | Hard-fork time (UTC) | 2026-04-27 13:00 | | Transaction protocol version after fork | 5.0.0 | | o1js version targeting protocol v5.0.0 | `o1js@3.0.0-mesa.698ca` | | Docker tag suffix | `-mesa` (for example `mina-daemon:4.0.0-preflight-3f038cb-bookworm-mesa`) | | Debian channel | `preflight` on `unstable.apt.packages.minaprotocol.com` | | Debian packages | `mina-mesa`, `mina-archive-mesa`, `mina-rosetta-mesa` | | Seed nodes | `seed-1.mina-mesa-network.gcp.o1test.net`, `seed-2.mina-mesa-network.gcp.o1test.net` | The preflight fork-schedule values are also recorded on the [Fork Schedule](/network-upgrades/mesa/fork-schedule) page. ## MUT The MUT network (`mesa-mut`) was a Mesa upgrade-test network that exercised the full stop-slot → fork → post-fork sequence on `4.0.0-rc1` builds. Operator feedback from MUT fed directly into the upgrade procedures documented in these pages. | Field | Value | | --- | --- | | Releases | `4.0.0-rc1` builds (for example `4.0.0-rc1-83b4654`, `4.0.0-rc1-mesa-mut-d7513d4`) | | Docker tag suffix | `-mesa-mut` (for example `mina-daemon:4.0.0-rc1-83b4654-bullseye-mesa-mut`) | | Seed nodes | `seed-1.mesa-mut.minaprotocol.com`, `seed-2.mesa-mut.minaprotocol.com` | ## Next Steps - [Mesa Trail Network](/network-upgrades/mesa/mesa-trail) — the current test network: build matrix and setup - [Mesa Upgrade Overview](/network-upgrades/mesa) — prepare for mainnet --- url: /network-upgrades/mesa/fork-schedule --- # Mesa Fork Schedule This page collects the concrete fork-schedule values for the Mesa upgrade per network. If you are integrating with Mina (exchange, custodian, indexer, Rosetta consumer, monitoring), this is the single source of truth for **when** to act and **which release** to run. The relevant moments are: - **`stop-transaction-slot`** (a.k.a. `slot_tx_end` in the daemon config) — the slot at which nodes stop accepting new user transactions. Block production continues with empty blocks until the network-slot. See the [glossary entry](/network-upgrades/mesa/glossary#stop-transaction-slot). - **`stop-network-slot`** (a.k.a. `slot_chain_end`) — the slot at which block production halts entirely. The network is offline between this slot and the Mesa genesis timestamp. See the [glossary entry](/network-upgrades/mesa/glossary#stop-network-slot). - **Mesa genesis timestamp** — the wall-clock time at which the first block on the Mesa chain is produced. Exactly 3 hours after the _stop-network-slot_. See the [glossary entry](/network-upgrades/mesa/glossary#mesa-genesis-timestamp). ## Mainnet :::info Upgrade day is 2026-09-03 The mainnet stop-slot schedule is published and is compiled into the releases below. Announced in the [3.5.0 Mainnet Stop Slot Release](https://github.com/MinaProtocol/mina/releases/tag/3.5.0-mainnet-stop-slot) and the [4.0.0 Mainnet Automode Upgrade Release](https://github.com/MinaProtocol/mina/releases/tag/4.0.0-mainnet). ::: | Field | Value | | --------------------------------------- | ------------------------------------------------------------------------------------------------------------------------------------------------------- | | Pre-fork (stop-slot) release | [`3.5.0-mainnet-stop-slot`](https://github.com/MinaProtocol/mina/releases/tag/3.5.0-mainnet-stop-slot) — `mina-mainnet=3.5.0-mainnet-stop-slot-5e100ee` | | Automode release | [`4.0.0-mainnet`](https://github.com/MinaProtocol/mina/releases/tag/4.0.0-mainnet) — `mina-mainnet-automode=4.0.0-mainnet-893c877` | | Mesa release (manual mode only) | _Published after the stop-network-slot_ | | `stop-transaction-slot` (`slot_tx_end`) | Slot **393800** — 2026-09-03 10:00 UTC | | `stop-network-slot` (`slot_chain_end`) | Slot **393900** — 2026-09-03 15:00 UTC | | Mesa genesis timestamp (UTC) | 2026-09-03 18:00 (`hard_fork_genesis_slot_delta` = 60 slots = 3 hours) | | State Finalization window | Exactly 100 slots = exactly 5 hours between `slot_tx_end` and `slot_chain_end` | Both mainnet packages come from the `stable` channel on `packages.o1test.net`. Run **one** of the two releases: - **Automode** — install `mina-mainnet-automode=4.0.0-mainnet-893c877` before the stop-transaction-slot. The dispatcher swaps to the Mesa binary by itself. No second upgrade. - **Manual** — install `mina-mainnet=3.5.0-mainnet-stop-slot-5e100ee` before the stop-transaction-slot, keep it running until the stop-network-slot, then install the Mesa release when it is published. See [Upgrade Modes](/network-upgrades/mesa/upgrade-modes). The archive package for both paths is `mina-archive=3.5.0-mainnet-stop-slot-5e100ee`. ## Devnet :::note Devnet forked on 2026-08-19 Devnet is on Mesa. The values below are historical; they will not change. ::: | Field | Value | | --------------------------------------- | --------------------------------------------------------------------------------------------------------------------------------------------------- | | Pre-fork (stop-slot) release | [`3.5.0-devnet-stop-slot`](https://github.com/MinaProtocol/mina/releases/tag/3.5.0-devnet-stop-slot) — `mina-devnet=3.5.0-devnet-stop-slot-849edfa` | | Automode release | [`4.0.0-devnet`](https://github.com/MinaProtocol/mina/releases/tag/4.0.0-devnet) — `mina-devnet-automode=4.0.0-devnet-2dc9218` | | Mesa release (manual mode only) | [`4.0.0-devnet-mesa`](https://github.com/MinaProtocol/mina/releases/tag/4.0.0-devnet-mesa) — `mina-devnet=4.0.0-6965b50` | | `stop-transaction-slot` (`slot_tx_end`) | Slot **413540** — 2026-08-19 10:00 UTC | | `stop-network-slot` (`slot_chain_end`) | Slot **413640** — 2026-08-19 15:00 UTC | | Mesa genesis timestamp (UTC) | 2026-08-19 18:00 | | State Finalization window | Exactly 100 slots = exactly 5 hours between `slot_tx_end` and `slot_chain_end` | Devnet packages come from the `alpha` channel on `packages.o1test.net`. A node that joins devnet now must use `mina-devnet=4.0.0-6965b50`; the two pre-fork releases can no longer connect. ## Preflight (archived) The Mesa preflight network is archived — it is no longer running and its builds are no longer supported. The numbers below are historical; they will not change. | Field | Value | | --------------------------------------- | ------------------------------ | | Pre-fork release | `4.0.0-preflight1-b649c79` | | Stop-slot release | `4.0.0-preflight-stop-2967b39` | | Mesa release | `4.0.0-preflight-3f038cb` | | Mesa hard-fork time (UTC) | 2026-04-27 13:00 | | Transaction protocol version after fork | 5.0.0 | | o1js version targeting protocol v5.0.0 | `o1js@3.0.0-mesa.698ca` | The **MUT** network (`mesa-mut`), which ran the same sequence on `4.0.0-rc1` builds, is also archived. For the full context on both archived networks, see [Archived Networks](/network-upgrades/mesa/archived-networks). ## How to use these values - **Exchanges**: schedule your deposit/withdrawal freeze to begin **before** `stop-transaction-slot` and re-enable **after** the Mesa genesis timestamp confirms block production. See the [Exchanges tab on Post-Upgrade](/network-upgrades/mesa/upgrade-steps/post-upgrade) for the full checklist. - **Block producers**: install the stop-slot release any time before `stop-transaction-slot`. If you are using [automode](/network-upgrades/mesa/upgrade-modes), no further action is needed — the dispatcher will swap to the Mesa binary automatically after the Mesa release is published. - **Archive operators**: schedule the archive schema upgrade for any time on or after `stop-network-slot`. The script is backward compatible and can also be run earlier. See [Archive Upgrade](/network-upgrades/mesa/archive-upgrade). - **Rosetta operators**: follow the manual-mode timeline — Rosetta does not support automode. See [Upgrade Modes](/network-upgrades/mesa/upgrade-modes). --- url: /network-upgrades/mesa/glossary --- # Glossary This page defines the key terms used throughout the Mesa upgrade documentation. If you encounter an unfamiliar term in any of the upgrade guides, you can look it up here. :::tip Bookmark this page for quick reference while reading the upgrade docs. ::: --- ## Network and Fork Terms ### Hard Fork A major, non-backward-compatible network upgrade. All node operators must upgrade their software before the fork activates. After the fork, nodes running the old software can no longer participate in the network. The Mesa upgrade is a hard fork. ### Stop-Slot Release The Mina release (version 3.x.x) that node operators install **before** the fork. This release contains the stop-slot logic that gracefully halts the network at the designated time. In [automode](#automode), this release also bundles both the [pre-fork](#pre-fork-binary) and [post-fork binary](#post-fork-binary). ### Stop-Transaction-Slot {#stop-transaction-slot} A predefined global slot number baked into the [stop-slot release](#stop-slot-release). When the network reaches this slot, nodes stop accepting new user transactions. Block production continues with empty blocks (no user commands, no coinbase, no fee transfers) for exactly 100 more slots (5 hours) until the [stop-network-slot](#stop-network-slot). This is the point where exchanges must disable deposits and withdrawals. Referred to as `slot_tx_end` in the Mina codebase and daemon configuration. ### Stop-Network-Slot {#stop-network-slot} A predefined global slot number that comes after the [stop-transaction-slot](#stop-transaction-slot). When the network reaches this slot, block production halts entirely. The network is now frozen, and the final state is used to build the Mesa release. In [automode](#automode), this is when the daemon automatically transitions to the [post-fork binary](#post-fork-binary). Referred to as `slot_chain_end` in the Mina codebase and daemon configuration. ### State Finalization The stabilization period between the [stop-transaction-slot](#stop-transaction-slot) and the [stop-network-slot](#stop-network-slot) — 100 slots, which is exactly 5 hours. During this window, empty blocks are produced so that all nodes converge on the same final state. No operator action is required; nodes should remain running. See [State Finalization](/network-upgrades/mesa/upgrade-steps/state-finalization). ### Mesa Genesis Timestamp The predefined time at which the first block is produced on the new Mesa chain — exactly 3 hours after the network reaches the [stop-network-slot](#stop-network-slot). This marks the start of the upgraded network. ### Mesa Release The new Mina build (version 4.x.x) published after [state finalization](#state-finalization) is complete. It contains the Mesa chain configuration and genesis ledger derived from the final pre-fork state. In [manual mode](#manual-mode), operators install this release to join the Mesa network. ### Mesa Trail Network The current testing environment for validating the Mesa upgrade before deployment to mainnet. Node operators and developers can test their infrastructure and applications against it. Mesa Trail may be unstable and is not intended for production use. It replaces the earlier **preflight** and **MUT** test networks, which are now [archived](/network-upgrades/mesa/archived-networks). See [Mesa Trail Network](/network-upgrades/mesa/mesa-trail). --- ## Upgrade Mode Terms ### Automode {#automode} The recommended upgrade path for daemon nodes (block producers, SNARK coordinators). In automode, the node handles the entire fork transition automatically — no manual intervention is required during the fork window. The [stop-slot release](#stop-slot-release) ships both the [pre-fork](#pre-fork-binary) and [post-fork binary](#post-fork-binary), and the [dispatcher](#dispatcher) routes to the correct one based on the fork state. See [Upgrade Modes](/network-upgrades/mesa/upgrade-modes). ### Manual Mode {#manual-mode} The traditional upgrade path where operators manually stop their node after the network halts, install the [Mesa release](#mesa-release), and restart. This gives full control over every step but requires prompt action when the release is published. See [Upgrade Modes](/network-upgrades/mesa/upgrade-modes). ### Automode Image {#automode-image} The Docker image that bundles the [automode](#automode) runtime — both the [pre-fork](#pre-fork-binary) and [post-fork binary](#post-fork-binary), plus the [dispatcher](#dispatcher). Published as `minaprotocol/mina-daemon-auto-hardfork:{version}-{codename}-{network}`. Use this image when running automode in Docker. The companion image `minaprotocol/mina-daemon-hardfork` is the manual-mode equivalent (no dispatcher). ### Pre-Fork Binary {#pre-fork-binary} The binary that runs the current (Berkeley) chain up to the [stop-network-slot](#stop-network-slot). In [automode](#automode), this is shipped as part of the `mina-{network}-automode` package and installed at `/usr/lib/mina/berkeley/mina`. In Docker, the [automode image](#automode-image) includes this binary. ### Post-Fork Binary {#post-fork-binary} The binary that runs the new Mesa chain after the fork activates. In [automode](#automode), this is shipped as part of the `mina-{network}-automode` package and installed at `/usr/lib/mina/mesa/mina`. The [dispatcher](#dispatcher) switches to this binary once the [activation file](#activation-file) is created. ### Dispatcher {#dispatcher} A shell script wrapper (`mina-dispatch`) installed at `/usr/local/bin/` that routes commands to the correct binary — [pre-fork](#pre-fork-binary) or [post-fork](#post-fork-binary). For `daemon`, routing is based on whether the [activation file](#activation-file) exists. For `client`, commands are always routed to the [post-fork binary](#post-fork-binary). Other subcommands (e.g., `accounts list`) are not supported — invoke the [pre-fork](#pre-fork-binary) or [post-fork](#post-fork-binary) binary by its full path (`/usr/lib/mina/berkeley/mina` or `/usr/lib/mina/mesa/mina`) directly. See [Upgrade Modes - Details](/network-upgrades/mesa/appendix/upgrade-modes-details). ### Activation File {#activation-file} A sentinel file created by the daemon when it reaches the [stop-network-slot](#stop-network-slot) during [automode](#automode). Its presence signals to the [dispatcher](#dispatcher) that the fork has completed and the [post-fork binary](#post-fork-binary) should be used on subsequent restarts. Located at `{config-directory}/auto-fork-mesa-{network}/activated`. --- ## Archive Upgrade Terms ### Trustless Upgrade {#trustless} An archive database upgrade method where operators run the `upgrade_to_mesa.sql` script on their existing database. The script is backward-compatible and can be applied before the fork while the Berkeley archive node is still running. It completes in under 1 minute. See [Archive Upgrade](/network-upgrades/mesa/archive-upgrade). ### Trustful Upgrade {#trustful} An archive database upgrade method where operators import an official SQL database dump published by o1Labs after the fork. This requires no pre-fork action — operators wait for the dump, create a fresh database, and import it. The trade-off is that you trust o1Labs' export rather than verifying the data yourself. ### Archive Hardfork Toolbox {#hardfork-toolbox} A dedicated CLI tool (`mina-archive-hardfork-toolbox`) for verifying the integrity of archive database upgrades and fork transitions. It provides commands to validate the fork block, verify schema upgrades, and mark the canonical chain. Shipped with the Mina archive package. See [Archive Upgrade — Verification](/network-upgrades/mesa/archive-upgrade#verification-with-the-archive-hardfork-toolbox). ### Replayer {#replayer} A verification tool (`mina-replayer`) that replays all transactions from a Mina archive database to reconstruct the ledger state from scratch. It can be used to verify that the archive database faithfully represents the canonical chain — both during the fork and as an ongoing integrity check. See [Archive Replayer](/node-operators/archive-node/replayer). ### Fork Config The official ledger checkpoint published with the [Mesa release](#mesa-release). Operators can compare the output of the [replayer](#replayer) against this config to verify their archive matches the canonical state used to build Mesa. --- ## Mesa-Specific Changes and Conventions Mesa bundles four Mina Improvement Proposals (MIPs) that change protocol behavior. The canonical MIP specs live in the [MinaProtocol/MIPs](https://github.com/MinaProtocol/MIPs/tree/main/MIPS) repository; each section below links to the spec for the proposal it describes. ### Faster Blocks — [MIP6](https://github.com/MinaProtocol/MIPs/blob/main/MIPS/mip-0006-slot-reduction-90s.md) Mesa halves Mina's slot time from **180 seconds to 90 seconds**, doubling block production frequency. To keep the long-term token emission rate flat, the per-block **coinbase reward is also halved** (from 720 MINA to 360 MINA). The total Mina supplied per epoch is unchanged. Several second-order consequences flow from the slot-time change: - **Epoch duration halves** from ~14.9 days to ~7.4 days. Scripts and operational procedures tied to epoch boundaries (delegation cooldown, automated payouts, monitoring dashboards) trigger about twice as often. - **Vesting schedules on active vesting accounts are automatically migrated** during the hard fork so they continue unlocking on the same real-world cadence. No operator action is required. - **The zkApp per-block command soft limit is lowered** from 24 to 12, ensuring SNARK workers can keep up with the faster 90-second block cadence. This change is delivered via soft fork before Mesa. - **SNARK coordinators handling maximum-cost zkApp transactions should deploy at least 4 workers** (≈4 CPU cores each) to keep up with the new 90-second slot timing. A prerequisite SNARK-worker parallelization is delivered via soft fork before Mesa. ### Expanded zkApp State — [MIP7](https://github.com/MinaProtocol/MIPs/blob/main/MIPS/mip-0007-increase-state-size-limit.md) Mesa raises the on-chain state available to a zkApp account from **8 field elements (indexes `0–7`) to 32 field elements (indexes `0–31`)**. zkApps can now store roughly four times more data directly on chain without off-chain workarounds. This applies to both the `zkapp_states` and `zkapp_states_nullable` database tables. See [Archive Node Schema Changes](/network-upgrades/mesa/appendix/archive-node-schema-changes) for the SQL diff. ### Larger Events and Actions — [MIP8](https://github.com/MinaProtocol/MIPs/blob/main/MIPS/mip-0008-increase-events-actions-limit.md) Mesa raises the per-transaction limit on events and actions from **100 field elements to 1024 field elements** for each. The previous cap of 16 field elements per individual event or action is also removed. This makes events and actions a viable channel for richer on-chain signaling and larger off-chain dispatch payloads in a single transaction. Mostly relevant to zkApp developers — node operators do not need to act on this change, but block producers will validate against the new limits automatically after the fork. ### Larger zkApp Transactions — [MIP9](https://github.com/MinaProtocol/MIPs/blob/main/MIPS/mip-0009-increase-zkapp-account-update-limit.md) Mesa **roughly triples** the maximum number of account updates a single zkApp transaction can contain. The previous weighted-cost formula (`10.26·np + 10.08·n2 + 9.14·n1 < 69.45`) is replaced with a simpler `np + n2 + n1 ≤ 16` rule that admits any balanced binary proof tree of height 4. This depends on the SNARK-worker parallelization shipped as a prerequisite for [MIP6](https://github.com/MinaProtocol/MIPs/blob/main/MIPS/mip-0006-slot-reduction-90s.md) — without it, processing maximum-size transactions inside a 90-second slot would not be feasible. ### Mesa Package Naming Convention The [automode](#automode) Debian package is published as `mina-{network}-automode` to distinguish the dual-binary automode variant from the standard manual-mode `mina-{network}` package. This allows operators to install the automode package side-by-side with the existing daemon without one replacing the other. `mina-{network}-automode` is an umbrella package: under the hood it depends on `mina-{network}-prefork-mesa` (the [pre-fork binary](#pre-fork-binary)) and `mina-{network}-postfork-mesa` (the [post-fork binary](#post-fork-binary) plus the [dispatcher](#dispatcher)), and apt resolves both transitively when you install it. ### Node Status Service A telemetry feature that reports non-sensitive node data (e.g., version, sync status) to help monitor the amount of upgraded active stake during the upgrade. **Off by default on the Mesa daemon** — it runs only when you pass `--node-status-url`, which is both the collector address and the on/off control. `--simplified-node-stats` (a boolean, default `true`) selects how much the report contains, not whether one is sent. `--disable-node-status` is an unrelated flag that controls whether your node answers node-status queries from other peers. See [Help Monitor the Network](/network-upgrades/mesa/upgrade-steps/post-upgrade#help-monitor-the-network) for the full flag set. --- url: /network-upgrades/mesa --- # Mesa Upgrade The Mesa upgrade is a major network upgrade (hard fork) for the Mina Protocol mainnet. It is not backward compatible: every consensus-participating Mina daemon (block producers, SNARK coordinators, archive nodes, Rosetta API nodes, and seed nodes) must run a Mesa-compatible release to remain on the network. Wallets, off-chain services, and downstream tooling do not run a daemon and only need to update if they pin to a specific transaction format or version. :::info New to the Mesa upgrade? This documentation uses terms like _automode_, _stop-slot_, _trustless upgrade_, _dispatcher_, and more. If you encounter an unfamiliar term, check the **[Glossary](/network-upgrades/mesa/glossary)** for definitions. ::: ## What Mesa Introduces Mesa bundles four Mina Improvement Proposals (MIPs) that change protocol behavior, plus two operational improvements to the upgrade flow itself. See the **[Glossary](/network-upgrades/mesa/glossary)** for detailed descriptions of each MIP and the canonical specs in the [MinaProtocol/MIPs](https://github.com/MinaProtocol/MIPs/tree/main/MIPS) repository. - **[Faster Blocks — MIP6](/network-upgrades/mesa/glossary#faster-blocks--mip6)** — Halves slot time to 90 seconds, halves coinbase reward, halves epoch duration. - **[Expanded zkApp State — MIP7](/network-upgrades/mesa/glossary#expanded-zkapp-state--mip7)** — Raises on-chain state from 8 to 32 field elements per zkApp account. - **[Larger Events and Actions — MIP8](/network-upgrades/mesa/glossary#larger-events-and-actions--mip8)** — Increases per-transaction event/action limit from 100 to 1024 field elements. - **[Larger zkApp Transactions — MIP9](/network-upgrades/mesa/glossary#larger-zkapp-transactions--mip9)** — Triples the max account updates per zkApp transaction. ### Automode Upgrades For the first time in Mina's history, block producers can upgrade through a hard fork **without manual intervention**. The automode mechanism ships both the pre-fork and post-fork binaries in a single package, with a dispatcher that automatically transitions to the new chain when the fork activates. See [Upgrade Modes](/network-upgrades/mesa/upgrade-modes) for details, including which node types do not support automode. ### Simplified Archive Upgrade Unlike the Berkeley upgrade (which required up to 48 hours for archive database conversion), the Mesa archive upgrade is a fast schema upgrade that completes in under a minute. See [Archive Upgrade](/network-upgrades/mesa/archive-upgrade). ## Upgrade Flow — End-to-End Timeline The Mesa upgrade follows four phases. The timeline below shows what happens at each stage, when it happens, and what **you** need to do. ### Overview Mina's Mesa Upgrade — four-phase timeline from Pre-Upgrade through Post-Upgrade, with state finalization and network shutdown markers The upgrade moves through four phases — **Pre-Upgrade**, **State Finalization**, **Upgrade**, and **Post-Upgrade** — anchored by three key moments: | Milestone | When | What happens | |---|---|---| | **stop-transaction-slot** | Hours before the fork | Network stops accepting new transactions | | **stop-network-slot** | Exactly 5 hours after stop-transaction-slot | Block production halts entirely | | **Mesa genesis timestamp** | Exactly 3 hours after stop-network-slot | First Mesa block is produced | --- ### Phase 1: Pre-Upgrade — weeks before the fork > **Goal:** Every participant is prepared and running the stop-slot release before the fork begins. Each actor type has a specific checklist — see **[Requirements](/network-upgrades/mesa/requirements)** for the full per-actor pre-upgrade procedures and hardware requirements. ### Phase 2: State Finalization — hours before the fork (exactly 5 hours) > **Goal:** The network reaches consensus on a final state. No new transactions are accepted. At the predefined **stop-transaction-slot**, nodes stop accepting new user transactions. Block production continues for ~100 more slots with empty blocks until the **stop-network-slot**. See **[State Finalization](/network-upgrades/mesa/upgrade-steps/state-finalization)** for the full per-actor instructions. ### Phase 3: Upgrade — fork day (network is down) > **Goal:** The network halts, state is exported, and the Mesa release is published. At the **stop-network-slot**, block production stops entirely. o1Labs exports the network state, builds the Mesa release, and publishes packages. See **[Fork Schedule](/network-upgrades/mesa/fork-schedule)** for the schedule values and **[Upgrade](/network-upgrades/mesa/upgrade-steps/upgrade)** for the per-actor instructions. ### Phase 4: Post-Upgrade — after the fork > **Goal:** Block production resumes on the Mesa network. Normal operations return. Exactly **3 hours** after the _stop-network-slot_, at the predefined Mesa genesis timestamp, the first Mesa block is produced. See **[Post-Upgrade](/network-upgrades/mesa/upgrade-steps/post-upgrade)** for verification checklists. --- For end-to-end walkthroughs by role (block producer, archive node, zkApp developer, exchange), see **[Examples](/network-upgrades/mesa/upgrade-steps/examples)**. ## Upgrade Modes The Mesa upgrade supports two modes for daemon node operators: **[Automode](/network-upgrades/mesa/upgrade-modes)** (recommended — node handles the fork transition automatically) and **[Manual](/network-upgrades/mesa/upgrade-modes)** (operator stops the node, installs the Mesa release, and restarts). See [Upgrade Modes](/network-upgrades/mesa/upgrade-modes) for the full comparison, requirements, and the persistent-filesystem / process-restart constraints that automode imposes. For low-level details on the dispatcher and dual-binary architecture, see [Upgrade Modes — Details](/network-upgrades/mesa/appendix/upgrade-modes-details). ## Quick Reference by Operator Type | Operator Type | Key Pages | |---|---| | **Block Producers** | [Requirements](/network-upgrades/mesa/requirements), [Upgrade Modes](/network-upgrades/mesa/upgrade-modes), [Upgrade Steps](/network-upgrades/mesa/upgrade-steps) | | **SNARK Workers / Coordinators** | [Requirements](/network-upgrades/mesa/requirements), [Upgrade Steps](/network-upgrades/mesa/upgrade-steps) | | **Archive Node Operators** | [Requirements](/network-upgrades/mesa/requirements), [Archive Upgrade](/network-upgrades/mesa/archive-upgrade), [Upgrade Steps](/network-upgrades/mesa/upgrade-steps) | | **Rosetta API Operators** | [Requirements](/network-upgrades/mesa/requirements), [Archive Upgrade](/network-upgrades/mesa/archive-upgrade), [Upgrade Steps](/network-upgrades/mesa/upgrade-steps) | | **Exchanges** | [Requirements](/network-upgrades/mesa/requirements), [Upgrade Steps](/network-upgrades/mesa/upgrade-steps), [Archive Node Schema Changes](/network-upgrades/mesa/appendix/archive-node-schema-changes) | ## Network Details The values below describe the **current Mainnet (pre-fork)** chain. They will change after the Mesa fork activates — the post-fork Chain ID, Git SHA-1, and node build link will be published in the Mesa release announcement. ``` Chain ID (Mainnet, pre-fork) a7351abc7ddf2ea92d1b38cc8e636c271c1dfd2c081c637f62ebc2af34eb7cc1 Git SHA-1 (Mainnet, pre-fork) ae112d3a96fe71b4ccccf3c54e7b7494db4898a4 Seed List https://bootnodes.minaprotocol.com/networks/mainnet.txt Node build https://github.com/MinaProtocol/mina/releases?q=mesa ``` {/* TODO(PR #1133): When the Mesa mainnet release is cut, add the post-fork Chain ID, Git SHA-1, and the specific release tag URL alongside the pre-fork values above. For the current test-network values, see [Mesa Trail Network](/network-upgrades/mesa/mesa-trail). */} --- url: /network-upgrades/mesa/mesa-trail --- # Mesa Trail Network **Mesa Trail** is the current Mesa test network — the environment for validating the Mesa upgrade before deployment to devnet and mainnet. This page covers the build matrix and how to connect each node type. :::caution Test network Mesa Trail is intended for testing only. It may experience instability, breaking changes, and unexpected behavior. Data on this network is not persistent or reliable, and the network may be reset without notice. ::: Two earlier Mesa test networks — **preflight** and **MUT** — are archived and no longer accept connections. If you are still running a preflight or MUT build, move to the Mesa Trail release below. Their historical values are recorded on [Archived Networks](/network-upgrades/mesa/archived-networks). ## Current Build Version **Version (install this):** `4.0.0-rc2-3418329` **Compatible o1js release:** `o1js@3.0.0-mesa.rc2` — the matching SDK for the Mesa transaction protocol. Install with `npm install o1js@3.0.0-mesa.rc2` (or the equivalent for your package manager) when developing or redeploying zkApps against Mesa Trail. Earlier `o1js` versions produce transactions that Mesa nodes reject. ### Docker Images Images are published to `gcr.io/o1labs-192920`. The tag format is `--devnet`: - **Mina Daemon:** `gcr.io/o1labs-192920/mina-daemon:4.0.0-rc2-3418329-bullseye-devnet` - **Archive Node:** `gcr.io/o1labs-192920/mina-archive:4.0.0-rc2-3418329-bullseye-devnet` - **Rosetta:** `gcr.io/o1labs-192920/mina-rosetta:4.0.0-rc2-3418329-bullseye-devnet` Available base distributions: `bullseye`, `bookworm`, `focal`, `jammy`, `noble`. Swap the codename in the tag to select one — for example `mina-daemon:4.0.0-rc2-3418329-noble-devnet`. ### Debian Packages **Repository:** `packages.o1test.net` **Channel:** `mesa-trail` **Codenames:** `bullseye`, `bookworm`, `focal`, `jammy`, `noble` Available packages (each at version `4.0.0-rc2-3418329`): | Package | Purpose | | --- | --- | | `mina-devnet` | Mina daemon | | `mina-archive-devnet` | Archive node | | `mina-rosetta-devnet` | Rosetta API | | `mina-devnet-config` | Network configuration shipped with the daemon | | `mina-logproc` | Log processing helper (installed as a daemon dependency) | :::note Unsigned repository `packages.o1test.net` is not GPG-signed, so the apt source line below uses `[trusted=yes]`. This is expected for test-network builds. ::: ## Connecting to the Network All node types must use the Mesa Trail seed peer list: ```bash --peer-list-url https://storage.googleapis.com/o1labs-gitops-infrastructure/mina-mesa-rc/mina-mesa-rc-peer-list-url.txt ``` ### Mina Daemon ```bash docker run --name mina-mesa-trail -d \ -p 8302:8302 \ --restart=always \ gcr.io/o1labs-192920/mina-daemon:4.0.0-rc2-3418329-bullseye-devnet \ daemon \ --peer-list-url https://storage.googleapis.com/o1labs-gitops-infrastructure/mina-mesa-rc/mina-mesa-rc-peer-list-url.txt ``` For a long-running node, mount config directories and add additional flags: ```bash docker run --name mina-mesa-trail -d \ -p 8302:8302 \ --restart=always \ -v $(pwd)/.mina-config:/root/.mina-config \ gcr.io/o1labs-192920/mina-daemon:4.0.0-rc2-3418329-bullseye-devnet \ daemon \ --peer-list-url https://storage.googleapis.com/o1labs-gitops-infrastructure/mina-mesa-rc/mina-mesa-rc-peer-list-url.txt \ --libp2p-keypair /data/.mina-config/keys/libp2p-key ``` ### Archive Node ```bash docker run --name mina-archive-mesa-trail -d \ -p 3086:3086 \ --restart=always \ gcr.io/o1labs-192920/mina-archive:4.0.0-rc2-3418329-bullseye-devnet \ mina-archive run \ --postgres-uri postgresql://archive_user:your-secure-password@postgres-host:5432/archive \ --server-port 3086 ``` If upgrading an existing Berkeley database, see [Archive Upgrade](/network-upgrades/mesa/archive-upgrade). ### Rosetta API ```bash docker run --name mina-rosetta-mesa-trail -d \ -p 3087:3087 \ --restart=always \ gcr.io/o1labs-192920/mina-rosetta:4.0.0-rc2-3418329-bullseye-devnet \ --port 3087 \ --archive-uri http://archive-host:3086/graphql \ --graphql-uri http://mina-daemon-host:3085/graphql ``` **Note:** Rosetta requires a running Mina daemon (port 3085) and archive node (port 3086). Both must be fully synced. First, install dependencies and configure the repository: ```bash # Step 1: Install dependencies sudo apt-get install -y lsb-release ca-certificates wget gnupg # Step 2: Add the repository with the mesa-trail channel. # packages.o1test.net is unsigned, hence [trusted=yes]. echo "deb [trusted=yes] http://packages.o1test.net $(lsb_release -cs) mesa-trail" | \ sudo tee /etc/apt/sources.list.d/mina-mesa-trail.list # Step 3: Update and install sudo apt-get update sudo apt-get install -y mina-devnet=4.0.0-rc2-3418329 ``` ### Mina Daemon ```bash mina daemon \ --peer-list-url https://storage.googleapis.com/o1labs-gitops-infrastructure/mina-mesa-rc/mina-mesa-rc-peer-list-url.txt \ --libp2p-keypair ~/.mina-config/keys/libp2p-key ``` ### Archive Node ```bash # Install archive package sudo apt-get install -y mina-archive-devnet=4.0.0-rc2-3418329 # Create PostgreSQL database (if needed) sudo -u postgres createdb archive sudo -u postgres createuser archive_user sudo -u postgres psql -c "ALTER USER archive_user WITH PASSWORD 'your-secure-password';" sudo -u postgres psql -c "GRANT ALL PRIVILEGES ON DATABASE archive TO archive_user;" # Start archive node mina-archive run \ --postgres-uri postgresql://archive_user:your-secure-password@localhost:5432/archive \ --server-port 3086 ``` If upgrading an existing Berkeley database, see [Archive Upgrade](/network-upgrades/mesa/archive-upgrade). ### Rosetta API ```bash sudo apt-get install -y mina-rosetta-devnet=4.0.0-rc2-3418329 mina-rosetta \ --port 3087 \ --archive-uri http://localhost:3086/graphql \ --graphql-uri http://localhost:3085/graphql ``` ### Connecting Mina Daemon to Archive Configure your daemon to send blocks to the archive node: ```bash mina daemon \ --peer-list-url https://storage.googleapis.com/o1labs-gitops-infrastructure/mina-mesa-rc/mina-mesa-rc-peer-list-url.txt \ --archive-address localhost:3086 ``` ## Verification After starting your node, verify connectivity to Mesa Trail: ### Check Node Status ```bash # For Docker docker exec -it mina-mesa-trail mina client status # For Debian installation mina client status ``` ### Monitor Logs ```bash # For Docker docker logs -f mina-mesa-trail # For systemd service (Debian) journalctl -u mina -f ``` ## Network Resources Chain data and configuration for Mesa Trail. The network is identified as `mesa-rc` in infrastructure paths and explorer URLs. ### Chain Data | Resource | Location | | --- | --- | | Seed peer list | [`mina-mesa-rc-peer-list-url.txt`](https://storage.googleapis.com/o1labs-gitops-infrastructure/mina-mesa-rc/mina-mesa-rc-peer-list-url.txt) | | Genesis config | [`mina-mesa-rc-genesis-config.json`](https://storage.googleapis.com/o1labs-gitops-infrastructure/mina-mesa-rc/mina-mesa-rc-genesis-config.json) | | Precomputed blocks | `https://storage.googleapis.com/mesa-rc-precomputed-blocks/` | | Archive database dumps | `https://storage.googleapis.com/mina-archive-dumps/` | | Block explorer | [MinaExplorer — `mesa-rc`](https://o1-labs.github.io/mina-explorer/#/blocks?network=mesa-rc) | | Faucet | [faucet.minaprotocol.com](https://faucet.minaprotocol.com/) | ### Precomputed Blocks Precomputed blocks are published to the `mesa-rc-precomputed-blocks` bucket, one JSON file per block, named `mina-mesa-rc-1--.json`: ```bash # List recent blocks gcloud storage ls gs://mesa-rc-precomputed-blocks/ | tail # Fetch a single block over HTTPS (no Google Cloud CLI required) curl -O https://storage.googleapis.com/mesa-rc-precomputed-blocks/mina-mesa-rc-1--.json ``` Use these to bootstrap an archive node with [`mina-archive-blocks`](/network-upgrades/mesa/archive-upgrade), or to replay chain history without running a full node. ### Archive Database Dumps Hourly archive dumps are published to the `mina-archive-dumps` bucket with the prefix `mina-mesa-rc`, named `mina-mesa-rc-1-archive-dump-_.sql.tar.gz`: ```bash # List available dumps gcloud storage ls gs://mina-archive-dumps/mina-mesa-rc-1-archive-dump-* # Download and restore the latest dump curl -O https://storage.googleapis.com/mina-archive-dumps/mina-mesa-rc-1-archive-dump-_.sql.tar.gz tar -xzf mina-mesa-rc-1-archive-dump-_.sql.tar.gz psql -d archive -f mina-mesa-rc-1-archive-dump-_.sql ``` A dump is the fastest way to stand up an archive node against Mesa Trail without replaying the chain, and it is the same mechanism behind the [_trustful_](/network-upgrades/mesa/glossary#trustful) archive upgrade path. ## Support and Feedback If you encounter issues or have feedback about Mesa Trail: 1. Check the [Mina Protocol Discord](https://discord.gg/minaprotocol) for community support 2. Report issues on the [Mina GitHub repository](https://github.com/MinaProtocol/mina/issues) 3. Join the Mesa upgrade discussions in the community channels ## Next Steps - Test your applications and infrastructure against Mesa Trail - Review the [Mesa Upgrade](/network-upgrades/mesa) overview for mainnet preparation - Provide feedback to help improve the Mesa upgrade process --- url: /network-upgrades/mesa/requirements --- # Requirements ## Hardware Requirements Please note the following are the hardware requirements for each node type after the upgrade: | Node Type | Memory | CPU | Storage | Network | |--|--|--|--|--| | Mina Daemon Node | 32 GB RAM | 8 core processor with BMI2, ADX and AVX CPU instruction sets are required | 16 GB | 1 Mbps Internet Connection | | SNARK Coordinator | 32 GB RAM | 8 core processor | 16 GB | 1 Mbps Internet Connection | | SNARK Worker (per worker) | 8 GB RAM | 6 core/12 threads with BMI2, ADX and AVX CPU instruction sets are required | 1 GB | 1 Mbps Internet Connection | | Archive Node | 32 GB RAM | 8 core processor | 64 GB | 1 Mbps Internet Connection | | Rosetta API standalone Docker image | 8 GB RAM | 2 core processor | 16 GB | 1 Mbps Internet Connection | | Rosetta API + Archive Node | 32 GB RAM | 8 core processor | 64 GB | 1 Mbps Internet Connection | | Mina Seed Node | 64 GB RAM | 8 core processor | 16 GB | 1 Mbps Internet Connection | ## Mina Daemon Requirements The Mesa daemon inherits the same networking and process-management requirements as the Berkeley daemon. Rather than restate them here, refer to the canonical sections in the Validator Node docs: - **IP and port configuration** — `--external-ip`, `--external-port`, default port `8302` (libp2p). See [Validator Node Requirements](/node-operators/validator-node/requirements#networking). - **Auto-restart on crash** — systemd `Restart=always`, Docker `--restart=always`. See [Running mina node as a service](/node-operators/validator-node/connecting-to-the-network#running-mina-node-as-a-service). The hardware table above is Mesa-specific; everything else lives once in the Validator Node docs. ## Seed Peer Requirements ### Generation of libp2p keypair To ensure connectivity across the network, it is essential that each seed node starts with its own **stable** `libp2p` keypair. A keypair determines the peer ID of the node, so each seed node needs a different keypair, and that keypair must stay the same across restarts. This stability allows other nodes in the network to reliably connect to the addresses in the published seed list. Although the same libp2p keys can be reused from before the upgrade, if you need to manually generate new libp2p keys, use the following command: ``` mina libp2p generate-keypair --privkey-path ``` Further information on [generating a libp2p key pair](/node-operators/seed-peers/generating-a-libp2p-keypair) on Mina Protocol. ## Pre-Upgrade Checklist Before the fork, each actor type must complete specific preparations. Complete these steps **weeks before the fork** to ensure a smooth upgrade. ### All operators - Verify your hardware meets the [requirements](#hardware-requirements) above (32 GB RAM, 8-core CPU with BMI2, ADX and AVX). - Back up your keys and configuration before installing any new packages. ### Block Producers - Choose your [Upgrade Mode](/network-upgrades/mesa/upgrade-modes): **automode** (recommended) or manual. - Install the stop-slot release [3.x.x](https://github.com/MinaProtocol/mina/releases). - If using automode, install the `mina-{network}-automode` package. See [Installing automode](/network-upgrades/mesa/upgrade-modes#installing-automode). ### SNARK Coordinators - A coordinator is a daemon node — follow the Block Producer path above (automode or manual). ### Standalone SNARK Workers - Workers spawned by a coordinator (`--run-snark-worker`) need no separate action — they inherit the coordinator's binary. - Workers run as a separate `mina internal snark-worker` process or container must be redeployed with the Mesa release after the fork. ### Archive Nodes - Install the stop-slot release. - Choose your upgrade method: [_trustless_](/network-upgrades/mesa/glossary#trustless) (run the upgrade script now) or [_trustful_](/network-upgrades/mesa/glossary#trustful) (import o1Labs dump later). - If doing trustless, run the [Archive Upgrade](/network-upgrades/mesa/archive-upgrade) script — it can be applied before the fork while the Berkeley archive node is still running. ### Exchanges - Install the stop-slot release. - Update integrations (mina-signer, Rosetta API). - Test on devnet. - Plan your deposit/withdrawal freeze window around the [`stop-transaction-slot`](/network-upgrades/mesa/glossary#stop-transaction-slot). ### zkApp Developers - Update to the Mesa-compatible o1js version (`o1js@3.0.0-mesa.rc2` for the Mesa Trail chain). - Recompile your contracts and verify them on the [Mesa Trail test network](/network-upgrades/mesa/mesa-trail). - Plan to redeploy every zkApp on Mesa — each must be redeployed because the protocol version bump changes the verification key. Your zkApp account and its on-chain state carry over to Mesa automatically, including the state fields at indexes `0-7`. The redeploy replaces the verification key; it does not reset your state. {/* TODO(PR #1133): Link to the official o1js Mesa upgrade guide once published (cjjdespres #3220525842). */} --- url: /network-upgrades/mesa/troubleshooting --- # Troubleshooting This page collects common operator questions and debugging tips for the Mesa upgrade. For low-level architecture and dispatcher internals, see [Upgrade Modes — Details](/network-upgrades/mesa/appendix/upgrade-modes-details). ## How do I know which binary my node is using? Check whether the activation state file exists. The file is located at: `{config-directory}/auto-fork-mesa-{network_id}/activated` Where: - `{config-directory}` is the path passed via `--config-directory` (defaults to `~/.mina-config` on the host, or `/root/.mina-config` in Docker) - `{network_id}` is the network name (e.g., `mainnet` or `devnet`) For example, on a typical mainnet setup: ```bash ls ~/.mina-config/auto-fork-mesa-mainnet/activated ``` - **File does not exist**: your node is using the pre-fork (Berkeley) binary - **File exists**: your node has transitioned to the Mesa binary ## Can I run non-daemon commands or use a specific binary version? As described in [Dispatcher Limitations](/network-upgrades/mesa/appendix/upgrade-modes-details#dispatcher-limitations), the dispatcher supports `daemon`, `client`, and `--version`. For any other command — including `accounts list`, `ledger export`, and other CLI operations — **you must use the version-specific binary directly**: | Binary | Description | Full path | |---|---|---| | Pre-fork (Berkeley) | Current chain | `/usr/lib/mina/berkeley/mina` | | Post-fork (Mesa) | Mesa chain | `/usr/lib/mina/mesa/mina` | ```bash # Use the Mesa binary for all non-daemon commands after the fork /usr/lib/mina/mesa/mina client status /usr/lib/mina/mesa/mina accounts list /usr/lib/mina/mesa/mina ledger export # Use the Berkeley binary for pre-fork queries /usr/lib/mina/berkeley/mina client status ``` Both binaries are installed at these fixed paths by the automode packages and are always available. They bypass the dispatcher entirely and run the binary directly, so they work regardless of the activation state. (There is no `mina-mesa` or `mina-berkeley` command on `PATH` — invoke the binaries by their full paths.) :::caution Do not manipulate the activation state file While it is technically possible to force the dispatcher to use a specific runtime by creating or removing the `activated` file, **this is strongly discouraged**. Manually manipulating the state file while the network is live can put your node on the wrong chain. If you need to run a specific version, invoke the full binary path (`/usr/lib/mina/berkeley/mina` or `/usr/lib/mina/mesa/mina`) directly instead. ::: ## Debug mode Set `MINA_DISPATCHER_DEBUG=1` in your environment to see which binary and arguments the dispatcher is using: ```bash MINA_DISPATCHER_DEBUG=1 mina daemon ... ``` For a dry run (print the command without executing): ```bash MINA_DISPATCHER_DRYRUN=1 mina daemon ... ``` --- url: /network-upgrades/mesa/upgrade-modes --- # Upgrade Modes The Mesa upgrade supports two modes for daemon node operators: **Automode** (recommended — the daemon handles the fork transition automatically) and **Manual Mode** (the operator stops, installs the Mesa release, and restarts). Both modes reach the same end state — a node running on the Mesa network. **Archive node operators, Rosetta API operators, and standalone SNARK workers must use Manual mode** — Automode is not available for those node types. ## Comparison | Aspect | Automode | Manual | |---|---|---| | Operator intervention during fork | None | Stop, install, restart | | Downtime | Minimal (automatic transition) | Depends on operator response time | | Applies to | Daemon nodes only (block producers, SNARK coordinators) | All node types (incl. archive, Rosetta, standalone SNARK workers) | | Control | Automated | Full manual control | | Risk | Lower (fewer manual steps) | Higher (depends on operator timing) | ## Choose your upgrade mode Pick the tab that matches the mode you intend to run. If you are unsure, start with the Automode tab — it is the recommended path for daemon nodes. Automode is the recommended upgrade path for the Mina daemon — the process that participates in consensus. This includes block producers and SNARK coordinators (a SNARK coordinator runs as a daemon). In automode, the node handles the entire fork transition automatically. ### Requirements - Install the stop-slot release ([3.x.x](https://github.com/MinaProtocol/mina/releases)) **before** the _stop-transaction-slot_ - Ensure your node remains running through the State Finalization phase - Meet the [hardware requirements](/network-upgrades/mesa/requirements) ### Who should use Automode - Block producers who want a hands-off upgrade experience - SNARK coordinators (run as a Mina daemon) - Operators who want to minimize downtime and operational risk Automode is **not** available for the following — operators of these node types must switch to the Manual Mode tab: - **Archive nodes** — schema upgrade is a separate manual step (see [Archive Upgrade](/network-upgrades/mesa/archive-upgrade)) - **Rosetta API nodes** — upgrade alongside the archive node they depend on - **Standalone SNARK workers** — `mina internal snark-worker` processes/containers run separately from any daemon; they must be stopped and redeployed with the Mesa binary after the fork. (Workers spawned by a coordinator inherit the coordinator's upgrade automatically.) ### How automode works during the fork 1. You install the stop-slot release ([3.x.x](https://github.com/MinaProtocol/mina/releases)) during the Pre-Upgrade phase. 2. Your node participates normally in block production through the State Finalization phase. 3. When the network reaches the _stop-network-slot_, the node automatically: - Stops producing blocks on the old chain - Transitions to the Mesa network configuration - Begins producing blocks on the Mesa network once the genesis timestamp is reached 4. No manual intervention is required during the fork. :::danger Automode requires a persistent config directory and an automatic restart policy At the fork, the daemon **exits cleanly** (exit code 0) after writing the Mesa configuration and an `activated` marker to the config directory. It does **not** restart itself. Your process manager must restart it, and the config directory must survive that restart for the dispatcher to find the `activated` marker. - **Persistent config directory**: `~/.mina-config` (host) or a named Docker volume / Kubernetes `PersistentVolumeClaim` mounted at `/root/.mina-config` (container). An ephemeral `emptyDir` will lose the `activated` file and break the transition. - **Automatic restart policy**: `Restart=always` on systemd (default in the Mina unit), `--restart=always` on Docker, `restartPolicy: Always` on Kubernetes. Failing to meet either requirement means your node will not join the Mesa network at genesis. See [Upgrade Modes — Details](/network-upgrades/mesa/appendix/upgrade-modes-details#restart-and-filesystem-requirements) for the underlying mechanism. ::: ### Installing automode Pick the install method that matches how you run your daemon today. Install the automode package — it ships the pre-fork binary, the post-fork binary, and the dispatcher together so the daemon routes to the correct binary before and after the fork: ```bash sudo apt-get update sudo apt-get install mina-{network}-automode=4.x.x ``` The package installs the pre-fork binary at `/usr/lib/mina/berkeley/mina`, the post-fork binary at `/usr/lib/mina/mesa/mina`, the dispatcher at `/usr/local/bin/mina-dispatch`, and the dispatcher configuration in `/etc/default/mina-dispatch`. `mina-{network}-automode` is an umbrella package — it depends on `mina-{network}-prefork-mesa` and `mina-{network}-postfork-mesa`, which apt pulls in automatically. You do not need to install them by hand. Start your node as usual — the dispatcher routes to the correct binary based on fork state. See the Debian automode example on the [Examples](/network-upgrades/mesa/upgrade-steps/examples) page. Use the `mina-daemon-auto-hardfork` image (the regular `mina-daemon` image is manual-mode only): ``` minaprotocol/mina-daemon-auto-hardfork:{version}-{codename}-{network} ``` The image bundles both binaries and the dispatcher. `/usr/local/bin/mina` is a symlink to `mina-dispatch`, and the entrypoint invokes `mina` by default, so the dispatcher is used automatically — no extra configuration is required. Start it with your normal flags **plus** `--restart=always` and a named volume mounted at `/root/.mina-config` — see the Docker automode example on the [Examples](/network-upgrades/mesa/upgrade-steps/examples) page. For docker-compose users, see the [docker-compose quickstart](/network-upgrades/mesa/appendix/automode-docker-compose-quickstart) (under Appendix) for a ready-to-edit compose file. Manual mode gives operators full control over each step of the upgrade process. **Archive node operators and Rosetta API operators must use manual mode** — Automode is not available for those node types. ### Requirements - Install the stop-slot release ([3.x.x](https://github.com/MinaProtocol/mina/releases)) **before** the _stop-transaction-slot_ - Be prepared to act promptly when the Mesa release is published to minimize downtime - Meet the [hardware requirements](/network-upgrades/mesa/requirements) ### Who should use Manual mode - Operators who need full control over the upgrade process - Operators with custom deployment pipelines that require explicit upgrade steps - Operators who want to validate the Mesa build before restarting - **Archive node operators** (automode is not available — schema upgrade is a separate manual step) - **Rosetta API operators** (Rosetta upgrades alongside the archive node it depends on) ### How manual mode works during the fork 1. You install the stop-slot release ([3.x.x](https://github.com/MinaProtocol/mina/releases)) during the Pre-Upgrade phase. 2. Your node participates normally through the State Finalization phase. 3. When the network halts at the _stop-network-slot_, you: - Stop your node - Wait for the Mesa release to be published - Install the Mesa release - Restart your node with the [updated flags](/network-upgrades/mesa/upgrade-steps/post-upgrade) 4. Your node begins participating in the Mesa network once the genesis timestamp is reached. ### Installing manual mode Install only the stop-slot release before the fork: ```bash sudo apt-get update sudo apt-get install mina-mainnet=3.x.x ``` After the fork, when the Mesa release is published, stop your node and install the Mesa package: ```bash sudo systemctl stop mina sudo apt-get install mina-mainnet=4.x.x sudo systemctl start mina ``` See the Debian manual example on the [Examples](/network-upgrades/mesa/upgrade-steps/examples) page. Use the regular `mina-daemon` image (not `mina-daemon-auto-hardfork`): ``` minaprotocol/mina-daemon:-bullseye-mainnet ``` After the fork, stop the container and start a new one with the Mesa image: ```bash docker stop mina && docker rm mina docker run --name mina -d \ --restart=always \ -v mina-config:/root/.mina-config \ minaprotocol/mina-daemon:-bullseye-mainnet \ daemon ... ``` See the Docker manual example on the [Examples](/network-upgrades/mesa/upgrade-steps/examples) page. For in-depth technical details on how the upgrade mechanism works internally — dispatcher routing, dual-binary architecture, fork-state file — see [Upgrade Modes - Details](/network-upgrades/mesa/appendix/upgrade-modes-details). --- url: /network-upgrades/mesa/upgrade-steps/examples --- # Examples The walkthroughs below follow concrete operators through the four Mesa upgrade phases (Pre-Upgrade, [State Finalization](/network-upgrades/mesa/upgrade-steps/state-finalization), [Upgrade](/network-upgrades/mesa/upgrade-steps/upgrade), [Post-Upgrade](/network-upgrades/mesa/upgrade-steps/post-upgrade)) for different roles and setups. Click to expand the example that matches your situation.
Example: Block Producer Upgrading with Automode (Debian) Imagine you are **Alice**, a block producer running on a Debian server. Here is what your upgrade looks like end to end. **Weeks before the fork** — Alice checks [hardware requirements](/network-upgrades/mesa/requirements) and installs the automode packages: ```bash sudo apt-get update sudo apt-get install mina-mainnet-automode=4.x.x ``` She starts her node normally. The dispatcher (installed as `/usr/local/bin/mina`) needs one automode-specific setting: **`MINA_HARDFORK_STATE_DIR` must point at her config directory** — it must match `--config-directory`, because that is where the dispatcher looks for the `auto-fork-mesa-mainnet/activated` marker to choose between the pre-fork and Mesa runtime. Export the variable and pass the matching flag: ```bash export MINA_HARDFORK_STATE_DIR=~/.mina-config mina daemon \ --block-producer-key ~/keys/my-wallet \ --config-directory ~/.mina-config \ --libp2p-keypair ~/keys/libp2p-key \ --peer-list-url https://bootnodes.minaprotocol.com/networks/mainnet.txt \ --file-log-rotations 500 \ --log-json ``` The automode dispatcher runs the pre-fork binary until the fork activates. To preview which runtime and arguments the dispatcher will exec without running it, prefix the command with `MINA_DISPATCHER_DRYRUN=1`. > For the full preparation checklist, see [Requirements](/network-upgrades/mesa/requirements). **Hours before the fork (State Finalization)** — The network reaches the _stop-transaction-slot_. Alice's node keeps producing blocks — she does **nothing**. Empty blocks are produced for 100 slots (exactly 5 hours) until all nodes agree on the final state. > For details on this phase, see [State Finalization](/network-upgrades/mesa/upgrade-steps/state-finalization). **Fork day (Upgrade)** — The network halts at the _stop-network-slot_. Alice's daemon generates the Mesa configuration, writes the `activated` marker file, and **shuts down cleanly** (exit code 0). Because Alice uses systemd with `Restart=always`, the daemon restarts automatically. On restart, the dispatcher detects the `activated` file and launches the Mesa binary. Alice does **nothing** — this all happens automatically. > For what happens if you chose manual mode instead, see [Upgrade](/network-upgrades/mesa/upgrade-steps/upgrade). For details on the restart mechanism, see [Upgrade Modes - Details](/network-upgrades/mesa/appendix/upgrade-modes-details#restart-and-filesystem-requirements). **After the fork (Post-Upgrade)** — Exactly 3 hours after the _stop-network-slot_, the first Mesa block is produced. Alice verifies: ```bash # Check if the activated file exists (path depends on your config directory and network ID) ls ~/.mina-config/auto-fork-mesa-mainnet/activated # Confirm Mesa chain ID mina client status ``` :::note Dispatcher and non-daemon commands The automode dispatcher only supports `daemon` and `client status` subcommands. For other commands, invoke the version-specific binary by its full path (`/usr/lib/mina/mesa/mina` or `/usr/lib/mina/berkeley/mina`) directly. See [Troubleshooting](/network-upgrades/mesa/troubleshooting#can-i-run-non-daemon-commands-or-use-a-specific-binary-version) for details. ::: She's done. Her node is producing blocks on Mesa. > For post-upgrade verification, monitoring, and flag reference, see [Post-Upgrade](/network-upgrades/mesa/upgrade-steps/post-upgrade#flag-and-configuration-reference).
Example: Block Producer — Manual Mode (Docker) **Carlos** runs a block producer using Docker and prefers manual control over the upgrade. **Weeks before the fork** — Carlos pulls the stop-slot Docker image and starts his node: ```bash docker pull minaprotocol/mina-daemon:-bullseye-mainnet docker run --name mina -d \ --restart=always \ -v mina-config:/root/.mina-config \ minaprotocol/mina-daemon:-bullseye-mainnet \ daemon \ --block-producer-key /keys/my-wallet \ --config-directory /root/.mina-config \ --libp2p-keypair /keys/libp2p-key \ --peer-list-url https://bootnodes.minaprotocol.com/networks/mainnet.txt \ --file-log-rotations 500 \ --log-json ``` > For the full preparation checklist, see [Requirements](/network-upgrades/mesa/requirements). **Hours before the fork (State Finalization)** — Carlos keeps his node running. He does **nothing** during this phase. > For details on this phase, see [State Finalization](/network-upgrades/mesa/upgrade-steps/state-finalization). **Fork day (Upgrade)** — The network halts at the _stop-network-slot_. Carlos waits for the Mesa release announcement, then swaps to the new image. > Throughout these examples, `` is a placeholder for the Mesa release tag announced for your target network. For the **Mesa Trail** test network the current value is published on [Mesa Trail Network](/network-upgrades/mesa/mesa-trail); for **devnet/mainnet** the value will be published with the corresponding release announcement. ```bash docker stop mina && docker rm mina docker pull minaprotocol/mina-daemon:-bullseye-mainnet docker run --name mina -d \ --restart=always \ -v mina-config:/root/.mina-config \ minaprotocol/mina-daemon:-bullseye-mainnet \ daemon \ --block-producer-key /keys/my-wallet \ --config-directory /root/.mina-config \ --libp2p-keypair /keys/libp2p-key \ --peer-list-url https://bootnodes.minaprotocol.com/networks/mainnet.txt \ --file-log-rotations 500 \ --log-json ``` > For detailed upgrade instructions, see [Upgrade](/network-upgrades/mesa/upgrade-steps/upgrade). **After the fork (Post-Upgrade)** — Exactly 3 hours after the _stop-network-slot_, block production starts. Carlos verifies: ```bash docker exec mina mina client status # confirms Mesa chain ID ``` > For post-upgrade verification, monitoring, and flag reference, see [Post-Upgrade](/network-upgrades/mesa/upgrade-steps/post-upgrade#flag-and-configuration-reference).
Example: Archive Node / Explorer Operator **Eve** runs an archive node, a Rosetta API instance, and a block explorer. She needs to upgrade both the daemon and the database. **Weeks before the fork** — Eve installs the stop-slot release and decides on her upgrade method: ```bash sudo apt-get update sudo apt-get install mina-mainnet=3.x.x ``` She chooses the **trustless** path — running the upgrade script early, while her archive is still online: ```bash # Install the Mesa archive package — it ships the upgrade script at # /etc/mina/archive/upgrade_to_mesa.sql. The upgrade is backward-compatible, # so her Berkeley archive keeps running normally afterwards. sudo apt-get update sudo apt-get install mina-archive-mainnet=4.x.x # Back up the database first pg_dump -U archive_db > berkeley-archive-backup.sql # Run the shipped upgrade script (completes in under 1 minute) psql -U -d archive_db -f /etc/mina/archive/upgrade_to_mesa.sql # Verify psql -U -d archive_db -c "SELECT * FROM migration_history;" ``` The script is backward-compatible — her existing Berkeley archive node keeps working normally after the upgrade. > For the full archive upgrade guide, see [Archive Upgrade](/network-upgrades/mesa/archive-upgrade). **Hours before the fork (State Finalization)** — Eve keeps her archive node running to capture all finalized blocks. > For details on this phase, see [State Finalization](/network-upgrades/mesa/upgrade-steps/state-finalization). **Fork day (Upgrade)** — The network halts. Eve installs the Mesa archive release and points it at her already-upgraded database: ```bash sudo systemctl stop mina-archive sudo systemctl stop mina sudo apt-get update sudo apt-get install mina-archive-mainnet=4.x.x mina-mainnet=4.x.x # Start archive process pointing to the upgraded DB mina-archive run \ --postgres-uri postgres://:@localhost:5432/archive_db \ --server-port 3086 \ --log-json --log-level DEBUG # Start the non-block-producing daemon connected to the archive mina daemon \ --archive-address localhost:3086 \ --config-directory ~/.mina-config \ --libp2p-keypair ~/keys/libp2p-key \ --peer-list-url https://bootnodes.minaprotocol.com/networks/mainnet.txt \ --file-log-rotations 500 \ --log-json ``` She also restarts Rosetta: ```bash docker run --name rosetta --rm -d \ -p 3088:3088 \ --entrypoint '' \ minaprotocol/mina-rosetta:-bullseye-mainnet \ /usr/local/bin/mina-rosetta \ --archive-uri "postgres://:@localhost:5432/archive_db" \ --graphql-uri "http://localhost:3085/graphql" \ --log-json --port 3088 ``` > For detailed upgrade instructions, see [Upgrade](/network-upgrades/mesa/upgrade-steps/upgrade). **After the fork (Post-Upgrade)** — Block production resumes. Eve verifies data integrity: ```bash # Check the archive is in sync mina client status # Run the verification toolbox mina-archive-hardfork-toolbox verify-upgrade \ --postgres-uri postgres://:@localhost:5432/archive_db \ --protocol-version \ --migration-version ``` She checks her explorer UI to confirm new Mesa blocks are appearing and the historical data is intact. > For the full validation workflow, see [Post-Upgrade](/network-upgrades/mesa/upgrade-steps/post-upgrade) and the [Archive Hardfork Toolbox](/network-upgrades/mesa/archive-upgrade#verification-with-the-archive-hardfork-toolbox).
Example: zkApp Developer **Frank** maintains a zkApp deployed on mainnet. His contract uses on-chain state and he wants to take advantage of Mesa's expanded 32-field state. **Weeks before the fork** — Frank updates his o1js dependency to the Mesa-compatible version and tests his zkApp on the [Mesa Trail test network](/network-upgrades/mesa/mesa-trail): ```bash npm install o1js@3.0.0-mesa.rc2 ``` This release targets the Mesa transaction protocol. `o1js@latest` currently resolves to a pre-Mesa version and will produce transactions that Mesa nodes reject. See [Mesa Trail Network](/network-upgrades/mesa/mesa-trail) for the matching daemon/archive/rosetta release. He verifies that: - His contract recompiles cleanly against Mesa-compatible o1js and deploys on Mesa Trail - Transactions execute end-to-end against the redeployed contract - If he plans to use the expanded state fields (indexes `8–31`), his updated contract version compiles and deploys on Mesa Trail > For details on testing against Mesa Trail, see [Mesa Trail Network](/network-upgrades/mesa/mesa-trail). **Hours before the fork (State Finalization)** — Frank does **nothing**. His deployed zkApp keeps running on the Berkeley chain. No transactions can be submitted during this phase anyway. **Fork day (Upgrade)** — Frank does **nothing during the network halt**. His zkApp account and on-chain state values carry over to the Mesa chain automatically (including state fields at indexes `0–7`). However, the verification key generated for Berkeley is no longer valid under the Mesa protocol — the contract cannot process transactions on Mesa until it is redeployed. **After the fork (Post-Upgrade)** — Block production resumes on Mesa. Frank **must redeploy his zkApp** before it can accept transactions, regardless of whether he uses the new state fields: ```bash # Required for every zkApp — the Mesa protocol version bump invalidates the Berkeley verification key zkapp deploy --network mainnet ``` If he is also adopting the expanded `8–31` state slots, this same deployment step ships the updated contract version that declares the new fields. > For post-upgrade details, see [Post-Upgrade](/network-upgrades/mesa/upgrade-steps/post-upgrade).
Example: Exchange Upgrading to Mesa **Bob** is an exchange operator. His main concern is avoiding lost deposits. Bob runs the full Rosetta-based stack, so he upgrades **three packages** — the node, the archive node, and the Rosetta API — plus his PostgreSQL archive database: - `mina-mainnet` — the daemon - `mina-archive-mainnet` — the archive node - `mina-rosetta-mainnet` — the Rosetta API (Exchanges on a custom GraphQL integration that do not run Rosetta or an archive only need `mina-mainnet`.) **Weeks before the fork** — Bob tests his integration (Rosetta API, mina-signer) on the [Mesa Trail test network](/network-upgrades/mesa/mesa-trail). He reviews [schema changes](/network-upgrades/mesa/appendix/archive-node-schema-changes) and installs the stop-slot release on his node: ```bash sudo apt-get install mina-mainnet=3.x.x ``` > For the full exchange preparation checklist, see [Requirements](/network-upgrades/mesa/requirements). **Hours before the fork** — Before the _stop-transaction-slot_ arrives, Bob **disables MINA deposits and withdrawals** on his platform and notifies customers about the maintenance window. :::danger Any transactions submitted after the stop-transaction-slot **will not exist on the Mesa chain**. See [State Finalization](/network-upgrades/mesa/upgrade-steps/state-finalization#exchanges) for the full exchange guidance. ::: **Fork day** — The network halts. Bob waits for the Mesa release announcement, then upgrades all three components and migrates his archive database: ```bash # Stop the stack sudo systemctl stop mina mina-archive # Install the Mesa releases for the node, archive, and Rosetta sudo apt-get update sudo apt-get install mina-mainnet=4.x.x mina-archive-mainnet=4.x.x mina-rosetta-mainnet=4.x.x # Upgrade the archive schema — the mina-archive package ships the script psql -U -d archive_db -f /etc/mina/archive/upgrade_to_mesa.sql # Restart the node and archive, then bring Rosetta back up sudo systemctl start mina mina-archive ``` > For detailed upgrade instructions, see [Upgrade](/network-upgrades/mesa/upgrade-steps/upgrade). **After the fork** — Block production resumes. Bob verifies his node is on the Mesa chain, confirms Rosetta API is working, then **re-enables MINA deposits and withdrawals**. ```bash mina client status # verify Mesa chain ID # test a small internal transfer before opening to customers ``` > For post-upgrade verification, monitoring, and flag reference, see [Post-Upgrade](/network-upgrades/mesa/upgrade-steps/post-upgrade#flag-and-configuration-reference).
--- url: /network-upgrades/mesa/upgrade-steps --- # Upgrade Steps The Mesa upgrade proceeds through four sequential phases. Each phase has specific actions for different node operator types. | Phase | Description | |---|---| | [Pre-Upgrade](/network-upgrades/mesa/requirements) | Prepare infrastructure, upgrade to the stop-slot release, run archive upgrade scripts | | [State Finalization](/network-upgrades/mesa/upgrade-steps/state-finalization) | 100-slot stabilization period — no new transactions accepted, block production continues | | [Upgrade](/network-upgrades/mesa/upgrade-steps/upgrade) | Network halts, state is exported, Mesa build is published | | [Post-Upgrade](/network-upgrades/mesa/upgrade-steps/post-upgrade) | Block production resumes on Mesa — verification and health checks for the new network | **Please note:** A simplified Node Status service will be part of the upgrade tooling and enabled by default in the Pre-Upgrade release with stop-slots ([3.x.x](https://github.com/MinaProtocol/mina/releases)). This feature allows for a safe upgrade by monitoring the amount of upgraded active stake. Only non-sensitive data is reported. Before proceeding, make sure you have reviewed the [Requirements](/network-upgrades/mesa/requirements) and chosen your [Upgrade Mode](/network-upgrades/mesa/upgrade-modes). ## Walkthroughs by role The per-phase pages above describe what every role does at each step. For end-to-end narrative walkthroughs with concrete commands by role and deployment style (block producer automode/manual, archive node, zkApp developer, exchange), see the [Examples](/network-upgrades/mesa/upgrade-steps/examples) page. Role-specific quick references: - **Block Producers & SNARK Coordinators** — pick a mode on [Upgrade Modes](/network-upgrades/mesa/upgrade-modes). Install commands for automode are in [Upgrade Modes — Installing automode](/network-upgrades/mesa/upgrade-modes#installing-automode). - **SNARK Workers** — coordinator-spawned workers inherit the coordinator's binary; standalone `mina internal snark-worker` deployments must be redeployed with the Mesa binary after the fork. - **Archive Node Operators** — Archive nodes do **not** support automode (see [Upgrade Modes](/network-upgrades/mesa/upgrade-modes) for limitations). See [Archive Upgrade](/network-upgrades/mesa/archive-upgrade) for the schema upgrade and trustless/trustful paths. - **Exchanges** — disable MINA deposits and withdrawals before the _stop-transaction-slot_ and keep them disabled until Mesa block production resumes. See [Exchanges](/network-upgrades/mesa/upgrade-steps/post-upgrade) on the Post-Upgrade page for the re-enable checklist. :::danger For exchanges Any transactions submitted after the _stop-transaction-slot_ **will not exist on the Mesa chain**. Disable deposits and withdrawals **before** [State Finalization](/network-upgrades/mesa/upgrade-steps/state-finalization) begins and keep them disabled until block production resumes on Mesa. ::: --- url: /network-upgrades/mesa/upgrade-steps/post-upgrade --- # Post-Upgrade Exactly 3 hours after the network reaches the _stop-network-slot_, at the predefined Mesa genesis timestamp, block production starts and the network is successfully upgraded. This page helps you **verify your node is healthy** and running on the Mesa chain. ## Per-actor summary | Actor | During this phase | | -------------------------- | --------------------------------------------------------------------------------------------------------------------------------------------------------------------------------------------------- | | **Block Producers** | Verify your node is on the Mesa chain (`mina client status`). If using automode, check the `activated` file. Monitor block production. | | **SNARK Workers** | Reconnect workers to the upgraded coordinator. Standalone workers must already be on the Mesa binary. Verify SNARK work is being produced. | | **Archive Node Operators** | Verify the archive database is in sync. Run [validation checks](#in-depth-validation). Fix any missing blocks. | | **Rosetta Operators** | Complete the archive node checks first, then verify Rosetta is responding. Run `rosetta-cli` validation. | | **Exchanges** | **Re-enable MINA deposits and withdrawals** once block production is confirmed and your systems are verified end to end. | | **zkApp Developers** | **Redeploy every zkApp** on Mesa — the protocol version bump invalidates Berkeley verification keys. Verify your contracts against o1js v3 / protocol v5. Use the expanded 32-field on-chain state. | The checks are split into separate tabs for **Rosetta API** and **Exchange** because the two roles overlap but are not the same. _Rosetta API_ here means an operator running the `mina-rosetta` integration layer (typically alongside an archive node). _Exchange_ means an operator running the customer-facing platform that ingests Mina balances and submits payments. Most exchanges use Rosetta, so they will work through both tabs; a handful operate without Rosetta (custom GraphQL integrations) and can skip the Rosetta tab. ## Verify Your Node First, confirm your node is on the Mesa chain — this check is identical for every role: ```bash # If using automode, check the activation file exists ls ~/.mina-config/auto-fork-mesa-mainnet/activated # Check node status mina client status ``` You should see: - **Sync status**: `Synced` - **Chain ID** matching the Mesa chain ID for your network. The chain ID changes at the fork and is network-specific (mainnet, devnet, and each test network get their own) — the exact value is published in the Mesa release announcement alongside the first Mesa packages. - **Git SHA-1** matching the published Mesa daemon commit - **Genesis timestamp** matching the published Mesa genesis timestamp - **Block height** advancing Then run the role-specific checks below. #### Verify block production Verify block production the same way you would on Berkeley — see [Block Producer Node](/node-operators/block-producer-node) for the relevant `mina client status` fields and checks. If you are a Delegation Program participant, your uptime continues to be tracked on the Mesa chain. #### Check logs for errors ```bash # Look for any errors in recent logs journalctl -u mina --since "1 hour ago" --no-pager | grep -i error # For Docker docker logs mina --since 1h 2>&1 | grep -i error ``` #### Verify SNARK workers are connected ```bash # Check that workers are producing proofs mina client status | grep -i snark ``` SNARK workers are **not compatible across the fork** — the transaction SNARK changed in Mesa, so a Berkeley-era worker cannot produce valid work for a Mesa coordinator. After the fork, every worker must run a Mesa-compatible release. Workers spawned by the coordinator pick up the new binary automatically; standalone workers must be redeployed. To restart a standalone worker against the coordinator: ```bash /usr/lib/mina/mesa/mina internal snark-worker \ --proof-level full \ --shutdown-on-disconnect false \ --daemon-address : ``` The automode dispatcher does not route `mina internal` subcommands — invoke the Mesa worker binary by its full install path (`/usr/lib/mina/mesa/mina`) as shown above. :::info Full archive procedure The checks below confirm a healthy archive. For the complete upgrade workflow — running the schema migration, the post-fork finalization steps (`convert-chain-to-canonical`, `populate-genesis-accounts`), and toolbox verification — see [Archive Upgrade](/network-upgrades/mesa/archive-upgrade). ::: #### 1. Verify archive data integrity ```bash # Check the schema-version table psql -U -d -c "SELECT * FROM migration_history;" # Run the hardfork toolbox verification mina-archive-hardfork-toolbox verify-upgrade \ --postgres-uri postgres://:@localhost:5432/ \ --protocol-version \ --migration-version ``` #### 2. Check for missing blocks Query the archive database to see if blocks are being captured: ```bash psql -U -d -c "SELECT height, state_hash FROM blocks ORDER BY height DESC LIMIT 5;" ``` If blocks are missing, use the archive tooling to backfill. See [In-Depth Validation](#in-depth-validation) below. #### 1. Complete the Archive Node checks above first Rosetta depends on a healthy archive database. #### 2. Verify Rosetta is responding For the full Rosetta API setup and verification guide, see [Rosetta API](/node-operators/data-and-history/rosetta). ```bash curl -s http://localhost:3088/network/list \ -H 'Content-Type: application/json' \ -d '{"metadata":{}}' | jq . ``` You should see `mainnet` in the response. #### 3. Test a balance lookup ```bash curl -s http://localhost:3088/account/balance \ -H 'Content-Type: application/json' \ -d '{ "network_identifier": {"blockchain":"mina","network":"mainnet"}, "account_identifier": {"address":""} }' | jq . ``` #### 1. Verify your integration stack - Confirm Rosetta API is responding (if used) - Confirm archive database is up to date (if used directly) - Test a small internal MINA transfer before re-enabling customer-facing operations #### 2. Re-enable deposits and withdrawals Only re-enable MINA deposits and withdrawals after: - Block production is confirmed (blocks are advancing) - Your integration is verified end to end - You have confirmed balances match expectations ## In-Depth Validation The checks in the tabs above cover basic health. This section provides deeper validation procedures for operators who want thorough verification. :::tip Verify the packaged state itself The checks below confirm that your node and archive database are healthy. To prove that the Mesa packages were built from the final pre-fork chain state, and to reproduce the genesis ledgers yourself, see [Verify the Release](/network-upgrades/mesa/verify-the-release). ::: 1. **Verify signature kind** — query the GraphQL endpoint to confirm the correct signature kind: ```graphql query { signatureKind } ``` For mainnet, this should return `mainnet`. 2. **Verify connectivity** — ensure your node has peers and is connected to the network. Check that the node is receiving and gossiping blocks. Use the `mina-archive-hardfork-toolbox` to verify the upgrade. All commands require `--postgres-uri postgresql://:@:/`. See the [Archive Upgrade](/network-upgrades/mesa/archive-upgrade#verification-with-the-archive-hardfork-toolbox) page for full toolbox documentation. **Verify schema upgrade:** ```bash mina-archive-hardfork-toolbox verify-upgrade \ --postgres-uri \ --protocol-version \ --migration-version ``` You can also verify manually: ```sql SELECT * FROM migration_history; ``` **Validate fork block integrity** (after the fork activates): ```bash mina-archive-hardfork-toolbox validate-fork \ --postgres-uri \ --fork-state-hash \ --fork-slot ``` **Verify no commands after fork point:** ```bash mina-archive-hardfork-toolbox fork-candidate no-commands-after \ --postgres-uri \ --fork-state-hash \ --fork-slot ``` **Verify extended zkApp state columns exist:** ```sql SELECT column_name FROM information_schema.columns WHERE table_name = 'zkapp_states_nullable' AND column_name LIKE 'element%' ORDER BY column_name; ``` Confirm columns `element0` through `element31` exist. **Check for missing blocks:** ```bash mina-missing-blocks-auditor --archive-uri postgres://:@
:/ ``` **Compare block heights** — the archive height should match or be close to the daemon's reported height: ```sql SELECT MAX(height) FROM blocks; ``` Use `rosetta-cli` to verify the API conforms to the Rosetta specification: ```bash # Spec check rosetta-cli check:spec --configuration-file config.json # Data check — aim for reconciliation coverage above 60% rosetta-cli check:data --configuration-file config.json # Construction check (after block production starts) rosetta-cli check:construction --configuration-file config.json --start-block 2 ``` 1. **Verify seed connectivity** — confirm all seeds listed in `https://bootnodes.minaprotocol.com/networks/mainnet.txt` are connectable. 2. **Verify block production** — monitor that blocks are being produced at the expected cadence via block explorers and your node's logs. 3. **Verify empty blocks during finalization** — confirm that all blocks between the _stop-transaction-slot_ and _stop-network-slot_ were empty (no user transactions, no coinbase, no fee transfers): ```sql SELECT b.height, b.state_hash FROM blocks b WHERE b.global_slot_since_genesis > AND b.global_slot_since_genesis <= AND ( EXISTS (SELECT 1 FROM blocks_user_commands buc WHERE buc.block_id = b.id) OR EXISTS (SELECT 1 FROM blocks_internal_commands bic WHERE bic.block_id = b.id) ); ``` This query should return zero rows. :::note In rare cases a non-empty block can appear after the _stop-transaction-slot_ — for example if a block producer and an archive operator both ran a build without the [stop-slot release](/network-upgrades/mesa/glossary#stop-slot-release). As long as the majority of stake upgraded, such a block lands on a short fork and does not affect the hard fork block, so it is not a problem for the upgrade. ::: --- ## Help Monitor the Network The Node Status reporting service is **off by default** on the Mesa daemon. The daemon sends nothing until you give it a collector address. To switch reporting on and point it at the o1Labs collection endpoints, pass: ```bash --node-status-url https://nodestats.minaprotocol.com/submit/stats --node-error-url https://nodestats.minaprotocol.com/submit/stats --simplified-node-stats true ``` - `--node-status-url` is the endpoint that receives status reports. It is also the on/off control: leave it out and the daemon starts no reporting service. - `--node-error-url` is the endpoint that receives crash reports the daemon emits just before terminating. It is a separate service with its own address. - `--simplified-node-stats` takes a boolean value and defaults to `true`. It selects the size of the report, not whether a report is sent. `true` sends a minimal, non-sensitive subset (version, sync status, peer count). `false` sends the full report, which contains more data, not less. :::caution `--disable-node-status` is a different feature `--disable-node-status` does **not** switch the reporting service off. It stops your node answering node-status queries from **other peers** on the network, which is a separate behavior and is enabled by default. To send nothing to a collector, simply leave `--node-status-url` unset. The `--node-stats-type` argument does not exist on the Mesa daemon. ::: ## Flag and Configuration Reference The flags below are **unchanged from Berkeley** — if your node was running correctly before the fork, the same flags will work on Mesa. This section is provided as a reference for operators setting up fresh nodes or verifying their configuration. For the canonical flag reference, see the [Validator Node docs](/node-operators/validator-node/connecting-to-the-network), [Block Producer docs](/node-operators/block-producer-node/getting-started), [SNARK Worker docs](/node-operators/snark-workers/getting-started), and [Archive Node docs](/node-operators/archive-node). :::info What changed in Mesa - **Only if you manually manage your genesis config or genesis ledgers, repoint `--genesis-ledger-dir` and `-config-file` at the Mesa-specific files.** Operators who rely on the package-installed genesis config — including all automode users — do not need to change anything. If you do override them, both ship inside the Mesa Debian/Docker package under `/var/lib/coda`: `--genesis-ledger-dir` should be `/var/lib/coda` (where the genesis ledger tarballs are installed), and `-config-file` should be the Mesa runtime config `/var/lib/coda/mainnet.json` (or the hash-suffixed `/var/lib/coda/config_.json`). The pre-fork config is preserved alongside it as `/var/lib/coda/mainnet.old.json`. - **All other flags carry over unchanged** — `--block-producer-key`, `--libp2p-keypair`, `--peer-list-url`, `--external-ip/port`, log flags, etc. behave the same on Mesa as on Berkeley. :::
Block Producer flags ``` mina daemon --block-producer-key --config-directory --file-log-rotations 500 --libp2p-keypair --log-json --peer-list-url https://bootnodes.minaprotocol.com/networks/mainnet.txt ENVIRONMENT VARIABLES RAYON_NUM_THREADS=6 MINA_LIBP2P_PASS MINA_PRIVKEY_PASS ```
SNARK Coordinator flags For detailed flag descriptions, see [SNARK Workers — Getting Started](/node-operators/snark-workers/getting-started). ``` mina daemon --config-directory --enable-peer-exchange true --file-log-rotations 500 --libp2p-keypair --log-json --peer-list-url https://bootnodes.minaprotocol.com/networks/mainnet.txt --run-snark-coordinator --snark-worker-fee 0.001 --work-selection [seq|rand|roffset] ENVIRONMENT VARIABLES MINA_LIBP2P_PASS ```
SNARK Worker flags For detailed flag descriptions, see [SNARK Workers — Getting Started](/node-operators/snark-workers/getting-started). ``` mina internal snark-worker --proof-level full --shutdown-on-disconnect false --daemon-address ENVIRONMENT VARIABLES RAYON_NUM_THREADS=8 ```
Archive Node flags Running an Archive Node involves a non-block-producing daemon connected to the archive process and a PostgreSQL database. For more information, see [Archive Node](/node-operators/archive-node). **Daemon (non-block-producing):** ``` mina daemon --archive-address :3086 --config-directory --enable-peer-exchange true --file-log-rotations 500 --libp2p-keypair --log-json --peer-list-url https://bootnodes.minaprotocol.com/networks/mainnet.txt ENVIRONMENT VARIABLES MINA_LIBP2P_PASS ``` **Archive process:** ``` mina-archive run --metrics-port --postgres-uri postgres://:@
:/ --server-port 3086 --log-json --log-level DEBUG ```
Rosetta API Once your Archive Node stack is running, start Rosetta pointing at your archive database and daemon GraphQL endpoint. Pick the install method that matches how you run the rest of your stack. Install the Mesa Rosetta package for your network, then run the binary directly: ```bash sudo apt-get update sudo apt-get install mina-rosetta-mainnet= # or: sudo apt-get install mina-rosetta-devnet= ``` ```bash mina-rosetta \ --archive-uri "${PG_CONNECTION_STRING}" \ --graphql-uri "${GRAPHQL_URL}" \ --log-json \ --log-level ${LOG_LEVEL} \ --port 3088 ``` ```bash docker run \ --name rosetta --rm \ -p 3088:3088 \ --entrypoint '' \ minaprotocol/mina-rosetta:-bullseye-mainnet \ /usr/local/bin/mina-rosetta \ --archive-uri "${PG_CONNECTION_STRING}" \ --graphql-uri "${GRAPHQL_URL}" \ --log-json \ --log-level ${LOG_LEVEL} \ --port 3088 ```
## Report Issues If you encounter any problems after the upgrade: - Report bugs on [GitHub](https://github.com/MinaProtocol/mina/issues) with the label `mesa` - Reach out on [Discord](https://discord.gg/minaprotocol) in the appropriate channel --- url: /network-upgrades/mesa/upgrade-steps/state-finalization --- # State Finalization Between the predefined _stop-transaction-slot_ and _stop-network-slot_, a stabilization period of 100 slots will occur. During this phase, the network consensus will not accept new blocks with transactions in them, including coinbase transactions. This means all blocks produced during this period will be completely empty — no user commands, no coinbase rewards, and no fee transfers. The state finalization period ensures all nodes reach a consensus on the latest network state before the upgrade. During the state finalization slots, it is crucial to maintain a high block density. Therefore, block producers and SNARK workers shall continue running their nodes to support the network's stability and security. Archive nodes should also continue to execute to ensure finalized blocks are in the database and can be carried over to the upgraded schema, preserving the integrity and accessibility of the network's history. ## Per-actor summary | Actor | During this phase | | -------------------------- | -------------------------------------------------------------------------------------------------------------------------------------------------------------------------------------------- | | **Block Producers** | Keep your node running. Block density during finalization is critical — do not stop your node. Both automode and manual operators simply keep running. | | **SNARK Workers** | Continue producing SNARK work. No special action required. | | **Archive Node Operators** | Keep the archive node running to capture all finalized blocks. If doing trustless upgrade, run the [archive upgrade script](/network-upgrades/mesa/archive-upgrade) now if not done already. | | **Rosetta Operators** | Follow the archive node instructions — keep your archive node running. | | **Exchanges** | **Disable MINA deposits and withdrawals.** Any transactions submitted after the stop-transaction-slot will not carry over to the Mesa chain. | | **zkApp Developers** | No action required. Monitor announcements for the Mesa genesis timestamp. | ## Block Producers and SNARK Workers 1. It is crucial for the network's successful upgrade that all block producers and SNARK workers maintain their block-producing nodes up and running throughout the state finalization phase. 2. If you are running multiple daemons like is common with many operators, you can run one single node at this stage. 3. If you are a Delegation Program operator, remember that your uptime data will continue to be tracked during the state finalization phase and will be considered for the delegation grant in the following epoch. :::info During this phase, both Automode and Manual mode operators simply keep their nodes running. No special action is needed regardless of your upgrade mode. ::: ## Archive Node Operators and Rosetta Operators :::info Full archive procedure For the complete upgrade workflow — the schema migration you can run now (before the fork), plus the post-fork finalization steps (`convert-chain-to-canonical`, `populate-genesis-accounts`) and toolbox verification you run once Mesa is live — see [Archive Upgrade](/network-upgrades/mesa/archive-upgrade). ::: **If you plan to do the _trustful_ upgrade, you can skip this step.** If you are doing the trustless upgrade, then: 1. Continue to execute the archive node to ensure finalized blocks are in the database. 2. Execute the [archive node upgrade script](/network-upgrades/mesa/archive-upgrade). It can be applied before the fork. 3. Continue to run archive node until after the network stops at the stop-network slot. 4. For more information on the archive node upgrade process, please refer to the [Archive Upgrade](/network-upgrades/mesa/archive-upgrade) section. ## Exchanges Exchanges shall disable MINA deposits and withdrawals during the state finalization period (the period between _stop-transaction-slot_ and _stop-network-slot_) since any transactions after the _stop-transaction-slot_ will not be part of the upgraded chain. Note that this assumes the majority of block producers are running the [stop-slot release](/network-upgrades/mesa/glossary#stop-slot-release), which is what enforces the transaction cutoff. If your own node is still on a pre-stop-slot build, you might technically be able to submit transactions, but the block producers running the stop-slot release will discard any blocks containing them. --- url: /network-upgrades/mesa/upgrade-steps/upgrade --- # Upgrade Starting at the _stop-network-slot_ the network will not produce nor accept new blocks, resulting in halting the network. During the upgrade period, o1Labs will use automated tooling to export the network state based on the block at the slot just before the _stop-transaction-slot_. The exported state will then be baked into the new Mesa build, which will be used to initiate the upgraded network. It is during the upgrade window that the Mesa network infrastructure will be bootstrapped, and seed nodes will become available. o1Labs will also finalize the archive node upgrade and publish the PostgreSQL database dumps for import by the archive node operators who wish to bootstrap their archives in a trustful manner. There are tools available to validate that the Mesa node was built from the pre-upgrade network state. To reproduce the packaged genesis ledgers and runtime configuration from the exported fork configuration, see [Verify the Release](/network-upgrades/mesa/verify-the-release). To check fork-block integrity in the archive database, see [In-Depth Validation](/network-upgrades/mesa/upgrade-steps/post-upgrade#in-depth-validation) for the `mina-archive-hardfork-toolbox` commands (`validate-fork`, `fork-candidate no-commands-after`). ## Per-actor summary | Actor | During this phase | | ------------------------------ | ------------------------------------------------------------------------------------------------------------------------------------------------------------------------------------------------------------------------------ | | **Block Producers (automode)** | Nothing. Your node transitions to Mesa automatically and will start producing blocks at the Mesa genesis timestamp. | | **Block Producers (manual)** | Stop your node. Wait for the Mesa release announcement, then install the new package and restart with [updated flags](/network-upgrades/mesa/upgrade-steps/post-upgrade). | | **SNARK Coordinators** | Same as block producers — automode transitions automatically; manual requires stop, install, and restart. | | **Standalone SNARK Workers** | Stop old workers. After the Mesa release is published, redeploy and start workers against the Mesa coordinator — an older worker cannot submit work to a Mesa coordinator. | | **Archive Node Operators** | Install the Mesa archive node release. Point it at your upgraded database (trustless) or import the o1Labs SQL dump (trustful). | | **Rosetta Operators** | Follow the archive node upgrade procedure for your archive database. Install the Mesa Rosetta release when published. | | **Exchanges** | Install the Mesa release if running node infrastructure. **Keep deposits/withdrawals disabled** until block production is confirmed on the Mesa chain (see [Post-Upgrade](/network-upgrades/mesa/upgrade-steps/post-upgrade)). | ## Block Producers and SNARK Workers :::info If you are using [Automode](/network-upgrades/mesa/upgrade-modes), your node handles this phase automatically. It will transition to the Mesa network without manual intervention. Skip to [Post-Upgrade](/network-upgrades/mesa/upgrade-steps/post-upgrade) for monitoring guidance. ::: If you are using **Manual mode**: 1. During the upgrade phase (between _stop-network-slot_ and the publishing of the Mesa release), block producers can shut down their nodes. 2. After the publication of the Mesa node release, block producers and SNARK workers should upgrade their nodes and be prepared for block production at the Mesa genesis timestamp, which is when the first Mesa block will be produced. 3. It is possible to continue using the same libp2p key after the upgrade. Pass it to the Mesa daemon with the [`--libp2p-keypair`](/node-operators/block-producer-node/getting-started) flag. All daemon flags carry over unchanged from Berkeley — see the [Post-Upgrade flag reference](/network-upgrades/mesa/upgrade-steps/post-upgrade#flag-and-configuration-reference) for the full per-role configuration. ## Archive Node Operators and Rosetta Operators 1. Upon publishing the archive node Mesa release, archive node operators and Rosetta operators should upgrade their systems. There will be both Docker images and archive node releases available to choose from. 2. Depending on the chosen upgrade method: - _Trustless_ - Operators should direct their Mesa archive process to the previously upgraded database. - _Trustful_ - Operators shall import the SQL dump file provided by o1Labs to a freshly created database. - Operators should direct their Mesa archive process to the newly created database. --- url: /network-upgrades/mesa/verify-the-release --- # Verify the Release The Mesa packages contain a genesis ledger and a runtime configuration that o1Labs generated from the state of the pre-fork chain. This page shows how to prove, on your own machine, that the packages you install were made from that state and from nothing else. This procedure is optional. It is written for exchanges, custodians, and node operators who must not take the contents of a package on trust. :::info This is not part of the upgrade path You do not have to run these checks to upgrade. For the upgrade itself, see [Upgrade Steps](/network-upgrades/mesa/upgrade-steps). For health checks on a node that is already running Mesa, see [Post-Upgrade](/network-upgrades/mesa/upgrade-steps/post-upgrade#in-depth-validation). ::: ## What the checks prove The verification tool compares three independent things: | Check | What it compares | What a pass means | | --- | --- | --- | | `config` | The ledger hashes in the fork configuration against the hashes in the precomputed fork block | The fork configuration describes the same chain state as the last block of the pre-fork chain | | `ledgers` | The ledgers a node exports from the packaged configuration against the ledgers exported from a configuration you build yourself | The packaged runtime configuration produces the same accounts as the fork configuration | | `tarballs` | The RocksDB contents of the packaged ledger tarballs against tarballs you generate, and against the copies published on S3 | The shipped ledger databases are byte-for-byte what the fork configuration produces | Together they show that the accounts, balances, and epoch ledgers in the Mesa release come from the pre-fork chain. **The checks do not prove** that the fork block itself is the correct one, or that the pre-fork chain was honest. To check the fork block and the archive database, use `mina-archive-hardfork-toolbox`, described in [Post-Upgrade](/network-upgrades/mesa/upgrade-steps/post-upgrade#in-depth-validation) and [Archive Upgrade](/network-upgrades/mesa/archive-upgrade#verification-with-the-archive-hardfork-toolbox). ## Before you start ### Machine Use a Debian or Ubuntu machine on x86-64. The node needs AVX instructions, which Intel emulation on macOS does not provide. Allow for the cost: the `ledgers` and `tarballs` checks each start a node and rehash every account. Together they take more than 20 minutes on mainnet-sized data, and they need enough free disk for three copies of the genesis ledgers. ### Packages Two packages supply the programs. Versions carry a release tag and a commit suffix, so copy them exactly instead of substituting a plain version number. Replace `` with the network you forked from, and the versions below with the ones published for your release. ```bash # The Mesa daemon, which also carries the verification tooling sudo apt-get install mina-=4.0.0-devnet-2dc9218 # The pre-fork genesis generator, used to build the reference ledgers sudo apt-get install mina-create--prefork-genesis-ledger=3.5.0-devnet-stop-slot-7a60364 ``` The two versions differ because the packages come from different branches: the Mesa side is built from the post-fork release, and the pre-fork generator from the `compatible` branch that the chain runs before the fork. The first package installs the verification script and every program it calls, except one: | Program | Package | | --- | --- | | `mina-verify-packaged-fork-config` | `mina-` | | `mina` | `mina-` | | `mina-create-genesis` | `mina-` | | `mina-hf-create-runtime-config` | `mina-` | | `mina-rocksdb-scanner` | `mina-` | | `mina-create-prefork-genesis` | `mina-create--prefork-genesis-ledger` | The pre-fork generator is a separate package because it is built from the pre-fork release, not from Mesa. Install the one whose `` matches the chain you forked from: `mina-create-mainnet-prefork-genesis-ledger` for a mainnet fork, `mina-create-devnet-prefork-genesis-ledger` for a devnet fork. The same `` value goes in `--network` and in the `.old.json` path used below. :::note Reference ledgers instead of the pre-fork package If you already hold a directory of reference ledgers and a `legacy_hashes.json`, pass `--reference-data-dir `. The tool then skips the pre-fork generation step, and you do not need `mina-create--prefork-genesis-ledger` at all. ::: ### Other tools - `jq` - `curl` - `gsutil`, unless you supply the precomputed fork block yourself through `PRECOMPUTED_FORK_BLOCK` ## Inputs | Input | Default | What it is | | --- | --- | --- | | Fork configuration | none, you must supply it | The full configuration exported from the pre-fork chain, with all accounts | | Packaged configuration | `/var/lib/coda/config_*.json` | The runtime configuration the Mesa package installed | | Genesis ledger directory | `/var/lib/coda` | Where the packaged ledger tarballs are | | Pre-fork configuration | `/var/lib/coda/.old.json` | The genesis ledger of the chain you forked from | | Precomputed fork block | fetched with `gsutil` | The last block of the pre-fork chain | ### Getting the fork configuration o1Labs publishes the fork configuration with the release. To export it yourself, query a node that is still on the pre-fork chain and is synchronized, before the network halts: ```bash curl --location "http://localhost:3085/graphql" \ --header "Content-Type: application/json" \ --data '{"query":"query { fork_config }"}' \ | jq '.data.fork_config' > fork_config.json ``` The file is large, because it holds every account. ## Run the checks Run the three checks separately. Each one can fail on its own, and running them apart makes a failure easier to read. Set `FORKING_FROM_CONFIG_JSON` to the pre-fork genesis ledger that the package installed. The quickest check. It fetches the precomputed fork block and compares hashes. It takes minutes, not hours. ```bash FORKING_FROM_CONFIG_JSON=/var/lib/coda/.old.json \ mina-verify-packaged-fork-config \ --network \ --fork-config fork_config.json \ --working-dir /tmp/mina-verification \ --checks config ``` Run this one first. If the hashes do not agree, the other two checks cannot pass either. This check starts a node three times and exports the staged ledger, the staking epoch ledger, and the next epoch ledger from each configuration. It is slow. ```bash FORKING_FROM_CONFIG_JSON=/var/lib/coda/.old.json \ mina-verify-packaged-fork-config \ --network \ --fork-config fork_config.json \ --working-dir /tmp/mina-verification \ --checks ledgers ``` The check also removes the tarballs from the genesis ledger directory once, to confirm that the node can download the same ledgers from S3 and that they agree. To skip that download, set `NO_TEST_LEDGER_DOWNLOAD=1`. This check compares the RocksDB contents of three copies of each ledger tarball: the packaged one, one it generates, and the one published on S3. ```bash FORKING_FROM_CONFIG_JSON=/var/lib/coda/.old.json \ mina-verify-packaged-fork-config \ --network \ --fork-config fork_config.json \ --working-dir /tmp/mina-verification \ --checks tarballs ``` To run all three in one command, leave `--checks` out. Its default is `config,tarballs,ledgers`. ### Result The tool writes `Validation successful` and exits with code 0 when every comparison agrees. On any mismatch it writes the file that differs and exits with code 1. Treat a non-zero exit as a failure to reproduce the package, and report it before you upgrade. ## Options | Flag | Meaning | | --- | --- | | `--network` | Name of the network, used to build the precomputed block path | | `--fork-config` | Path to the exported fork configuration | | `--working-dir` | Directory for the generated ledgers and configurations | | `--checks` | Comma-separated list from `config`, `ledgers`, `tarballs`. Default: all three | | `--precomputed-block-prefix` | Overrides the bucket prefix for the fork block, for example `gs://mina_network_block_data/devnet` | | `--reference-data-dir` | Directory of pre-generated reference ledgers. Skips pre-fork generation | | `--cached-hardfork-data` | Directory of already generated ledgers and `hashes.json`, to save a rehash | The tool also reads these environment variables: | Variable | Default | Use | | --- | --- | --- | | `FORKING_FROM_CONFIG_JSON` | `/var/lib/coda/mainnet.json` | The pre-fork genesis ledger. Set this to `.old.json` for a Mesa package | | `PACKAGED_DAEMON_CONFIG` | `/var/lib/coda/config_*.json` | The configuration to verify | | `GENESIS_LEDGER_DIR` | `/var/lib/coda` | Where the packaged tarballs are | | `PRECOMPUTED_FORK_BLOCK` | fetched with `gsutil` | A local copy of the fork block | | `NO_TEST_LEDGER_DOWNLOAD` | unset | Set it to skip the S3 download comparison | | `MINA_LEDGER_S3_BUCKET` | `https://s3-us-west-2.amazonaws.com/snark-keys-ro.o1test.net` | Where the published tarballs are | | `SECONDS_PER_SLOT` | `180` | Slot length of the network | | `MINA_LOG_LEVEL` | `info` | Log level of the node used for the exports | | `MINA_EXE`, `MINA_GENESIS_EXE`, `MINA_LEGACY_GENESIS_EXE`, `CREATE_RUNTIME_CONFIG`, `MINA_ROCKSDB_SCANNER` | the installed programs | Override any program, for example when you build from source | ## Verify from a container The Mesa Docker images carry the same programs, so you can verify without installing packages on the host. Replace the tag with the published Mesa tag for your distribution. ```bash docker run --rm -it \ -v "$PWD:/workdir" \ minaprotocol/mina-daemon: \ bash -c 'FORKING_FROM_CONFIG_JSON=/var/lib/coda/.old.json \ mina-verify-packaged-fork-config \ --network \ --fork-config /workdir/fork_config.json \ --working-dir /workdir/verification \ --checks config' ``` The image does not contain `mina-create-prefork-genesis`. For the `ledgers` and `tarballs` checks from a container, mount a reference directory and pass `--reference-data-dir`. ## If a check fails | Symptom | Likely cause | | --- | --- | | `Hashes in config ... don't match hashes from the precomputed block` | The fork configuration and the fork block are from different blocks. Confirm you exported the configuration from the correct chain, and that `--network` and `--precomputed-block-prefix` point at the right bucket | | `Error: program not found in PATH` | A package is missing. Check the program table above | | `Error: gsutil is required when PRECOMPUTED_FORK_BLOCK is nonexistent path` | Install `gsutil`, or give a local fork block through `PRECOMPUTED_FORK_BLOCK` | | `daemon died before exporting ledgers` | The node could not start. Read the node log in the working directory. Not enough memory is the usual cause | | `kvdb contents mismatch` | A ledger tarball does not agree with the reference. This is a real failure. Report it | For other problems, see [Troubleshooting](/network-upgrades/mesa/troubleshooting). --- url: /node-developers/bip44 --- # BIP44 Information | index | hexa | symbol | coin | |:------|:-----------|:-------|:----------------------------------| | 12586 | 0x8000312a | MINA | [Mina](https://minaprotocol.com/) | Mina uses the 5 level [BIP32](https://github.com/bitcoin/bips/blob/master/bip-0032.mediawiki) path format specified in [BIP44](https://github.com/bitcoin/bips/blob/master/bip-0044.mediawiki) ``` m / purpose' / coin_type' / account' / change / address_index ``` Keypairs are derived by varying only the ``account`` while keeping the ``change`` and ``address_index`` zero. # BIP32 path format ``` m / 44' / 12586' / account' / 0 / 0 ``` # Examples | account | path | |:--------|:------------------------| | 0 | m/44'/12586'/0'/0/0 | | 271 | m/44'/12586'/271'/0/0 | --- url: /node-developers/code-review-guidelines --- # Code Review Guidelines A good pull request: - Does about one thing (new feature, bug fix, etc) - Adds tests and documentation for any new functionality - When fixing a bug, adds or fixes test that would have caught said bug ## OCaml things - Are the [style guidelines](./style-guide) being followed? - Do the signatures make sense? Are they minimal and reusable? - Does anything need to be functored over? - Are there any error cases that aren't handled correctly? - Are calls to `_exn` functions justified? Are their preconditions for not throwing an exception met? Is the exception it throws useful? - There shouldn't be commented out code. - No stray debug code lying around. - Any logging is appropriate. All `Logger.trace` logs should be inessential, because they won't be shown to anyone by default. - Should this code live in its library? Should it live in a different library? - Does the code confuse you? Maybe there should be a comment, or it should be structured differently. - Does a behavior change break assumptions other code makes? --- url: /node-developers/codebase-overview --- # Codebase Overview The Mina Protocol is written in OCaml, a statically typed, functional programming language. For OCaml beginners, it may help to skim through [Real World OCaml](https://realworldocaml.org/) for a good introduction to the language, and some deep dives into specific topics if you're interested. Assuming basic familiarity with OCaml, here's some more info on how it is used in the Mina Protocol. ## Code Structure See the [Repository Structure page](/node-developers/repository-structure). ## Compilation The OCaml compiler can target bytecode and native compilation. The code statically links with some libraries so it can't compile to bytecode. The code doesn't play well with the REPL. Dune, the build system, has a concept of folders that represent modules and files that a module. If the folder has a file with the same name, it's essentially equivalent to `index.js` in Node. Interface files in OCaml with the `.mli` extension contain type signatures and structures for a module. The corresponding implementation must have the same file name with the `.ml` extension. Only the things defined in the interface are available from other modules. If an interface file does not exist for a module, everything is exposed by default. The same convention and rules apply to files with the `.rei` and `.re` extensions. For the linking step, `dune` uses `ldd` under the hood. You can also use things like `-O3` for optimization. For debugging, you can use `gdb`. ## Open-source Library Documentation There are multiple libraries for OCaml. One challenge with learning OCaml is locating and reading documentation for the various libraries. For example, the Jane Street `Core` library has the following structure: ``` Base | Core_kernel -> Async_kernel | | Unix <- Core -> Async ``` In general, the source code of an installed library is not available, so follow these tips to find the documentation. To review the docs for Core, a standard library overlay. Core is a popular alternative to the OCaml standard library. First, go to the [Core](https://github.com/janestreet/core) codebase on GitHub and then locate the correct documentation. If you don't see the module you're looking for, go to next to `Core_kernel`. If that fails, then look for `Base`. To use the find capability in GitHub, expand the sections. Most documentation is published in HTML. However, you can use the an IDE to find and review code and documentation, like the Merlin editor service that provides modern IDE features for OCaml. Merlin provides type hints and code navigation, like Go To Definition. Note that Merlin works only if your code compiles. OPAM, the source-based package manager for OCaml, usually ships documentation with libraries that you can access using Merlin. ## Extensions OCaml uses the ppx meta-programming system that generates code at compile time. For example, consider this ppx extension on a type signature: ``` type t = | A | B [@ to_yojson f] [@@ deriving yojson] ``` The single `@` scopes an extension to a single expression. The `@@` denotes the extension is expanded in the scope of the calling context. For an extension on a structure or a value, use the following syntax. `%` returns a value/expression. `%%` injects a statement ``` let x = [% ...] [%% ...] let y = let%... z = ... in match%... ... with | ... | ... in [%% if x] let x = y [%% else] let x = z [%% endif] ``` **TL;DR** Anytime you see `[@ ...]` `[@@ ...]` `[% ...]` `[%% ...]` it's an OCaml language extension. ## Monads Functional design patterns that allows you to write computation in a very generic way, that removes the need for boilerplate code. Monads allow us to abstract up to a higher level of computation, while taking care of all the glue for us. In other words, monads are programmable semicolons. For example consider the following imperative example: ``` function example(x) { if ( x == null ) return null; x = x + 1; if ( !isEven(x) ) return null; return x; } ``` This can expressed similarly in functional programming using a monad, using option: ``` type a' option = | None | Some of 'a let return x = Some x (* Bind infix operation, applies f to m *) let (>>=) m f = match m with | Some x -> f x | None -> None (** Map infix operation Essentially the same as bind, but the inner function unwraps the value. **) let (>>|) m f = m >>= (fun x -> return (f x)) ``` Now we an use these primitives to reimplement the imperative example above as follows. ``` let add_one = ((+) 1) let bind_even : int -> int option = fun x -> if x mod 2 = 0 then Some x else None let example x = x >>| add_one >>= bind_even; ``` OCaml has a `ppx` that makes writing monads much easier to follow, using the let syntax. ``` let%bind x = y in f x (* This compiles down to the following *) y >>= (fun x -> f x) ``` Essentially, this syntax takes the value from the let statement and places it on the left of the bind infix call, and puts the assignment into a lambda. ## Async Under the hood, async uses Monads. However, ivars are the low-level async primitive. `'a Ivar.t` is essentially a mutex that can only be filled once. After the value from a computation returns, it then fills the ivar. The rest of the syntactic sugar takes the ivar and passes them through `Deferred` monads. A `yield` function exists, but avoid using it since it has some weird behavior. Instead, operate on the wrapped values that happen in between `Deferred` bindings. ## Custom Helpers Use these custom helpers: - `Strict_pipe` - wraps pipe and gives certain guarantees around how it can be used. - `Broadcast_pipe` - allows a single pipe to be hooked up to multiple downstream pipes. Do not use: - `Async.Pipe` operates essentially like a buffer and is unsafe since it has unlimited buffering by default (memory overflow) and some funky behavior around which end of the pipe should do what. - `Linear_pipe` - deprecated in favor of `Strict_pipe` and `Broadcast_pipe`. --- url: /node-developers/contributing --- # Contributing to Mina Mina is an open-source project with a mission to build an inclusive and sustainable community-driven protocol. As such, Mina welcomes contributions. The protocol is in development and is always improving. You can make contributions in many ways, including writing code, user testing, documentation, and community support. For specific instructions for contributing in each of these domains, see the codebase repositories or ask in [Mina Protocol Discord](https://discord.gg/minaprotocol). For general questions on getting involved, reach out to the Mina community on the [Mina Protocol Discord](https://discord.gg/minaprotocol) server. ## Developers Mina is entirely open source, and the code is distributed under the terms of the [Apache License 2.0](https://github.com/MinaProtocol/mina/blob/master/LICENSE). ## Docs Mina Docs are also open source. We love our community. Help us make the docs better, contributions are welcome and appreciated. - For a quick fix, click **EDIT THIS PAGE**. - For a more substantial contribution, see the [Docs Contributing Guidelines](https://github.com/o1-labs/docs2/blob/main/CONTRIBUTING.md). ## Mina Grants Grants are rewarded for certain projects related to the development of Mina. See [Mina Grants](https://minaprotocol.com/grants) for details. The projects are mostly programming focused, but the areas of design and community development are included. Reach out in the [#grants](https://discord.com/channels/484437221055922177/727960609832042607) channel on Mina Protocol Discord for questions about the grant program. ## Reporting Issues If you notice Code of Conduct violations, please follow the Reporting Guidelines in [Code of Conduct](https://github.com/MinaProtocol/mina/blob/develop/CODE_OF_CONDUCT.md) to file a report and alert the community to ensure a safe space for everyone. If you encounter critical bugs or vulnerabilities in the protocol, report them to security@minaprotocol.com. For minor bugs and issues, create an issue on GitHub. --- url: /node-developers/graphql-api --- # GraphQL API :::caution - Mina APIs are still under construction, so these endpoints may change. - By default, the GraphQL port is bound to localhost. Exposing the GraphQL API to the internet allows anyone to send Mina from the accounts known to the daemon. ::: The Mina daemon exposes a [GraphQL API](https://graphql.org/) used to request information from and submit commands to a running node. To use the GraphQL API, connect your GraphQL client to `http://localhost:3085/graphql` or open in your browser to use the [GraphiQL IDE](https://github.com/graphql/graphiql). - By default, an HTTP server runs on port `3085`. You can configure a different port, use the `-rest-port` flag with the daemon startup command. - The default security permits only connections from `localhost`. To listen on all interfaces, add the `-insecure-rest-server` flag to the daemon startup command. In addition to information about the running node, the GraphQL API can return data about the network's latest blocks. However, as the blockchain's historical state is not persisted in Mina, only blocks in the node's transition frontier are returned, i.e., the last `k` blocks. For other historical data, use the [Archive Node](/node-operators/archive-node/getting-started) that is designed to retain and retrieve historical data. The full Mina GraphQL schema is available [https://github.com/MinaProtocol/mina/blob/develop/graphql_schema.json](https://github.com/MinaProtocol/mina/blob/develop/graphql_schema.json). ### Queries The Mina GraphQL API has a number of [queries](/node-operators/validator-node/querying-data) to extract data from a running node. [GraphQL queries](https://graphql.org/learn/queries/) allow specifying the data to be returned in the response. For example, to get the latest block and creator information known to the daemon: ``` query { bestChain(maxLength: 1) { creator stateHash protocolState { consensusState { blockHeight } previousStateHash } transactions { coinbase } } } ``` The following query requests all pending transactions in the transaction pool together with their fees. This query can be used to generate an estimate of a suggested fee for a transaction: ``` query { pooledUserCommands { id, fee } } ``` :::tip The memo field returned for a transaction is [Base58Check encoded](https://en.bitcoin.it/wiki/Base58Check_encoding). ::: ``` query { account(publicKey: "") { balance { total } delegate nonce } } ``` You can submit GraphQL requests from the command line of a node. For example, to use cURL to get the last ten block creators known to the node: ``` curl -d '{"query": "{ bestChain(maxLength: 10) { creator } }"}' -H 'Content-Type: application/json' http://localhost:3085/graphql ``` ### Mutations GraphQL mutations modify the running node in some way. For example, mutations may be used to send a payment, create a new account, or to add additional peers. Consult the GraphQL schema for all available mutations. Adding a new peer: ``` mutation { addPeers(peers:{ libp2p_port:10511, host:"34.73.68.198", peer_id:"12D3KooWSJB2gZWi3ruVmtTF9JBCEBpCrJfuWCWzzRr8mMQWFQ9U" }) } ``` Update a SNARK worker to use a fee of 0.1 MINA: ``` mutation { setSnarkWorkFee(input: {fee: "100000000"}) } ``` ### Subscriptions A GraphQL subscription allows a GraphQL client to have data pushed to it when an event occurs. In Mina, there are subscriptions for: - _newSyncUpdate_ - occurs when the sync status of the node changes. - _newBlock_ - occurs when a new block is received. - chainReorganisation - occurs when the best tip of the node changes in a non-trivial way. For example, to subscribe to all new blocks produced: ``` subscription { newBlock { creator stateHash protocolState { consensusState { blockHeight } previousStateHash } } } ``` The new block subscription can also be limited to return only new blocks created by a defined public key with the `publicKey` argument. ### GraphQL API and public Internet Exposing the GraphQL endpoint with full API support to the public Internet **is not** recommended. However, you can start the Mina Daemon node with the `--open-limited-graphql-port` and `--limited-graphql-port ` CLI arguments to expose the GraphQL endpoint with limited API support. ### Resources - [5-minute introduction video on Mina GraphQL API](http://bit.ly/GraphQLAPIin5) Coda - [First steps with the Mina GraphQL API](https://garethtdavies.com/crypto/first-steps-with-coda-graphql-api.html) - [Introduction to GraphQL](https://graphql.org/learn/) --- url: /node-developers --- # Node Developers Explore the codebase on [GitHub](https://github.com/MinaProtocol/mina). To start contributing code to Mina, see the [Contributing Guide](/node-developers/contributing). The [protocol](https://github.com/MinaProtocol/mina/tree/master/src) and [CLI](https://github.com/MinaProtocol/mina/tree/master/src/app/cli) are written in OCaml. All levels of experience in any or all of these tools is welcome. Other documents relevant to contributing code include: - [Style Guide](/node-developers/style-guide) - [Code Review Guidelines](/node-developers/code-review-guidelines) - [Repository Structure](/node-developers/repository-structure) - [BIP44 Information](/node-developers/bip44) Mina is entirely open source. The code is distributed under the terms of the [Apache License 2.0](https://github.com/MinaProtocol/mina/blob/master/LICENSE). --- url: /node-developers/repository-structure --- # Repository Structure The file structure of the [Mina repository](https://github.com/minaprotocol/mina)the roles various files play: - `dockerfiles/` Contains Docker-related scripts - `docs/` Documentation for the code and processes for contributing are here. The documentation website with the walkthrough docs lives in `frontend/website/docs`. - `frontend/` All code related to Mina frontend UIs and products - `wallet/` Source code for the Mina wallet - `website/` Code for https://minaprotocol.com - `posts/` Markdown docs for blog posts - `src/` Source code for the website - `static/` Static files like images, etc. - `rfcs/` This directory contains all accepted RFCs (or "requests for comments") made according to the [RFC process](https://github.com/MinaProtocol/mina/blob/master/CONTRIBUTING.md#rfcs). - `scripts/` - `src/` All protocol source code, both application and library code, is in this directory. - `*.opam` These files are needed for our `dune` build system. There must be one for each library in `lib`. When you create a library `lib/foo_lib` with a `dune` file giving the library's name as `foo_lib`, you must create a `foo_lib.opam` file. - `config/` Build time config - these .mlh files define compile time constants and their values. - `app/` Applications live here. - `cli/` This is the mina client/daemon. It is what you use to run a staker, a snarker, or a simple client for sending and receiving transactions. - `website/` Soon to be deprecated directory for the website - most of the code has migrated over to `frontend/website/` - `reformat/` This program runs `ocamlformat` on most of the files in the source tree, with a few exceptions. - `logproc/` This utility reads from `stdin` and can filter and pretty print the log messages emitted by the mina daemon. - `libp2p_helper/` This program uses go-libp2p to implement the peer-to-peer plumbing that Mina daemons need. - `external/` Local copies of external libraries which we've had to make some tweaks to. - `lib/` Libraries powering mina. The libraries here basically fall into two categories. 1. General purpose data-types and functionality. This includes `snarky`, `fold_lib`, `vrf_lib`, `sgn`, and others. 2. Application specific functionality, structured as a library. This includes `syncable_ledger`, `staged_ledger`, `transaction_snark`, and others. --- url: /node-developers/sandbox-node --- # Sandbox Node The Mina Sandbox Node enables you to test and get familiar with core features of the protocol and build tooling in a stable environment -- it's a single-node private network that uses the same configuration as the live testnet. This sandbox supports multiple accounts, sending transactions between them, and also supports performing SNARK work, delegating, and staking. In fact since it's a single node network, you earn all the block rewards! :::info The sandbox does **NOT** connect you to a live network. ::: ## Installation [Docker](https://www.docker.com) is a tool for portably running applications. The Mina Sandbox is packaged with Docker, and now built-in to our daemon containers. It’s easy to install--we suggest the [Docker Desktop](https://www.docker.com/products/docker-desktop). After you have Docker installed run the following command to spin up the Mina Sandbox. ``` docker run \ --publish 3085:3085 \ -d \ --name mina \ -e RUN_DEMO=true \ -e MINA_PRIVKEY_PASS='' \ minaprotocol/mina-daemon:3.3.0-8c0c2e6-bullseye-mainnet ``` This command starts a daemon inside the docker container and exposes the GraphQL port (3085) to your computer. This port is used for communication with the client. This daemon automatical runs in the background with a block producer and SNARK worker. You can view logs by executing. ``` docker logs --follow mina ``` And stop mina by running. ``` docker stop mina ``` You can use the Mina CLI to interact with the sandbox node. The following command opens a shell inside the docker container from where you can issue any of the available [cli commands](/node-operators/reference/mina-cli-reference). ``` docker exec -it mina bash ``` ### Account details The container has one account with this public key: ``` B62qiZfzW27eavtPrnF6DeDSAKEjXuGFdkouC3T5STRa6rrYLiDUP2p ``` The password for this account is the empty string (there's no password -- you can leave the password field blank). ## How to use the sandbox There are a few things you can do with your sandbox now that you have it running: - [Install Mina](/node-operators/validator-node/installing-on-ubuntu-and-debian) as usual and use many of the client commands. Since the daemon is already running in the container, you don't need to run `mina daemon`! - Install the GUI Wallet app to use a graphical interface to your node. Enter '127.0.0.1' as the host of your node during setup. - Head over to [http://localhost:3085/graphql](http://localhost:3085/graphql) to play with the GraphQL API directly. --- url: /node-developers/style-guide --- # Style Guide ## Ocaml [ocaml]: #ocaml ### General [ocaml-general]: #ocaml-general Our style guidelines are an extension of a couple of existing style guidelines. The first is ocamlformat, and it acts as the source of truth for most of our coding style. In fact, ocamlformat is a blocker on CI, so your code must be formatted by it's guidelines in order to be merged into master. Ocamlformat does not handle all important cases of style, however, as it is only defining and enforcing how code should be spaced out and indented. For anything which ocamlformat does not cover, the [Jane Street styleguide](https://opensource.janestreet.com/standards/) should be referenced. This styleguide we define here is intended to be an extension of the janestreet styleguide, with more attention to detail in concern to a few specific constructs we use regularly throughout our codebase. ### Mli Files [ocaml-mli]: #ocaml-mli A `*.mli` file should not be included for a `*.ml` file if the `*.ml` file's automatically derived interface is different. Many `*.ml` files in our codebase consist of only signatures and a functor. In the case of those files, there is not purpose to redefining the `*.mli` file because there is no new or restricted information in that file. If a `*.ml` file contains implementations in the root structure, then a `*.mli` file should most likely be created. ### Modules [ocaml-modules]: #ocaml-modules #### Prefer Standardized Shortnames The names `t`, `T`, and `S` are common shortnames used in modules to signify specific things. The name `t` is used to represent the root type of a module. For instance, if there is a module `Account` which contains types and values related to accounts, then `Account.t` is the type of an account. The name `t` can also be used as a value iff there is only intended to be one value of the root type of the module. As an example, if you wanted to have a single global logger in a `Logger` module, the type `Logger.t` could be the type of a logger, and the value `Logger.t` could be the global logger value of type `Logger.t`. The module name `T` is used to encapsulate the root type and basic definitions regarding a root type of a module. It is a common practice used when you want to instantiate some functors for a module's root type and have the instantiations appear in the module itself. As an example, it is common to call the `Comparable.Make` functor in order to derive various helper values/modules from a comparable type. In this case, if we had a module `Account` again, and we wanted to derive the `Comparable.S` signature, then we would define a module `T` in `Account` which defines a root type `t` and the required functions for the `Comparable.Make` functor argument (in this case, `compare`). With this `T` module, we can then `include T` and `include Comparable.Make (T)` in the `Account` module to bring in all related values/modules for the `Account.t` type. Here is a full example of that: ``` module Account = struct module T = struct type t = ... [@@deriving compare] end include T include Comparable.Make (T) end ``` The module type name `S` is used for defining the root signature of a module. This is most commonly used when you have a module which contains a functor. In this case, we typically call the functor `Make` and declare the functor returns the type `S`, putting both of these values in the same module. Looking back at our previous example, `Core_kernel`'s `Comparable` module follows this pattern: `Comparable.Make` is a functor which returns a `Comparable.S`. #### Prefer One Type Per Module [ocaml-modules-singleton-types]: #ocaml-modules-singleton-types As a general rule of thumb, each module should be scoped to a single type. This pattern helps isolate concerns and, in turn, allows value names to be shorter, as they are located by context. Take, for example, a `Merkle_tree` module. This module will need a type `Merkle_tree.t` which represents the entire merkle tree (or a node of it). A `Merkle_tree` will also want to have a `path` type. It is preferable to place this `path` type into it's own nested module (`Merkle_tree.Path.t` instead of `Merkle_tree.path`). To help understand why this is preferable, imagine we did put path in `Merkle_tree.path`. Now, `Merkle_tree` contains values (functions) that relate not only to the merkle tree type itself, but also the a path of a merkle tree. For clarity, it would be natural to prepend all of the value names related to a path with `path_` (`path_map`, `path_length`, etc...). By isolating `Path` to it's own module, we can shorten these names while keep the context of values clear. Additionally, if we choose to in the future, we may encapsulate the implementation details of `Path` by applying a restrictive signature to it, which would make the separation of concerns more clear via compiler enforcement. #### No Monkeypatching [ocaml-modules-monkeypatching]: #ocaml-modules-monkeypatching Monkeypatching of modules is explicitly disallowed in our codebase. Monkeypatching is defined as the act of taking an existing module and redefining it with extended or modified values. More simply, it's anything of the form. ``` module A = struct module M = struct let x = ... end end module M = struct include A.M let y = ... (* or `let x = ...` *) end ``` Monkeypatching may be the easiest path to getting code to compile sometimes, but in general, it creates confusion and/or technical debt in the codebase. If you need to monkeypatch a module, you should have a good reason as to why. #### Functor Signature Equalities [ocaml-modules-functor-patterns]: #ocaml-modules-functor-patterns Signature `with` statements for signatures of modules generated by functors should be limited to the form `S with module M1 = M2` whenever possible. Replacement equalities `:=` should be limited to `include` statements where portions of the signature need to be limited (for example, when a nested module in the signature is already defined at the current structure scope). The form `S with type t = ...` is also not preferred as it scales poorly as the number of common dependencies between signatures involved with a functor increases. Note that this places increased importance on the janestreet styleguide rule "Prefer standard signature includes to hand-written interfaces". #### Functor Arity [ocaml-modules-functor-arity]: #ocaml-modules-functor-arity Functor can have a maximum arity of 3 (arity is the number of arguments; in this case, the number of nested functors - functors returning functors). If a functor requires more than 3 modules as arguments, then the required modules should all be nested into one module. The standard pattern for this is to define a signature `Inputs_intf` for your functor, which will, in turn, define the module arguments to the functor. See below for a simple example. ``` module type Inputs_intf = sig module A : A.S module B : B.S module C : C.S module D : D.S end module type S = sig include Inputs_intf (* ... *) end module Make (Inputs : Inputs_intf) : S with module A = Inputs.A and module B = Inputs.B and module C = Inputs.C and module D = Inputs.D = struct open Inputs (* ... *) end ``` # Code Idiosyncrasies We use a particular style of OCaml. Here's some of the important things. ## Parameterized records ```ocaml type ('payload, 'pk, 'signature) t_ = {payload: 'payload; sender: 'pk; signature: 'signature} [@@deriving eq, sexp, hash] type t = (Payload.t, Public_key.t, Signature.t) t_ [@@deriving eq, sexp, hash] (* ... *) type var = (Payload.var, Public_key.var, Signature.var) t_ ``` We're defining a base type `t_` with type variables for all types of record fields. Then we define the record using these type variables. Finally, we instantiate the record with `type t`, this is the OCaml type. And also `type var` this is the type of this value in a SNARK circuit. We'll cover this more later. Whenever we want something to be programmable from within a SNARK circuit we define it in this manner so we can reuse the record definition across both types. There is some talk of moving to OCaml object types to do this sort of thing so we don't need to deal with positional arguments. Perhaps I (@bkase) will write up an RFC for that at some point. ### Ppx_deriving ```ocaml type t = int [@@deriving sexp, eq] ``` This is the first time we've seen a macro. Here we use `sexp` from [ppx_jane](https://github.com/janestreet/ppx_jane) and `eq` from [ppx_deriving](https://github.com/ocaml-ppx/ppx_deriving). ### Stable.V1 ```ocaml module Stable : sig module V1 : sig type t = (* ... *) [@@deriving bin_io, (*...*)] end end ``` Whenever a type is serializable, it's important for us to maintain backwards compatibility once we have a stable release. Ideally, we wouldn't define `bin_io` on any types outside of `Stable.V1`. When we change the structure of the datatype we would create a `V2` under `Stable`. ### Property based tests [Core](https://opensource.janestreet.com/core/) has an implementation of [QuickCheck](https://blog.janestreet.com/quickcheck-for-core/) that we use whenever we can in unit tests. Here is an example signature for a `Quickcheck.Generator.t` of payments. ```ocaml (* Generate a single payment between * $a, b \in keys$ * for fee $\in [0,max_fee]$ * and an amount $\in [1,max_amount]$ *) val gen : keys:Signature_keypair.t array -> max_amount:int -> max_fee:int -> t Quickcheck.Generator.t ``` ### Typesafe invariants (help with naming this section) In Mina, very important checks are frequently performed on certain pieces of data. For example, we need to confirm that the signature is valid on a user-command we receive over the network. Such checks can be expensive, so we only want to do them once, but we want to remember that we've done them. ```ocaml (* inside user_command.mli *) module With_valid_signature : sig type nonrec t = private t [@@deriving sexp, eq] (*...*) end val check : t -> With_valid_signature.t option ``` Here we define `With_valid_signature` (usage will be `User_command.With_valid_signature.t`) using `type nonrec t = private t` to allow upcasting to a `User_command.t`, but prevent downcasting. The _only_ way to turn a `User_command.t` into a `User_command.With_valid_signature.t` is to `check` it. Now the compiler will catch our mistakes. ### Unit Tests We use [ppx_inline_test](https://github.com/janestreet/ppx_inline_test) for unit testing. Of course whenever we can, we combine that with `QuickCheck`. ```ocaml let%test_unit = Quickcheck.test ~sexp:[%sexp_of: Int.t] Int.quickcheck_generator ~f:(fun x -> assert (Int.equal (f_inv (f x)) x)) ``` ### Functors We are in the process of migrating to using module signature equalities -- see [the above section](#functor-signature-equalities) and [the rfc for rationale](https://github.com/MinaProtocol/mina/blob/master/rfcs/0004-style-guidelines.md), but we still have a lot of code using type substitutions (`with type foo := bar`). First we define the resulting module type of the functor, keeping all types we'll be functoring in abstract. ```ocaml module type S = sig type boolean_var type curve type curve_var (*...*) end ``` Then we define the functor: ```ocaml module Schnorr (Impl : Snark_intf.S) (Curve : sig (*...*) end) (Message : Message_intf with type boolean_var := Impl.Boolean.var (*...*)) : S with type boolean_var := Impl.Boolean.var and type curve := Curve.t and type curve_var := Curve.var (*...*) = struct (* here we implement the signature described in S *) end ``` ### Custom SNARK circuit logic This is also the first time we see custom SNARK circuit logic. A pattern we've been using is to scope all operations that you'd want to run inside a SNARK under a submodule `module Checked`. For example, inside [sgn.mli](https://github.com/MinaProtocol/mina/blob/master/src/lib/sgn/sgn.mli) we see: ```ocaml (* ... *) val negate : t -> t module Checked : sig val negate : var -> var end ``` `negate` is the version of the function that runs in OCaml, and `Checked.negate` is the one that runs inside of a SNARK circuit. --- url: /node-operators/archive-node/archive-redundancy --- # Archive Redundancy The [archive node](/node-operators/archive-node/getting-started) stores its data in a PostgreSQL database that node operators host on a provider of their choice, including self-hosting. For redundancy, archive node data can also be stored to an object storage like [Google Cloud Storage](#upload-block-data-to-google-cloud-storage); soon S3 and others) or to a [`mina.log`](#save-block-data-from-logs) file that reside on your computer or be streamed to any typical logging service, for example, LogDNA. Archive data is critical for applications that require historical lookup. On the protocol side, archive data is important for disaster recovery to reconstruct a certain state. A single [archive node](/node-operators/archive-node/getting-started) set up might not be sufficient. If the daemon that sends blocks to the archive process or if the archive process itself fails for some reason, there can be missing blocks in the database. To minimize the risk of archive data loss, employ the redundancy techniques described on this page; to detect and repair gaps once they have already formed, see [Backfilling Missing Blocks](./backfilling-missing-blocks). A single archive node setup has a daemon sending blocks to an archive process that writes them to the database. To connect multiple daemons to the archive process, specify the address of an archive process in multiple daemons to reduce the dependency on a single daemon to provide blocks to the archive process. For example, the server port of an archive process is 3086. The daemons can connect to that port using the flag `archive-address` ``` mina daemon \ ..... --archive-address :3086\ ``` Similarly, it is possible to have multiple archive processes write to the same database. In this case, the `postgres-uri` passed to the archive process is the same across multiple archive processes. However, multiple archive processes concurrently writing to a database could cause data inconsistencies (explained in https://github.com/MinaProtocol/mina/issues/7567). To avoid this, set the transaction isolation level of the archive database to `Serializable` with the following query: ALTER DATABASE `` SET DEFAULT_TRANSACTION_ISOLATION TO SERIALIZABLE ; Set the transaction level after you create the [database](/node-operators/archive-node/getting-started) and before you connect an archive process to it. ## Back up block data To ensure that archive data can be restored, use the following features to back up and restore block data. A mechanism for logging a high-fidelity machine-readable representation of blocks using JSON includes some opaque information deep within. These logs are used internally to quickly replay blocks to get to certain chain states for debugging. This information suffices to recreate exact states of the network. Some of the internal data look like this: ```json {"data":["Signed_command",{"payload":{"common":{"fee":"100","fee_token":"1","fee_payer_pk":"B62qixbmBBmCmv1xH5SeF1hw6EqwSNVPi9B28epa3phqVMSyuZk9EoH","nonce":"340","valid_until":"4294967295","memo":"E4YM2vTHhWEg66xpj52JErHUBU4pZ1yageL4TVDDpTTSsv8mK6YaH"},"body":["Payment",{"source_pk":"B62qixbmBBmCmv1xH5SeF1hw6EqwSNVPi9B28epa3phqVMSyuZk9EoH","receiver_pk":"B62qm2GCuGCEK79mEjeyaeiFoukThuZLJCHGe9HAzuAnfbtS5FHtPnP","token_id":"1","amount":"100000000"}]},"signer":"B62qixbmBBmCmv1xH5SeF1hw6EqwSNVPi9B28epa3phqVMSyuZk9EoH","signature":"7mXGz8Df1gu92HVWGue24wcrGxDWkgQrDK59xQGXc627PKFQvVAPSzZn7JMkHtfdBUXavDHcgLBZy4iR4UmA5seRCPMkFDci"}],"status":["Applied",{"fee_payer_account_creation_fee_paid":null,"receiver_account_creation_fee_paid":null,"created_token":null},{"fee_payer_balance":"31866000100000","source_balance":"31866000100000","receiver_balance":"34099000000"}]}],"coinbase":["One",null],"internal_command_balances":[["Coinbase",{"coinbase_receiver_balance":"75477804514901","fee_transfer_receiver_balance":null}],["Fee_transfer",{"receiver1_balance":"65266376010003","receiver2_balance":"78601129170700"}],["Fee_transfer",{"receiver1_balance":"66001820000000","receiver2_balance":"76870784414900"}],["Fee_transfer",{"receiver1_balance":"71158365898775","receiver2_balance":"59264207944722"}],["Fee_transfer",{"receiver1_balance":"68546088449962","receiver2_balance":"66721919100000"}],["Fee_transfer",{"receiver1_balance":"67700798001000","receiver2_balance":"66372760000000"}],["Fee_transfer",{"receiver1_balance":"85383891400000","receiver2_balance":"107174952265469"}],["Fee_transfer",{"receiver1_balance":"65879310000000","receiver2_balance":"66282230000000"}]]}]},"delta_transition_chain_proof":["jxLZWooV57gKCmanzCHHt1CDbHfUpMu6MkynUdqN9ZkBUJi7B1W",[]]} ``` This JSON evolves as the format of the block and transaction payloads evolve in the network. ### Upload block data to Google Cloud Storage The daemon generates a file for each block with the name `-.json` . These files are called precomputed blocks and have all the fields of a block. To specify a daemon to upload block data to Google Cloud Storage, pass the flag `--upload-blocks-to-gcloud`. Set the following environment variables: - `GCLOUD_KEYFILE`: Key file for authentication - `NETWORK_NAME`: Network name to use in the filename to easily distinguish between blocks in different networks (Mainnet and Testnets) - `GCLOUD_BLOCK_UPLOAD_BUCKET`: Google Cloud Storage bucket where the files are uploaded ### Save block data from logs The daemon logs the block data if the flag `-log-precomputed-blocks` is passed. The log to look for is `Saw block with state hash $state_hash` that contains `precomputed_block` in the metadata and has the block information. These precomputed blocks contain the same information that gets uploaded to Google Cloud Storage. ### Generate block data from another archive database From a fully synced archive database, you can generate block data for each block using the `mina-extract-blocks` tool. The `mina-extract-blocks` tool generates a file for each block with name `.json`. The tool takes an `--archive-uri`, an `--end-state-hash`, and an optional `--start-state-hash`, and writes all the blocks in the chain starting from start-state-hash and ending at end-state-hash (including start and end). If only the end hash is provided, then the tool generates blocks starting with the unparented block closest to the end block. This would be the genesis block if there are no missing blocks in between. The block data in these files are called extensional blocks. Since these blocks are generated from the database, they have only the data stored in the archive database and do not contain any other information pertaining to a block (for example, blockchain SNARK) like the precomputed blocks and can only be used to restore blocks in the archive database. Provide the flag `--all-blocks` to write out all blocks contained in the database. ### Back up the archive database In addition to retaining per-block files, you can snapshot the entire PostgreSQL archive database. A database dump is the fastest way to seed a fresh archive without replaying every block. Use `pg_dump` to create a snapshot: ```bash pg_dump -U -Fp | gzip > archive-$(date +%F).sql.gz ``` Schedule this regularly (a nightly cron is typical) and publish the dumps to object storage that your downstream consumers can reach. o1Labs publishes nightly dumps of its public-network archives to the [mina-archive-dumps](https://storage.googleapis.com/mina-archive-dumps/) GCS bucket as a convenience: ```bash # Mainnet curl -O https://storage.googleapis.com/mina-archive-dumps/mainnet-archive-dump-$(date +%F)_0000.sql.tar.gz # Devnet — swap "mainnet" for "devnet". ``` :::tip Mirror the dumps you depend on Hosting your own dumps (and your own per-block files) is what keeps the network from converging on a single provider. The o1Labs bucket is a convenience, not a guarantee. ::: ## Restoring missing blocks Detecting gaps and restoring blocks from the backups described above is covered on a dedicated page: [Backfilling Missing Blocks](./backfilling-missing-blocks). That guide walks through `mina-missing-blocks-auditor`, `mina-archive-blocks`, and the missing-blocks guardian script. ## Staking ledgers Staking ledgers are used to determine slot winners for each epoch. Mina daemon stores staking ledger for the current and the next epoch after it is finalized. When transitioning to a new epoch, the "next" staking ledger from the previous epoch is used to determine slot winners of the new epoch and a new "next" staking ledger is chosen. Since staking ledgers for older epochs are no longer accessible, you can still keep them around for reporting or other purposes. Export these ledgers using the mina cli command: mina ledger export [current-staged-ledger|staking-epoch-ledger|next-epoch-ledger] Epoch ledger transition happens once every 7 days (given slot-time = 90 seconds and slots-per-epoch = 7140). The window to backup a staking ledger is ~27 days considering "next" staking ledger is finalized after k (currently 290) blocks in the current epoch and therefore is available for the rest of the current epoch and the entire next epoch. --- url: /node-operators/archive-node/backfilling-missing-blocks --- # Backfilling Missing Blocks A Mina archive database can develop gaps whenever the daemon or the `mina-archive` process is unavailable while a new block is being added — for example a process restart, a network blip between the daemon and the archive, or the archive process being briefly down. The daemon does not persist missed blocks for later delivery, so any block that lands during the outage will be missing from the database until you backfill it from another source. Because the archive stores only incremental changes, even a single missing block breaks chain continuity and makes downstream queries (balances, Rosetta, zkApp event/action lookups, replayer runs) unreliable. This page explains how to: - detect and repair gaps automatically with the [missing-blocks-guardian](#recommended-the-missing-blocks-guardian) script (recommended for most setups), - obtain the block data the repair pulls from (see [Sources of block data](#sources-of-block-data)), - and reach for the [individual tools](#individual-tools) when the guardian's defaults are not a good fit. ## Recommended: the missing-blocks-guardian For almost every archive setup, the right tool is `mina-missing-blocks-guardian`. It is shipped in the `mina-archive` Debian package and Docker image, and wraps the auditor and the block-importer into a single loop — detect gap → download the missing precomputed block → import it → re-check. The [Docker Compose example](./docker-compose) wires it up out of the box. The guardian has three modes: | Subcommand | Behavior | | --- | --- | | `audit` | Run the check once and exit. Returns whether the database is healthy without modifying anything. Use this from monitoring / alerting (e.g. a Kubernetes liveness check or a cron-driven Prometheus exporter). | | `single-run` | Detect gaps, then walk back from each orphan parent, download the corresponding precomputed block from `PRECOMPUTED_BLOCKS_URL`, import it, and repeat until the database is clean. Exits when done. Right for one-off repairs and bootstrapping. | | `daemon` | The same recovery loop as `single-run`, but kept running forever. Re-audits every `TIMEOUT` seconds (default 600); when a repair completes it sleeps `6 × TIMEOUT` before checking again. Right for production archive nodes. | Required environment variables: | Variable | Purpose | | --- | --- | | `DB_USERNAME`, `PGPASSWORD`, `DB_HOST`, `DB_PORT`, `DB_NAME` | PostgreSQL connection for the archive database. | | `PRECOMPUTED_BLOCKS_URL` | Base URL of the precomputed-blocks bucket (e.g. `https://storage.googleapis.com/mina_network_block_data` or your own mirror). | | `MINA_NETWORK` | Network name used as a filename prefix (`mainnet`, `devnet`, ...). | Optional overrides (`MISSING_BLOCKS_AUDITOR`, `ARCHIVE_BLOCKS`, `BLOCKS_FORMAT`, `TIMEOUT`) are documented in the script's `--help` output. A minimal one-shot repair: ```bash export DB_USERNAME=postgres DB_HOST=localhost DB_PORT=5432 DB_NAME=archive export PGPASSWORD=postgres export PRECOMPUTED_BLOCKS_URL=https://storage.googleapis.com/mina_network_block_data export MINA_NETWORK=mainnet mina-missing-blocks-guardian single-run ``` Swap `single-run` for `daemon` to run the loop continuously alongside your archive node, or `audit` to plug it into health-checking. ## Sources of block data To fill a gap you need the block(s) that the auditor reports as missing in one of two formats: - **Precomputed blocks** — the full block JSON the daemon serializes, named `--.json`. Use these whenever possible. - **Extensional blocks** — a slimmer JSON generated from an existing archive database via `mina-extract-blocks`. Sufficient to repair an archive but lacks the SNARK and other fields that are not stored in PostgreSQL. How to *store* these files (uploading blocks from a daemon, saving them from logs, extracting them from another archive, scheduling database dumps) is covered on [Archive Redundancy](./archive-redundancy#back-up-block-data). This page assumes the files already exist somewhere and only documents *where to read them from* for a backfill. The two public sources that o1Labs operates as a convenience are: | Bucket | Contents | Use for | | --- | --- | --- | | [`gs://mina-archive-dumps`](https://storage.googleapis.com/mina-archive-dumps/) | Nightly archive-database snapshots (`-archive-dump-_0000.sql.tar.gz`) | Bootstrapping a fresh archive — apply the dump first, then backfill anything produced after the snapshot. | | [`gs://mina_network_block_data`](https://storage.googleapis.com/mina_network_block_data/) | Per-block precomputed JSON files (`--.json`) | The block-by-block input the auditor + guardian walk through to close gaps. | :::tip Decentralization These o1Labs buckets are a convenience, not a guarantee. The network is healthier when operators publish their own dumps and precomputed-block mirrors — see [Archive Redundancy](./archive-redundancy) for how to set that up. ::: If you mirror the data to your own bucket, point the guardian at your URL via the `PRECOMPUTED_BLOCKS_URL` environment variable. ## Individual tools The guardian script is a thin wrapper around two underlying binaries shipped in the `mina-archive` Debian package and Docker image: `mina-missing-blocks-auditor` (detect) and `mina-archive-blocks` (restore). Most operators never need to invoke them directly — but the details are useful when: - you want to plug detection into an existing monitoring pipeline rather than run the guardian's loop, - you are importing extensional blocks produced by `mina-extract-blocks` instead of precomputed blocks from a bucket, - you are debugging a repair that the guardian could not complete on its own, - or your setup deviates enough from the assumed shape that the guardian's defaults do not apply (custom block-name layout, non-Postgres staging, etc.). ### Detecting gaps with mina-missing-blocks-auditor `mina-missing-blocks-auditor` reports on the health of the archive database. It is read-only and safe to run against a live node. ```bash mina-missing-blocks-auditor \ --archive-uri postgres://:@:/ ``` It performs four independent checks and encodes the results in its exit code (a bitfield, `0` means a healthy database): | Bit | Check | What it means | | --- | --- | --- | | 0 | Missing blocks | One or more blocks have no parent row in `blocks` (orphan parents). Genesis and the first post-hard-fork block are excluded. | | 1 | Pending blocks below tip | Pending blocks exist at a height below the highest canonical block — a sign that finalization stalled or rows were lost. | | 2 | Chain length | The reconstructed canonical chain is shorter than `max(height)` of canonical blocks. | | 3 | Chain status | A block reachable from the canonical tip has a `chain_status` other than `canonical`. | For every missing block the auditor logs a structured entry that names the orphan, its expected parent, and the size of the gap: ```text Block has no parent in archive db block_id: 12345 state_hash: 3N... height: 387200 parent_hash: 3N... parent_height: 387199 missing_blocks_gap: 1 ``` The `parent_hash` and `parent_height` are exactly what you need to locate the missing block file — this is how the guardian drives its download loop. ### Restoring blocks with mina-archive-blocks Once you have the missing block files, `mina-archive-blocks` writes them into PostgreSQL. Pass `--precomputed` or `--extensional` to match the file format: ```bash # Precomputed blocks (from the daemon or the public bucket) mina-archive-blocks \ --precomputed \ --archive-uri postgres://:@:/ \ mainnet-387200-3NK....json mainnet-387201-3NL....json # Extensional blocks (produced by mina-extract-blocks) mina-archive-blocks \ --extensional \ --archive-uri postgres://:@:/ \ 3NK....json ``` Useful flags: - `--successful-files ` — append successfully imported filenames to a log. - `--failed-files ` — append filenames that failed (parse error, schema mismatch, missing dependency). - `--log-successful false` — suppress per-block success logs when importing many files. Re-run `mina-missing-blocks-auditor` after the import to confirm the gap is closed. ## Backfilling around a hard fork The chain itself is continuous across a hard fork — but it is a common case that an archive operator is not online at the moment the fork happens, or joins the network later, and therefore has to patch in the post-fork blocks they missed. Backfilling around a hard fork uses exactly the same workflow as any other gap, with one extra precondition: - **The first canonical block of the new fork must already be in the database.** This is the block whose `global_slot_since_hard_fork = 0`. It is typically inserted either by running the upgrade script that comes with the new release, or by importing a post-fork archive dump that already contains it. Without this row, the auditor has no anchor on the new chain to walk back from, and the guardian cannot stitch the post-fork blocks together. With the fork block present, run `mina-missing-blocks-guardian single-run` (or `daemon`) as in the [recommended flow](#recommended-the-missing-blocks-guardian) and it will pull every precomputed block in between from `PRECOMPUTED_BLOCKS_URL` until the new chain is contiguous. ## Related - [Archive Redundancy](./archive-redundancy) — the companion page on how to *store* precomputed blocks, extensional blocks, and database dumps so a backfill source always exists. This page covers what to do once those backups are in place. - [Docker Compose example](./docker-compose) — a ready-made stack that runs the guardian alongside a bootstrap-from-dump postgres and a mina-archive process. - [Archive Nodes Getting Started](./getting-started) — initial setup of the archive database and `mina-archive` process. --- url: /node-operators/archive-node/docker-compose --- # Docker Compose Archive This example demonstrates how to run a Mina archive node using Docker Compose for the Mainnet network. This Docker Compose setup includes a Postgres database, a bootstrap database with the latest SQL Dump available, an archive node, a Mina node and a Missing Blocks Guardian script to monitor and populate the gaps in the archive database Copy and paste the provided configuration into a `docker-compose.yml` file. Then run `docker compose up -d` to start the services, and use `docker compose logs -f` to monitor the logs. ```yaml services: postgres: image: postgres:17 restart: always environment: POSTGRES_PASSWORD: postgres POSTGRES_DB: archive healthcheck: test: ["CMD-SHELL", "psql -U postgres -d archive -tAc \"SELECT COUNT(*) FROM pg_database WHERE datname='archive';\" | grep -q '^1$'"] interval: 5s timeout: 10s retries: 10 volumes: - './archive/postgresql/data:/var/lib/postgresql/data' ports: - '5432:5432' bootstrap_db: image: 'minaprotocol/mina-archive:3.3.0-8c0c2e6-bullseye-mainnet' # image: 'minaprotocol/mina-daemon:4.0.0-6965b50-bullseye-devnet' # Use this image for Devnet command: > bash -c ' curl -O https://storage.googleapis.com/mina-archive-dumps/mainnet-archive-dump-$(date +%F_0000).sql.tar.gz; tar -zxvf mainnet-archive-dump-$(date +%F_0000).sql.tar.gz; psql postgres://postgres:postgres@postgres:5432/archive -c " ALTER SYSTEM SET max_connections = 500; ALTER SYSTEM SET max_locks_per_transaction = 100; ALTER SYSTEM SET max_pred_locks_per_relation = 100; ALTER SYSTEM SET max_pred_locks_per_transaction = 5000; " psql postgres://postgres:postgres@postgres:5432/archive -f mainnet-archive-dump-$(date +%F_0000).sql; ' # For Devnet Network, replace "mainnet" references with "devnet" in the block above depends_on: postgres: condition: service_healthy missing_blocks_guardian: image: 'minaprotocol/mina-archive:3.3.0-8c0c2e6-bullseye-mainnet' # image: 'minaprotocol/mina-daemon:4.0.0-6965b50-bullseye-devnet' # Use this image for Devnet command: > bash -c ' curl -O https://raw.githubusercontent.com/MinaFoundation/helm-charts/main/mina-archive/scripts/missing-blocks-guardian-command.sh; export GUARDIAN_PRECOMPUTED_BLOCKS_URL=https://673156464838-mina-precomputed-blocks.s3.us-west-2.amazonaws.com/mainnet; export MINA_NETWORK=mainnet; export PG_CONN=postgres://postgres:postgres@postgres:5432/archive; while true; do bash missing-blocks-guardian-command.sh; sleep 600; done ' # For Devnet Network, replace "mainnet" references with "devnet" in the block above depends_on: bootstrap_db: condition: service_completed_successfully mina_archive: image: 'minaprotocol/mina-archive:3.3.0-8c0c2e6-bullseye-mainnet' restart: always command: - mina-archive - run - --postgres-uri - postgres://postgres:postgres@postgres:5432/archive - --server-port - "3086" volumes: - './archive/data:/data' depends_on: bootstrap_db: condition: service_completed_successfully mina_node: image: 'minaprotocol/mina-daemon:3.3.0-8c0c2e6-bullseye-mainnet' # image: 'minaprotocol/mina-daemon:4.0.0-6965b50-bullseye-devnet' # Use this image for Devnet restart: always entrypoint: [] command: > bash -c ' mina daemon --archive-address mina_archive:3086 \ --peer-list-url https://bootnodes.minaprotocol.com/networks/mainnet.txt \ --insecure-rest-server \ --rest-port 3085 ' # use --peer-list-url https://bootnodes.minaprotocol.com/networks/devnet.txt for Devnet ports: - '3085:3085' - '8302:8302' depends_on: bootstrap_db: condition: service_completed_successfully ``` Once the services are running, you can access the Mina node graphql endpoint at `http://localhost:3085/graphql` and the postgres database using `psql postgres://postgres:postgres@localhost:5432/archive`. To retrieve the status of the Mina Node, run `docker compose exec mina_node mina client status` --- url: /node-operators/archive-node/getting-started --- # Archive Nodes Getting Started Mina nodes are succinct by default, so they don't need to maintain historical information about the network, block, or transactions. For some use cases, it is useful to maintain this historical data on an archive node. :::tip A zkApp can retrieve events and actions from one or more Mina archive nodes. If your smart contract needs to fetch events and actions from an archive node, see [How to Fetch Events and Actions](/zkapps/writing-a-zkapp/feature-overview/fetch-events-and-actions). ::: An archive node is a regular mina daemon that is connected to a running `mina-archive` process using the `--archive-address` flag. The daemon regularly sends blockchain data to the archive process that stores it in a [PostgreSQL](https://www.postgresql.org/) database. ## Archive Node Requirements **Software**: Supported environments include macOS, Linux (Debian 10, 11 and Ubuntu 20.04 LTS), and any host machine with Docker. **Processor**: Only x86-64 CPU architecture is supported. **Hardware**: Running an archive node does not require any special hardware. In addition to the [PostgreSQL](https://www.postgresql.org/) database requirements, running an archive node on the Mina network requires at least: - 8-core processor - 32 GB of RAM - 64 GB of free storage Running an archive node requires some knowledge of managing a PostgreSQL database instance. You must set up a database, run the archive node, connect it to a daemon, and run queries on the data. ## Install Mina, PostgreSQL, and the archive node package 1. Install the latest version of Mina. You must upgrade to the latest version of the daemon. Follow the steps in [Getting Started](../block-producer-node/getting-started). 1. Download and install [PostgreSQL](https://www.postgresql.org/download/). 1. Install the archive node package. - Ubuntu/Debian: ``` sudo apt-get install mina-archive=3.3.0-8c0c2e6 ``` - Docker: ``` minaprotocol/mina-archive:3.3.0-8c0c2e6-bullseye-mainnet ``` ## Set up the archive node These steps might be different for your operating system, if you're connecting to a cloud instance of PostgreSQL, if your deployment uses Docker, or if you want to run these processes on different machines. :::caution Using the `--config` parameter ensures genesis accounts are inserted into the database, which is important to avoid gaps in account balances since the archive node stores only incremental changes. However, inserting genesis accounts can take significant time and resources. You can skip `--config` if you're connecting to devnet or mainnet and starting from an existing archive database dump rather than an empty archive. *Never* use it on long lived network such as mainnet or devnet ::: For production, run the archive database in the background, use your operating system service manager (like systemd) to run it for you, or use a postgres service hosted by a cloud provider. To run a local archive node in the foreground for testing: 1. Start a local postgres server and connect to port 5432: ```sh postgres -p 5432 -D /usr/local/var/postgres ``` For macOS: ```sh brew services start postgres ``` 1. Create a local postgres database called `archive`: ```sh psql -p 5432 --h localhost -c "create database archive" ``` 1. Load the mina archive schema into the archive database, (create_schema.sql and zkapp_tables.sql): ```sh psql -h localhost -p 5432 -d archive -f <(curl -Ls https://raw.githubusercontent.com/MinaProtocol/mina/release/3.0.2/src/app/archive/create_schema.sql) ``` 1. Start the archive process on port 3086 and connect to the postgres database that runs on port 5432: ```sh mina-archive run \ --postgres-uri postgres://localhost:5432/archive \ --server-port 3086 ``` 1. Start the mina daemon and connect it to the archive process that you started on port 3086: ``` mina daemon \ ..... --archive-address 3086 ``` To connect to an archive process on another machine, specify a hostname with `` i.e. `154.97.53.97:3086`. 1. Install Docker on your machine. For more information, see [Docker](https://docs.docker.com/get-docker/). 2. Pull the archive node image from Docker Hub. ```sh docker pull minaprotocol/mina-archive:3.3.0-8c0c2e6-bullseye-mainnet ``` 3. Pull and install the postgres image from Docker Hub. ```sh docker pull postgres ``` 4. Start the postgres container and expose its networking to other containers. ```sh docker run --name postgres -p 5432:5432 -e POSTGRES_PASSWORD=postgres -d postgres ``` 5. Create a local postgres database called `archive`. ```sh docker exec -it postgres createdb -U postgres archive ``` 6. Load the mina archive schemas into the archive database, (create_schema.sql and zkapp_tables.sql.) ```sh curl -Ls https://raw.githubusercontent.com/MinaProtocol/mina/1551e2faaa246c01636908aabe5f7981715a10f4/src/app/archive/create_schema.sql | docker exec -i postgres psql -U postgres -d archive curl -Ls https://raw.githubusercontent.com/MinaProtocol/mina/1551e2faaa246c01636908aabe5f7981715a10f4/src/app/archive/zkapp_tables.sql | docker exec -i postgres psql -U postgres -d archive ``` 7. Create a local directory to store the archive node data. ```sh mkdir -p /tmp/archive ``` 8. Start the archive node. ```sh docker run \ --name archive \ -p 3086:3086 \ -v /tmp/archive:/data \ minaprotocol/mina-archive:3.3.0-8c0c2e6-bullseye-mainnet \ mina-archive run \ --postgres-uri postgres://postgres:postgres@postgres:5432/archive \ --server-port 3086 ``` 9. Start the mina daemon and connect it to the archive process that you started on port 3086: ``` mina daemon \ ..... --archive-address 3086 ``` To connect to an archive process on another machine, specify a hostname with `` i.e. `154.97.53.97:3086`. Docker Compose is a tool for defining and running multi-container Docker applications. With Compose, you use a YAML file to configure your application's services. Then, with a single command, you create and start all the services from your configuration. 1. Install Docker and Docker Compose on your machine. For more information, see [Docker](https://docs.docker.com/get-docker/) and [Docker Compose](https://docs.docker.com/compose/install/). 2. Pull the required images: ```sh docker pull minaprotocol/mina-archive:3.3.0-8c0c2e6-bullseye-mainnet docker pull postgres ``` 3. Create a local directory to store the archive node data. ```sh mkdir -p /tmp/archive ``` 4. Create a `docker-compose.yml` file with the following contents: ```yml services: postgres: image: postgres:17 environment: POSTGRES_PASSWORD: postgres volumes: - './postgres-data:/var/lib/postgresql/data' ports: - '5432:5432' archive: image: 'minaprotocol/mina-archive:3.3.0-8c0c2e6-bullseye-mainnet' command: >- mina-archive run --postgres-uri postgres://postgres:postgres@postgres:5432/archive --server-port 3086 volumes: - '/tmp/archive:/data' ports: - '3086:3086' depends_on: - postgres ``` 5. Start the archive node. ```sh docker compose up ``` 6. Start the mina daemon and connect it to the archive process that you started on port 3086: ``` mina daemon \ ..... --archive-address 3086 ``` To connect to an archive process on another machine, specify a hostname with `` i.e. `154.97.53.97:3086`. ## Using the Archive Node Take a look at the tables in the database. To list the tables, run the `\dt` command in psql. The output will look like this: ``` List of relations Schema | Name | Type | Owner --------+-------------------------------+-------+------- public | account_identifiers | table | mina public | accounts_accessed | table | mina public | accounts_created | table | mina public | blocks | table | mina public | blocks_internal_commands | table | mina public | blocks_user_commands | table | mina public | blocks_zkapp_commands | table | mina public | epoch_data | table | mina public | internal_commands | table | mina public | protocol_versions | table | mina public | public_keys | table | mina public | snarked_ledger_hashes | table | mina public | timing_info | table | mina public | token_symbols | table | mina public | tokens | table | mina public | user_commands | table | mina public | voting_for | table | mina public | zkapp_account_precondition | table | mina public | zkapp_account_update | table | mina public | zkapp_account_update_body | table | mina public | zkapp_account_update_failures | table | mina public | zkapp_accounts | table | mina public | zkapp_action_states | table | mina public | zkapp_amount_bounds | table | mina public | zkapp_balance_bounds | table | mina public | zkapp_commands | table | mina public | zkapp_epoch_data | table | mina public | zkapp_epoch_ledger | table | mina public | zkapp_events | table | mina public | zkapp_fee_payer_body | table | mina public | zkapp_field | table | mina public | zkapp_field_array | table | mina public | zkapp_global_slot_bounds | table | mina public | zkapp_length_bounds | table | mina public | zkapp_network_precondition | table | mina public | zkapp_nonce_bounds | table | mina public | zkapp_permissions | table | mina public | zkapp_states | table | mina public | zkapp_states_nullable | table | mina public | zkapp_timing_info | table | mina public | zkapp_token_id_bounds | table | mina public | zkapp_updates | table | mina public | zkapp_uris | table | mina public | zkapp_verification_key_hashes | table | mina public | zkapp_verification_keys | table | mina (45 rows) ``` Use the `\d table_name` to look at the structure of a table in the database. For example to see the structure of the user_commands table, run the `\d user_commands` command in psql. The output will look like this: ``` Table "public.user_commands" Column | Type | Collation | Nullable | Default --------------+-------------------+-----------+----------+------------------------------------------- id | integer | | not null | nextval('user_commands_id_seq'::regclass) command_type | user_command_type | | not null | fee_payer_id | integer | | not null | source_id | integer | | not null | receiver_id | integer | | not null | nonce | bigint | | not null | amount | text | | | fee | text | | not null | valid_until | bigint | | | memo | text | | not null | hash | text | | not null | Indexes: "user_commands_pkey" PRIMARY KEY, btree (id) "user_commands_hash_key" UNIQUE CONSTRAINT, btree (hash) Foreign-key constraints: "user_commands_fee_payer_id_fkey" FOREIGN KEY (fee_payer_id) REFERENCES public_keys(id) "user_commands_receiver_id_fkey" FOREIGN KEY (receiver_id) REFERENCES public_keys(id) "user_commands_source_id_fkey" FOREIGN KEY (source_id) REFERENCES public_keys(id) Referenced by: TABLE "blocks_user_commands" CONSTRAINT "blocks_user_commands_user_command_id_fkey" FOREIGN KEY (user_command_id) REFERENCES user_commands(id) ON DELETE CASCADE ``` Review the full schema at [/archive/create_schema.sql](https://github.com/minaProtocol/mina/blob/master/src/app/archive/create_schema.sql) and [/archive/zkapp_tables.sql](https://github.com/MinaProtocol/mina/blob/berkeley/src/app/archive/zkapp_tables.sql) ## Query the database Now that you know the structure of the data, try some queries. **Example 1:** Find all blocks that were created by your public key: ``` SELECT * FROM blocks AS b INNER JOIN public_keys AS pk1 ON b.creator_id = pk1.id WHERE value = 'MY_PK' ``` **Example 2:** Find all payments received by your public key: ``` SELECT * FROM user_commands AS uc JOIN blocks_user_commands AS buc ON uc.id = buc.user_command_id JOIN public_keys AS pk ON uc.receiver_id = pk.id WHERE value = 'MY_PK' AND type = 'payment' ``` **Example 3:** Find the block at height 12 on the canonical chain: ``` WITH RECURSIVE chain AS ( (SELECT ... FROM blocks b WHERE height = (select MAX(height) from blocks) ORDER BY timestamp ASC LIMIT 1) UNION ALL SELECT ... FROM blocks b INNER JOIN chain ON b.id = chain.parent_id AND chain.id <> chain.parent_id ) SELECT ..., pk.value as creator FROM chain c INNER JOIN public_keys pk ON pk.id = c.creator_id WHERE c.height = 12 ``` **Example 3:** List the counts of blocks created by each public key and sort them in descending order" ``` SELECT p.value, COUNT(*) FROM blocks INNER JOIN public_keys AS p ON creator_id = ip.id GROUP BY p.value ORDER BY count DESC; ``` **Example 4:** List the counts of applied payments created by each public key and sort them in descending order: ``` SELECT p.value, COUNT(*) FROM user_commands INNER JOIN public_keys AS p ON source_id = p.id WHERE status = 'applied' AND type = 'payment' GROUP BY p.value ORDER BY count DESC; ``` **Example 5** Get the latest block: ``` SELECT height as blockheight, global_slot_since_genesis as globalslotsincegenesis, global_slot_since_hard_fork as globalslot, state_hash as statehash, parent_hash as parenthash, ledger_hash as ledgerhash, to_char(to_timestamp(cast ("timestamp" as bigint) / 1000) AT TIME ZONE 'UTC', 'YYYY-MM-DD"T"HH24:MI:SS') || '.' || LPAD(((cast("timestamp" as bigint) % 1000)::text), 3, '0') || 'Z' as datetime FROM blocks WHERE id in (SELECT MAX(id) FROM blocks); ``` **Example 6** Identify blocks with missing parents, between blockheight 500 and blockheight 5000 ``` SELECT height FROM blocks WHERE parent_id is null AND height >= 500 AND height <= 5000 and height > 1; ``` --- url: /node-operators/archive-node --- # About Archive Nodes Mina nodes are succinct by default, so they don't need to maintain historical information about the network, block, or transactions. An archive node is a Mina node that stores the historical chain data to a persistent data source, PostgreSQL, so it can later be retrieved. For some use cases, it is useful to maintain this historical data on an archive node. :::tip A zkApp can retrieve events and actions from one or more Mina archive nodes. If your smart contract needs to fetch events and actions from an archive node, see [How to Fetch Events and Actions](../../zkapps/writing-a-zkapp/feature-overview/fetch-events-and-actions). ::: An archive node is a regular mina daemon that is connected to a running `mina-archive` process. The mina daemon regularly sends blockchain data to the `mina-archive` process that then stores it in a [PostgreSQL](https://www.postgresql.org/) database. Running an archive node requires some knowledge of managing a PostgreSQL database instance. You must set up a database, run the archive node, connect it to a daemon, and run queries on the data. # Archive Node This section describes how to set up and run an Archive node within the Mina protocol. - [Getting Started with Archive Nodes](archive-node/getting-started) - A beginner's guide to launching an Archive Node. - [Ensuring Archive Redundancy](archive-node/archive-redundancy) - Strategies to mitigate the risk of losing archived data. --- url: /node-operators/archive-node/replayer --- # Archive Replayer `mina-replayer` replays all transactions from a Mina archive database, applying them sequentially to reconstruct the ledger state. It is an **ongoing verification tool**: run it at any time to confirm that your archive database faithfully represents the canonical chain. It also plays a role at hard-fork time — see [Hard Fork Replay](#hard-fork-replay) at the end of this page. ## What the Replayer Does The replayer reads transactions from the archive database in order (respecting global slot and sequence number) and applies them to a starting ledger. At each step, it verifies that the computed Merkle root matches what the archive recorded. This catches data corruption, missing transactions, or schema issues in your archive. ## Prerequisites - A PostgreSQL database with Mina archive data - The `mina-replayer` binary (ships with the Mina archive Debian package and the archive/daemon Docker images) - An input JSON file specifying the starting ledger ### Getting the binary `mina-replayer` ships with the Mina archive Debian package and the archive/daemon Docker images — there is no need to build it from source: - **Debian:** install the archive package, which puts `mina-replayer` on your `PATH`. - **Docker:** run it straight from the archive image, for example: ```bash docker run --rm minaprotocol/mina-archive:-bullseye-mainnet mina-replayer --help ``` ## Basic Usage The replayer requires two arguments: an input file and a database connection. ```bash mina-replayer \ --archive-uri postgres://:@:/ \ --input-file input.json ``` ### Required Flags | Flag | Description | |---|---| | `--archive-uri` | PostgreSQL connection string for the archive database | | `--input-file` | JSON file specifying the starting ledger and target state | ### Optional Flags | Flag | Description | |---|---| | `--output-file` | Write the final ledger state to this file | | `--continue-on-error` | Don't stop on transaction application errors | | `--checkpoint-interval` | Create intermediate checkpoint files every N blocks | | `--checkpoint-output-folder` | Directory for checkpoint files | | `--checkpoint-file-prefix` | Filename prefix for checkpoint files | | `--genesis-ledger-dir` | Directory containing the genesis ledger | | `--log-json` | Output logs in JSON format | | `--log-level` | Console log level (e.g., `info`, `debug`, `spam`) | | `--log-file` | Write logs to a file | ## Input File Format The input file tells the replayer where to start. For a full replay from genesis: ```json { "genesis_ledger": { "add_genesis_winner": false, "s3_data_hash": "", "hash": "" } } ``` If resuming from a previous checkpoint, include `start_slot_since_genesis` and any prior epoch data. ## Replay Modes ### Full Replay (from genesis) This is the most thorough verification. It replays every transaction from genesis, catching any inconsistency in the entire archive history. ```bash mina-replayer \ --archive-uri \ --input-file genesis-input.json \ --output-file output.json ``` **Use this mode when:** you want full confidence that your archive is correct. ### Replay from Checkpoint If you already have a checkpoint, you can replay just the portion after it instead of re-replaying the entire history. ```bash mina-replayer \ --archive-uri \ --input-file checkpoint.json ``` **Use this mode when:** you want to verify recent blocks without re-replaying the full history. ## Using Checkpoints for Long Replays For mainnet, a full replay from genesis can take a long time. Use checkpoints to break it into resumable segments: ```bash mina-replayer \ --archive-uri \ --input-file input.json \ --checkpoint-interval 10000 \ --checkpoint-output-folder ./checkpoints \ --checkpoint-file-prefix mainnet-replay ``` This creates a checkpoint file every 10,000 blocks. If the replay is interrupted, restart from the latest checkpoint by using it as the `--input-file`. ## Troubleshooting ### Merkle root mismatch The replayer verifies the computed ledger Merkle root against the archive at each block. A mismatch means your archive has missing or incorrect data. Check for: - Missing blocks (`mina-missing-blocks-auditor`) - Database corruption - Incomplete schema upgrade ### Continue on error If you want to see all errors rather than stopping at the first one: ```bash mina-replayer --continue-on-error --archive-uri --input-file input.json ``` --- ## Hard Fork Replay :::info Extra — only relevant during a hard fork This section applies only while a hard fork is in progress; on a normal day you do not need it. ::: At a hard fork, the replayer does additional work: it replays the archive up to the fork point and exports the final ledger state as the genesis ledger for the new chain. Specifically, it: 1. Replays all transactions from genesis (or a checkpoint) up to the fork point 2. Stops at the `slot_chain_end` (the stop-network-slot where the old chain halts) 3. Exports the final ledger state as a JSON checkpoint — the genesis ledger for the new chain 4. Lets you compare that checkpoint against the official fork config to verify your archive matches the canonical state ### Hard fork flags | Flag | Description | |---|---| | `--hard-fork-target ` | The target hard fork (e.g. `mesa`) | | `--stop-slot-config-file` | JSON file with the fork parameters (stop slots, epoch data) | | `--hard-fork-output-file` | Output file for the post-fork genesis ledger checkpoint | ### Stop-slot configuration file The stop-slot config defines the fork parameters. This file uses the same format as the daemon runtime config: ```json { "genesis": { "genesis_state_timestamp": "2026-02-24T19:30:00Z" }, "ledger": { "add_genesis_winner": false, "s3_data_hash": "", "hash": "" }, "daemon": { "slot_tx_end": 1900, "slot_chain_end": 1920, "hard_fork_genesis_slot_delta": 40 }, "epoch_data": { "staking": { "seed": "", "s3_data_hash": "", "hash": "" }, "next": { "seed": "", "s3_data_hash": "", "hash": "" } } } ``` Key fields in `daemon`: - **`slot_tx_end`** — the stop-transaction-slot (no more transactions accepted after this slot) - **`slot_chain_end`** — the stop-network-slot (chain halts here, this is the fork point) - **`hard_fork_genesis_slot_delta`** — slot offset for the new genesis relative to the fork point ### Running the hard fork replay ```bash mina-replayer \ --archive-uri postgres://:@:/ \ --input-file input.json \ --hard-fork-target \ --stop-slot-config-file stop-slot-config.json \ --hard-fork-output-file output.json \ --log-json \ --log-level info ``` The replayer will: 1. Start from the genesis ledger (or checkpoint) specified in `input.json` 2. Replay all transactions from the archive (user commands, internal commands, and zkApp transactions) 3. Stop at the `slot_chain_end` — blocks at or beyond this slot are excluded 4. Apply the hard fork migration to produce the post-fork ledger 5. Write the result to `output.json` ### Output format The output file contains the genesis configuration for the new chain: ```json { "start_slot_since_genesis": 1960, "genesis_ledger": { "hash": "", "s3_data_hash": "", "add_genesis_winner": false } } ``` The `start_slot_since_genesis` is the new genesis slot, computed from the fork point plus `hard_fork_genesis_slot_delta`. ### Verifying against the official fork config After producing the replayer output, compare it to the official fork configuration published with the release: ```bash # Compare ledger hashes (ignoring s3_data_hash, which may differ due to non-deterministic RocksDB metadata) diff \ <(jq -S 'del(.genesis_ledger.s3_data_hash)' output.json) \ <(jq -S 'del(.genesis_ledger.s3_data_hash)' official-fork-config.json) ``` If the diff is empty, your archive database correctly represents the canonical chain state at the fork point. :::tip Why ignore s3_data_hash? The `s3_data_hash` is a SHA3-256 hash of the gzipped RocksDB ledger directory. RocksDB includes non-deterministic metadata (timestamps, sequence numbers, compaction state) and gzip headers may also differ across runs. The logical ledger contents are identical even when this hash differs — the `hash` field (the Merkle root) is the authoritative check. ::: ### Hard fork troubleshooting **"No blocks found before slot_chain_end"** — the replayer could not find any blocks in the archive before the fork point. Verify: - Your archive database contains blocks up to the fork slot - The `slot_chain_end` in your stop-slot config is correct ## Further Reading - [Archive Node](/node-operators/archive-node) — running and maintaining an archive node - [Replayer source code](https://github.com/MinaProtocol/mina/tree/compatible/src/app/replayer) --- url: /node-operators/block-producer-node/docker-compose --- # Docker Compose Block Producer This example demonstrates how to run a Mina Block Producer node using Docker Compose for the Mainnet network. The Docker Compose setup includes a Mina Block Producer node, and another script to generate a wallet key. Copy and paste the provided configuration into a `docker-compose.yml` file. Then run `docker compose up -d` to start the services, and use `docker compose logs -f` to monitor the logs. ```yaml services: generate_wallet_key: image: 'minaprotocol/mina-daemon:3.3.0-8c0c2e6-bullseye-mainnet' # image: 'minaprotocol/mina-daemon:4.0.0-6965b50-bullseye-devnet' # Use this image for Devnet environment: MINA_PRIVKEY_PASS: PssW0rD entrypoint: [] command: > bash -c ' mina advanced generate-keypair --privkey-path /root/.mina-config/keys/wallet-key chmod -R 0700 /root/.mina-config/keys chmod -R 0600 /root/.mina-config/keys/wallet-key ' volumes: - './node/mina-config:/root/.mina-config' mina_block_producer: image: 'minaprotocol/mina-daemon:3.3.0-8c0c2e6-bullseye-mainnet' # image: 'minaprotocol/mina-daemon:4.0.0-6965b50-bullseye-devnet' # Use this image for Devnet restart: always environment: MINA_PRIVKEY_PASS: PssW0rD entrypoint: [] command: > bash -c ' mina daemon \ --peer-list-url https://bootnodes.minaprotocol.com/networks/mainnet.txt \ --block-producer-key /root/.mina-config/keys/wallet-key ' # use --peer-list-url https://bootnodes.minaprotocol.com/networks/devnet.txt for Devnet volumes: - './node/mina-config:/root/.mina-config' ports: - '8302:8302' depends_on: generate_wallet_key: condition: service_completed_successfully ``` --- url: /node-operators/block-producer-node/getting-started --- # Block Producer Getting Started :::note Before following this guide, complete the Validator Node setup — from [Requirements](/node-operators/validator-node/requirements) through [Connect to Mainnet or Devnet](/node-operators/validator-node/connecting-to-the-network). You should have a synced node and a [key pair](/node-operators/validator-node/generating-a-keypair) before proceeding. ::: ## Start the daemon Run the daemon with the `--block-producer-key` flag pointing to your wallet key: ```sh mina daemon --peer-list-url https://bootnodes.minaprotocol.com/networks/mainnet.txt \ --block-producer-key ~/keys/my-wallet ``` To send block rewards to a different account (e.g. a cold wallet), add the `--coinbase-receiver` flag: ```sh mina daemon --peer-list-url https://bootnodes.minaprotocol.com/networks/mainnet.txt \ --block-producer-key ~/keys/my-wallet \ --coinbase-receiver $RECEIVER_PUBLICKEY ``` ## Verify block production Run `mina client status` and check the `Block producers running` field: ```text Block producers running: 1 (B62q...) Coinbase receiver: Block producer Next block will be produced in: in 7.077h for slot: ... ``` --- url: /node-operators/block-producer-node/hot-cold-block-production --- # Hot and Cold Block Production Block production requires a node connected to the internet, which means the block producer's private key is exposed on an online machine. To mitigate this risk, Mina supports a hot/cold wallet pattern: - A **[hot wallet](/glossary#hot-wallet)** has its private key on an internet-connected machine. It is used to run the block producer node but should hold minimal funds. - A **[cold wallet](/glossary#cold-wallet)** has its private key stored offline (e.g. generated on an air-gapped laptop or a hardware wallet like [Ledger](https://shop.ledger.com/)). It holds the majority of your stake. By delegating from your cold wallet to your hot wallet, you can produce blocks — and earn all associated rewards — while keeping the bulk of your funds in cold storage. ## Setup You need at least two accounts: one cold wallet and one hot wallet. See [Generating a Key Pair](/node-operators/validator-node/generating-a-keypair) for key generation instructions. ### 1. Create a hot wallet Generate a key pair on your block producer machine. Do **not** use a Ledger or other hardware security module (HSM) for this key — the private key must be accessible to the mina daemon. Take note of your hot wallet public key. ### 2. Fund the hot wallet Your hot wallet must be present in the consensus ledger before it can be used for staking. - If your hot wallet address is present in the genesis ledger, no further action is needed. - Otherwise, send at least enough MINA to cover the account creation fee to your hot wallet address. ### 3. Create a cold wallet Generate a key pair using the most secure method available — preferably on a machine disconnected from the internet, or on a hardware wallet. ### 4. Fund the cold wallet Your cold wallet must be present in the consensus ledger before its stake can be counted when delegated to your hot wallet. - If your cold wallet address is present in the genesis ledger, no further action is needed. - Otherwise, send enough MINA to meaningfully participate in consensus to your cold wallet address. ### 5. Delegate from cold to hot Delegate your cold wallet's stake to your hot wallet: ```sh mina client delegate-stake \ --sender $COLD_PUBLIC_KEY \ --receiver $HOT_PUBLIC_KEY ``` If your cold wallet is on a Ledger, follow the delegate instructions in the [Mina Ledger app README](https://github.com/jspada/ledger-app-mina/tree/v1.0.0-beta.2). ### 6. Start producing blocks Follow the [Getting Started](/node-operators/block-producer-node/getting-started) guide using your hot wallet key as the `--block-producer-key`. ## Why can't I use an HSM directly? You may wonder why Mina can't let you produce blocks directly from a secure enclave or HSM. Two components of block production require the private key in ways that make this impractical: ### Finding eligible slots A block producer determines slot eligibility by evaluating a VRF (verifiable random function) with their private key. The VRF must be evaluated for your account and every account that delegates to you, for all slots within an epoch. ### Creating the blockchain SNARK When a block producer wins a slot, they must create a SNARK proof that the new block is a valid extension of the existing chain. This proof embeds VRF information using the private key — replacing the simple signature that other protocols use. Creating this proof is computationally expensive and relies on advanced cryptography that is extremely difficult, and likely impossible, to perform quickly enough inside today's secure hardware. --- url: /node-operators/block-producer-node --- # About Block Producers The role of a block producer in Mina is to achieve [consensus](https://minaprotocol.com/blog/what-is-ouroboros-samasika) and provide security to the blockchain. The block producer is responsible for creating new blocks that include recent transactions broadcast on the network and a blockchain proof that proves the current state of the chain is valid. In Mina, anyone can become a block producer. There is an unbounded number of participants with the chance of producing a block proportional to the funds staked. Funds are not locked and are not subject to slashing. In return for staking funds and generating the required blockchain proofs, blocks that are produced and included in the canonical chain are rewarded in the form of a coinbase and transaction fees, less any fees paid to purchase required [transaction SNARK work](/node-operators/snark-workers). To successfully produce a block, a block producer must have the current state of the blockchain. A block producer must have enough available compute to produce a blockchain SNARK within the slot time and be connected to peers to broadcast the generated block within an acceptable delay as defined by the network consensus parameters. ## Block Producers This section describes how to run a Block Producer on the Mina protocol. - [Getting Started](block-producer-node/getting-started) - How to install and get started running a block producer. - [Hot and Cold Block Production ](block-producer-node/hot-cold-block-production) - How to get started running a block producer. --- url: /node-operators/block-producer-node/staking-service-guidelines --- # Staking Service Guidelines The important parts of running a staking service are predicting/determining winning slots in which you can produce blocks and paying out participants. The Mina protocol does not automatically payout rewards to delegates, so part of running a staking service is manually paying out participants by [sending many transactions](#sending-many-transactions). This document aims to explain the different components that you should think about when managing those payouts. Specifically, this document provides an understanding of odds of winning blocks, gathering data from the ledger for later use, and computing relevant staking payout information from this data. ## Staking Rewards The coinbase reward for producing a block is 360 MINA. ## Dumping Staking Ledgers In order to compute odds of winning a block for a given epoch, or to retroactively compute the coinbase reward a given account would receive, you need to have the staking ledger from that epoch. Mina daemons only keep around the staking ledger for the current epoch and the staking ledger for the next epoch, so if you want to capture a staking ledger for an epoch, you need to do it before or during that epoch. The `mina ledger export` command can be used to export ledgers from a running daemon: ``` Print the specified ledger (default: staged ledger at the best tip). Note: Exporting snarked ledger is an expensive operation and can take a few seconds mina ledger export STAGED-LEDGER|SNARKED-LEDGER|STAKING-EPOCH-LEDGER|NEXT-EPOCH-LEDGER === flags === [--daemon-port HOST:PORT/LOCALHOST-PORT] Client to local daemon communication. If HOST is omitted, then localhost is assumed to be HOST. (examples: 8301, 154.97.53.97:8301) (default: 8301) (alias: -daemon-port) [--plaintext] Use plaintext input or output (default: JSON) (alias: -plaintext) [--state-hash STATE-HASH] State hash, if printing a staged ledger (default: state hash for the best tip) (alias: -state-hash) [-help] print this help text and exit (alias: -?) ``` It requires an argument to identifier of the ledger you wish to export. The table below describes what each of these identifiers represent.
| Identifier | Description | |----------------------|-----------------------------------------------------------------| | staking-epoch-ledger | The staking ledger for the current epoch. | | next-epoch-ledger | The staking ledger for the next epoch (epoch after current). | | staged-ledger | The most recent staged ledger (from the best tip of that node). | | snarked-ledger | The most recent snarked ledger (from the best tip of that node).|
In order to ensure you always have each staking ledger available for use after epochs have expired, we recommend exporting the staking-epoch-ledger every (7140 × 1.5) ÷ 60 = 178.5 hours (there are 7140 slots in an epoch, and each slot is 90 seconds long). By default, ledgers are exported as json data. See `mina ledger export -help` for documentation of flags which will enable other formats. When output as json, the ledger will be represented as an array of account objects. Below is an example of what an account object in json looks like. ```json { "pk": "B62qrwZRsNkU39TrGpFwDdpRS2JaCB2yFZKMFNqLFYjcqGE5G5fWA8p", "balance": "17000", "delegate": "B62qrwZRsNkU39TrGpFwDdpRS2JaCB2yFZKMFNqLFYjcqGE5G5fWA8p", "token": "1", "token_permissions": {}, "receipt_chain_hash": "2mzbV7WevxLuchs2dAMY4vQBS6XttnCUF8Hvks4XNBQ5qiSGGBQe", "voting_for": "3NK2tkzqqK5spR2sZ7tujjqPksL45M3UUrcA4WhCkeiPtnugyE2x", "permissions": { "stake": true, "edit_state": "signature", "send": "signature", "set_delegate": "signature", "set_permissions": "signature", "set_verification_key": "signature" } } ``` For a running staking service, you are interested in the accounts which you control and the accounts which are staking to accounts you control. As an example, if we only had one account in our staking service, we could grab all the accounts we are interested in for a ledger using a command like: ```sh mina ledger export staking-epoch-ledger | jq "$(cat < A standardized API for blockchain integration — query historical data, build transactions, and integrate with exchanges. [Rosetta API](https://www.rosetta-api.org/) (rebranded as [Mesh](https://docs.cdp.coinbase.com/mesh/docs/welcome/) by Coinbase) is an open-source specification and set of tools that make deploying and interacting with blockchains quick and easy. Mina implements a subset of the Rosetta specification — not all endpoints defined in the spec are available. Mina's Rosetta implementation is primarily used by exchanges to integrate MINA deposits, withdrawals, and balance queries. :::note The Rosetta API is auxiliary to Mina's existing [GraphQL API](/node-operators/reference/mina-cli-reference) and [Archive Node](/node-operators/archive-node). While GraphQL provides access to current network state, historical and persistence data requires the Archive database. Rosetta bundles both data sources behind a standardized interface and exists primarily to satisfy exchange integration requirements. ::: ## Architecture The Rosetta stack consists of four components that work together: | Component | Default Port | Description | |---|---|---| | **Mina Daemon** | 8302 (P2P), 3085 (GraphQL) | Syncs with the network, produces/validates blocks | | **Archive Node** | 3086 | Stores historical block data in PostgreSQL | | **PostgreSQL** | 5432 | Database backend for the archive node | | **Rosetta API** | 3087 (online), 3088 (offline) | Translates Mina data into the Rosetta specification | All ports listed above are defaults and can be overridden via configuration. When using Docker, these are the ports inside the container — map them to your desired host ports with `-p`. ## Installation There are three ways to run Rosetta, depending on your needs. ### Option 1: All-in-One Docker Image (Recommended for getting started) The all-in-one image bundles the daemon, archive node, PostgreSQL, and Rosetta API into a single container. It automatically initializes the archive database from public o1Labs backups. **Requirements:** Docker with at least 12 GB RAM allocated (16 GB recommended). #### Mainnet ```bash docker run -it --rm --name rosetta \ --entrypoint=./docker-start.sh \ -p 8302:8302 -p 3085:3085 -p 3086:3086 -p 3087:3087 \ minaprotocol/mina-rosetta:3.3.1-7b34378-noble-mainnet ``` #### Devnet ```bash docker run -it --rm --name rosetta \ --entrypoint=./docker-start.sh \ -p 8302:8302 -p 3085:3085 -p 3086:3086 -p 3087:3087 \ -e MINA_NETWORK=devnet \ -e PEER_LIST_URL=https://bootnodes.minaprotocol.com/networks/devnet.txt \ minaprotocol/mina-rosetta:3.2.0-97ad487-bookworm-devnet ``` Initial sync typically takes between 20 minutes and 1 hour depending on your hardware and network connection. You can check sync status with: ```bash docker exec rosetta mina client status ``` #### Environment Variables The all-in-one image supports the following environment variables for customization: | Variable | Default | Description | |---|---|---| | `MINA_NETWORK` | `mainnet` | Network to connect to (`mainnet` or `devnet`) | | `PEER_LIST_URL` | Network-specific seed list | URL for the peer list | | `LOG_LEVEL` | `Debug` | Log level (`Info`, `Debug`, `Warn`, `Error`) | | `MINA_GRAPHQL_PORT` | `3085` | GraphQL API port | | `MINA_ARCHIVE_PORT` | `3086` | Archive node port | | `MINA_ROSETTA_ONLINE_PORT` | `3087` | Rosetta online API port | | `MINA_ROSETTA_OFFLINE_PORT` | `3088` | Rosetta offline API port | | `POSTGRES_USERNAME` | `pguser` | PostgreSQL username | | `POSTGRES_DBNAME` | `archive` | PostgreSQL database name | | `POSTGRES_DATA_DIR` | `/data/postgresql` | PostgreSQL data directory | | `MINA_ARCHIVE_DUMP_URL` | `https://storage.googleapis.com/mina-archive-dumps` | Base URL for archive database dumps | | `MINA_CONFIG_DIR` | `/data/.mina-config` | Mina configuration directory | ### Option 2: Docker Compose (Recommended for production) For production deployments, use Docker Compose to run each component as a separate container. This gives you more control over resource allocation, logging, and restarts. For production deployments, a complete Docker Compose configuration with all four services (PostgreSQL, archive node, Mina daemon, and Rosetta API) is available in the [Rosetta Docker Compose guide](/node-operators/rosetta/docker-compose). ### Option 3: Debian Packages (Manual setup) You can install each component individually via Debian packages. This is useful if you already run a Mina daemon and archive node and only need to add the Rosetta API. ```bash # Add the Mina repository (if not already configured) echo "deb [trusted=yes] http://packages.o1test.net/ noble stable" | sudo tee /etc/apt/sources.list.d/mina.list sudo apt-get update # Install the Rosetta package for your network sudo apt-get install mina-rosetta-mainnet # or: sudo apt-get install mina-rosetta-devnet ``` Then run the Rosetta API pointing to your existing daemon and archive database: ```bash mina-rosetta \ --archive-uri postgres://:@:/ \ --graphql-uri http://localhost:3085/graphql \ --log-json \ --port 3087 ``` This requires a running [Mina daemon](/node-operators/block-producer-node) and [archive node](/node-operators/archive-node) with a populated PostgreSQL database. ## Offline Mode The Rosetta Construction API requires an "offline" endpoint that can build and sign transactions without network access. Use the standalone entrypoint for this: ```bash docker run -it --rm --name rosetta-offline \ --entrypoint=./docker-standalone-start.sh \ -p 3088:3088 \ minaprotocol/mina-rosetta:3.3.1-7b34378-noble-mainnet ``` This starts only the Rosetta API process — no daemon, archive, or database. Point your Construction API calls to this endpoint for offline operations. ## Demo Mode For development and testing, the demo mode launches a local sandbox with a simple genesis ledger and all components running inside a single container: ```bash docker run -it --rm --name rosetta-demo \ --entrypoint=./docker-demo-start.sh \ -p 3085:3085 -p 3087:3087 \ minaprotocol/mina-rosetta:3.3.1-7b34378-noble-mainnet ``` This creates an isolated network with no external connectivity — useful for developing integrations before connecting to mainnet or devnet. ## Available Images | Network | Image | Notes | |---|---|---| | **Mainnet (noble)** | `minaprotocol/mina-rosetta:3.3.1-7b34378-noble-mainnet` | amd64 | | **Mainnet (bookworm)** | `minaprotocol/mina-rosetta:3.3.1-7b34378-bookworm-mainnet` | Also available for arm64 | | **Devnet (bookworm)** | `minaprotocol/mina-rosetta:3.2.0-97ad487-bookworm-devnet` | Latest devnet | Images are published on [Docker Hub](https://hub.docker.com/r/minaprotocol/mina-rosetta/tags). ## Verifying the API Once your node is synced, verify the Rosetta API is working. **List available networks:** ```bash curl -s http://localhost:3087/network/list \ -H 'Content-Type: application/json' \ -d '{"metadata":{}}' | jq . ``` **Get network status:** ```bash curl -s http://localhost:3087/network/status \ -H 'Content-Type: application/json' \ -d '{"network_identifier": {"blockchain": "mina", "network": "mainnet"}}' | jq . ``` **Query an account balance:** ```bash curl -s http://localhost:3087/account/balance \ -H 'Content-Type: application/json' \ -d '{ "network_identifier": {"blockchain": "mina", "network": "mainnet"}, "account_identifier": {"address": ""} }' | jq . ``` ## Building Your Own Image For most users, the official images are sufficient. If you need to build a custom image, see the [Rosetta README](https://github.com/MinaProtocol/mina/blob/master/src/app/rosetta/README.md) in the Mina repository for build instructions. ## Questions and Support - Post questions in [Mina GitHub Discussions](https://github.com/MinaProtocol/mina/discussions) - Report bugs on [GitHub Issues](https://github.com/MinaProtocol/mina/issues) - Join the [Mina Discord](https://discord.gg/minaprotocol) for community support --- url: /node-operators/delegation-program/foundation-delegation-program --- # Mina Foundation Delegation Program How to Participate in the Mina Foundation Delegation Program Learn how to receive a delegation from Mina Foundation. :::info **PLEASE READ:** This affects the submission of uptime data and the Performance Score results for receiving a delegation. The sidecar tracking system was **discontinued on June 14th 2024**. Please use the **SNARK-work-based** uptime tracking system. - [Instructions for the SNARK-work-based uptime system](./uptime-tracking-system) Please follow the latest updates and post questions in the [#delegation-program](https://discord.com/channels/484437221055922177/808895957978447882) channel on Mina Protocol Discord. ::: This Delegation Program is an implementation of the Mina Foundation Delegation Policy, the official policy on the delegations of MINA tokens from the Mina Foundation (referred to as “Foundation” below). If you are a block producer looking to participate in the Mina Foundation Delegation Program, this page explains how the program works and how to send uptime data and pay back rewards. :::note There are two delegation programs in Mina's ecosystem — one from the Mina Foundation and [one from o1Labs](https://www.o1labs.org/blog/delegation-policy-2024#o1labs-delegation-program-policy), Mina's ecosystem partner. This page details the program only for the Mina Foundation. ::: ## Overview Mina Foundation is committed to decentralizing the governance of the Mina protocol. In order to delegate their voting power, Mina Foundation delegates its tokens to community members through the [Mina Foundation Delegation Program](https://minaprotocol.com/blog/mina-foundation-delegation-policy). In the Delegation Program, Mina Foundation delegates its tokens to a number of validators. As the validators earn staking rewards associated with the delegation, they must return the remaining rewards to Mina Foundation, **but can keep 8% of the staking rewards**. Block producers are selected on a quarterly basis, known as a delegation cycle, based on their Performance Scores (see below) and requirements outlined in the [Mina Foundation Delegation Policy](https://minaprotocol.com/blog/mina-foundation-delegation-policy). ## Eligibility Requirements ### How do I participate in the program? If you are new to the Mina Foundation Delegation Program, please make sure you have fulfilled the following requirements in order to be eligible for receiving a delegation from the Foundation's token allocation. #### Step 1: Complete the application Review the [Mina Foundation Delegation Policy](https://minaprotocol.com/blog/mina-foundation-delegation-policy) then complete [the application form](https://docs.google.com/forms/d/e/1FAIpQLSduM5EIpwZtf5ohkVepKzs3q0v0--FDEaDfbP2VD4V6GcBepA/viewform). You will be asked to share your public key for receiving a delegation in the application. #### Step 2: Run the Uptime Tracking System The uptime tracking system sends recent blockchain data from your block producer node's perspective to a service. This service verifies whether this recent data is synced with the chain. If it is synced, it means your node is online. Instructions for how to run the uptime tracking system: - [SNARK-based Uptime System](./uptime-tracking-system) #### Step 3: Pass the KYC/AML requirement (only if selected for delegation) In order to receive a delegation, you must also meet the KYC/AML requirements of Mina Foundation. If you have recently been selected as a validator who will be receiving a delegation, but have not yet completed any of the KYC/AML requirements, please look out for an email with further instructions. For more details on this requirement, please review the policies outlined in the [Mina Foundation Delegation Policy](https://minaprotocol.com/blog/mina-foundation-delegation-policy). :::note You can only complete this step if you’re receiving a delegation for the next cycle. When you are selected for a delegation, you will be contacted with instructions on how to proceed with completing the KYC/AML requirement. ::: ## Program Guidelines Now that you understand how to become eligible to participate in the program, please review the following guidelines to better understand how to receive a delegation and send back rewards. ### How do I get selected for a delegation? #### Measuring Uptime Performance Score The **Uptime Performance Score** is an important factor for selecting the public keys to receive a Mina Foundation Delegation Program delegation from a token provider. **Uptime** is the measurement of when your block producer node is online. In the Mina Foundation Delegation Program, uptime is measured in 20-minute windows. If your block producer node is online at any time within a given 20-minute window, you will be marked as online for that period. :::note You may run more than one node with the same block producer key if you want to increase your chances of remaining online. ::: :::tip To participate in the delegation program, your block producer node must stay online and connected to the network at all times. If you cannot maintain uptime, consider [delegating your stake](/node-operators/validator-node/staking-and-snarking) instead. ::: **Uptime Performance** is the percentage over a time period in which a block producer node is online and operational. The time period of Mina Foundation's delegation programs is 90 days. This percentage is based on all possible 20-minute windows over the last time period. ### How do I track my performance score? The **leaderboard** shows the ranking of block producers participating in the delegation program based on uptime performance. The sooner you fix issues with your nodes sending uptime data, the sooner you'll be rewarded with a better uptime and position on the leaderboard. Your position on this leaderboard is an important factor in your public key being selected to receive delegation from Mina Foundation. See the following uptime leaderboards for the latest uptime performance scores: - Official Leaderboard: https://uptime.minaprotocol.com - Community Leaderboards: - Minataur: https://minataur.net/uptime ### What happens after I receive a delegation? #### Payout Procedure As per the Mina Foundation Delegation policy, there is a mandatory requirement on delegatees to use the latest version of the [payout script](https://github.com/jrwashburn/mina-pool-payout) to manage the return of rewards. This payout script includes: - Mapping of delegating wallet addresses with the correct return wallet address - Calculation of the Reward amounts and paybacks of the remaining rewards to the delegators. - Specific memo which includes the md5 hash of Pool’s Public Key (MD5 hash) For more details and to review the script, see the [README](https://github.com/jrwashburn/mina-pool-payout/blob/main/README.md) file in the `mina-pool-payout` repository. #### Payout Addresses You must return rewards to the address specified in the [Mina Delegation Program Return Addresses](https://docs.google.com/spreadsheets/d/1Fm4XSS9Xu4eWAhpM06sdySUKvLClR5SculXfP5o5sSc/edit?usp=sharing) mapping document. This will be covered when running the script in managing reward payback. #### Payout Frequency Rewards must be distributed at least once for a given epoch. You must send one payment in the amount of your obligation to the correct address specified in the [Mina Delegation Program Return Addresses](https://docs.google.com/spreadsheets/d/1Fm4XSS9Xu4eWAhpM06sdySUKvLClR5SculXfP5o5sSc/edit?usp=sharing) mapping document and if applicable, send the correct amount to the burn address. Both payments should have a memo field with the md5 hash value of your block producer public key. This is the easiest method to avoid confusion in tracking payments and will reduce the likelihood you will be incorrectly flagged as delinquent. All the rewards for epoch N must be delivered (ie. accepted in a block, not just sent) no later than slot number 3,500 of the next epoch. This gives you about half a week to sort out these payments. ### How do I calculate the reward payout? For reference, this explanation describes how reward returns are calculated. For details, see the [implementation](https://github.com/jrwashburn/mina-pool-payout/blob/main/src/core/payoutCalculator/PayoutCalculatorIsolateSuperCharge.ts) code. #### Reward Specifications You must send back at least the amount specified by this mechanism. At the end of each epoch, do all of the following: 1. Compute the total stake delegated to your account for the epoch 2. Compute the share of stake from the token provider (from both accounts) by dividing the token provider delegation by the total stake. (i.e. `provider_share = provider_delegation / total_stake`). The resulting share should be between 0 and 1. 3. For each block produced that has a non-zero block-reward on the canonical chain rewards must be calculated based on 360 MINA. 4. Calculate the Mina Foundation payout by multiplying the coinbase reward (equal to `360 MINA` ) by the provider share calculated in the previous step minus an 8% percent fee. (i.e. `payout = (provider_share * 0.92) * 360)`. 5. Send a transaction to the token provider accounts with the appropriate payout and memo - please follow the rules in the "Payout Attribution" section with your transaction. More details in the following source code parts: [PayoutCalculatorIsolateSuperCharge.ts](https://github.com/jrwashburn/mina-pool-payout/blob/7f00dbd9e693f76ea6a950c29862120a170625a9/src/core/payoutCalculator/PayoutCalculatorIsolateSuperCharge.ts#L126) and [ConfigurationManager.ts](https://github.com/jrwashburn/mina-pool-payout/blob/7f00dbd9e693f76ea6a950c29862120a170625a9/src/configuration/ConfigurationManager.ts#L21C15-L21C15). The block producer can keep all of the transaction fees or divide them equally amongst the other members of the pool. :::tip The canonical chain will be calculated as 12 blocks behind any tip at slot 3,500 of the next epoch. ::: #### Example of a Reward Payout Calculation Consider the following: - Account A has 2 million MINA - Account B is controlled by the Mina Foundation and has 6 million MINA which are delegated to Account A via the Delegation Program. - Account C is controlled by a third party and has 2 million MINA. This account also delegates to Account A and has also agreed to Account A retaining 8% of the staking rewards. In this example, the total amount of stake for Account A is 10 million calculated by adding up the balances from all the accounts. Now let's consider Epoch 5. The share of the stake from the Foundation is `6 million MINA / 10 million MINA = 0.6` or 60%. The share of the stake from Account B is `2 million MINA / 10 million MINA = 0.2` or 20%. 3 blocks are produced in this epoch that end up on the canonical chain. The blocks were won by Account A. 1. Account A retains, 0.2 x 360 MINA x 3 blocks = 216 MINA. 2. Mina Foundation, Account B, payout would be: (0.6 x 0.92) x 360 MINA x 3 blocks = 596.16 MINA. 3. Account A retains 8%, (0.6 x 0.08) x 360 MINA x 3 blocks = 51.84 MINA. 3. Account C payout would be: (0.2 x 0.92) x 360 MINA x 3 blocks = 198.72 MINA. 4. Account A retains 8%, (0.2 x 0.08) x 360 MINA x 3 blocks = 17.28 MINA ### Relevant Links - [Mina Foundation Delegation Policy](https://minaprotocol.com/blog/mina-foundation-delegation-policy) - [SNARK-based Uptime System](/node-operators/delegation-program/uptime-tracking-system) #### Need any help? Post your questions in the [#delegation-program](https://discord.com/channels/484437221055922177/808895957978447882) channel on the Mina Protocol Discord. --- url: /node-operators/delegation-program --- # Delegation Program The Mina Foundation Delegation Program enables block producers to receive token delegations from the Mina Foundation and earn staking rewards. :::info The sidecar tracking system was **discontinued on June 14th 2024**. Please use the **SNARK-work-based** uptime tracking system. See [Uptime Tracking System](/node-operators/delegation-program/uptime-tracking-system) for setup instructions. ::: - **[Foundation Delegation Program](/node-operators/delegation-program/foundation-delegation-program)** -- Eligibility requirements, performance scoring, payout procedures, and reward calculations. - **[Uptime Tracking System](/node-operators/delegation-program/uptime-tracking-system)** -- Instructions for the SNARK-based uptime tracking system used to measure node uptime. ## Related - [Staking and Snarking](/node-operators/validator-node/staking-and-snarking) -- How staking and delegation work on Mina - [Block Producers](/node-operators/block-producer-node) -- Getting started with block production --- url: /node-operators/delegation-program/uptime-tracking-system --- # Uptime Tracking System Instructions for the SNARK-based uptime tracking system. Learn how to set up the uptime tracking system for the Mina Foundation Delegation Program :::info **PLEASE READ:** This affects the submission of uptime data and the Performance Score results for receiving a delegation. The sidecar tracking system was **discontinued on June 14th 2024**. Please use the **SNARK-work-based** uptime tracking system. - [Instructions for the SNARK-work-based uptime system](./uptime-tracking-system) Please follow the latest updates and post questions in the [#delegation-program](https://discord.com/channels/484437221055922177/808895957978447882) channel on Mina Protocol Discord. ::: In order to maintain eligibility for various grants and the Mina Foundation Delegation Program, you must connect to our uptime tracking endpoint to run the SNARK-work-based uptime tracking system with your daemon to report node uptime. If you are required to keep your node online for a grant or specific program, you must run a small uptime tracking program that will report your daemon's uptime. This tutorial will walk you through the process of installing, configuring and running the uptime tracking system. :::note

We recommend that you save some of your SNARK work data logs. You can also share the logs with us if you’re interested in helping out with data checks.

::: ### Pre-requisites Make sure you updated your node to at least release (3.0.0+): ## How to set up the uptime system The SNARK-work-based uptime system is built into the mina daemon. The new uptime tracking system no longer requires importing your keypair and supports a new flag `--uptime-submitter-key`, which takes the path to your private key, just like `--block-producer-key`. To get started, pass in the following information to the daemon: - The path to the private key with the flag: `--uptime-submitter-key
` - The URL of our testing backend server with the flag: `--uptime-url https://uptime-backend.minaprotocol.com/v1/submit` - The password for the keypair associated with the given public key has the environment variable `UPTIME_PRIVKEY_PASS=`. If you are using a .mina-env file on Debian then this value should be on its own line, not included in `EXTRA_FLAGS=`. Here’s an example of what your .mina-env file should look like for Debian: ~~~ EXTRA_FLAGS="--block-producer-key /home/mina/my-wallet --uptime-submitter-key /home/mina/my-wallet --uptime-url https://uptime-backend.minaprotocol.com/v1/submit" UPTIME_PRIVKEY_PASS= MINA_PRIVKEY_PASS= LOG_LEVEL=Info FILE_LOG_LEVEL=Debug ~~~ ### Relevant Links - [Latest Release Notes for Mina Protocol](https://github.com/MinaProtocol/mina/releases) - [Mina Foundation Delegation Policy](https://minaprotocol.com/blog/mina-foundation-delegation-policy) - [Mina Docs: Mina Foundation Delegation Program](/node-operators/delegation-program) #### Need any help? Post your questions in the [#Delegation-Program](https://discord.gg/ywDzwmGABT) channel on Discord. --- url: /node-operators/downgrading-to-older-versions --- # Downgrading to Older Versions If you are running a Mina node on a version above 3.3.0 and need to roll back to 3.3.0 or below, you can convert the on-disk state in place using `mina-storage-converter`. This avoids a full rebootstrap from a remote S3 ledger bucket, which can save significant time. ## When is downgrading needed? Downgrading is typically necessary when a fork fails and there is a RocksDB version bump between the stop slot release and the pre-stop slot release. In such cases, the development team will notify node operators that a downgrade is required to continue operating on the correct chain. ## Debian/Ubuntu ### 1. Stop the Mina daemon Ensure your Mina node is fully shut down before proceeding: ```sh mina client stop daemon ``` Or however you normally stop your node process. Verify it is no longer running before continuing. ### 2. Install storage toolbox packages Install the required toolbox packages that provide `mina-storage-converter` and the RocksDB scanners: ```sh sudo apt-get install -y mina-daemon-storage-toolbox mina-daemon-recovery-storage-toolbox ``` ### 3. Convert on-disk state Run `mina-storage-converter` to convert the local database to the format expected by the older version. ```sh mina-storage-converter \ --node-dir ${NODE_DIR} \ --current-scanner /usr/lib/mina/storage/*/${SOURCE_VERSION}/mina-rocksdb-scanner \ --stable-scanner /usr/lib/mina/storage/*/${TARGET_VERSION}/mina-rocksdb-scanner ``` Where: - `NODE_DIR` is the path to your node's config directory. This is usually `~/.mina-config` if you haven't set it explicitly. - `SOURCE_VERSION` is the version you are downgrading from. - `TARGET_VERSION` is the version you are downgrading to (e.g. `3.3.0`). The `*` wildcard lets bash resolve the RocksDB version directory automatically, so you don't need to know which RocksDB version is bundled with each Mina release. The tool will prompt for confirmation before making changes. ### 4. Install the target version Install the older Mina package. For example, to install 3.3.0: ```sh sudo apt-get install --allow-downgrades -y mina-mainnet=3.3.0 ``` ### 5. Start the Mina daemon Start your node as usual: ```sh mina daemon ${YOUR_EXTRA_DAEMON_ARGS_HERE} ``` Your node should resume from the converted local state without needing to rebootstrap. ## Docker On-disk state conversion is only possible if your `mina-config` directory is persisted as a volume outside the container (e.g. via `--mount "type=bind,source=$(pwd)/.mina-config,dst=/root/.mina-config"`). :::caution If your `mina-config` is not persisted outside of the container, there is no way to convert the on-disk state. You will need to rebootstrap from scratch after switching to the older image. ::: Since the Docker image is a Debian/Ubuntu environment with the Mina Debian package installed, you can run the same conversion steps inside the container. The default `NODE_DIR` inside the container is `/root/.mina-config`. ### 1. Stop the running container Assume your mina daemon container is running with name `mina-node` ```sh docker stop mina-node ``` ### 2. Install toolbox packages and run the converter Use the current (newer) image to install the toolbox packages and run the conversion against your mounted `mina-config` volume: ```sh docker run -it --rm \ --entrypoint bash \ --mount "type=bind,source=$(pwd)/.mina-config,dst=/root/.mina-config" \ minaprotocol/mina-daemon:${SOURCE_VERSION}-bullseye-mainnet \ -c "apt-get update && apt-get install -y mina-daemon-storage-toolbox mina-daemon-recovery-storage-toolbox && mina-storage-converter --node-dir /root/.mina-config --current-scanner /usr/lib/mina/storage/*/${SOURCE_VERSION}/mina-rocksdb-scanner --stable-scanner /usr/lib/mina/storage/*/${TARGET_VERSION}/mina-rocksdb-scanner" ``` ### 3. Start a new container with the target version Remove the old container and start with the target image: ```sh docker rm mina-node docker run --name mina-node -d \ -p 8302:8302 \ --restart=always \ --mount "type=bind,source=$(pwd)/.mina-config,dst=/root/.mina-config" \ minaprotocol/mina-daemon:${TARGET_VERSION}-bullseye-mainnet \ daemon ${YOUR_EXTRA_DAEMON_ARGS_HERE} ``` Your node should resume from the converted local state without needing to rebootstrap. --- url: /node-operators/exchange-operators --- # Exchange Operators Exchange operators are node operators who run additional infrastructure for blockchain integration. To list MINA on your exchange, you need to run a Mina node with archive and Rosetta API support. This page provides an overview of the components involved and links to the relevant setup guides. ## Components ### Validator Node A Mina daemon connected to the network. This is the base requirement for any node operator. See [Validator Node](/node-operators/validator-node) for setup instructions. ### Archive Node An archive node stores the full history of the blockchain in a PostgreSQL database. Exchanges need this to query historical transactions and track deposits. - [Archive Node](/node-operators/archive-node) — set up and run an archive node ### Rosetta API [Rosetta](https://www.rosetta-api.org/) is a standardized API for blockchain integration. It is the recommended way to integrate MINA deposits, withdrawals, and balance queries. - [Rosetta API Overview](/node-operators/data-and-history/rosetta) — architecture and available endpoints - [Run with Docker](/node-operators/rosetta/run-with-docker) — quickest way to get started - [Docker Compose](/node-operators/rosetta/docker-compose) — production setup with all services - [Build from Sources](/node-operators/rosetta/build-from-sources) — build and run from source - [Code Samples](/node-operators/rosetta/samples) — example integrations for deposits, withdrawals, and block scanning ## FAQ See the [Exchange Integration FAQ](/node-operators/faq#exchange-integration) for answers to common questions about listing MINA, account creation fees, transaction memos, staking, and more. --- url: /node-operators/faq --- # FAQ ## General ### What is Mina Signer? The [Mina Signer](https://github.com/o1-labs/o1js/blob/main/src/mina-signer/README.md) NodeJS SDK allows you to sign strings, payments, and delegations using Mina's key pairs for various specified networks. The Mina Signer supersedes the deprecated Client SDK. ## SNARKs and SNARK Workers ### If I run a SNARK worker, how do I get paid for SNARKs that I generate? Block producers (the validators who add new blocks to the blockchain) are required to buy SNARKs from the network (called the snarketplace) and pay out some of their block reward as fees to the SNARK workers who generated SNARKs. This workflow creates a secondary incentive mechanism in the network to reward nodes that help compress transactions. ### Is generating SNARKs similar to Proof-of-Work (PoW) mining? No, they are different in several ways: - SNARK proof-of-work is deterministic, while PoW mining requires randomly calculating hashes to try and solve a puzzle. There is no luck element in SNARK work — if a SNARK worker wants to generate a SNARK of a transaction, they only need to generate the proof once. This means SNARK work is much less expensive and less environmentally wasteful, as the compute is all spent towards a productive goal. - There is no difficulty increase for SNARK work, as there is with PoW mining. In fact, as SNARK constructions, and proof generation times improve, the difficulty can actually decrease. - SNARK work is not directly involved in consensus. SNARK workers play no role in determining the next state of the blockchain. Their role is to simply generate SNARKs of transactions observed in the network - As a SNARK worker, there is no requirement for uptime. PoW miners need to run their rigs non-stop to ensure they don't miss out on a potential block. SNARK workers can come online and offline as they please — it is more like Uber, where there is always be work to be done, and nobody needs to say ahead of time when they want to work. ### Why have my SNARKs not been included? (A.K.A. How should I price my SNARKs?) Even though your SNARK worker might be producing SNARKs at a breakneck pace, if someone else produces a cheaper proof for a particular job you have already completed, their SNARK is preferred due to its lower fee. Pricing your SNARKs is a delicate balance between the cost of compute, the market environment (demand for SNARKs), your SNARK throughput, and the speed at which each of your SNARK worker processes can produce SNARKs. Sometimes, it might even be economically prudent to turn off your SNARK worker altogether until the market improves. ### Will SNARK workers require more storage and computing power over time? What about compared to Mina full nodes? SNARK workers will not need more storage or computing power over time. SNARK workers simply query the mempool for pending transactions requiring SNARK proofs, and then generate said proof -- this does not require syncing historical data. In addition, the underlying proving cost of SNARK work doesn't get more expensive with time. If we are comparing SNARK worker nodes with full nodes on Mina, then yes SNARK workers benefit from specialized hardware as generating SNARK proofs can be compute intensive. Again, however, with the explosion of SNARK research, this is likely to change and become more accessible to consumer hardware. ### What is the difference between a SNARK, a SNARK proof, and SNARK work? SNARKs are a very overloaded term. When you read **SNARK**, it could be referring to the concept of succinct non-interactive proof systems (for example, SNARKs vs Bulletproofs), the specific technical implementation of the proof system (for example, the construction, the circuit, or the prover), or the individual instance of the proof itself (for example, the blockchain SNARK). The general terminology is: - SNARK: the general concept of succinct, non-interactive zero knowledge proofs - SNARK circuit: the specific circuit and prover, as pertaining to an app - SNARK proof: an individual proof that is generated by a SNARK prover - SNARK work: a Mina protocol data structure that is a wrapper around one or two SNARK proofs and a price to be paid to the SNARK worker that generated the proof or proofs ### Is there any concern about a single large SNARK worker dumping work in the snarketplace, and then raising prices after monopolizing the market? In economics, there is a pricing strategy called [predatory pricing (or dumping)]() where one supplier of a product seeks to exhaust competing suppliers in the market by undercutting the market price. The supplier prices their goods much cheaper than the market rate in order to drive out competitors, even if it means incurring short-term losses. After the market has been cleared, the dominant supplier then increases prices [above competitive market rates](https://en.wikipedia.org/wiki/Supracompetitive_pricing), as competition has been extinguished. However, this strategy is effective only in markets where there are high barriers to entry. Meaning, competitors who were crowded out in the predation stage are unable to rejoin the market. This is not the case for SNARK work because the barriers to entry are low. Anyone who has spare compute can join the snarketplace and produce as little as one SNARK work and profit on that unit of work. The only barrier to entry is the initial capital expense on hardware, but hardware requirements are low so that users with spare equipment can come online and participate. If any SNARK worker succeeds in driving out the market and increases prices, newcomers are anticipated to reappear and drive prices back down. ### Does speed of producing SNARKs matter? If my computer is slower, will I be at a disadvantage? No, provided that the SNARK work produced is still required by block producers, it doesn't matter who produced it first — only the price matters to block producers. The caveat here is that earlier inclusion into the SNARK mempool is obviously beneficial, as block producers are likely to "see" the work earlier. However, you can envision a scenario where a set of SNARK workers are favored because they produced the most number of SNARK works that are profitable, and buying proofs from as few entities as possible would allow for more transactions to be included in any block. There is also a threshold at which time becomes a factor, but this scenario applies only to very underpowered devices. ### Will a full node need to store all intermediate SNARK proofs? Will the storage requirements grow linearly with blocks? No, when a new block is generated, Mina computes the proof recursively over the prior proof and the new block. This is the advantage of recursive composition -- at any given time, nodes need to store only the most recent proof. Intermediate proofs are not needed. For historical clarity on how this architecture emerged, see the [Using zkSNARKs to create a blockless blockchain](https://www.youtube.com/watch?v=eWVGATxEB6M) talk. ### How do you control or limit the number of threads that SNARK workers use? When you start the mina daemon, use the `-snark-worker-parallelism` flag. This flag is equivalent to setting `OMP_NUM_THREADS`, but doesn't affect block production. ## Exchange Integration #### Where can I find third-party audit reports for Mina? The latest third-party audit reports are publicly available here: - [https://research.nccgroup.com/2020/05/13/public-report-coda-cryptographic-review](https://research.nccgroup.com/2020/05/13/public-report-coda-cryptographic-review/) - [https://leastauthority.com/blog/audit-of-mina-ledger-application-for-o1-labs](https://leastauthority.com/blog/audit-of-mina-ledger-application-for-o1-labs/) - [https://research.nccgroup.com/2022/02/22/public-report-o1-labs-mina-client-sdk-signature-library-and-base-components-cryptography-and-implementation-review](https://research.nccgroup.com/2022/02/22/public-report-o1-labs-mina-client-sdk-signature-library-and-base-components-cryptography-and-implementation-review) :::note Any news and updates related to exchange listing shared by the Mina Foundation are on [www.minaprotocol.com](https://minaprotocol.com) or the official [Mina Protocol](https://x.com/MinaProtocol) X (Twitter). Mina Foundation cannot individually answer any listing questions. ::: #### Why do you recommend using Rosetta for integrating Mina to our exchange? Rosetta is an open-source specification that helps exchanges and developers integrate blockchains. Since Rosetta is actively maintained and specifically designed to enable simpler, faster, and more reliable blockchain integrations, we highly recommend using Rosetta to integrate Mina blockchain with your exchange. #### Is there an account creation fee? Yes, Mina Protocol charges a fee of 1 MINA when you create a new account. This fee helps protect the network from denial of service-type attacks. Over time, this fee can change. #### What is the maximum size of the mempool? How do we work around this? The max mempool size is 3,000. After it hits that size, transactions with the lowest fees are discarded. Set your fee to an amount higher than 0.001 MINA, the current average fee for transactions in the pool. You can view the fees for pending transactions and adjust your fees accordingly: [https://minascan.io/mainnet/txs/pending-txs](https://minascan.io/mainnet/txs/pending-txs). #### Why do some users appear to have lost their funds when sending to exchanges? :::tip While Mina and its SDKs do support the memo field when sending a transaction, the recommended best practice is do NOT require a memo for deposits. ::: To associate the deposit with the user's account, some exchanges require their users to include a unique memo field when sending MINA deposits to the exchange's address. If the user does not include this unique memo when sending their deposit, the receiving exchange may not be able to associate the deposit properly with the user's exchange account. These funds are NOT lost. The exchanges have received the funds at the exchange's address, but the exchange may not be able to automatically associate the deposit with the user's exchange account without such a memo. To prevent this issue, we recommend that exchanges do NOT require a memo for deposits. At the same time, exchanges and wallet creators are recommended to expose an optional memo field during a Mina send transaction. #### What is the maximum number of rollback blocks? The table in [Lifecycle of a Payment](/mina-protocol/lifecycle-of-a-payment) describes how many blocks you wait for a transaction to be confirmed. #### How should I calculate transaction fees? To calculate your transaction fees, use [https://fees.mina.tools](https://fees.mina.tools/). #### My Mina node gets stuck sometimes. How can I detect this and fix it? This is a known issue for some earlier releases. Restart your mina node whenever this issue is detected. You can use the following script to run a cron job every 3 minutes (the slot length) or more frequently: ``` MINA_STATUS=$($MINA client status --json) HIGHESTBLOCK="$(echo $MINA_STATUS | jq .highest_block_length_received)" HIGHESTUNVALIDATEDBLOCK="$(echo $MINA_STATUS | jq .highest_unvalidated_block_length_received)" # Calculate difference between validated and unvalidated blocks. # If block height is more than 4 block behind, something is likely wrong. DELTAVALIDATED="$(($HIGHESTUNVALIDATEDBLOCK-$HIGHESTBLOCK))" if [[ "$DELTAVALIDATED" -gt 4 ]]; then $MINA client stop fi ``` :::tip Be sure your Mina daemon is monitored by something such as systemd, so it can auto-restart. ::: #### My archive node is missing block information after a restart. How can I recover the data? Archive node operators often choose to run redundant archive nodes to store block data to one or more locations of their choice (for example, PostgreSQL, GCP, local files, or a logging service) and to backfill any missed block data if needed. For convenience, [mina_network_block_data](https://console.cloud.google.com/storage/browser/mina_network_block_data) from the archive node is available to help others in the community backfill any missing information. This bucket contains blocks from various Mina networks — for example, Mainnet and the most recent Devnet `devnet2`. Filter by filename for the network you want. Note that this bucket contains blocks for various other networks too, such as QAnet, which is not recommended for your testing. QAnet is used by o1Labs during targeted iterative development. Filenames contain the network name, block height, and state hash of the block. Blocks older than height 25,705 include only the network name and state hash in the filename. Example filenames: (Recent) ``` mainnet-30627-3NLfKanQ53X2MRKx5ZRvb9nVCEB9eJpcnssGCTpT3J1cojhB5M19.json ``` (Older) ``` mainnet-3NKUBmkc7UZ7ik5JyCM4WNzkN1HG5heMB5zNDUkf3Kgta1MFY6LY.json ``` You can download a specific block using curl: ``` curl https://mina_network_block_data.storage.googleapis.com/ ``` You can import this file using the mina archive blocks tool. The command for it is: ``` mina-archive-blocks --precomputed --archive-uri FILE. ``` #### How do I query for the canonical block at a certain height from the archive node? Use a recursive query. See [Query the database](/node-operators/archive-node/getting-started#query-the-database) examples in the Archive Node docs. #### Why am I getting this error message: "Not able to connect to the network"? This error message usually occurs due to a chain ID mismatch from running a Devnet build on Mainnet, or vice versa. To check whether you are running a devnet or mainnet build, run `Mina client status`. Next, compare the output's chain ID of your node to the expected chain ID of the network you are trying to connect to. You can find required information for comparison within the [GitHub announcements](https://github.com/MinaProtocol/mina/discussions/categories/announcements) or [Discord](https://discord.com/channels/484437221055922177/601171209287368715) server. #### Are there any official broadcast nodes that can be used? No, there are no official broadcast nodes at this time. However, you can broadcast transactions using [https://minascan.io/mainnet/broadcast/payment](https://minascan.io/mainnet/broadcast/payment). Use this method as a backup, the recommended method is to broadcast transactions yourself. #### Should I be staking my funds? Since Mina is a Proof of Stake (PoS) consensus network without lockup for staked tokens, it is recommended to stake these funds to support the quality of the Mina network. Additionally, by not staking, you are missing out on staking rewards that you can otherwise be receiving from the Mina blockchain. You can look into staking this wallet, either by running your own block production node or just by delegating your funds to a staking pool on the network. Delegating to a staking pool is simpler to set up. :::note Newly staked accounts incur a delay of 18 to 29 days before you start receiving rewards. ::: #### Why is there a delay for staking to take effect? For purposes of ensuring consensus, there is a delay between when delegations are sent on the blockchain and when they take effect with respect to staking on the network. The staking ledger always operates between 18 to 29 days behind the live ledger. #### How long is the delay and when is the next staking snapshot? The timing of the next staking snapshot varies. Since the timing is based on a combination of consensus timing (epochs) and snarketplace throughput, it is difficult to determine exactly how long this delay can be. A conservative estimate is that delegations sent 3 days before the epoch transition can take effect in the upcoming epoch. This means that, for any given delegation, there is an average of 18 to 29 days delay before this delegation updates block production. You can use this Delegation Calculator tool built by Carbonara to see the next staking ledger cutoff: [https://epoch.mina.tools](https://epoch.mina.tools/). #### What is the best way to test tooling and integration with Mina? Test tooling and integrations on Devnet before going live on Mainnet. The Devnet network is dedicated for developers building on top of the Mina protocol and is designed for testing and experimentation. Be sure to simulate expected Mainnet conditions, such as transaction volume and frequency, to help identify and solve potential issues ahead of time. See [Connect to Devnet](/node-operators/validator-node/connecting-to-the-network). --- url: /node-operators --- # Introduction The [Mina Protocol](/mina-protocol) is a layer 1 blockchain that is secured by [proof of stake consensus](/mina-protocol/proof-of-stake). Node operators are people who run Mina nodes. Mina node operators participate in consensus to create new blocks and help compress data by generating zk-SNARKs. ## Mina Node Roles A node is a machine running the [Mina daemon](/glossary#daemon). Different nodes fulfill different roles within the Mina network: 1. Validator - A plain Mina daemon node that participates in network consensus and can be used for operations such as sending and signing payments. 2. [Block Producer](/glossary#block-producer) - A node that participates in a process to determine what blocks it is allowed to produce and then produces blocks containing transactions that can be broadcast to the network. People who run [block producer](https://docs.minaprotocol.com/mina-protocol/block-producers) nodes are also called block producers. 3. [SNARK Coordinators](/glossary#snark-coordinator) - A role on a Mina node in the Mina network that distributes work to a series of SNARK workers in parallel to block production. 4. [SNARK Workers](https://docs.minaprotocol.com/glossary#snark-worker) - SNARK workers create [zk-SNARKs](https://minaprotocol.com/blog/what-are-zk-snarks) for each transaction. These zk-SNARKs are used to create recursive zk-SNARKs that prove the correctness of a block, and in turn, these zk-SNARKs are used to create recursive zk-SNARKs that prove the correctness of the network. These zk-SNARKs help provide the Mina Protocol with succinctness. 5. [Archive Nodes](/node-operators/archive-node) - A regular mina daemon that is connected to a running `mina-archive` process. The daemon regularly sends blockchain data to the archive process that stores it in a [PostgreSQL](https://www.postgresql.org/) database. 6. [Seed Nodes](https://docs.minaprotocol.com/glossary#seed-nodes) - Keep a record of nodes in the network and enable nodes joining the network to connect to peer nodes. ## Operating a Node Node operators are network participants who run Mina nodes on a Mina network. This section describes how to run each node role and where to find the operational references. ### Validators - [Requirements](/node-operators/validator-node/requirements) - Hardware, software, and network requirements - [Generating a Key Pair](/node-operators/validator-node/generating-a-keypair) - How to generate key pairs - [Querying Data](/node-operators/validator-node/querying-data) - Query blockchain data via GraphQL - [Staking and Snarking](/node-operators/validator-node/staking-and-snarking) - How to stake your MINA - [Logging](/node-operators/validator-node/logging) - Log files, levels, and export ### Specialized Node Types - [Block Producers](/node-operators/block-producer-node) - Running a Block Producer - [SNARK Coordinator & Workers](/node-operators/snark-workers) - Running SNARK coordinator and worker roles - [Archive Nodes](/node-operators/archive-node) - Running an Archive Node - [Seed Node](/node-operators/seed-peers) - Running a Seed Node ### Data and Programs - [Data and History](/node-operators/data-and-history) - Rosetta API and blockchain integration - [Delegation Program](/node-operators/delegation-program) - The Mina Foundation Delegation Program for Block Producers ### Reference - [Mina CLI Reference](/node-operators/reference/mina-cli-reference) - Guide to CLI interactions with Mina networks - [Mina Signer](/node-operators/mina-signer) - Key generation and transaction signing ### Support - [Troubleshooting](/node-operators/troubleshooting) - Solutions to common problems - [FAQ](/node-operators/faq) - Frequently asked questions ## Exchange Integration [Exchange Operators](/node-operators/exchange-operators) describes how exchanges can integrate with the Mina blockchain using Rosetta API, archive nodes, and validator nodes. --- url: /node-operators/mina-signer --- # Mina Signer [Mina Signer](/mina-signer) is a NodeJS/Browser-compatible library for signing transactions and generating keys. The Rosetta stack also ships an offline signer CLI tool. Both can be used to sign transactions offline for later submission via the [Construction API](/node-operators/rosetta/samples/send-transactions). ## Migration from o1labs/client-sdk The signing library `o1labs/client-sdk` is deprecated and will stop working after the Mina mainnet upgrade. All users should migrate to [mina-signer](https://www.npmjs.com/package/mina-signer). When migrating: 1. Adjust the `nonce` to the correct nonce on the sender account 2. Update the `url` variable with an existing Mina Node GraphQL endpoint See [Broadcasting a Signed Payment](/mina-signer#broadcasting-a-signed-payment) for a complete example. ## Generating a key pair with mina-signer See [Generating Keys](/mina-signer#generating-keys) for full details. A quick example: ```ts const mina = new Client({network: 'testnet'}) const keypair = mina.genKeys() ``` ## Generating a key pair with signer CLI In a native build, the signer is at `_build/default/src/app/rosetta/ocaml-signer/signer.exe`. In Docker, it's at `/rosetta/app/mina-ocaml-signer`. Examples below use `signer` as an alias. Generate a private key: ```bash signer generate-private-key ``` Derive the public key and account address: ```bash signer derive-public-key --private-key ``` ## Signing a transaction with mina-signer ```ts mina.signRosettaTransaction(payload, privateKey) ``` :::note We recommend using `mina.rosettaCombinePayload` to sign and prepare a payload for the `/construction/combine` request. See [Sending Transactions](/node-operators/rosetta/samples/send-transactions) for the full flow. ::: ## Signing a transaction with signer CLI ```bash signer sign --private-key --unsigned-transaction ``` Replace `` with the unsigned transaction string from the `/construction/payloads` endpoint. See [Sending Transactions](/node-operators/rosetta/samples/send-transactions) for the full flow. --- url: /node-operators/reference --- # Reference - **[Mina CLI Reference](/node-operators/reference/mina-cli-reference)** -- Complete reference for the `mina` command line interface. - **[Mina Signer](/node-operators/mina-signer)** -- Key generation and transaction signing for node operators. - **[Troubleshooting](/node-operators/troubleshooting)** -- Solutions to common problems when running a Mina node. - **[FAQ](/node-operators/faq)** -- Frequently asked questions about node operations, SNARKs, and the Mina network. --- url: /node-operators/reference/mina-cli-reference --- # Mina CLI Reference The Mina CLI (Command Line Interface) is the primary way for users to interact with the Mina network. It provides standard client functionality to create accounts, send transactions, and participate in consensus. There are also advanced client and daemon commands for power users. The Mina CLI is installed when you [install Mina](/node-operators/validator-node/installing-on-ubuntu-and-debian). :::tip Mina APIs are always improving. See `mina help` for the most up-to-date version. ::: ## mina ``` Mina mina SUBCOMMAND === subcommands === accounts Client commands concerning account management daemon Mina daemon client Lightweight client commands advanced Advanced client commands ledger Ledger commands libp2p Libp2p commands internal Internal commands parallel-worker internal use only transaction-snark-profiler transaction snark profiler version print version information help explain a given subcommand (perhaps recursively) ``` ## mina accounts ``` Client commands concerning account management mina accounts SUBCOMMAND === subcommands === list List all owned accounts create Create new account import Import a password protected private key to be tracked by the daemon. Set MINA_PRIVKEY_PASS environment variable to use non-interactively (key will be imported using the same password). export Export a tracked account so that it can be saved or transferred between machines. Set MINA_PRIVKEY_PASS environment variable to use non-interactively (key will be exported using the same password). unlock Unlock a tracked account lock Lock a tracked account help explain a given subcommand (perhaps recursively) ``` ### mina accounts list ``` List all owned accounts mina accounts list === flags === [--config-directory DIR] Configuration directory (alias: -config-directory) [--rest-server URI/LOCALHOST-PORT] graphql rest server for daemon interaction (examples: 3085 or http://localhost:3085/graphql, /dns4/peer1-rising-phoenix.o1test.net:3085/graphql) (alias: -rest-server) [-help] print this help text and exit (alias: -?) ``` ### mina accounts create ``` Create new account mina accounts create === flags === [--rest-server URI/LOCALHOST-PORT] graphql rest server for daemon interaction (examples: 3085 or http://localhost:3085/graphql, /dns4/peer1-rising-phoenix.o1test.net:3085/graphql) (default: 3085 or http://localhost:3085/graphql) (alias: -rest-server) [-help] print this help text and exit (alias: -?) ``` ### mina accounts import ``` Import a password protected private key to be tracked by the daemon. Set MINA_PRIVKEY_PASS environment variable to use non-interactively (key will be imported using the same password). mina accounts import === flags === --privkey-path FILE File to read private key from (alias: -privkey-path) [--config-directory DIR] Configuration directory (alias: -config-directory) [--rest-server URI/LOCALHOST-PORT] graphql rest server for daemon interaction (examples: 3085 or http://localhost:3085/graphql, /dns4/peer1-rising-phoenix.o1test.net:3085/graphql) (alias: -rest-server) [-help] print this help text and exit (alias: -?) ``` ### mina accounts export ``` Export a tracked account so that it can be saved or transferred between machines. Set MINA_PRIVKEY_PASS environment variable to use non-interactively (key will be exported using the same password). mina accounts export === flags === --privkey-path FILE File to write private key into (public key will be FILE.pub) (alias: -privkey-path) --public-key PUBLICKEY Public key of account to be exported (alias: -public-key) [--config-directory DIR] Configuration directory (alias: -config-directory) [--rest-server URI/LOCALHOST-PORT] graphql rest server for daemon interaction (examples: 3085 or http://localhost:3085/graphql, /dns4/peer1-rising-phoenix.o1test.net:3085/graphql) (default: 3085 or http://localhost:3085/graphql) (alias: -rest-server) [-help] print this help text and exit (alias: -?) ``` ### mina accounts unlock ``` Unlock a tracked account mina accounts unlock === flags === --public-key PUBLICKEY Public key to be unlocked (alias: -public-key) [--rest-server URI/LOCALHOST-PORT] graphql rest server for daemon interaction (examples: 3085 or http://localhost:3085/graphql, /dns4/peer1-rising-phoenix.o1test.net:3085/graphql) (default: 3085 or http://localhost:3085/graphql) (alias: -rest-server) [-help] print this help text and exit (alias: -?) ``` ### mina accounts lock ``` Lock a tracked account mina accounts lock === flags === --public-key PUBLICKEY Public key of account to be locked (alias: -public-key) [--rest-server URI/LOCALHOST-PORT] graphql rest server for daemon interaction (examples: 3085 or http://localhost:3085/graphql, /dns4/peer1-rising-phoenix.o1test.net:3085/graphql) (default: 3085 or http://localhost:3085/graphql) (alias: -rest-server) [-help] print this help text and exit (alias: -?) ``` ### mina accounts help ``` explain a given subcommand (perhaps recursively) mina accounts help [SUBCOMMAND] === flags === [-expand-dots] expand subcommands in recursive help [-flags] show flags as well in recursive help [-recursive] show subcommands of subcommands, etc. [-help] print this help text and exit (alias: -?) ``` ## mina client ``` Lightweight client commands mina client SUBCOMMAND === subcommands === get-balance Get balance associated with a public key get-tokens Get all token IDs that a public key has accounts for send-payment Send payment to an address delegate-stake Delegate your stake to another public key cancel-transaction Cancel a transaction -- this submits a replacement transaction with a fee larger than the cancelled transaction. set-snark-worker Set key you wish to snark work with or disable snark working set-snark-work-fee Set fee reward for doing transaction snark work export-logs Export daemon logs to tar archive export-local-logs Export local logs (no daemon) to tar archive stop-daemon Stop the daemon status Get running daemon status help explain a given subcommand (perhaps recursively) ``` ### mina client get-balance ``` Get balance associated with a public key mina client get-balance === flags === --public-key PUBLICKEY Public key for which you want to check the balance (alias: -public-key) [--rest-server URI/LOCALHOST-PORT] graphql rest server for daemon interaction (examples: 3085 or http://localhost:3085/graphql, /dns4/peer1-rising-phoenix.o1test.net:3085/graphql) (default: 3085 or http://localhost:3085/graphql) (alias: -rest-server) [--token TOKEN_ID] The token ID for the account (alias: -token) [-help] print this help text and exit (alias: -?) ``` ### mina client get-tokens ``` Get all token IDs that a public key has accounts for mina client get-tokens === flags === --public-key PUBLICKEY Public key for which you want to find accounts (alias: -public-key) [--rest-server URI/LOCALHOST-PORT] graphql rest server for daemon interaction (examples: 3085 or http://localhost:3085/graphql, /dns4/peer1-rising-phoenix.o1test.net:3085/graphql) (default: 3085 or http://localhost:3085/graphql) (alias: -rest-server) [-help] print this help text and exit (alias: -?) ``` ### mina client send-payment ``` Send payment to an address mina client send-payment === flags === --amount VALUE Payment amount you want to send (alias: -amount) --receiver PUBLICKEY Public key to which you want to send money (alias: -receiver) --sender PUBLICKEY Public key from which you want to send the transaction (alias: -sender) [--fee FEE] Amount you are willing to pay to process the transaction (default: 0.25) (minimum: 0.001) (alias: -fee) [--memo STRING] Memo accompanying the transaction (alias: -memo) [--nonce NONCE] Nonce that you would like to set for your transaction (default: nonce of your account on the best ledger or the successor of highest value nonce of your sent transactions from the transaction pool ) (alias: -nonce) [--rest-server URI/LOCALHOST-PORT] graphql rest server for daemon interaction (examples: 3085 or http://localhost:3085/graphql, /dns4/peer1-rising-phoenix.o1test.net:3085/graphql) (default: 3085 or http://localhost:3085/graphql) (alias: -rest-server) [-help] print this help text and exit (alias: -?) ``` ### mina client delegate-stake ``` Delegate your stake to another public key mina client delegate-stake === flags === --receiver PUBLICKEY Public key to which you want to delegate your stake (alias: -receiver) --sender PUBLICKEY Public key from which you want to send the transaction (alias: -sender) [--fee FEE] Amount you are willing to pay to process the transaction (default: 0.25) (minimum: 0.001) (alias: -fee) [--memo STRING] Memo accompanying the transaction (alias: -memo) [--nonce NONCE] Nonce that you would like to set for your transaction (default: nonce of your account on the best ledger or the successor of highest value nonce of your sent transactions from the transaction pool ) (alias: -nonce) [--rest-server URI/LOCALHOST-PORT] graphql rest server for daemon interaction (examples: 3085 or http://localhost:3085/graphql, /dns4/peer1-rising-phoenix.o1test.net:3085/graphql) (default: 3085 or http://localhost:3085/graphql) (alias: -rest-server) [-help] print this help text and exit (alias: -?) ``` ### mina client cancel-transaction ``` Cancel a transaction -- this submits a replacement transaction with a fee larger than the cancelled transaction. mina client cancel-transaction === flags === --id ID Transaction ID to be cancelled (alias: -id) [--rest-server URI/LOCALHOST-PORT] graphql rest server for daemon interaction (examples: 3085 or http://localhost:3085/graphql, /dns4/peer1-rising-phoenix.o1test.net:3085/graphql) (default: 3085 or http://localhost:3085/graphql) (alias: -rest-server) [-help] print this help text and exit (alias: -?) ``` ### mina client set-snark-worker ``` Set key you wish to snark work with or disable snark working mina client set-snark-worker === flags === [--address PUBLICKEY] Public-key address you wish to start snark-working on; null to stop doing any snark work. Warning: If the key is from a zkApp account, the account's receive permission must be None. (alias: -address) [--rest-server URI/LOCALHOST-PORT] graphql rest server for daemon interaction (examples: 3085 or http://localhost:3085/graphql, /dns4/peer1-rising-phoenix.o1test.net:3085/graphql) (default: 3085 or http://localhost:3085/graphql) (alias: -rest-server) [-help] print this help text and exit (alias: -?) ``` ### mina client set-snark-work-fee ``` Set fee reward for doing transaction snark work mina client set-snark-work-fee FEE === flags === [--rest-server URI/LOCALHOST-PORT] graphql rest server for daemon interaction (examples: 3085 or http://localhost:3085/graphql, /dns4/peer1-rising-phoenix.o1test.net:3085/graphql) (default: 3085 or http://localhost:3085/graphql) (alias: -rest-server) [-help] print this help text and exit (alias: -?) ``` ### mina client export-logs ``` Export daemon logs to tar archive mina client export-logs === flags === [--rest-server URI/LOCALHOST-PORT] graphql rest server for daemon interaction (examples: 3085 or http://localhost:3085/graphql, /dns4/peer1-rising-phoenix.o1test.net:3085/graphql) (default: 3085 or http://localhost:3085/graphql) (alias: -rest-server) [--tarfile STRING] Basename of the tar archive (default: date_time) (alias: -tarfile) [-help] print this help text and exit (alias: -?) ``` ### mina client export-local-logs ``` Export local logs (no daemon) to tar archive mina client export-local-logs === flags === [--config-directory DIR] Configuration directory (alias: -config-directory) [--tarfile STRING] Basename of the tar archive (default: date_time) (alias: -tarfile) [-help] print this help text and exit (alias: -?) ``` ### mina client stop-daemon ``` Stop the daemon mina client stop-daemon === flags === [--daemon-port HOST:PORT/LOCALHOST-PORT] Client to local daemon communication. If HOST is omitted, then localhost is assumed to be HOST. (examples: 8301, 154.97.53.97:8301) (default: 8301) (alias: -daemon-port) [-help] print this help text and exit (alias: -?) ``` ### mina client status ``` Get running daemon status mina client status === flags === [--daemon-port HOST:PORT/LOCALHOST-PORT] Client to local daemon communication. If HOST is omitted, then localhost is assumed to be HOST. (examples: 8301, 154.97.53.97:8301) (default: 8301) (alias: -daemon-port) [--json] Use JSON output (default: plaintext) (alias: -json) [--performance] Include performance histograms in status output (default: don't include) (alias: -performance) [-help] print this help text and exit (alias: -?) ``` ### mina client help ``` explain a given subcommand (perhaps recursively) mina client help [SUBCOMMAND] === flags === [-expand-dots] expand subcommands in recursive help [-flags] show flags as well in recursive help [-recursive] show subcommands of subcommands, etc. [-help] print this help text and exit (alias: -?) ``` ## mina daemon ``` Mina daemon mina daemon === flags === [--all-peers-seen-metric true|false] whether to track the set of all peers ever seen for the all_peers metric (default: false) (alias: -all-peers-seen-metric) [--archive-address HOST:PORT/LOCALHOST-PORT] Daemon to archive process communication. If HOST is omitted, then localhost is assumed to be HOST. (examples: 3086, 154.97.53.97:3086) (alias: -archive-address) [--archive-rocksdb] Stores all the blocks heard in RocksDB (alias: -archive-rocksdb) [--background] Run process on the background (alias: -background) [--bind-ip IP] IP of network interface to use for peer connections (alias: -bind-ip) [--block-producer-key DEPRECATED:] Use environment variable `MINA_BP_PRIVKEY` instead. Private key file for the block producer. Providing this flag or the environment variable will enable block production. You cannot provide both `block-producer-key` and `block-producer-pubkey`. (default: use environment variable `MINA_BP_PRIVKEY`, if provided, or else don't produce any blocks) Warning: If the key is from a zkApp account, the account's receive permission must be None. (alias: -block-producer-key) [--block-producer-password PASSWORD] Password associated with the block-producer key. Setting this is equivalent to setting the MINA_PRIVKEY_PASS environment variable. Be careful when setting it in the commandline as it will likely get tracked in your history. Mainly to be used from the daemon.json config file (alias: -block-producer-password) [--block-producer-pubkey PUBLICKEY] Public key for the associated private key that is being tracked by this daemon. You cannot provide both `block-producer-key` (or `MINA_BP_PRIVKEY`) and `block-producer-pubkey`. (default: don't produce blocks) Warning: If the key is from a zkApp account, the account's receive permission must be None. (alias: -block-producer-pubkey) [--client-port PORT] local RPC-server for clients to interact with the daemon (default: 8301) (alias: -client-port) [--coinbase-receiver PUBLICKEY] Address to send coinbase rewards to (if this node is producing blocks). If not provided, coinbase rewards will be sent to the producer of a block. Warning: If the key is from a zkApp account, the account's receive permission must be None. (alias: -coinbase-receiver) [--config-directory DIR] Configuration directory (alias: -config-directory) [--config-file PATH] ... path to a configuration file (overrides MINA_CONFIG_FILE, default: /daemon.json). Pass multiple times to override fields from earlier config files (alias: -config-file) [--contact-info contact] info used in node error report service (it could be either email address or discord username), it should be less than 200 characters (alias: -contact-info) [--demo-mode] Run the daemon in demo-mode -- assume we're "synced" to the network instantly (alias: -demo-mode) [--direct-peer /ip4/IPADDR/tcp/PORT/p2p/PEERID] ... Peers to always send new messages to/from. These peers should also have you configured as a direct peer, the relationship is intended to be symmetric (alias: -direct-peer) [--disable-node-status] Disable reporting node status to other nodes (default: enabled) (alias: -disable-node-status) [--enable-flooding true|false] Publish our own blocks/transactions to every peer we can find (default: false) (alias: -enable-flooding) [--enable-peer-exchange true|false] Help keep the mesh connected when closing connections (default: false) (alias: -enable-peer-exchange) [--external-ip IP] External IP address for other nodes to connect to. You only need to set this if auto-discovery fails for some reason. (alias: -external-ip) [--external-port PORT] Port to use for all libp2p communications (gossip and RPC) (default: 8302) (alias: -external-port) [--file-log-level LEVEL] Set log level for the log file (Internal|Spam|Trace|Debug|Info|Warn|Error|Faulty_peer|Fatal, default: Trace) (alias: -file-log-level) [--file-log-rotations Number] of file log rotations before overwriting old logs (default: 50) [--gc-stat-interval INTERVAL] in mins for collecting GC stats for metrics (Default: 15.000000) (alias: -gc-stat-interval) [--generate-genesis-proof true|false] Deprecated. Passing this flag has no effect (alias: -generate-genesis-proof) [--genesis-ledger-dir DIR] Directory that contains the genesis ledger and the genesis blockchain proof (default: ) (alias: -genesis-ledger-dir) [--hardfork-handling keep-running|migrate-exit] Internal flag, controlling how the daemon handles an upcoming hard fork. Exposed for testing purposes. Currently it only causes the daemon to maintain migrated versions of the root and epoch ledger databases alongside the stable databases. (default: keep-running). (alias: -hardfork-handling) [--insecure-rest-server] Have REST server listen on all addresses, not just localhost (this is INSECURE, make sure your firewall is configured correctly!) (alias: -insecure-rest-server) [--internal-tracing] Enables internal tracing into $config-directory/internal-tracing/internal-trace.jsonl (alias: -internal-tracing) [--isolate-network true|false] Only allow connections to the peers passed on the command line or configured through GraphQL. (default: false) (alias: -isolate-network) [--libp2p-keypair KEYFILE] Keypair (generated from `mina libp2p generate-keypair`) to use with libp2p discovery (alias: -libp2p-keypair) [--libp2p-metrics-port PORT] libp2p metrics server for scraping via Prometheus (default no libp2p-metrics-server) (alias: -libp2p-metrics-port) [--limited-graphql-port PORT] GraphQL-server for limited daemon interaction (alias: -limited-graphql-port) [--log-block-creation true|false] Log the steps involved in including transactions and snark work in a block (default: true) (alias: -log-block-creation) [--log-json] Print log output as JSON (default: plain text) (alias: -log-json) [--log-level LEVEL] Set log level (Internal|Spam|Trace|Debug|Info|Warn|Error|Faulty_peer|Fatal, default: Info) (alias: -log-level) [--log-precomputed-blocks true|false] Include precomputed blocks in the log (default: false) (alias: -log-precomputed-blocks) [--log-snark-work-gossip true|false] Log snark-pool diff received from peers (default: false) (alias: -log-snark-work-gossip) [--log-txn-pool-gossip true|false] Log transaction-pool diff received from peers (default: false) (alias: -log-txn-pool-gossip) [--max-connections NN] max number of connections that this peer will have to neighbors in the gossip network. Tuning this higher will strengthen your connection to the network in exchange for using more RAM (default: 50) (alias: -max-connections) [--metrics-port PORT] metrics server for scraping via Prometheus (default no metrics-server) (alias: -metrics-port) [--min-connections NN] min number of connections that this peer will have to neighbors in the gossip network (default: 20) (alias: -min-connections) [--minimum-block-reward AMOUNT] Minimum reward a block produced by the node should have. Empty blocks are created if the rewards are lower than the specified threshold (default: No threshold, transactions and coinbase will be included as long as the required snark work is available and can be paid for) (alias: -minimum-block-reward) [--node-error-url URL] of the node error collection service (alias: -node-error-url) [--node-status-url URL] of the node status collection service (alias: -node-status-url) [--open-limited-graphql-port] Have the limited GraphQL server listen on all addresses, not just localhost (this is INSECURE, make sure your firewall is configured correctly!) (alias: -open-limited-graphql-port) [--peer /ip4/IPADDR/tcp/PORT/p2p/PEERID] ... initial "bootstrap" peers for discovery (alias: -peer) [--peer-list-file PATH] path to a file containing "bootstrap" peers for discovery, one multiaddress per line (alias: -peer-list-file) [--peer-list-url URL] URL of seed peer list file. Will be polled periodically. (alias: -peer-list-url) [--peer-protection-rate float] Proportion of peers to be marked as protected (default: 0.2) (alias: -peer-protection-rate) [--precomputed-blocks-file PATH] Path to write precomputed blocks to, for replay or archiving (alias: -precomputed-blocks-file) [--proof-level full|check|none] Internal, for testing. Start or connect to a network with full proving (full), snark-testing with dummy proofs (check), or dummy proofs (none) (alias: -proof-level) [--proposed-protocol-version NN.NN.NN] Proposed protocol version to signal other nodes (alias: -proposed-protocol-version) [--rest-port PORT] local REST-server for daemon interaction (default: 3085) (alias: -rest-port) [--run-snark-coordinator PUBLICKEY] Run a SNARK coordinator with this public key (ignored if the run-snark-worker is set). Warning: If the key is from a zkApp account, the account's receive permission must be None. (alias: -run-snark-coordinator) [--run-snark-worker PUBLICKEY] Run the SNARK worker with this public key. Warning: If the key is from a zkApp account, the account's receive permission must be None. (alias: -run-snark-worker) [--seed] Start the node as a seed node (alias: -seed) [--simplified-node-stats whether] to report simplified node stats (default: true) (alias: -simplified-node-stats) [--snark-worker-fee FEE] Amount a worker wants to get compensated for generating a snark proof (default: 100000000) (alias: -snark-worker-fee) [--snark-worker-parallelism NUM] Run the SNARK worker using this many threads. Equivalent to setting OMP_NUM_THREADS, but doesn't affect block production. (alias: -snark-worker-parallelism) [--start-filtered-logs LOG-FILTER] ... Include filtered logs for the given filter. May be passed multiple times [--stop-time UPTIME] in hours after which the daemon stops itself (only if there were no slots won within an hour after the stop time) (Default: 168) (alias: -stop-time) [--stop-time-interval UPTIME] An upper bound (inclusive) on the random number of hours added to the stop-time. Setting it to zero disables this randomness. (Default: 9) (alias: -stop-time-interval) [--tracing] Trace into $config-directory/trace/$pid.trace (alias: -tracing) [--upload-blocks-to-gcloud true|false] upload blocks to gcloud storage. Requires the environment variables GCLOUD_KEYFILE, NETWORK_NAME, and GCLOUD_BLOCK_UPLOAD_BUCKET (alias: -upload-blocks-to-gcloud) [--uptime-send-node-commit-sha] true|false Whether to send the commit SHA used to build the node to the uptime service. (default: false) (alias: -uptime-send-node-commit-sha) [--uptime-submitter-key KEYFILE] Private key file for the uptime submitter. You cannot provide both `uptime-submitter-key` and `uptime-submitter-pubkey`. (alias: -uptime-submitter-key) [--uptime-submitter-pubkey PUBLICKEY] Public key of the submitter to the Mina delegation program, for the associated private key that is being tracked by this daemon. You cannot provide both `uptime-submitter-key` and `uptime-submitter-pubkey`. (alias: -uptime-submitter-pubkey) [--uptime-url URL] URL of the uptime service of the Mina delegation program (alias: -uptime-url) [--validation-queue-size NN] size of the validation queue in the p2p network used to buffer messages (like blocks and transactions received on the gossip network) while validation is pending. If a transaction, for example, is invalid, we don't forward the message on the gossip net. If this queue is too small, we will drop messages without validating them. If it is too large, we are susceptible to DoS attacks on memory. (default: 150) (alias: -validation-queue-size) [--work-reassignment-wait WAIT-TIME] in ms before a snark-work is reassigned (default: 420000ms) (alias: -work-reassignment-wait) [--work-selection seq|rand|roffset] Choose work sequentially (seq), randomly (rand), or sequentially with a random offset (roffset) (default: rand) (alias: -work-selection) [--working-dir PATH] path to chdir into before starting (useful for background mode, defaults to cwd, or / if -background) (alias: -working-dir) [-help] print this help text and exit (alias: -?) ``` ## mina advanced ``` Advanced client commands mina advanced SUBCOMMAND === subcommands === add-peers Add peers to the daemon Addresses take the format /ip4/IPADDR/tcp/PORT/p2p/PEERID archive-blocks Archive a block from a file. If an archive address is given, this process will communicate with the archive node directly; otherwise it will communicate through the daemon over the rest-server batch-send-payments Send multiple payments from a file client-trustlist Client trustlist management compile-time-constants Print a JSON map of the compile-time consensus parameters compute-receipt-chain-hash Compute the next receipt chain hash from the previous hash and transaction ID constraint-system-digests Print MD5 digest of each SNARK constraint dump-keypair Print out a keypair from a private key file generate-hardfork-config Generate reference hardfork configuration generate-keypair Generate a new public, private keypair get-nonce Get the current nonce for an account get-peers List the peers currently connected to the daemon get-public-keys Get public keys get-trust-status Get the trust status associated with an IP address get-trust-status-all Get trust statuses for all peers known to the trust system hash-transaction Compute the hash of a transaction from its transaction ID node-status Get node statuses for a set of peers object-lifetime-statistics Dump internal object lifetime statistics to JSON pending-snark-work List of snark works in JSON format that are not available in the pool yet pooled-user-commands Retrieve all the user commands that are pending inclusion pooled-zkapp-commands Retrieve all the zkApp commands that are pending inclusion print-signature-kind Print the signature kind that this binary is compiled with reset-trust-status Reset the trust status associated with an IP address runtime-config Compute the runtime configuration used by a running daemon send-rosetta-transactions Dispatch one or more transactions, provided to stdin in rosetta format set-coinbase-receiver Set the coinbase receiver snark-job-list List of snark jobs in JSON format that are yet to be included in the blocks snark-pool-list List of snark works in the snark pool in JSON format start-internal-tracing Start internal tracing to $config-directory/internal-tracing/internal-trace.jsonl start-tracing Start async tracing to $config-directory/trace/$pid.trace status-clear-hist Clear histograms reported in status stop-internal-tracing Stop internal tracing stop-tracing Stop async tracing test Testing-only commands thread-graph Return a Graphviz Dot graph representation of the internal thread hierarchy time-offset Get the time offset in seconds used by the daemon to convert real time into blockchain time validate-keypair Validate a public, private keypair validate-transaction Validate the signature on one or more transactions, provided to stdin in rosetta format verify-receipt Verify a receipt of a sent payment visualization Visualize data structures special to Mina vrf Commands for vrf evaluations wrap-key Wrap a private key into a private key file help explain a given subcommand (perhaps recursively) ``` ### mina advanced add-peers ``` Add peers to the daemon Addresses take the format /ip4/IPADDR/tcp/PORT/p2p/PEERID mina advanced add-peers PEER [PEER ...] === flags === [--rest-server URI/LOCALHOST-PORT] graphql rest server for daemon interaction (examples: 3085 or http://localhost:3085/graphql, /dns4/peer1-rising-phoenix.o1test.net:3085/graphql) (default: 3085 or http://localhost:3085/graphql) (alias: -rest-server) [--seed true/false] Whether to add these peers as 'seed' peers, which may perform peer exchange. Default: true (alias: -seed) [-help] print this help text and exit (alias: -?) ``` ### mina advanced archive-blocks ``` Archive a block from a file. If an archive address is given, this process will communicate with the archive node directly; otherwise it will communicate through the daemon over the rest-server mina advanced archive-blocks [FILES ...] === flags === [--archive-address HOST:PORT/LOCALHOST-PORT] Daemon to archive process communication. If HOST is omitted, then localhost is assumed to be HOST. (examples: 3086, 154.97.53.97:3086) (alias: -archive-address) [--extensional] Blocks are in extensional JSON format (alias: -extensional) [--failed-files PATH] Appends the list of files that failed to be processed (alias: -failed-files) [--log-successful true/false] Whether to log messages for files that were processed successfully (alias: -log-successful) [--precomputed] Blocks are in precomputed JSON format (alias: -precomputed) [--rest-server URI/LOCALHOST-PORT] graphql rest server for daemon interaction (examples: 3085 or http://localhost:3085/graphql, /dns4/peer1-rising-phoenix.o1test.net:3085/graphql) (default: 3085 or http://localhost:3085/graphql) (alias: -rest-server) [--successful-files PATH] Appends the list of files that were processed successfully (alias: -successful-files) [-help] print this help text and exit (alias: -?) ``` ### mina advanced batch-send-payments ``` Send multiple payments from a file mina advanced batch-send-payments PAYMENTS-FILE === flags === --privkey-path FILE File to read private key from (alias: -privkey-path) [--daemon-port HOST:PORT/LOCALHOST-PORT] Client to local daemon communication. If HOST is omitted, then localhost is assumed to be HOST. (examples: 8301, 154.97.53.97:8301) (default: 8301) (alias: -daemon-port) [-help] print this help text and exit (alias: -?) ``` ### mina advanced client-trustlist ``` Client trustlist management mina advanced client-trustlist SUBCOMMAND === subcommands === add Add an IP to the trustlist list List the CIDR masks in the trustlist remove Remove a CIDR mask from the trustlist help explain a given subcommand (perhaps recursively) ``` ### mina advanced compile-time-constants ``` Print a JSON map of the compile-time consensus parameters mina advanced compile-time-constants === flags === [-help] print this help text and exit (alias: -?) ``` ### mina advanced compute-receipt-chain-hash ``` Compute the next receipt chain hash from the previous hash and transaction ID mina advanced compute-receipt-chain-hash === flags === --previous-hash HASH Previous receipt chain hash, Base58Check-encoded --transaction-id TRANSACTION_ID Transaction ID, Base64-encoded [--index NN] For a zkApp, 0 for fee payer or 1-based index of account update [--signature-kind mainnet|testnet|] Signature kind to use (default: value compiled into this binary) [-help] print this help text and exit (alias: -?) ``` ### mina advanced constraint-system-digests ``` Print MD5 digest of each SNARK constraint mina advanced constraint-system-digests === flags === [--signature-kind mainnet|testnet|] Signature kind to use (default: value compiled into this binary) [-help] print this help text and exit (alias: -?) ``` ### mina advanced dump-keypair ``` Print out a keypair from a private key file mina advanced dump-keypair === flags === --privkey-path FILE File to read private key from (alias: -privkey-path) [-help] print this help text and exit (alias: -?) ``` ### mina advanced generate-hardfork-config ``` Generate reference hardfork configuration mina advanced generate-hardfork-config === flags === --hardfork-config-dir DIR Directory to generate hardfork configuration, relative to the daemon working directory [--daemon-port HOST:PORT/LOCALHOST-PORT] Client to local daemon communication. If HOST is omitted, then localhost is assumed to be HOST. (examples: 8301, 154.97.53.97:8301) (default: 8301) (alias: -daemon-port) [--generate-fork-validation BOOL] whether generating the fork validation folder. Defaults to true [-help] print this help text and exit (alias: -?) ``` ### mina advanced generate-keypair ``` Generate a new public, private keypair mina advanced generate-keypair === flags === --privkey-path FILE File to write private key into (public key will be FILE.pub) (alias: -privkey-path) [-help] print this help text and exit (alias: -?) ``` ### mina advanced get-nonce ``` Get the current nonce for an account mina advanced get-nonce === flags === --address PUBLICKEY Public-key address you want the nonce for (alias: -address) [--daemon-port HOST:PORT/LOCALHOST-PORT] Client to local daemon communication. If HOST is omitted, then localhost is assumed to be HOST. (examples: 8301, 154.97.53.97:8301) (default: 8301) (alias: -daemon-port) [--token TOKEN_ID] The token ID for the account (alias: -token) [-help] print this help text and exit (alias: -?) ``` ### mina advanced get-peers ``` List the peers currently connected to the daemon mina advanced get-peers === flags === [--rest-server URI/LOCALHOST-PORT] graphql rest server for daemon interaction (examples: 3085 or http://localhost:3085/graphql, /dns4/peer1-rising-phoenix.o1test.net:3085/graphql) (default: 3085 or http://localhost:3085/graphql) (alias: -rest-server) [-help] print this help text and exit (alias: -?) ``` ### mina advanced get-public-keys ``` Get public keys mina advanced get-public-keys === flags === [--daemon-port HOST:PORT/LOCALHOST-PORT] Client to local daemon communication. If HOST is omitted, then localhost is assumed to be HOST. (examples: 8301, 154.97.53.97:8301) (default: 8301) (alias: -daemon-port) [--json] Use JSON output (default: plaintext) (alias: -json) [--with-details] Show extra details (eg. balance, nonce) in addition to public keys (alias: -with-details) [-help] print this help text and exit (alias: -?) ``` ### mina advanced get-trust-status ``` Get the trust status associated with an IP address mina advanced get-trust-status === flags === --ip-address IP An IPv4 or IPv6 address for which you want to query the trust status (alias: -ip-address) [--daemon-port HOST:PORT/LOCALHOST-PORT] Client to local daemon communication. If HOST is omitted, then localhost is assumed to be HOST. (examples: 8301, 154.97.53.97:8301) (default: 8301) (alias: -daemon-port) [--json] Use JSON output (default: plaintext) (alias: -json) [-help] print this help text and exit (alias: -?) ``` ### mina advanced get-trust-status-all ``` Get trust statuses for all peers known to the trust system mina advanced get-trust-status-all === flags === [--daemon-port HOST:PORT/LOCALHOST-PORT] Client to local daemon communication. If HOST is omitted, then localhost is assumed to be HOST. (examples: 8301, 154.97.53.97:8301) (default: 8301) (alias: -daemon-port) [--json] Use JSON output (default: plaintext) (alias: -json) [--nonzero-only] Only show trust statuses whose trust score is nonzero (alias: -nonzero-only) [-help] print this help text and exit (alias: -?) ``` ### mina advanced hash-transaction ``` Compute the hash of a transaction from its transaction ID mina advanced hash-transaction === flags === --transaction-id ID ID of the transaction to hash [-help] print this help text and exit (alias: -?) ``` ### mina advanced node-status ``` Get node statuses for a set of peers mina advanced node-status === flags === [--daemon-peers] Get node statuses for peers known to the daemon (alias: -daemon-peers) [--daemon-port HOST:PORT/LOCALHOST-PORT] Client to local daemon communication. If HOST is omitted, then localhost is assumed to be HOST. (examples: 8301, 154.97.53.97:8301) (default: 8301) (alias: -daemon-port) [--peers CSV-LIST] Peer multiaddrs for obtaining node status (alias: -peers) [--show-errors] Include error responses in output (alias: -show-errors) [-help] print this help text and exit (alias: -?) ``` ### mina advanced object-lifetime-statistics ``` Dump internal object lifetime statistics to JSON mina advanced object-lifetime-statistics === flags === [--daemon-port HOST:PORT/LOCALHOST-PORT] Client to local daemon communication. If HOST is omitted, then localhost is assumed to be HOST. (examples: 8301, 154.97.53.97:8301) (default: 8301) (alias: -daemon-port) [-help] print this help text and exit (alias: -?) ``` ### mina advanced pending-snark-work ``` List of snark works in JSON format that are not available in the pool yet mina advanced pending-snark-work === flags === [--rest-server URI/LOCALHOST-PORT] graphql rest server for daemon interaction (examples: 3085 or http://localhost:3085/graphql, /dns4/peer1-rising-phoenix.o1test.net:3085/graphql) (default: 3085 or http://localhost:3085/graphql) (alias: -rest-server) [-help] print this help text and exit (alias: -?) ``` ### mina advanced pooled-user-commands ``` Retrieve all the user commands that are pending inclusion mina advanced pooled-user-commands [PUBLIC-KEY] === flags === [--rest-server URI/LOCALHOST-PORT] graphql rest server for daemon interaction (examples: 3085 or http://localhost:3085/graphql, /dns4/peer1-rising-phoenix.o1test.net:3085/graphql) (default: 3085 or http://localhost:3085/graphql) (alias: -rest-server) [-help] print this help text and exit (alias: -?) ``` ### mina advanced pooled-zkapp-commands ``` Retrieve all the zkApp commands that are pending inclusion mina advanced pooled-zkapp-commands [PUBLIC-KEY] === flags === [--rest-server URI/LOCALHOST-PORT] graphql rest server for daemon interaction (examples: 3085 or http://localhost:3085/graphql, /dns4/peer1-rising-phoenix.o1test.net:3085/graphql) (default: 3085 or http://localhost:3085/graphql) (alias: -rest-server) [-help] print this help text and exit (alias: -?) ``` ### mina advanced print-signature-kind ``` Print the signature kind that this binary is compiled with mina advanced print-signature-kind === flags === [-help] print this help text and exit (alias: -?) ``` ### mina advanced reset-trust-status ``` Reset the trust status associated with an IP address mina advanced reset-trust-status === flags === --ip-address IP An IPv4 or IPv6 address for which you want to reset the trust status (alias: -ip-address) [--daemon-port HOST:PORT/LOCALHOST-PORT] Client to local daemon communication. If HOST is omitted, then localhost is assumed to be HOST. (examples: 8301, 154.97.53.97:8301) (default: 8301) (alias: -daemon-port) [--json] Use JSON output (default: plaintext) (alias: -json) [-help] print this help text and exit (alias: -?) ``` ### mina advanced runtime-config ``` Compute the runtime configuration used by a running daemon mina advanced runtime-config === flags === [--rest-server URI/LOCALHOST-PORT] graphql rest server for daemon interaction (examples: 3085 or http://localhost:3085/graphql, /dns4/peer1-rising-phoenix.o1test.net:3085/graphql) (default: 3085 or http://localhost:3085/graphql) (alias: -rest-server) [-help] print this help text and exit (alias: -?) ``` ### mina advanced send-rosetta-transactions ``` Dispatch one or more transactions, provided to stdin in rosetta format mina advanced send-rosetta-transactions === flags === [--rest-server URI/LOCALHOST-PORT] graphql rest server for daemon interaction (examples: 3085 or http://localhost:3085/graphql, /dns4/peer1-rising-phoenix.o1test.net:3085/graphql) (default: 3085 or http://localhost:3085/graphql) (alias: -rest-server) [-help] print this help text and exit (alias: -?) ``` ### mina advanced set-coinbase-receiver ``` Set the coinbase receiver mina advanced set-coinbase-receiver === flags === [--block-producer] Send coinbase rewards to the block producer's public key (alias: -block-producer) [--public-key PUBLICKEY] Public key of account to send coinbase rewards to (alias: -public-key) [--rest-server URI/LOCALHOST-PORT] graphql rest server for daemon interaction (examples: 3085 or http://localhost:3085/graphql, /dns4/peer1-rising-phoenix.o1test.net:3085/graphql) (default: 3085 or http://localhost:3085/graphql) (alias: -rest-server) [-help] print this help text and exit (alias: -?) ``` ### mina advanced snark-job-list ``` List of snark jobs in JSON format that are yet to be included in the blocks mina advanced snark-job-list === flags === [--daemon-port HOST:PORT/LOCALHOST-PORT] Client to local daemon communication. If HOST is omitted, then localhost is assumed to be HOST. (examples: 8301, 154.97.53.97:8301) (default: 8301) (alias: -daemon-port) [-help] print this help text and exit (alias: -?) ``` ### mina advanced snark-pool-list ``` List of snark works in the snark pool in JSON format mina advanced snark-pool-list === flags === [--rest-server URI/LOCALHOST-PORT] graphql rest server for daemon interaction (examples: 3085 or http://localhost:3085/graphql, /dns4/peer1-rising-phoenix.o1test.net:3085/graphql) (default: 3085 or http://localhost:3085/graphql) (alias: -rest-server) [-help] print this help text and exit (alias: -?) ``` ### mina advanced start-internal-tracing ``` Start internal tracing to $config-directory/internal-tracing/internal-trace.jsonl mina advanced start-internal-tracing === flags === [--daemon-port HOST:PORT/LOCALHOST-PORT] Client to local daemon communication. If HOST is omitted, then localhost is assumed to be HOST. (examples: 8301, 154.97.53.97:8301) (default: 8301) (alias: -daemon-port) [-help] print this help text and exit (alias: -?) ``` ### mina advanced start-tracing ``` Start async tracing to $config-directory/trace/$pid.trace mina advanced start-tracing === flags === [--daemon-port HOST:PORT/LOCALHOST-PORT] Client to local daemon communication. If HOST is omitted, then localhost is assumed to be HOST. (examples: 8301, 154.97.53.97:8301) (default: 8301) (alias: -daemon-port) [-help] print this help text and exit (alias: -?) ``` ### mina advanced status-clear-hist ``` Clear histograms reported in status mina advanced status-clear-hist === flags === [--daemon-port HOST:PORT/LOCALHOST-PORT] Client to local daemon communication. If HOST is omitted, then localhost is assumed to be HOST. (examples: 8301, 154.97.53.97:8301) (default: 8301) (alias: -daemon-port) [--json] Use JSON output (default: plaintext) (alias: -json) [--performance] Include performance histograms in status output (default: don't include) (alias: -performance) [-help] print this help text and exit (alias: -?) ``` ### mina advanced stop-internal-tracing ``` Stop internal tracing mina advanced stop-internal-tracing === flags === [--daemon-port HOST:PORT/LOCALHOST-PORT] Client to local daemon communication. If HOST is omitted, then localhost is assumed to be HOST. (examples: 8301, 154.97.53.97:8301) (default: 8301) (alias: -daemon-port) [-help] print this help text and exit (alias: -?) ``` ### mina advanced stop-tracing ``` Stop async tracing mina advanced stop-tracing === flags === [--daemon-port HOST:PORT/LOCALHOST-PORT] Client to local daemon communication. If HOST is omitted, then localhost is assumed to be HOST. (examples: 8301, 154.97.53.97:8301) (default: 8301) (alias: -daemon-port) [-help] print this help text and exit (alias: -?) ``` ### mina advanced test ``` Testing-only commands mina advanced test SUBCOMMAND === subcommands === create-genesis Test genesis creation submit-to-archive Generate blocks with zkApp transactions and payments. Optionally submit to archive node or save to file for analysis. help explain a given subcommand (perhaps recursively) ``` ### mina advanced thread-graph ``` Return a Graphviz Dot graph representation of the internal thread hierarchy mina advanced thread-graph === flags === [--rest-server URI/LOCALHOST-PORT] graphql rest server for daemon interaction (examples: 3085 or http://localhost:3085/graphql, /dns4/peer1-rising-phoenix.o1test.net:3085/graphql) (default: 3085 or http://localhost:3085/graphql) (alias: -rest-server) [-help] print this help text and exit (alias: -?) ``` ### mina advanced time-offset ``` Get the time offset in seconds used by the daemon to convert real time into blockchain time mina advanced time-offset === flags === [--rest-server URI/LOCALHOST-PORT] graphql rest server for daemon interaction (examples: 3085 or http://localhost:3085/graphql, /dns4/peer1-rising-phoenix.o1test.net:3085/graphql) (default: 3085 or http://localhost:3085/graphql) (alias: -rest-server) [-help] print this help text and exit (alias: -?) ``` ### mina advanced validate-keypair ``` Validate a public, private keypair mina advanced validate-keypair === flags === --privkey-path FILE File to write private key into (public key will be FILE.pub) (alias: -privkey-path) [--signature-kind mainnet|testnet|] Signature kind to use (default: value compiled into this binary) [-help] print this help text and exit (alias: -?) ``` ### mina advanced validate-transaction ``` Validate the signature on one or more transactions, provided to stdin in rosetta format mina advanced validate-transaction === flags === [--signature-kind mainnet|testnet|] Signature kind to use (default: value compiled into this binary) [-help] print this help text and exit (alias: -?) ``` ### mina advanced verify-receipt ``` Verify a receipt of a sent payment mina advanced verify-receipt === flags === --address PUBLICKEY Public-key address of sender (alias: -address) --payment-path PAYMENTPATH File to read json version of verifying payment (alias: -payment-path) --proof-path PROOFFILE File to read json version of payment receipt (alias: -proof-path) [--daemon-port HOST:PORT/LOCALHOST-PORT] Client to local daemon communication. If HOST is omitted, then localhost is assumed to be HOST. (examples: 8301, 154.97.53.97:8301) (default: 8301) (alias: -daemon-port) [--legacy] Use legacy json format (zkapp command with hashes) [--token TOKEN_ID] The token ID for the account (alias: -token) [-help] print this help text and exit (alias: -?) ``` ### mina advanced visualization ``` Visualize data structures special to Mina mina advanced visualization SUBCOMMAND === subcommands === registered-masks Produce a visualization of the registered-masks transition-frontier Produce a visualization of the transition-frontier help explain a given subcommand (perhaps recursively) ``` ### mina advanced vrf ``` Commands for vrf evaluations mina advanced vrf SUBCOMMAND === subcommands === batch-check-witness Check a batch of vrf evaluation witnesses read on stdin. Outputs the verified vrf evaluations (or no vrf output if the witness is invalid), and whether the vrf output satisfies the threshold values if given. The threshold should be included in the JSON for each vrf as the 'vrfThreshold' field, of format {delegatedStake: 1000, totalStake: 1000000000}. The threshold is not checked against a ledger; this should be done manually to confirm whether threshold_met in the output corresponds to an actual won block. batch-generate-witness Generate a batch of vrf evaluation witnesses from {"globalSlot": _, "epochSeed": _, "delegatorIndex": _} JSON message objects read on stdin generate-witness Generate a vrf evaluation witness. This may be used to calculate whether a given private key will win a given slot (by checking threshold_met = true in the JSON output), or to generate a witness that a 3rd account_update can use to verify a vrf evaluation. help explain a given subcommand (perhaps recursively) ``` ### mina advanced wrap-key ``` Wrap a private key into a private key file mina advanced wrap-key === flags === --privkey-path FILE File to write private key into (public key will be FILE.pub) (alias: -privkey-path) [-help] print this help text and exit (alias: -?) ``` ### mina advanced help ``` explain a given subcommand (perhaps recursively) mina advanced help [SUBCOMMAND] === flags === [-expand-dots] expand subcommands in recursive help [-flags] show flags as well in recursive help [-recursive] show subcommands of subcommands, etc. [-help] print this help text and exit (alias: -?) ``` ## mina ledger ``` Ledger commands mina ledger SUBCOMMAND === subcommands === currency Print the total currency for each token present in the ledger contained in the specified file export Print the specified ledger (default: staged ledger at the best tip). Note: Exporting snarked ledger is an expensive operation and can take a few seconds hash Print the Merkle root of the ledger contained in the specified file test Testing-only commands help explain a given subcommand (perhaps recursively) ``` ### mina ledger currency ``` Print the total currency for each token present in the ledger contained in the specified file mina ledger currency === flags === --ledger-file LEDGER-FILE File containing an exported ledger [--plaintext] Use plaintext input or output (default: JSON) (alias: -plaintext) [-help] print this help text and exit (alias: -?) ``` ### mina ledger export ``` Print the specified ledger (default: staged ledger at the best tip). Note: Exporting snarked ledger is an expensive operation and can take a few seconds mina ledger export STAGED-LEDGER|SNARKED-LEDGER|STAKING-EPOCH-LEDGER|NEXT-EPOCH-LEDGER === flags === [--daemon-port HOST:PORT/LOCALHOST-PORT] Client to local daemon communication. If HOST is omitted, then localhost is assumed to be HOST. (examples: 8301, 154.97.53.97:8301) (default: 8301) (alias: -daemon-port) [--plaintext] Use plaintext input or output (default: JSON) (alias: -plaintext) [--state-hash STATE-HASH] State hash, if printing a staged ledger or snarked ledger (default: state hash for the best tip) (alias: -state-hash) [-help] print this help text and exit (alias: -?) ``` ### mina ledger hash ``` Print the Merkle root of the ledger contained in the specified file mina ledger hash === flags === --ledger-file LEDGER-FILE File containing an exported ledger [--plaintext] Use plaintext input or output (default: JSON) (alias: -plaintext) [-help] print this help text and exit (alias: -?) ``` ### mina ledger test ``` Testing-only commands mina ledger test SUBCOMMAND === subcommands === apply Test ledger application generate-accounts Generate a ledger for testing help explain a given subcommand (perhaps recursively) ``` ### mina ledger help ``` explain a given subcommand (perhaps recursively) mina ledger help [SUBCOMMAND] === flags === [-expand-dots] expand subcommands in recursive help [-flags] show flags as well in recursive help [-recursive] show subcommands of subcommands, etc. [-help] print this help text and exit (alias: -?) ``` ## mina libp2p ``` Libp2p commands mina libp2p SUBCOMMAND === subcommands === dump-keypair Print an existing libp2p keypair generate-keypair Generate a new libp2p keypair and print out the peer ID help explain a given subcommand (perhaps recursively) ``` ### mina libp2p dump-keypair ``` Print an existing libp2p keypair mina libp2p dump-keypair === flags === --privkey-path FILE File to read private key from (alias: -privkey-path) [-help] print this help text and exit (alias: -?) ``` ### mina libp2p generate-keypair ``` Generate a new libp2p keypair and print out the peer ID mina libp2p generate-keypair === flags === --privkey-path FILE File to write private key into (public key will be FILE.pub) (alias: -privkey-path) [-help] print this help text and exit (alias: -?) ``` ### mina libp2p help ``` explain a given subcommand (perhaps recursively) mina libp2p help [SUBCOMMAND] === flags === [-expand-dots] expand subcommands in recursive help [-flags] show flags as well in recursive help [-recursive] show subcommands of subcommands, etc. [-help] print this help text and exit (alias: -?) ``` --- url: /node-operators/rosetta/build-from-sources --- # Building and running Rosetta from source code In [Running with Docker](run-with-docker), you learned that the Docker container runs the mina daemon, mina-archive, and Rosetta API. If you already have mina-archive up and running, you can also build and run the Rosetta API natively and wire it to the existing mina daemon and mina-archive. :::tip To run mina daemon and mina-archive natively, follow the [Archive Node page](/node-operators/archive-node/getting-started) instructions. ::: The easiest way to build Rosetta natively is to use the Nix development environment. 1. Clone the official [mina repository](https://github.com/MinaProtocol/mina.git) and switch to the `compatible` branch. 1. If you don't already have Nix on your machine, install it following the steps in the [nix/README.md](https://github.com/MinaProtocol/mina/blob/develop/nix/README.md). 1. Run the `./nix/pin.sh` script to enable submodules to be available to the build: ```shell ./nix/pin.sh ``` 1. Launch the development shell: ```shell nix develop mina ``` 1. Build Rosetta app: ```shell dune build --profile=mainnet src/app/rosetta ``` 1. After a successful build, the Rosetta app is available here: `_build/default/src/app/rosetta/rosetta.exe` You can run it with following command: ```shell MINA_ROSETTA_MAX_DB_POOL_SIZE=64 \ _build/default/src/app/rosetta/rosetta.exe --port 3087 \ --graphql-uri --archive-uri postgres://:@:/ ``` --- url: /node-operators/rosetta/docker-compose --- # Docker Compose Rosetta For production deployments, use Docker Compose to run each Rosetta component as a separate container. This gives you control over resource allocation, logging, and restarts. The full Docker Compose configuration — including `docker-compose.yml`, example environment files for mainnet and devnet, a `Makefile`, and a `README` — is maintained in the Mina repository: **[`mina/src/app/rosetta/docker-compose/`](https://github.com/MinaProtocol/mina/tree/compatible/src/app/rosetta/docker-compose)** ## Quick start :::tip Before running the commands below, review the [Configuration](#configuration) section to see all available options — including image tags, network selection, ports, and database settings. ::: ```bash git clone https://github.com/MinaProtocol/mina.git cd mina/src/app/rosetta/docker-compose # For mainnet cp example.mainnet.env .env # For devnet cp example.devnet.env .env # Edit .env — set MINA_LIBP2P_PASS and review POSTGRES_PASSWORD vi .env # Start all services docker compose up -d # Or use make shortcuts make mainnet # copies mainnet env and starts services make devnet # copies devnet env and starts services ``` ## Services overview The Docker Compose setup includes six services: | Service | Description | Default Port | |---------|-------------|--------------| | **postgres** | PostgreSQL 17 with health checks | 5432 (container), configurable host port | | **bootstrap_db** | One-shot: downloads and imports the latest daily archive dump | — | | **mina_archive** | Archive process, stores block data in PostgreSQL | 3086 | | **mina_node** | Mina daemon with GraphQL API | 3085 (GraphQL), 8302 (P2P) | | **mina_rosetta** | Rosetta API for exchange integration | 3087 | | **missing_blocks_guardian** | Monitors and recovers missing blocks between nightly dumps and chain tip | — | ## Configuration All configuration is done through a single `.env` file. Key variables: ### Docker images | Variable | Description | |----------|-------------| | `MINA_DAEMON_IMAGE` | Mina daemon Docker image | | `MINA_ARCHIVE_IMAGE` | Mina archive Docker image | | `MINA_ROSETTA_IMAGE` | Mina Rosetta Docker image | For mainnet, images are pulled from [Docker Hub](https://hub.docker.com/u/minaprotocol) (`minaprotocol/mina-*`). For devnet, images are pulled from the o1Labs GCR registry. ### Network | Variable | Description | |----------|-------------| | `MINA_NETWORK` | `mainnet` or `devnet` | | `MINA_PEERLIST_URL` | Bootstrap peers URL | | `MINA_LIBP2P_PASS` | Passphrase for the libp2p key (required) | ### Ports | Variable | Default | Description | |----------|---------|-------------| | `POSTGRES_PORT` | `5433` | Host port mapped to PostgreSQL | | `MINA_REST_PORT` | `3085` | GraphQL API port | | `MINA_P2P_PORT` | `8302` | P2P networking port | | `MINA_ARCHIVE_PORT` | `3086` | Archive server port | | `MINA_ROSETTA_PORT` | `3087` | Rosetta API port | ### Archive bootstrap | Variable | Description | |----------|-------------| | `ARCHIVE_DUMP_BASE_URL` | Base URL for daily archive dumps | | `ARCHIVE_DUMP_PREFIX` | Dump filename prefix (`mainnet-archive-dump` or `devnet-archive-dump`) | | `GUARDIAN_PRECOMPUTED_BLOCKS_URL` | S3 bucket URL for precomputed blocks used by the missing blocks guardian | ## Data persistence Bind mounts preserve data across `docker compose down` / `up`: | Host path | Container path | Contents | |-----------|---------------|----------| | `./archive/postgresql/data` | `/var/lib/postgresql/data` | PostgreSQL data | | `./archive/data` | `/data` | Archive node data | | `./mina_node/.mina-config` | `/root/.mina-config` | Daemon config, keys, peers | | `./mina_rosetta/.mina-config` | `/root/.mina-config` | Rosetta config | ## Make targets | Command | Description | |---------|-------------| | `make devnet` | Copy devnet env and start services | | `make mainnet` | Copy mainnet env and start services | | `make stop` | Stop all services | | `make clean` | Stop services, remove volumes and all persisted data | | `make logs` | Follow logs for all services | | `make status` | Show container status | | `make health` | Check health of Postgres, GraphQL, and Rosetta endpoints | ## Verifying the deployment Once services are running and the node is synced: ```bash # Check container status make status # Run health checks make health # Check sync status docker compose exec mina_node mina client status # Query Rosetta API curl -s http://localhost:3087/network/list \ -H 'Content-Type: application/json' -d '{}' | jq . # Connect to archive database psql postgres://postgres:postgres@localhost:5433/archive ``` ## Clean start To wipe all data and start fresh: ```bash make clean docker compose up -d ``` --- url: /node-operators/rosetta/run-with-docker --- # Running with Docker :::info There is a known issue that you can't use the docker image on the Apple silicon chip. To run Mina Rosetta on Apple silicon, you can use the steps in [Building and running Rosetta from source code](build-from-sources). ::: 1. [Install Docker](https://www.docker.com/get-started) and check that your Docker configuration has at least 16 GB RAM (the recommended amount is 32 GB). 1. Check the latest release for Mainnet on the official [Mina GitHub releases](https://github.com/MinaProtocol/mina/releases) page. 1. Use the Mina Rosetta Docker image: :::note If you want to build your own docker image, you can find more details in [Mina's Rosetta repository](https://github.com/MinaProtocol/mina/blob/develop/src/app/rosetta/README.md). However, for most users, it's not necessary to build your own image in order to interact with the API. ::: The container in `/rosetta` includes three entrypoints, which each run a different set of services connected to a particular network. - **docker-start.sh** (default) - connects the mina node to a network (defaults to Mainnet) and initializes the archive database from publicly-available nightly O(1) Labs backups. This script runs a mina node, mina-archive, a postgresql DB, and mina-rosetta. The script also periodically checks for blocks that may be missing between the nightly backup and the tip of the chain and will fill in those gaps by walking back the linked list of blocks in the canonical chain and importing them one at a time. The script is configurable through environment variables. Take a look at the source for more information about what and how you can configure. - **docker-standalone-start.sh** - starts only the mina-rosetta API endpoint and any flags passed into the script go to mina-rosetta. You may use this for the "offline" part of the Construction API or if you want a setup with each service in its own container. - **docker-demo-start.sh** launches a mina node with a very simple 1-address genesis ledger as a sandbox for developing and playing around in. This script starts the full suite of tools (a mina node, mina-archive, a postgresql DB, and mina-rosetta), but for a demo network with all operations occurring inside this container and no external network activity. Run the container with following command (replace the image tag with one from dockerhub that's compatible with the network you are trying to connect to, also replace `--entrypoint` and any environment variable if needed): ``` docker run -it --rm --name rosetta \ --entrypoint=./docker-start.sh \ -p 10101:10101 -p 3085:3085 -p 3086:3086 -p 3087:3087 \ minaprotocol/mina-rosetta:3.3.0-8c0c2e6-bullseye-mainnet ``` You can also create a file with the environment variables and pass it to the docker run command with `--env-file` flag. For example, create a file named `mainnet.env` with the following content: ``` MINA_NETWORK=mainnet PEERS_LIST_URL=https://bootnodes.minaprotocol.com/networks/mainnet.txt MINA_ARCHIVE_DUMP_URL=https://storage.googleapis.com/mina-archive-dumps MINA_GENESIS_LEDGER_URL=https://storage.googleapis.com/o1labs-gitops-infrastructure/mainnet/mainnet.json BLOCKS_BUCKET=https://storage.googleapis.com/mina_network_block_data ``` Then run the container with the following command: ``` docker run -it --rm --name rosetta \ --entrypoint=./docker-start.sh \ -p 8302:8302 -p 3085:3085 -p 3086:3086 -p 3087:3087 \ --env-file mainnet.env \ minaprotocol/mina-rosetta: ``` Example environment files for public networks can be found in [this](https://github.com/MinaProtocol/mina/blob/develop/src/app/rosetta/scripts) directory of Mina's Rosetta repository. :::note - It can take 20 min to 1 hour for your node to sync - Port 8302 is the default P2P port and must be exposed to the open internet - The GraphQL API runs on port 3085 (accessible via localhost:3085/graphql) - PostgreSQL runs on port 3086 - Rosetta runs on port 3087 ::: --- url: /node-operators/rosetta/samples --- # Code Samples These samples use `curl` and [`jq`](https://jqlang.github.io/jq/) to interact with the Rosetta API. They assume a running Rosetta instance on `localhost:3087`. Set these shell variables before running the examples: ```bash ROSETTA_URL="http://localhost:3087" NETWORK='{"blockchain":"mina","network":"mainnet"}' ``` All endpoints except `/network/list` require a `network_identifier` parameter. The samples include it in each request body. :::tip Replace `mainnet` with `devnet` if you are testing against a devnet instance. ::: --- url: /node-operators/rosetta/samples/requests --- # Requests and Responses The Rosetta API specification defines high-level descriptions of request and response objects. Exact JSON layouts differ between blockchains. This page covers Mina-specific objects and shows how to query each endpoint with curl. All examples assume the shell variables from the [Code Samples](/node-operators/rosetta/samples) setup. ## Network endpoints List available networks: ```bash curl -s "$ROSETTA_URL/network/list" \ -H 'Content-Type: application/json' \ -d '{"metadata":{}}' | jq . ``` Sample response: ```json {"network_identifiers":[{"blockchain":"mina","network":"mainnet"}]} ``` You must pass the `network_identifier` object as a parameter to all other endpoints. In Mina's Rosetta implementation, it exists only for the network you run Rosetta for, so this array always contains one object. Get network status (current block height, sync state, peers): ```bash curl -s "$ROSETTA_URL/network/status" \ -H 'Content-Type: application/json' \ -d "{\"network_identifier\":$NETWORK}" | jq . ``` Get supported options and operation types: ```bash curl -s "$ROSETTA_URL/network/options" \ -H 'Content-Type: application/json' \ -d "{\"network_identifier\":$NETWORK}" | jq . ``` ## Block and transaction queries Fetch a block by index: ```bash curl -s "$ROSETTA_URL/block" \ -H 'Content-Type: application/json' \ -d "{\"network_identifier\":$NETWORK,\"block_identifier\":{\"index\":1000}}" | jq . ``` Fetch a block by hash: ```bash curl -s "$ROSETTA_URL/block" \ -H 'Content-Type: application/json' \ -d "{\"network_identifier\":$NETWORK,\"block_identifier\":{\"hash\":\"BLOCK_HASH\"}}" | jq . ``` List pending transactions in the mempool: ```bash curl -s "$ROSETTA_URL/mempool" \ -H 'Content-Type: application/json' \ -d "{\"network_identifier\":$NETWORK}" | jq . ``` ## Account queries Query an account balance: ```bash curl -s "$ROSETTA_URL/account/balance" \ -H 'Content-Type: application/json' \ -d "{ \"network_identifier\":$NETWORK, \"account_identifier\":{\"address\":\"B62qr...\",\"token_id\":\"wSHV2S4qX9jFsLjQo8r1BsMLH2ZRKsZx6EJd1sbozGPieEC4Jf\"} }" | jq . ``` Search for transactions by address: ```bash curl -s "$ROSETTA_URL/search/transactions" \ -H 'Content-Type: application/json' \ -d "{\"network_identifier\":$NETWORK,\"address\":\"B62qr...\"}" | jq . ``` Search for a specific transaction by hash: ```bash curl -s "$ROSETTA_URL/search/transactions" \ -H 'Content-Type: application/json' \ -d "{\"network_identifier\":$NETWORK,\"transaction_identifier\":{\"hash\":\"CkpY...\"}}" | jq . ``` Derive an account address from a public key: ```bash curl -s "$ROSETTA_URL/construction/derive" \ -H 'Content-Type: application/json' \ -d "{ \"network_identifier\":$NETWORK, \"public_key\":{\"hex_bytes\":\"PUBLIC_KEY_HEX\",\"curve_type\":\"pallas\"} }" | jq . ``` ## Operation object In Rosetta terminology, each transaction consists of one or more operations. In Mina's implementation, each operation has: - `operation_identifier` and `related_operations`: a mandatory index, and optional array of related operations - `type`: the operation type - `account`: the account identifier the operation relates to - `amount`: an object with `value` — a signed number representing the balance change
Sample operation JSON ```json { "operation_identifier": { "index": 2 }, "related_operations": [{ "index": 1 }], "type": "payment_receiver_inc", "account": { "address": "B62qqJ1AqK3YQmEEALdJeMw49438Sh6zuQ5cNWUYfCgRsPkduFE2uLU", "metadata": { "token_id": "1" } }, "amount": { "value": "90486110", "currency": { "symbol": "MINA", "decimals": 9 } } } ```
:::note All possible operation types are available from the `/network/options` endpoint. The most common types are `fee_payment`, `payment_source_dec`, and `payment_receiver_inc`. ::: ## Transfer transaction layout A MINA token transfer is represented by three operations (account updates): 1. Decrease fee payer balance (fee payer = sender) 2. Decrease sender balance by the transfer amount 3. Increase receiver balance by the transfer amount
Sample transfer transaction JSON ```json { "transaction_identifier": { "hash": "CkpYVELyYvzbyAwYcnMQryEeQ7Gd6Ws7mZNXpmF5kEAyvwoTiUfbX" }, "operations": [ { "operation_identifier": { "index": 0 }, "type": "fee_payment", "account": { "address": "B62qpLST3UC1rpVT6SHfB7wqW2iQgiopFAGfrcovPgLjgfpDUN2LLeg", "metadata": { "token_id": "1" } }, "amount": { "value": "-37000000", "currency": { "symbol": "MINA", "decimals": 9 } } }, { "operation_identifier": { "index": 1 }, "type": "payment_source_dec", "account": { "address": "B62qpLST3UC1rpVT6SHfB7wqW2iQgiopFAGfrcovPgLjgfpDUN2LLeg", "metadata": { "token_id": "1" } }, "amount": { "value": "-58486000", "currency": { "symbol": "MINA", "decimals": 9 } } }, { "operation_identifier": { "index": 2 }, "related_operations": [{ "index": 1 }], "type": "payment_receiver_inc", "account": { "address": "B62qkiF5CTjeiuV1HSx4SpEytjiCptApsvmjiHHqkb1xpAgVuZTtR14", "metadata": { "token_id": "1" } }, "amount": { "value": "58486000", "currency": { "symbol": "MINA", "decimals": 9 } } } ] } ```
This operations array is what you pass to `/construction/preprocess` and `/construction/payloads` when building a transfer. See [Sending Transactions](send-transactions) for the full flow. --- url: /node-operators/rosetta/samples/scan-blocks --- # Scanning Blocks To poll for new blocks, query `/network/status` for the current block height, then fetch each block sequentially. Get the current block height: ```bash curl -s "$ROSETTA_URL/network/status" \ -H 'Content-Type: application/json' \ -d "{\"network_identifier\":$NETWORK}" | jq '.current_block_identifier.index' ``` Fetch a specific block by index: ```bash BLOCK_INDEX=1000 curl -s "$ROSETTA_URL/block" \ -H 'Content-Type: application/json' \ -d "{\"network_identifier\":$NETWORK,\"block_identifier\":{\"index\":$BLOCK_INDEX}}" | jq . ``` A simple polling loop that waits for new blocks: ```bash HEIGHT=$(curl -s "$ROSETTA_URL/network/status" \ -H 'Content-Type: application/json' \ -d "{\"network_identifier\":$NETWORK}" | jq '.current_block_identifier.index') while true; do BLOCK=$(curl -s "$ROSETTA_URL/block" \ -H 'Content-Type: application/json' \ -d "{\"network_identifier\":$NETWORK,\"block_identifier\":{\"index\":$HEIGHT}}") if echo "$BLOCK" | jq -e '.block' > /dev/null 2>&1; then echo "Block $HEIGHT:" echo "$BLOCK" | jq '.block.transactions[] | .transaction_identifier.hash' HEIGHT=$((HEIGHT + 1)) else sleep 10 fi done ``` --- url: /node-operators/rosetta/samples/send-transactions --- # Sending Transactions :::info This flow follows the [Construction API Overview](https://docs.cloud.coinbase.com/rosetta/docs/construction-api-overview) from the official Rosetta documentation. ::: The steps to send a MINA payment: 1. Derive the account address from a public key 2. Build the unsigned transaction via preprocess → metadata → payloads 3. Sign offline with the [signer tool](/node-operators/mina-signer) 4. Combine the signature into a signed blob 5. Submit the signed transaction ## Prerequisites - A key pair generated with the [offline signer tool](/node-operators/mina-signer) - The account must have a balance (send test funds on devnet first) - Set the shell variables from the [Code Samples](/node-operators/rosetta/samples) setup Set your keys and transfer parameters: ```bash PUBLIC_KEY="YOUR_PUBLIC_KEY_HEX" SENDER="B62q..." RECEIVER="B62q..." TOKEN_ID="wSHV2S4qX9jFsLjQo8r1BsMLH2ZRKsZx6EJd1sbozGPieEC4Jf" FEE=10000000 # 0.01 MINA in nanomina VALUE=1000000000 # 1 MINA in nanomina ``` ## Step 1: Derive account address ```bash curl -s "$ROSETTA_URL/construction/derive" \ -H 'Content-Type: application/json' \ -d "{ \"network_identifier\":$NETWORK, \"public_key\":{\"hex_bytes\":\"$PUBLIC_KEY\",\"curve_type\":\"pallas\"} }" | jq . ``` ## Step 2: Build the operations payload Construct the three operations that represent a MINA transfer (see [Requests and Responses](requests#transfer-transaction-layout) for details on the structure): ```bash OPERATIONS='[ { "operation_identifier":{"index":0}, "type":"fee_payment", "account":{"address":"'"$SENDER"'","metadata":{"token_id":"'"$TOKEN_ID"'"}}, "amount":{"value":"-'"$FEE"'","currency":{"symbol":"MINA","decimals":9}} }, { "operation_identifier":{"index":1}, "type":"payment_source_dec", "account":{"address":"'"$SENDER"'","metadata":{"token_id":"'"$TOKEN_ID"'"}}, "amount":{"value":"-'"$VALUE"'","currency":{"symbol":"MINA","decimals":9}} }, { "operation_identifier":{"index":2}, "related_operations":[{"index":1}], "type":"payment_receiver_inc", "account":{"address":"'"$RECEIVER"'","metadata":{"token_id":"'"$TOKEN_ID"'"}}, "amount":{"value":"'"$VALUE"'","currency":{"symbol":"MINA","decimals":9}} } ]' ``` ## Step 3: Preprocess ```bash PREPROCESS=$(curl -s "$ROSETTA_URL/construction/preprocess" \ -H 'Content-Type: application/json' \ -d "{\"network_identifier\":$NETWORK,\"operations\":$OPERATIONS}") echo "$PREPROCESS" | jq . ``` ## Step 4: Metadata ```bash METADATA=$(curl -s "$ROSETTA_URL/construction/metadata" \ -H 'Content-Type: application/json' \ -d "$(echo "$PREPROCESS" | jq -c ". + { \"network_identifier\":$NETWORK, \"public_keys\":[{\"hex_bytes\":\"$PUBLIC_KEY\",\"curve_type\":\"pallas\"}] }")") echo "$METADATA" | jq . ``` ## Step 5: Payloads (unsigned transaction) ```bash PAYLOADS=$(curl -s "$ROSETTA_URL/construction/payloads" \ -H 'Content-Type: application/json' \ -d "$(echo "$METADATA" | jq -c ". + { \"network_identifier\":$NETWORK, \"operations\":$OPERATIONS }")") echo "$PAYLOADS" | jq . UNSIGNED_TX=$(echo "$PAYLOADS" | jq -r '.unsigned_transaction') ``` ## Step 6: Sign offline Use the [signer CLI tool](/node-operators/mina-signer#signing-a-transaction-with-signer-cli): ```bash SIGNATURE=$(signer sign --private-key "$PRIVATE_KEY" --unsigned-transaction "$UNSIGNED_TX") ``` ## Step 7: Combine ```bash SIGNING_PAYLOAD=$(echo "$PAYLOADS" | jq -c '.payloads[0]') COMBINE=$(curl -s "$ROSETTA_URL/construction/combine" \ -H 'Content-Type: application/json' \ -d "{ \"network_identifier\":$NETWORK, \"unsigned_transaction\":\"$UNSIGNED_TX\", \"signatures\":[{ \"signing_payload\":$SIGNING_PAYLOAD, \"public_key\":{\"hex_bytes\":\"$PUBLIC_KEY\",\"curve_type\":\"pallas\"}, \"signature_type\":\"schnorr_poseidon\", \"hex_bytes\":\"$SIGNATURE\" }] }") SIGNED_TX=$(echo "$COMBINE" | jq -r '.signed_transaction') echo "$COMBINE" | jq . ``` ## Step 8: Get transaction hash ```bash curl -s "$ROSETTA_URL/construction/hash" \ -H 'Content-Type: application/json' \ -d "{\"network_identifier\":$NETWORK,\"signed_transaction\":\"$SIGNED_TX\"}" | jq . ``` ## Step 9: Submit ```bash curl -s "$ROSETTA_URL/construction/submit" \ -H 'Content-Type: application/json' \ -d "{\"network_identifier\":$NETWORK,\"signed_transaction\":\"$SIGNED_TX\"}" | jq . ``` After submission, you can monitor for confirmation using the [block scanning](scan-blocks) approach — poll blocks until your transaction hash appears. --- url: /node-operators/rosetta/samples/track-deposits --- # Tracking Deposits To track deposits, scan each block for `payment_receiver_inc` operations matching your deposit address. Fetch a block and filter for deposits to a specific address: ```bash DEPOSIT_ADDRESS="B62qr..." BLOCK_INDEX=1000 curl -s "$ROSETTA_URL/block" \ -H 'Content-Type: application/json' \ -d "{\"network_identifier\":$NETWORK,\"block_identifier\":{\"index\":$BLOCK_INDEX}}" \ | jq --arg addr "$DEPOSIT_ADDRESS" ' .block.transactions[] | { tx_hash: .transaction_identifier.hash, deposits: [ .operations[] | select(.account.address == $addr and .type == "payment_receiver_inc") | { amount: .amount.value } ] } | select(.deposits | length > 0) ' ``` A continuous deposit monitoring loop: ```bash DEPOSIT_ADDRESS="B62qr..." HEIGHT=$(curl -s "$ROSETTA_URL/network/status" \ -H 'Content-Type: application/json' \ -d "{\"network_identifier\":$NETWORK}" | jq '.current_block_identifier.index') while true; do BLOCK=$(curl -s "$ROSETTA_URL/block" \ -H 'Content-Type: application/json' \ -d "{\"network_identifier\":$NETWORK,\"block_identifier\":{\"index\":$HEIGHT}}") if echo "$BLOCK" | jq -e '.block' > /dev/null 2>&1; then echo "$BLOCK" | jq --arg addr "$DEPOSIT_ADDRESS" ' .block.transactions[] | { tx_hash: .transaction_identifier.hash, deposits: [ .operations[] | select(.account.address == $addr and .type == "payment_receiver_inc") | { amount: .amount.value } ] } | select(.deposits | length > 0) ' HEIGHT=$((HEIGHT + 1)) else sleep 10 fi done ``` --- url: /node-operators/seed-peers/docker-compose --- # Docker Compose Seed Peer This example demonstrates how to run a Mina Seed node using Docker Compose for the Mainnet network. This Docker Compose setup includes a Mina seed node, and a script to generate a libp2p key. Copy and paste the provided configuration into a `docker-compose.yml` file. Then run `docker compose up -d` to start the services, and use `docker compose logs -f` to monitor the logs. ```yaml services: generate_libp2p_key: image: 'minaprotocol/mina-daemon:3.3.0-8c0c2e6-bullseye-mainnet' environment: MINA_LIBP2P_PASS: PssW0rD entrypoint: [] command: > bash -c ' mina libp2p generate-keypair -privkey-path /root/.mina-config/keys/libp2p-key chmod -R 0700 /root/.mina-config/keys chmod -R 0600 /root/.mina-config/keys/libp2p-key ' volumes: - './node/mina-config:/root/.mina-config' mina_node: image: 'minaprotocol/mina-daemon:3.3.0-8c0c2e6-bullseye-mainnet' # image: 'minaprotocol/mina-daemon:4.0.0-6965b50-bullseye-devnet' # Use this image for Devnet restart: always environment: MINA_LIBP2P_PASS: PssW0rD entrypoint: [] command: > bash -c ' mina daemon \ --peer-list-url https://bootnodes.minaprotocol.com/networks/mainnet.txt \ --libp2p-keypair /root/.mina-config/keys/libp2p-key \ --seed ' # use --peer-list-url https://bootnodes.minaprotocol.com/networks/devnet.txt for Devnet volumes: - './node/mina-config:/root/.mina-config' ports: - '8302:8302' depends_on: generate_libp2p_key: condition: service_completed_successfully ``` To retrieve the status of the Mina Node, run `docker compose exec mina_node mina client status` In the client status, you should also see the _Adresses and ports_ section. ```shell Addresses and ports: External IP: 35.197.32.58 Bind IP: 0.0.0.0 Libp2p PeerID: 12D3KooW9wsoTH3RvWJntT8CnQAMKAYgd1DztxumTaeH3TikQ6b3 Libp2p port: 8302 Client port: 8301 ``` Base on the above output, you can build you "relay circuit" address as follows: ```shell /ip4/35.197.32.58/tcp/8302/p2p/12D3KooW9wsoTH3RvWJntT8CnQAMKAYgd1DztxumTaeH3TikQ6b3 ``` If you prefer using a DNS instead of an IP address, you can use the following format: ```shell /dns4/seed.example.com/tcp/8302/p2p/12D3KooW9wsoTH3RvWJntT8CnQAMKAYgd1DztxumTaeH3TikQ6b3 ``` Finally, you can add the relay circuit address the official Mina Seed Peers list by submitting a pull request to the [MinaFoundation/seeds](https://github.com/MinaFoundation/seeds) repository --- url: /node-operators/seed-peers/generating-a-libp2p-keypair --- # Generating a libp2p Key Pair libp2p keypairs are gossip network identities. To ensure connectivity across the network, all seed nodes must start with a **stable** libp2p keypair so that other nodes can reliably connect. :::info libp2p keys are different from wallet keys. To generate a wallet key pair, see [Generating a Key Pair](/node-operators/validator-node/generating-a-keypair). ::: ## Generate the keypair Use the `mina libp2p generate-keypair` command: ```sh mina libp2p generate-keypair --privkey-path ~/keys/my-libp2p ``` :::caution Do not store libp2p keys in the same file as your wallet keys. ::: ## Use the keypair Pass the generated key to the Mina daemon with the `--libp2p-keypair` flag: ```sh mina daemon ... --libp2p-keypair ~/keys/my-libp2p ... ``` See [Seed Peers Getting Started](/node-operators/seed-peers/getting-started) for full seed node configuration. --- url: /node-operators/seed-peers/getting-started --- # Seed Peers Getting Started Seed peers are our helpful allies that make it easy for the rest of us to connect to the network. Most nodes connect to the Mina network using seed peers that are run explicitly as seed nodes. ## Running a Seed Node The two important things about seed nodes: 1. Their address should be static 2. They need high uptime and be able to support many connections -- thus they should avoid doing as much as possible other than "seeding" ### Enforcing and publishing a static address First of all, you need a static host where you'll be running your node. Preferably, you can use DNS and host your seed node at, for example: `seed.o1test.net`. Alternatively, you can also set up a static ipv4 address such as `82.230.217.200`. Secondly, you'll need to select the port that your node is running on. By default, it's on `8302`. Thirdly, you'll want to pregenerate your libp2p keypair -- this is used to identify you on the gossip network. See [Generating a libp2p Key Pair](/node-operators/seed-peers/generating-a-libp2p-keypair) for instructions. Then run your daemon with the `--libp2p-keypair ` and `--seed` flags: Finally you'd publish your DNS address like so: ``` /dns4/seed.o1test.net/tcp/8302/p2p/12D3KooWGDHtsPUS8dZk3x3FUgsXCWwpnSJ6W7EwkWZKBZXczkwC ``` Or a static IP one in this manner: ``` /ip4/82.230.217.200/tcp/8302/p2p/12D3KooWCE97fGwuDCicVNK3ZWF8fVzfNezp3uGjmSc8VrRFem6a ``` This address string can be used for folks to connect to you. ### Tuning your node for uptime and high connections Firstly, don't run block production or SNARK working on this node. Full stop. By doing neither of these things, the surface area for logic executing on this node reduces drastically. It would be preferable to run with a larger `--max-connection` flag. At least 100. You'll still be able to seed with more than 100 nodes in total, it's just that you'll only be able to maintain connections with 100 at once. ## Example Configuration Create a file called `~/.mina-env` to store your private configuration, passwords, etc. ``` MINA_LIBP2P_PASS="My_V3ry_S3cure_Password" LOG_LEVEL=Info FILE_LOG_LEVEL=Debug EXTRA_FLAGS=" --libp2p-keypair --seed --max-connection 100" PEERS_LIST_URL=https://bootnodes.minaprotocol.com/networks/mainnet.txt ``` Please note that `` could change in value depending on where you stored your libp2p keypair from the previous steps. In Docker, the keypath will always be `/keys/filename` due to where volumes are mounted. Follow along as normal with systemctl to start the mina service: ```sh systemctl --user daemon-reload systemctl --user start mina systemctl --user enable mina sudo loginctl enable-linger ``` Run the image with your config and keys mounted into the container: ``` cd ~ docker run --name mina-seed-node -d \ --restart always \ -p 8302:8302 \ -v "$(pwd)/keys:/root/keys:ro" \ -v "$(pwd)/.mina-config:/root/.mina-config" \ -v "$(pwd)/.mina-env:/entrypoint.d/mina-env:ro" \ minaprotocol/mina-daemon:3.3.0-8c0c2e6-bullseye-mainnet \ daemon ``` Make sure to create `~/.mina-env` as described above so that it can be mounted into the Docker container. ## Peers List There will be a peers list hosted with a handful of o1Labs nodes and another much larger handful of addresses from folks unaffiliated with o1Labs. This list is curated for nodes that should be great seed peers and will try their best to keep the list up-to-date as well. ## Alternate Peer Lists We have a decentralized network after all -- we encourage other members in the community to host seed lists. To create a list, please talk to those you trust and use their addresses as seed peers. To consume such alternate lists, you can swap the parameter `--peer-list-file` or `--peer-list-url` to point to another one. --- url: /node-operators/seed-peers --- # About Seed Peers Seed peer providers are an independent group of nodes that assist new nodes to find peers and connect to the Mina Protocol. Seed peers improve the onboarding experience for other nodes and make sure the nodes start bootstrapping as soon as possible. Mina's seed peers are considered to be leaders among the community. They are not compensated in any way - they perform their role as a service to the Mina community. For the full list of seed peers and information on how to contribute, please refer to the [Official Git Repository](https://github.com/MinaFoundation/seeds). - **Mainnet**: https://bootnodes.minaprotocol.com/networks/mainnet.txt - **Devnet**: https://bootnodes.minaprotocol.com/networks/devnet.txt ## Seed Peers This section describes how to run a seed peer on the Mina protocol. - [Getting Started](seed-peers/getting-started) - How to get started running a seed peer. --- url: /node-operators/snark-workers/docker-compose --- # Docker Compose SNARK Workers This example runs a SNARK coordinator and a SNARK worker together using Docker Compose. It includes a one-time init container that generates a wallet key. Save the following as `docker-compose.yml`, then start with `docker compose up -d`. Monitor logs with `docker compose logs -f`. ```yaml services: generate_wallet_key: image: 'minaprotocol/mina-daemon:3.3.0-8c0c2e6-bullseye-mainnet' environment: MINA_PRIVKEY_PASS: PssW0rD entrypoint: [] command: > bash -c ' mina advanced generate-keypair --privkey-path /root/.mina-config/keys/wallet-key chmod -R 0700 /root/.mina-config/keys chmod -R 0600 /root/.mina-config/keys/wallet-key ' volumes: - './node/mina-config:/root/.mina-config' mina_snark_coordinator: image: 'minaprotocol/mina-daemon:3.3.0-8c0c2e6-bullseye-mainnet' restart: always environment: MINA_PRIVKEY_PASS: PssW0rD MINA_CLIENT_TRUSTLIST: "0.0.0.0/0" healthcheck: test: ["CMD-SHELL", "mina client status"] interval: 60s timeout: 10s retries: 100 entrypoint: [] command: > bash -c ' mina daemon \ --peer-list-url https://bootnodes.minaprotocol.com/networks/mainnet.txt \ --snark-worker-fee 0.001 \ --run-snark-coordinator $(cat /root/.mina-config/keys/wallet-key.pub) \ --work-selection rand ' volumes: - './node/mina-config:/root/.mina-config' ports: - '8302:8302' depends_on: generate_wallet_key: condition: service_completed_successfully mina_snark_worker: image: 'minaprotocol/mina-daemon:3.3.0-8c0c2e6-bullseye-mainnet' restart: always entrypoint: [] command: > bash -c ' mina internal \ snark-worker \ --daemon-address \ mina_snark_coordinator:8301 \ --proof-level full ' volumes: - './node/mina-config:/root/.mina-config' depends_on: mina_snark_coordinator: condition: service_healthy ``` ```yaml services: generate_wallet_key: image: 'minaprotocol/mina-daemon:4.0.0-6965b50-bullseye-devnet' environment: MINA_PRIVKEY_PASS: PssW0rD entrypoint: [] command: > bash -c ' mina advanced generate-keypair --privkey-path /root/.mina-config/keys/wallet-key chmod -R 0700 /root/.mina-config/keys chmod -R 0600 /root/.mina-config/keys/wallet-key ' volumes: - './node/mina-config:/root/.mina-config' mina_snark_coordinator: image: 'minaprotocol/mina-daemon:4.0.0-6965b50-bullseye-devnet' restart: always environment: MINA_PRIVKEY_PASS: PssW0rD MINA_CLIENT_TRUSTLIST: "0.0.0.0/0" healthcheck: test: ["CMD-SHELL", "mina client status"] interval: 60s timeout: 10s retries: 100 entrypoint: [] command: > bash -c ' mina daemon \ --peer-list-url https://bootnodes.minaprotocol.com/networks/devnet.txt \ --snark-worker-fee 0.001 \ --run-snark-coordinator $(cat /root/.mina-config/keys/wallet-key.pub) \ --work-selection rand ' volumes: - './node/mina-config:/root/.mina-config' ports: - '8302:8302' depends_on: generate_wallet_key: condition: service_completed_successfully mina_snark_worker: image: 'minaprotocol/mina-daemon:4.0.0-6965b50-bullseye-devnet' restart: always entrypoint: [] command: > bash -c ' mina internal \ snark-worker \ --daemon-address \ mina_snark_coordinator:8301 \ --proof-level full ' volumes: - './node/mina-config:/root/.mina-config' depends_on: mina_snark_coordinator: condition: service_healthy ``` To scale additional workers, duplicate the `mina_snark_worker` service with a different name (e.g. `mina_snark_worker_2`). --- url: /node-operators/snark-workers/getting-started --- # SNARK Workers Getting Started :::note Before following this guide, complete the Validator Node setup — from [Requirements](/node-operators/validator-node/requirements) through [Connect to Mainnet or Devnet](/node-operators/validator-node/connecting-to-the-network). You should have a synced node and a [key pair](/node-operators/validator-node/generating-a-keypair) before proceeding. ::: There are two modes for running SNARK work: - **Embedded worker** — the daemon runs a single SNARK worker internally. Simpler to set up, no external processes needed. - **Coordinator with external workers** — the daemon runs a SNARK coordinator that distributes work to one or more external SNARK worker processes. Use this to scale across multiple machines or cores. In both modes, the daemon also participates in the network as a normal validator. ## Embedded SNARK worker Run the daemon with `--run-snark-worker` to produce SNARK proofs directly within the daemon process: ```sh mina daemon \ --peer-list-url https://bootnodes.minaprotocol.com/networks/mainnet.txt \ --run-snark-worker $SNARK_WORKER_PUBLICKEY \ --snark-worker-fee 0.001 \ --work-selection seq ``` | Flag | Description | |--|--| | `--run-snark-worker` | Public key to receive SNARK work fees | | `--snark-worker-fee` | Fee (in MINA) to charge per SNARK proof | | `--work-selection` | Work selection method: `seq`, `rand`, or `roffset` | | `--snark-worker-parallelism` | Number of threads for SNARK work (does not affect block production) | ## Coordinator with external workers ### Start the coordinator Run the daemon with `--run-snark-coordinator`. The coordinator distributes work to external SNARK worker processes, propagates the generated proofs to the network, and sets the public key that receives SNARK work fees from those workers: ```sh mina daemon \ --peer-list-url https://bootnodes.minaprotocol.com/networks/mainnet.txt \ --run-snark-coordinator $SNARK_WORKER_PUBLICKEY \ --snark-worker-fee 0.001 \ --work-selection seq ``` | Flag | Description | |--|--| | `--run-snark-coordinator` | Public key to receive SNARK work fees from external workers | | `--snark-worker-fee` | Fee (in MINA) to charge per SNARK proof | | `--work-selection` | Work selection method: `seq`, `rand`, or `roffset` | ### Connect workers to the coordinator :::caution The protocol between the coordinator and workers is not secure. Only run workers on the same intranet as the coordinator — do not expose the coordinator port to the public internet. ::: On each worker machine, run: ```sh mina internal snark-worker \ --proof-level full \ --shutdown-on-disconnect false \ --daemon-address ``` The default coordinator port is `8301`. Use `--snark-worker-parallelism` on the worker to set the number of threads used for SNARK work. For a Docker Compose example that sets up a coordinator and worker together, see [Docker Compose Example](/node-operators/snark-workers/docker-compose). ## Related - [Mina CLI Reference](/node-operators/reference/mina-cli-reference) — Full `mina daemon` command reference - [FAQ: SNARKs and SNARK Workers](/node-operators/faq#snarks-and-snark-workers) — Common questions about SNARK pricing, fees, and performance --- url: /node-operators/snark-workers --- # SNARK Workers While most protocols have one primary group of node operators (miners, validators, or block producers), Mina has a second group — **SNARK workers**. These nodes produce [zk-SNARK](/glossary#zk-snark) proofs of transactions, which keep the Mina blockchain at a constant size instead of growing over time. A **SNARK coordinator** can distribute work across a pool of SNARK workers. Deep knowledge of zk-SNARKs is not required to run a SNARK worker, but for background see the [What are zk-SNARKs?](https://minaprotocol.com/blog/what-are-zk-snarks) primer. ## Next steps - [Getting Started](/node-operators/snark-workers/getting-started) — Run a SNARK worker or coordinator - [Docker Compose Example](/node-operators/snark-workers/docker-compose) — Run a coordinator and worker with Docker Compose - [FAQ: SNARKs and SNARK Workers](/node-operators/faq#snarks-and-snark-workers) — Common questions about SNARK pricing, fees, and performance --- url: /node-operators/troubleshooting --- # Troubleshooting Here are some common problems you might encounter while trying to set up the Mina daemon. If you can't find your issue here please ask for help on [Discord](https://bit.ly/MinaDiscord) or open an issue on [Github](https://github.com/MinaProtocol/mina/issues). - [General](#general) - [Syncing a node](#syncing-a-node) - [Networking](#networking) - [Accounts and Transactions](#accounts-and-transactions) - [Block producer](#block-producer) - [SNARK worker](#snark-worker) - [Logging](#logging) ## General ### My node crashes every few minutes? If the node crashes quickly and repeatably, this is likely a configuration issue such as incorrect permissions on the private key, failing to find peers due to incorrectly passing the peers.txt file, an incorrect password or special characters in the password. The last few lines of the logs should provide more information on the issue. ### I closed my SSH terminal, and the node crashed? If you start the mina daemon in the foreground, once you detach from it, it will shut down (via a SIGINT signal). To run the process in the background so that you may detach, you have many options: - Start the daemon with the `-background` flag. - Run as a systemd service (see [the docs](/node-operators/validator-node/connecting-to-the-network#running-mina-node-as-a-service)). - Run with Docker (see [the docs](/node-operators/validator-node/connecting-to-the-network#running-mina-node-as-a-service)). - Run the daemon in a terminal multiplexer such as screen or [tmux](https://icohigh.gitbook.io/mina-node-testnet/english/setting-up-tmux) that you can detach from to keep the process running. Running as a service / via Docker is recommended as they have the advantage of automated restarts if your node crashes. ### What permissions are required for the keys directory? The `keys` directory should have 700 permissions, and the private key file 600. For example, these commands update the permissions when the keys directory is contained within your home directory and your private key file is named `my-wallet`: ``` chmod 700 ~/keys chmod 600 ~/keys/my-wallet ``` ### Can I run on a Raspberry Pi / ARM-based device? No. Only x86-64 is supported and not ARM. ### I have special characters in my password, and it is giving an error? You should use quotes around the password i.e. `"MY_PASSWORD"` and/or you can escape the special characters such as `$` in the password using the `\` character. ### I get a permissions error when running the docker command? Add the current user to the docker group as per [this article](https://docs.docker.com/engine/install/linux-postinstall/). You could prefix the command with `sudo`, but this is not recommended. ### I see monitor.ml.Error "Timed out getting connection from process" on macOS? If you're running Mina on macOS and see the following time out error `monitor.ml.Error "Timed out getting connection from process"`, you'll need to add your hostname to `/etc/hosts` by running the following: - $ `hostname` to get your hostname - Open the `/etc/hosts` file and add the mapping: ``` ## # Host Database # # localhost is used to configure the loopback interface # when the system is booting. Do not change this entry. ## 127.0.0.1 localhost 127.0.0.1 This is necessary because sometimes macOS doesn't resolve your hostname to your local IP address. ``` ### What hardware do I need? See the requirements for the current network [here](/node-operators/block-producer-node/getting-started). Some lower-tier VPS providers may have an issue producing blocks within the slot time. If you continue to experience missing blocks, you may wish to try on more powerful hardware. ### I would like the mina service to start on boot? If you use `systemd` to manage the Mina daemon then it will not automatically restart on a reboot of the machine. You can manually run the service with `start` via `systemctl --user start mina` or start the service automatically at boot with `enable` by using `systemctl --user enable mina`. ### What should I add for MINA_PRIVKEY_PASS? When you generated a keypair, you created a password. Use the password you created for the value of `MINA_PRIVKEY_PASS`. ### I get an error about ~/.mina-config/daemon.json missing? This is an optional file to pass [configuration options](/node-operators/reference/mina-cli-reference#mina-daemon) to the daemon (rather than passing via the command line). The daemon looks for it by default, which results in an error if you do not include it. Just ignore this error (unless you are trying to include it) as it is not fatal, and the daemon will start as per normal. ### I see messages about prover/verifier being killed periodically This is normal, and these processes are currently periodically killed and restarted. Ignore these messages unless they result in a fatal error/crash. ### I crashed with "Fatal error: out of memory"? This is a common issue - see [this issue](https://github.com/MinaProtocol/mina/issues/6851) on GitHub and add any relevant information with logs and restart your node. ### Can I provide my password using an environment variable? Yes. Set the `MINA_PRIVKEY_PASS` environment variable to be your password. ### I am trying to install on Ubuntu 20.04 / Debian 10 and get dependency errors? See this [guide for ubuntu 20.04](https://discordapp.com/channels/484437221055922177/583400552487059546/822269019687354418) on Mina Protocol Discord to manually resolve the required dependencies. Alternatively, use a [supported OS](https://github.com/MinaProtocol/mina/releases) or use Docker. ## Syncing a node ### I am stuck at block height of 1 and a max observed block length of 1 The output of `mina client status` outputs similar to the following: ``` Block height: 1 Max observed block length: 1 ``` This issue was fixed by the release `9652f8ee092ea77e29f5ab49fa0a295e36743e8b`, please ensure you have upgraded. It is normal to see a height of 1 while the daemon initializes. It could take several minutes (20 mins to an hour) before the node progress to the catchup phase. ### My "Max observed block length" is 1 but my block height is correct? This issue was fixed by the release `9652f8ee092ea77e29f5ab49fa0a295e36743e8b`, please ensure you have upgraded. After upgrading make sure you let the daemon run (20 mins to an hour), and the error should resolve itself. ### My node is stuck in catchup / the block height does not update When the node is synced, **Block height** should be equal to **Max observed block length**, as seen in the output of `mina client status` and should match the current height of the network, as shown in the screenshot below: ![Syncing a node](https://i.imgur.com/iWJTYTr.png) When starting the node, and the node is in a bootstrap/catchup state, the block height will display 1 or a number that is a few hundred blocks from the current best block length (but much greater than 1). During catchup, the block height will not incrementally update, other than when new blocks are produced and will jump to the correct height when catchup is complete. So be patient; this process can take several hours to complete and does vary depending on the hardware used. ### I synced at height 1 / not at the current height of the network? What matters is that your current blockchain length, as seen in `mina client status`, is equal to the current network height. If your node is reporting it is synced at the wrong height, it should eventually enter the catchup phase to get the node to the correct height. You may occasionally switch between catchup and synced if the network sees any short forks it tries to catch up to. ### Why does my blockchain height jump to 1000+ and then get stuck? We only need the last `k` (290) blocks of the blockchain to produce blocks. So once bootstrap is completed, the root of the transition frontier (essentially your local store of blocks) should be the current maximum height minus `k` (290). The part of the syncing process that takes significant time is downloading those missing `k` blocks, which is the role of **catchup**. During catchup, you won't see your block height increase (other than new blocks produced on the network) until it jumps to the current height and is synced. This takes time, so leave it running! ### My sync status is offline? This status indicates that you have not received any messages from peers for the last ~24 minutes. Ensure that you use the `--peer-list` argument that points to `https://bootnodes.minaprotocol.com/networks/mainnet.txt` See [Connect to Mainnet](/node-operators/validator-node/connecting-to-the-network). ## Networking ### My hosting provider is warning me: "Abuse message: Netscan detected" There is some behavior with our p2p networking module that triggers this warning on some hosting providers (specifically we've heard this happening with Hetzner). To mitigate this configure your firewall to allow traffic from ssh, http, https and deny outgoing traffic to all private ip addresses. Here is an example of this using the [ufw](https://help.ubuntu.com/community/UFW#UFW_-_Uncomplicated_Firewall) firewall tool. Thanks Ducca for sharing these rules and confirming they fix the issues on Hetzner. Allow SSH, HTTP, HTTPS porst: ``` ufw allow 22 ufw allow 80 ufw allow 443 ufw enable ``` Block outgoing private connection: ``` ufw deny out from any to 10.0.0.0/8 ufw deny out from any to 172.16.0.0/12 ufw deny out from any to 192.168.0.0/16 ufw deny out from any to 100.64.0.0/10 ufw deny out from any to 198.18.0.0/15 ufw deny out from any to 169.254.0.0/16 ``` See [this issue](https://github.com/MinaProtocol/mina/issues/7053) for more details. ### What ports need to be open? The only port required to be open for the daemon to communicate with peers is TCP port `8302`. The client port `8301` should **never** be exposed to the internet. There may be outdated references to other ports that were once used before but are no longer required. ### Node fails with "Failed to find any peers, crashing as this is not a seed node"? Ensure that you use the `--peer-list` argument that points to `https://bootnodes.minaprotocol.com/networks/mainnet.txt` See [Connect to Mainnet](/node-operators/validator-node/connecting-to-the-network). ### I get an error couldn't determine our IP from the internet? If you see `couldn't determine our IP from the internet, use --external-ip` flag, then the daemon failed to determine its own IP from [these service providers](https://github.com/MinaProtocol/mina/blob/056d0203722ddfec1c7ad216846434648cd7af5e/src/app/cli/src/find_ip.ml#L7-L11). Your firewall may be blocking HTTP/S requests, or you have a misconfigured network connection. To bypass this, pass in the flag `-external-ip ` when starting the Mina daemon. To get your external IP address, run `curl ifconfig.me`. ### Do I need to configure port forwarding manually? The Mina node does its best to configure itself to be able to connect to the outside world without you needing to do any extra work. However, this may fail, depending on your router and network setup. In this case, you may have to manually forward the external-port. A common cause of this is routers not supporting UPnP, a protocol that allows the node to configure the port forwarding automatically. If you experience this type of problem, find your router model and search for ` port forwarding` and follow the instructions to forward the ports from your router to your device running the Mina node. You'll need to open the TCP port `8302` by default. Note: When running Mina in the cloud, you should instead configure security groups for your cloud provider. ### Do I need to allow "Accept incoming connections" If you see one or more warnings like the below, then choose "Allow": ``` Do you want the application "mina" to accept incoming network connections? ``` ## Accounts and Transactions ### What fee should I use to send a transaction / my transaction is stuck as pending? Transactions that are included in blocks are prioritized by their transaction fees. If many transactions are pending, then the highest fee transactions will be included first. So, increasing your fees is the best way to ensure that your transaction is included. To view the transaction pool on a running node, you can use the following command (you will need to install `jq,` which is used to format the output of the following command, e.g., `sudo apt install jq`): ``` mina advanced pooled-user-commands | jq . | grep fee | sort | uniq -c | sort -n 1 "fee": "0.031", 5 "fee": "0.1", ``` If there are many transactions in the pool, you may need to increase your fee. For a visual overview of transaction fees, see [here](https://minascan.io/mainnet/home). If you have a stuck transaction due to a low fee, you will have to wait for it to be included in a block or to be evicted from the transaction pool as there is currently no way to cancel a transaction due to this [known issue](https://github.com/MinaProtocol/mina/issues/6605). ### How many transactions can be included in a block? On the current network, this is 128, which also includes the coinbase transaction as well as any fee transfers to pay SNARK workers. ### Can I cancel a transaction? You can cancel pending transactions. See [Mina Client](/node-operators/reference/mina-cli-reference#mina-client) or wallet instructions. ### I sent a transaction, but it was never included in a block? See [this answer](#what-fee-should-i-use-to-send-a-transaction--my-transaction-is-stuck-as-pending). The transaction was likely stuck as pending and then eventually evicted from the transaction pool. Try sending again. ### Why is the coinbase 0 / there are no transactions included in a block? In certain circumstances, there is no SNARK work available to be purchased or is too expensive to be purchased. In this case, it may not be possible to include a coinbase transaction, and so there is no coinbase awarded for the block. If transactions are not being included, the transaction fees likely do not cover the cost of the SNARK work required to be purchased to offset, including the transactions. ### Does the order of sending transactions matter? Yes, transactions are processed in order according to the nonce associated with the transaction. So, if you send a transaction that is stuck, with, for example, a low fee, all following transactions will also be stuck regardless of the fees used in the later transactions. Try to cancel the stuck transaction. ### Why does my account say "locked"? If the output of `mina accounts list` shows your account is locked, this means that you need to unlock it using your private key password in order to use it to send transactions. To unlock, simply use the `mina accounts unlock --public-key` command. A block producer does **not** need the account to be unlocked to produce blocks. ### What are time-locked accounts? Why are some accounts time locked and others are not? See [Time-Locked Accounts](/mina-protocol/time-locked-accounts). ### Can I send a payment before I am synced? Yes, but only if you have funds already in the ledger. If you requested funds from, e.g. the faucet or another community member, you will need to wait until you are synced so that you have a balance you can use to send. ### Error: Specified sender is not in the ledger or sent a transaction in transaction pool when sending a transaction See [this answer](#can-i-send-a-payment-before-i-am-synced). You will need to wait until you are synced if you do not have an existing balance in the ledger. ### I am running a block producer, but I don't see anything in mina accounts list? If you started the daemon passing the `block-producer-key` flag, then you still need to import the account to the daemon in order to send a transaction. To do so, use the `mina accounts import --privkey-path` command, passing in the location of the private key file. ## Block producer ### How do I run a block producer? The methods to start a node [in the documentation](/node-operators/validator-node/connecting-to-the-network) will run a block producer by default. ### How do I know if I am running a block producer To check the status of your block producer, run `mina client status` and look for the lines **Block producers running**. You should see a value of 1 and also your public key. ![Running a block producer](https://i.imgur.com/IsXZcXN.png) The line **Next block will be produced in** lets you know the next time you have won a slot to produce a block. If you have not won any further blocks in the epoch, a message "None this epoch..." will be displayed and will only update once a new epoch starts. ### How can I increase my chance of winning a block? The chance of winning a block is determined by a Verifiable Random Function (VRF), with the chance of winning a block being proportional to your stake. The VRF will always return the same result no matter how many times it is run, so there is no way of improving your chance of winning a block. Other than your staking balance, it is down to luck. The stake associated with your public key is determined in advance at the start of an epoch. There is a delay in it being considered, so receiving funds, block rewards, delegating other funds, and SNARK worker rewards will **not** improve your chance of winning a block in this epoch as these funds will not be considered in the staking ledger for at least another full epoch (~2 weeks). ### Why was my block orphaned? Why did I not get a block reward? There can be more than one block producer per slot due to the way block producers are selected. So if two (or more) blocks are produced for the same slot, it will cause a short fork, and only one will be chosen - the winner in this instance is random based on the VRF output for each block producer. If you consistently see orphaned blocks, then you may be producing blocks slowly, and so other block producers may not see your block before building atop the current longest chain. It is also possible to produce a block in catchup, and this block will also be quickly orphaned as it is not building on the correct height. ### Why did I not produce a block or miss a slot? There are a few reasons why you could miss a slot / not successfully produce a block, for example, the node restarting and being in bootstrap at the time of producing a slot. Also, you must produce a block within the slot time (90 seconds). If you are on less powerful hardware or the daemon is competing for resources, it may not produce the block in time. In this instance, you should find in your logs: `Internally generated block $state_hash cannot be rebroadcast because it's not a valid time to do so ($timing)` It is not recommended to run a SNARK worker on the same machine at the same time you are producing a block as the SNARK worker is resource-intensive and may lead to the block not being produced in time. You can disable the SNARK worker during block production by, for example, using the [SNARK stopper script](https://github.com/c29r3/mina-snark-stopper). ### Why is the block rate so low / how often should there be a block? A slot on the current network is every 90 seconds, though not all slots should have a block produced, so on average, we would expect a block every 2 mins. However, not all the stake is online and active in producing blocks, and so not all slots will have a block, and sometimes there can be long delays between blocks. As more of the stake is online and staking, this situation improves. ### Why does o1Labs win most of the blocks? To keep the network stable, o1Labs has 30% of the stake, so has a much greater probability of winning a slot and producing a block. Users who were given a balance of 66,000 mina have about a 0.1% chance of winning any particular slot, so should expect a block every couple of days, but luck plays a major factor in how often you will win a block. ### How do I know if I won a block or a transaction went through? The easiest way is to check a [block explorer](https://minascan.io/mainnet/home). You can also get this information for recent blocks via the [GraphQL API](https://minaprotocol.com/docs/node-developers/graphql-api). ### Why do I have a message of "No blocks won this this epoch"? See [this answer](#how-can-i-increase-my-chance-of-winning-a-block). ## SNARK worker ### My SNARK work is not getting bought. What fee should I use for a SNARK worker? If you are running a SNARK worker and not seeing any work being included in blocks, then likely others are producing cheaper SNARK work. Multiple SNARK workers are all competing for the same SNARK work, with only the lowest fee for each being included in the SNARK pool to be bought by block producers. Sometimes high fees will be included in blocks, and this is a function of how SNARK workers select which work to complete and which work is required to be purchased by the block producer. By default, the work selection for a SNARK worker is random. You can change this by adding the `-work-selection` flag to the `mina daemon` command: `-work-selection seq` will work on jobs in the order required to be included from the scan state and will likely result in your snarks being included without a potentially lengthy delay; `-work-selection roffset` functions similarly to the `seq` option, but it begins processing jobs from a random offset instead of starting with the first job indicated by the scan state. For choosing fees, you can look at historical blocks to determine prices that have been bought. ### How can I disable the SNARK worker? Run `mina client set-snark-worker` to disable the SNARK worker. To enable again, pass your public key `mina client set-snark-worker --address `. ### Can I run a SNARK worker and block producer on the same machine? Yes, you can, but you should stop the snark worker during block production so as not to compete for resources and miss producing a block. SNARK workers also consume more resources in general. See the [snark stopper script](https://github.com/c29r3/mina-snark-stopper) to help in automating this. ## Logging ### I see weird messages/errors in the logs? The logs are noisy and often contain "scary" looking messages such as failure to connect etc. As a general rule, if the message is not fatal and the node does not crash, it is likely nothing to be worried about. The below messages are all considered "normal": ``` "RPC #841 failed: \"internal RPC error error: unknown stream_idx\"" "Peer $peer didn't have enough information to answer ledger_hash query. See error for more details: $error" "Timed out waiting for the parent of $cached_transition after 0 ms, signalling a catchup job" "Failed to reset stream (this means it was probably closed successfully): $error error: { "string": "RPC #365 failed: \"internal RPC error error: unknown stream_idx\"" } ``` ### How can I get my logs running as a service? `journalctl --user -u mina -n 1000 -f` ### How do I get my logs running Docker? `docker logs --follow mina` ### How do I get my logs running the daemon manually? `tail -f ~/.mina-config/mina.log` ### How many logs are kept / where are the logs located? The `~/.mina-config` directory contains the Mina logs, see [Logging](/node-operators/validator-node/logging). This directory contains the following: - `mina.log` - This file contains the latest logs of the daemon. Each log file is limited to 10 MiB in size and rotates through 50 log files. Rotated log files are named `mina.log.x` from `mina.log.0` to `mina.log.50`. - `mina-best-tip.log` - This is used to write the best tip logs to make it easier to collect the required logs from nodes to determine the state for a hard fork. Each file is limited to 5 MiB and rotates through a maximum of 5 files from` mina-best-tip.log.0` to `mina-best-tip.log.5`. - `mina-prover.log` - This logs memory usage and batch size of the prover and is limited to 128 MiB and rotates via a single log file. - `mina-verifier.log` - This logs memory usage and batch size of the verifier and is limited to 128 MiB and rotates via a single log file. - `mina.version` - This file contains the Git SHA of the running daemon. --- url: /node-operators/validator-node/connecting-to-the-network --- # Connect to Mainnet or Devnet Use this guide to connect a node to either network and verify connectivity. If you're using Ubuntu or Debian, first follow the [installation guide](/node-operators/validator-node/installing-on-ubuntu-and-debian), then return to this page for node startup. ## Standalone node ### Start **Note:** A known issue exists with the Hetzner hosting provider. If you are using Hetzner, follow the [Networking troubleshooting](/node-operators/troubleshooting#my-hosting-provider-is-warning-me-abuse-message-netscan-detected) guidance before starting a node. ```sh mina daemon --peer-list-url https://bootnodes.minaprotocol.com/networks/mainnet.txt ``` Devnet is for testing and experimentation. MINA on Devnet has no real value. ```sh mina daemon --peer-list-url https://bootnodes.minaprotocol.com/networks/devnet.txt ``` ### Stop In a new terminal, run: ```sh mina client stop-daemon ``` ## Running mina node as a service Configure your node to keep running after logout, restart on reboot, and auto-restart on crash or clean exit: - **Systemd** — the Mina systemd unit ships with `Restart=always` by default, so the daemon is restarted automatically after a crash or a clean exit (e.g. the hard-fork stop-slot shutdown). No extra configuration is required. - **Docker** — pass `--restart=always` (or `--restart=unless-stopped`) when creating the container. The default (`no`) will **not** restart the daemon. ### Start the service Create `~/.mina-env` and set options as needed: ```sh MINA_PRIVKEY_PASS="My_V3ry_S3cure_Password" LOG_LEVEL=Info FILE_LOG_LEVEL=Debug ``` Start and enable the service: ```sh systemctl --user daemon-reload systemctl --user start mina systemctl --user enable mina sudo loginctl enable-linger ``` Prepare directories: ```sh cd ~ mkdir -p ~/.mina-config ``` Create `~/.mina-env`: ```sh export MINA_PRIVKEY_PASS="My_V3ry_S3cure_Password" LOG_LEVEL=Info FILE_LOG_LEVEL=Debug PEER_LIST_URL=https://bootnodes.minaprotocol.com/networks/mainnet.txt ``` ```sh export MINA_PRIVKEY_PASS="My_V3ry_S3cure_Password" LOG_LEVEL=Info FILE_LOG_LEVEL=Debug PEER_LIST_URL=https://bootnodes.minaprotocol.com/networks/devnet.txt ``` Run the container: ```sh docker run --name mina-node -d \ -p 8302:8302 \ --restart=always \ -v $(pwd)/.mina-env:/entrypoint.d/mina-env:ro \ -v $(pwd)/keys:/keys:ro \ -v $(pwd)/.mina-config:/root/.mina-config \ minaprotocol/mina-daemon:3.3.0-8c0c2e6-bullseye-mainnet \ daemon ``` ```sh docker run --name mina-node -d \ -p 8302:8302 \ --restart=always \ -v $(pwd)/.mina-env:/entrypoint.d/mina-env:ro \ -v $(pwd)/keys:/keys:ro \ -v $(pwd)/.mina-config:/root/.mina-config \ minaprotocol/mina-daemon:4.0.0-6965b50-bullseye-devnet \ daemon ``` ### Stop the service ```sh systemctl --user stop mina ``` ```sh docker stop mina-node ``` ## Monitor the mina client status ```sh mina client status ``` ```sh docker exec -it mina-node mina client status ``` On first bootstrap, expect the following timeline: | Time after start | Expected status | |--|--| | 0 – ~5 min | `mina client status` may fail to connect while the daemon initializes | | ~5 – ~25 min | `Sync Status: Bootstrap` then `Sync Status: Catchup` | | ~30 min | `Sync Status: Synced` | Subsequent restarts sync faster when the on-disk cache in `~/.mina-config` is preserved. For Docker, ensure `/root/.mina-config` is mounted to a persistent host volume. ## Step up your game Once synced, continue with [Sending a Payment](/mina-protocol/sending-a-payment) and [Staking and Snarking](/node-operators/validator-node/staking-and-snarking). --- url: /node-operators/validator-node/generating-a-keypair --- # Wallet Key Pair To use Mina on Mainnet or to fully participate in a Mina test network, the first step is to generate a wallet key pair that consists of a public key and a private key. The public key identifies each block producer on the network. In some cases, you want to generate more than one wallet key pair. For example, to run a block producer most securely, it is advisable to have accounts on both hot and cold wallets. See [Hot and Cold Block Production](/node-operators/block-producer-node/hot-cold-block-production). Always give out your public keys. Mina will never ask you for your private keys. Be sure that your private keys are stored safely. :::caution Never give out your private key. ::: If you lose your private key or if a malicious actor gains access to your private key, you will lose access to your account and lose your account funds. ## Generate a wallet keypair The supported tools for generating wallet key pairs are: - [mina advanced generate-keypair](#using-mina-advanced-generate-keypair) command - [Ledger Hardware Wallet](#ledger-hardware-wallet) - [Mina Signer](#mina-signer) - [Mina command line wallet package](https://github.com/jspada/ledger-app-mina/blob/v1.0.0-beta.2/README.md#command-line-wallet) that interfaces with your Ledger device and Mina blockchain to generate addresses on the Ledger hardware wallet ### Using mina advanced generate-keypair #### Preparations 1. Create a folder on your system where you can store the key files. By convention, the `~/keys` folder: ```sh mkdir ~/keys ``` 2. Ensure the permissions are set properly for this folder to prevent unwanted processes from accessing these files: ```sh chmod 700 ~/keys ``` :::caution Make sure to set a new and secure password for the commands below. Mina will never ask you for this password. Do not share this password with anyone. ::: #### Using Docker If you don't have Mina installed locally, you can use Docker. Start an interactive shell with your keys directory mounted: ```sh docker run -it --rm --entrypoint /bin/bash \ --volume "$YOUR_KEY_DIR":/root/keys \ minaprotocol/mina-daemon:3.3.0-8c0c2e6-bullseye-mainnet ``` All `mina` commands below can then be run directly inside the container. #### Generate your wallet keypair Run the `mina advanced generate-keypair` command: ```sh mina advanced generate-keypair --privkey-path ~/keys/my-wallet ``` When prompted, type in the password you intend to use to secure this key. Do NOT forget this password. If already set, the tool uses the password from the `MINA_PRIVKEY_PASS` environment variable instead of prompting you. Two files are created for your public/private key pair: - `~/keys/my-wallet`: the encrypted private key - `~/keys/my-wallet.pub`: the public key in plain text Finally, ensure the permissions are set properly for the private key file to prevent unwanted processes from accessing it. ```sh chmod 600 ~/keys/my-wallet ``` Be sure to store the private key file and password you used in a secure place, such as a password manager. ### Ledger Hardware Wallet You can use your [Ledger Nano S](https://www.ledger.com/) hardware wallet to securely store your Mina private keys. To get started, install the Mina app on the [Ledger Hardware Wallet](/using-mina/ledger-hardware-wallet). ### Mina Signer You can also use [Mina Signer](/node-operators/mina-signer) to generate key pairs and sign transactions. ## Validate your private key Now that you've created your key, validate that it works. Use the `mina advanced validate-keypair` command to verify that you can sign a transaction. ```sh mina advanced validate-keypair --privkey-path ~/keys/my-wallet ``` ## Next steps Now that you have created a public/private key pair, you are ready to [connect to the network](/node-operators/validator-node/connecting-to-the-network) or share your public key. --- url: /node-operators/validator-node --- # Validator Node The essentials for running a Mina validator node. This section covers everything you need to set up and operate a basic Mina validator node — from initial requirements through day-to-day operations. ## Setup 1. **[Requirements](/node-operators/validator-node/requirements)** -- Hardware, software, and network requirements for each node type. 2. **[Installing on Ubuntu and Debian](/node-operators/validator-node/installing-on-ubuntu-and-debian)** -- Install Mina packages for Mainnet or Devnet on Ubuntu and Debian. 3. **[Generating a Key Pair](/node-operators/validator-node/generating-a-keypair)** -- Generate wallet and libp2p key pairs needed for node operation. 4. **[Connect to Mainnet or Devnet](/node-operators/validator-node/connecting-to-the-network)** -- Start your validator and connect it to the target network. ## Operations 5. **[Staking and Snarking](/node-operators/validator-node/staking-and-snarking)** -- Participate in consensus through staking, delegate MINA, and configure SNARK workers. 6. **[Querying Data](/node-operators/validator-node/querying-data)** -- Query blockchain data from your running node via GraphQL. 7. **[Logging](/node-operators/validator-node/logging)** -- Understand log files, log levels, and how to export logs for debugging. ## Next Steps Once your validator is running, explore advanced node configurations: - [Block Producer](/node-operators/block-producer-node) -- Produce blocks and earn rewards - [SNARK Worker](/node-operators/snark-workers) -- Generate zk-SNARKs and earn fees - [Archive Node](/node-operators/archive-node) -- Maintain historical blockchain data --- url: /node-operators/validator-node/installing-on-ubuntu-and-debian --- # Installation Supported environments include Linux (Debian 10, 11, 12 and Ubuntu 20.04, 22.04 and 24.04), any host with Docker, and macOS (build from source). The binary download is around 1 GB. For pre-release builds, see the [Mina Releases](https://github.com/MinaProtocol/mina/releases) page on GitHub. ## Install by platform ### Ubuntu and Debian ```sh sudo rm /etc/apt/sources.list.d/mina*.list echo "deb [trusted=yes] http://packages.o1test.net $(lsb_release -cs) stable" | sudo tee /etc/apt/sources.list.d/mina.list sudo apt-get update sudo apt-get install --yes curl unzip mina-mainnet=3.3.0-8c0c2e6 ``` ```sh sudo rm /etc/apt/sources.list.d/mina*.list echo "deb [trusted=yes] http://packages.o1test.net $(lsb_release -cs) alpha" | sudo tee /etc/apt/sources.list.d/mina-devnet.list sudo apt-get install --yes apt-transport-https sudo apt-get update sudo apt-get install --yes curl unzip mina-devnet=3.3.0-alpha1 ``` ### Docker Docker is cross-platform (Linux, macOS, Windows). Install Docker from [Get Docker](https://docs.docker.com/get-docker/), then follow the [Connect to the Mina Network](/node-operators/validator-node/connecting-to-the-network) instructions to run the daemon as a container. ### Windows Windows is not natively supported. Use the [Docker](#docker) instructions instead. ### macOS No pre-built packages are available for macOS. Use [Docker](#docker) or [build from source](#build-from-source). ### Build from source On Linux or macOS, you can build from source by following the [Building Mina](https://github.com/MinaProtocol/mina/blob/master/README-dev.md#building-mina) instructions. ## Verify your installation ```sh mina version ``` The output should include a `Commit` line. ## Next steps - [Generating a Wallet Key Pair](/node-operators/validator-node/generating-a-keypair) - [Connect to Mainnet or Devnet](/node-operators/validator-node/connecting-to-the-network) --- url: /node-operators/validator-node/logging --- # Logging ## Log files Mina logs are stored in `~/.mina-config/`: | File | Description | Size limit | Rotation | |--|--|--|--| | `mina.log` | Main daemon logs | 10 MiB | 50 files (`mina.log.0` .. `mina.log.50`) | | `mina-best-tip.log` | Best tip logs (useful for hard fork analysis) | 5 MiB | 1 file | | `mina-prover.log` | Prover memory usage and batch sizes | 128 MiB | 1 file | | `mina-verifier.log` | Verifier memory usage and batch sizes | 128 MiB | 1 file | ## Following logs Depending on how you started the daemon: ```sh # Docker docker logs --follow mina-node # Systemd journalctl --user -u mina -n 1000 -f # Direct tail -f ~/.mina-config/mina.log ``` ## Log levels The Mina daemon supports the following log levels, from most to least verbose: 1. Spam 2. Trace 3. Debug 4. **Info** (default for stdout) 5. Warn 6. Error 7. Fatal Setting a level filters out all messages below it. For example, `Info` shows only Info, Warn, Error, and Fatal messages. ## Log format By default, logs are output as plain text. When `-log-json` is enabled, logs use the following JSON structure: ```json { "timestamp": "2020-12-23 21:25:04.616526Z", "level": "Error", "source": { "module": "Transition_router", "location": "File \"src/lib/transition_router/transition_router.ml\", line 231, characters 12-24" }, "message": "Failed to find any peers during initialization (crashing because this is not a seed node)", "metadata": { "host": "1.1.1.2", "peer_id": "12D3KooWGQSPgo7ypy9717D3Vgz2RHaqB2ndDRHEFcAfJDAv284q", "pid": 12, "port": 8302 } } ``` ## Daemon logging options Set these flags when starting the daemon: | Flag | Default | Description | |--|--|--| | `-log-level` | Info | Log level for stdout | | `-file-log-level` | Trace | Log level for log files | | `-log-json` | off | Output logs as JSON instead of plain text | | `-log-block-creation` | true | Log steps for including transactions and SNARK work in a block | | `-log-received-blocks` | false | Log blocks received from peers | | `-log-snark-work-gossip` | false | Log snark-pool diffs received from peers | | `-log-txn-pool-gossip` | false | Log transaction-pool diffs received from peers | | `-log-precomputed-blocks` | false | Include precomputed blocks in logs | ## Exporting logs ### From a running node ```sh mina client export-logs -tarfile ``` Compresses available logs into a `.tar.gz` archive in `~/.mina-config/exported_logs/`. The `-tarfile` flag is optional and defaults to the current date-time. Logs can also be exported via GraphQL using the `exportLogs` [mutation](/node-developers/graphql-api#mutations). ### From a stopped node ```sh mina client export-local-logs -tarfile ``` Same behavior, but works without a running daemon. ## Crash reports If the daemon crashes, it generates a crash report in `~/.mina-config/`. Only the latest report is retained, named with the crash date-time. A crash report may contain: | File | Description | |--|--| | `crash_summary.json` | System info, version, and final log output | | `mina_status.json` | Output of `mina client status` at time of crash | | `mina_short.log` | Last 4 MB of `mina.log` | | `registered_mask.dot` | Latest ledger visualization | | `frontier.dot` | Latest frontier visualization | | `daemon.json` | Daemon configuration file | You can upload crash reports and exported logs directly to a [GitHub issue](https://github.com/MinaProtocol/mina/issues) to help with debugging. --- url: /node-operators/validator-node/querying-data --- # Interacting with the Node via GraphQL API The Mina daemon exposes a [GraphQL API](/node-developers/graphql-api) that you can use to query recent blockchain data and submit signed transactions. ## Setup Once your node is [connected to the network](./connecting-to-the-network), the GraphQL server is available at `localhost:3085` by default. To use a different port: ```sh mina daemon ... -rest-server-port ``` To make the server accessible from outside `localhost`: ```sh mina daemon ... -insecure-rest-server ``` :::caution If you expose the GraphQL server externally, ensure your firewall is configured properly. See [GraphQL API](/node-developers/graphql-api) for details. ::: If you want to archive historical data beyond what the node keeps in memory, see [Archive Node](/node-operators/archive-node/getting-started). ## Querying data The examples below query _recent_ chain data -- approximately the last 290 blocks (~10 hours of activity). To explore all available fields, open the GraphQL sandbox at `http://localhost:3085/graphql` in your browser. ### Block data ```graphql query BlockData { bestChain(maxLength: 10) { stateHash creatorAccount { balance { total } } } } ``` ### Account balance Query the current balance of a public key. The response also includes the `blockHeight` and `stateHash` of the block the balance was read from. ```graphql query CurrentBalance { account(publicKey: "B62qmyjqEtUEZrsBpUaiz18DCkwh1ovCrJboiHbDhpvH8JEoaag5fUP") { balance { blockHeight total stateHash } } } ``` ### Staking information In Mina, an account is either staking directly or delegating its entire stake. Query the current delegation status: ```graphql query StakingInfo { account(publicKey: "B62qmyjqEtUEZrsBpUaiz18DCkwh1ovCrJboiHbDhpvH8JEoaag5fUP") { balance { blockHeight total stateHash } delegateAccount { publicKey } } } ``` If `delegateAccount.publicKey` is `null`, the account is staking directly. :::note The active staking ledger for the current epoch is drawn from the SNARKed ledger of the last block two epochs prior. In practice, staking ledger transitions happen every 2-4 weeks. ::: ### Transaction details Look up transactions within recent blocks on the best chain: ```graphql query TransactionDetails { bestChain(maxLength: 10) { stateHash creatorAccount { balance { total } } transactions { coinbase userCommands { amount fee feePayer { publicKey } hash isDelegation kind memo nonce receiver { publicKey } source { publicKey } } } } } ``` ## Submitting a signed transaction Send a pre-signed payment using the `sendPayment` mutation: ```graphql mutation SubmitSignedTransaction { __typename sendPayment(input: { fee: "3000000", amount: "42", to: "B62qrcFstkpqXww1EkSGrqMCwCNho86kuqBd4FrAAUsPxNKdiPzAUsy", from: "B62qiy32p8kAKnny8ZFwoMhYpBppM1DWVCqAPBYNcXnsAHhnfAAuXgg", nonce: "0", memo: "This is a memo", validUntil: "50000" }, signature: { field: "26393275544831950408026742662950427846842308902199169146789849923161392179806", scalar: "28530962508461835801829592060779431956054746814505059654319465133050504973404" }) { payment { amount fee kind memo nonce source { publicKey } receiver { publicKey } isDelegation } } } ``` --- url: /node-operators/validator-node/requirements --- # Requirements ## Hardware Requirements Please note the following are the hardware requirements for each node type after the upgrade: | Node Type | Memory | CPU | Storage | Network | |--|--|--|--|--| | Block Producer | 32 GB RAM | 8 core processor with BMI2, ADX and AVX CPU instruction set are required | 64 GB | 1 Mbps Internet Connection | | SNARK Coordinator | 32 GB RAM | 8 core processor | 64 GB | 1 Mbps Internet Connection | | SNARK Worker | 32 GB RAM | 4 core/8 threads per worker with BMI2. ADX and AVX CPU instruction set are required | 64 GB | 1 Mbps Internet Connection | | Archive Node | 32 GB RAM | 8 core processor | 64 GB | 1 Mbps Internet Connection | | Rosetta API standalone Docker image | 32 GB RAM | 8 core processor | 64 GB | 1 Mbps Internet Connection | | Mina Seed Node | 64 GB RAM | 8 core processor | 64 GB | 1 Mbps Internet Connection | ## Software Supported environments include macOS, Linux (Debian 10, 11 and Ubuntu 20.04 LTS), and any host machine with Docker. Only x86-64 CPU architecture is supported. ## Clock Synchronization Your server must run a clock synchronization protocol such as [NTP](https://en.wikipedia.org/wiki/Network_Time_Protocol) to participate in consensus. Most Linux distributions include NTP by default. ## Recommended VM Instances o1Labs has tested running nodes on several cloud providers. We recommend the following instances for basic node operator needs. Custom requirements and different cost constraints might require a different instance type. - AWS [c5.2xlarge](https://www.ec2instances.info/?filter=c5.2xl®ion=us-west-2&cost_duration=daily&selected=c5.2xlarge) - GCP [c2-standard-8](https://cloud.google.com/compute/docs/machine-types) - Azure [Standard_F8s_v2](https://docs.microsoft.com/en-us/azure/virtual-machines/windows/sizes-compute#fsv2-series-1) - Digital Ocean [c-8-16gib](https://cloud.digitalocean.com/droplets/new?size=c-8-16gib) ## Networking **IP:** By default, the Mina daemon determines its public IP address automatically via HTTPS (443) and HTTP (80). If you are behind a NAT or firewall, set the `--external-ip` flag to specify your public IP address. **Port:** Nodes must expose a port to communicate with peers. The default is TCP port `8302`. You can change it with the `--external-port` flag. **Firewall and port forwarding:** Allow inbound traffic on the following ports through your external IP address: - TCP port `8302` (required for peer communication) - TCP port `3085` (optional, for the GraphQL API) If you are using UFW: ```sh sudo ufw enable sudo ufw allow 22 sudo ufw allow 8302 sudo ufw allow 3085 ``` --- url: /node-operators/validator-node/staking-and-snarking --- # Delegating MINA Delegating assigns your stake to a block producer who shares earned rewards minus a fee. You don't need to run a node yourself. See [Staking Rewards on Mina](https://minaprotocol.com/blog/staking-rewards-on-mina) for reward details. If you want to produce blocks directly, see the [Block Producers](/node-operators/block-producer-node) section. - Your delegation takes effect after a latency period of 2-4 weeks. - You can re-delegate or un-delegate at any time with no penalty. Changes take effect after 1-2 epochs. - Your **full balance** is always delegated -- there is no partial delegation. ## Delegate your stake First, unlock your account: ```sh mina account unlock --public-key $DELEGATOR_PUBLICKEY ``` Then delegate: ```sh mina client delegate-stake \ --receiver $DELEGATEE_PUBLICKEY \ --sender $DELEGATOR_PUBLICKEY \ --fee 0.1 ``` | Flag | Description | |--|--| | `--receiver` | Public key of the delegatee (block producer) | | `--sender` | Public key of the account you are delegating from | | `--fee` | Transaction fee paid to the network | A stake delegation is a transaction on-chain, which is why it requires a fee. See also: [Mina Foundation Delegation Program](/node-operators/delegation-program/foundation-delegation-program). --- url: /participate/bugs-and-feature-requests --- # Reporting Issues, Bugs, & Feature Requests ## How to report things on Mina If you notice a bug, issue, or missing feature, please follow the steps below: ### 1. Search existing issues Before making a report, first search through [existing issues](https://github.com/MinaProtocol/mina/issues) to see if something similar has been reported. ### 2. Found a bug? If your issue is a bug, related to the Mina website or you have feedback about user experience, you can report it on the [Mina Protocol repo on GitHub](https://github.com/MinaProtocol/mina/issues/new/choose). ### 3. Found a vulnerability? If your issue is a vulnerability that may be putting other people's funds at risk or is related to the protocol infrastructure, the first step is to report the issue on the [Mina Protocol repo on GitHub](https://github.com/MinaProtocol/mina/issues/new/choose). You can request an invitation in the [#security](https://discord.com/channels/484437221055922177/799979001585336331) channel on Mina Protocol Discord. ### 4. Found an urgent issue? If your issue is time-sensitive and needs immediate attention, please send more details and your contact information to security@o1labs.org. A member of the engineering team will reach out promptly. :::note Our community learns best when we learn together. Please avoid sending issues by using Discord DMs. Instead, try the options listed here. ::: ### Join the security discussion Thanks for your help in securing the network! To learn more and discuss Mina-related security topics, you can participate in the [#security](https://discord.com/channels/484437221055922177/799979001585336331) channel on Mina Protocol Discord. --- url: /participate/careers --- # Careers If you're looking for another way to get involved with Mina, consider exploring the following career opportunities at Mina Foundation and Mina ecosystem partners. ### Mina Foundation [Mina Foundation Careers Page](https://apply.workable.com/mina-foundation/) ### Mina Ecosystem Partners - o1Labs [Careers](https://boards.greenhouse.io/o1labs) - Incubators of the Mina Protocol - =nil; Foundation [Careers](https://nil.foundation/careers/) - Creators of the zkBridge bridge from Mina to Ethereum - Viable Systems [Careers](https://www.viablesystems.io/rust-jobs) - Tools to help improve the performance of the Mina nodes and overall network Are you a Mina ecosystem partner? Select "EDIT THIS PAGE" at the top of this page to submit a pull request to add your company blog. Thank you for helping grow the Mina ecosystem. --- url: /participate/github --- # GitHub Mina Protocol is an open source project. ### Code Repositories As a decentralized protocol, Mina is open-source and its codebase is publicly available on GitHub. We invite you to view and become a contributor: [Github logo  MinaProtocol/mina](https://github.com/MinaProtocol/mina)  [](https://github.com/MinaProtocol/mina) [Github logo  o1-labs/o1js](https://github.com/o1-labs/o1js)  [](https://github.com/o1-labs/o1js) [Github logo  o1-labs/zkapp-cli](https://github.com/o1-labs/zkapp-cli)  [](https://github.com/o1-labs/zkapp-cli) ### Mina Discussions If you have questions or want to participate in discussions about the source code, head over to Mina Discussions: [Github logo  Mina Discussions on Github](https://github.com/MinaProtocol/mina/discussions) We also provide guidance on [Reporting Issues, Bugs, & Feature Requests](bugs-and-feature-requests). --- url: /participate/office-hours --- # Office Hours Talk with someone while you get started or when you need help ## zkApps Developers Office Hours On every Tuesday 16.00-17.00 UCT and every Saturday 08.00-09.00 UCT, Mina Foundation and o1Labs cohost online office hours to help zkApp developers. You can join to ask your o1js / Mina related questions, share and get feedback on your zkApp ideas, meet new developers, find team members for your ongoing ZK projects, or just to have a chat! Instead of creating an official or formal environment, our goal with the office hours is to make the developer community inside the Mina ecosystem more familiar with each other, and give the developers a chance to chat with Mina Foundation, o1Labs members, and other experienced o1js developers. Come to ask any questions — beginner to advanced! Register for upcoming [zkApps Developer Office Hours](https://lu.ma/mina). :::tip For a quicker response, you can ask questions and search for similar previous questions in the [#zkapps-developers](https://discord.com/channels/484437221055922177/915745847692636181) channel or [#zkapps-questions](https://discord.com/channels/484437221055922177/1047214314349658172) forum on Mina Protocol Discord. ::: --- url: /using-mina/Protect-Your-MINA --- # General Security Practices Security is critical when managing cryptocurrency. These are basic guidelines to help keep your MINA safe — always do your own research and stay informed about the latest security best practices. ### Never Share Your Seed Phrase, Private Keys, or Passwords Your seed phrase (12-24 words), private keys and wallet passwords are the master key to your wallet. **Never share it with anyone** for any reason. It should be: - Written down on paper (not stored digitally) - Kept in a secure location (safe, lockbox, etc.) - Never typed on websites or shared in messages - Never photographed or screenshotted ### Avoid Common Scams The crypto space has many types of scams. Here are the most common scams: - **Discord or Telegram impersonators:** Scammers copy team names and photos to appear legitimate. Please note that no one from Mina will DM you first. Always check for verified badges, and when in doubt, confirm in public channels. - **Impersonator Websites:** Scammers create convincing fake sites to steal your info. Always double-check URLs and bookmark official ones. - **Malicious links or software:** Clicking unknown links or installing unverified software can compromise your wallet or device. Only download from official Mina sources and avoid connecting your wallet to unfamiliar sites. Join the **#scam-alerts channel** on [Mina Discord](https://discord.gg/minaprotocol) to see real-time alerts about active scams targeting the Mina community. ### Follow General Security Best Practices - **Use hardware wallets** for large amounts (Ledger) - **Enable 2FA** on exchange accounts - **Keep software updated** - wallet apps, browsers, operating systems - **Use strong, unique passwords** for each service - **Be skeptical** of urgent requests or pressure to act quickly - **Verify everything** - double-check addresses before sending transactions - **Start small** - test with small amounts when trying new services **Remember: Crypto transactions are irreversible.** Once you send MINA, you can't get it back. Always take your time and verify everything. --- url: /using-mina/how-to-delegate --- Learn how to delegate MINA and receive staking rewards. # How to Delegate Instead of running your own node, you can delegate your MINA tokens to a validator (also called a block producer) and may receive staking rewards in return. Delegation is simple, requires no technical expertise, and allows you to participate in securing the Mina network while potentially earning variable rewards, which have historically averaged around 7% annually depending on network conditions and validator performance. Rewards are provided by independent validators. No entity custodies, controls, or guarantees any staking returns. Past performance is not indicative of future results ### Understanding Staking vs Delegating **Delegating (recommended for most users):** You assign your MINA to a validator who runs the infrastructure. You earn rewards without needing to run a node yourself. This is what most MINA holders do. **Running a block producer (advanced):** You operate your own node 24/7 to produce blocks directly. This requires technical knowledge, reliable infrastructure, and constant monitoring. [**More info here.**](https://minaprotocol.com/node-operators) **This guide focuses on delegating**, which is simple and accessible to everyone. ### Why Delegate MINA? - **No minimum amount required** - Delegate any amount of MINA - **No lock-up period** - Your MINA stays in your wallet and remains accessible - **No slashing risk** - Tokens aren’t taken for validator downtime or misbehavior - **Earn rewards by helping secure the Mina network** - delegating your MINA supports decentralization and may yield variable staking returns (recently ~7% annually, depending on validator performance and network conditions). - **Support decentralization** - Help secure and decentralize the Mina network Even if you don't stake Mina, your wallet may still be called upon to produce a block. If you aren't delegating or staking, no block will be produced and no transactions get processed in that slot. By delegating or staking your MINA, you ensure it actively helps produce blocks and secure the network. ### Prerequisites Before delegating, ensure you have: 1. A Mina wallet installed (Auro, Clorio, or Ledger) 2. MINA tokens in your wallet 3. A small amount of MINA for transaction fees ### How Delegation Works When you delegate MINA to a validator: 1. Your tokens **never leave your wallet** - you maintain full control 2. The validator uses your stake weight to increase their chances of producing blocks 3. When the validator wins a block (360 MINA reward), they distribute rewards proportionally to all delegators 4. The validator takes a commission fee and you receive your share of the remaining rewards 5. It takes **1-2 weeks** for your delegation to become active on the network 6. You can change validators anytime with no penalties :::note Values like staking rewards, epoch duration, and APY are subject to change with network upgrades. For example, after the latest Mesa upgrade, block rewards decreased from 720 to 360 MINA per block, and epoch duration was reduced from 2-4 weeks to 1-2 weeks. ::: ### How to Delegate Mina Here’s how to delegate MINA within common wallets: - [**Auro**](https://www.aurowallet.com) - Open the wallet, tap “*Staking*”, tap “*Go to Staking*”, select a block producer, and confirm the transaction details.
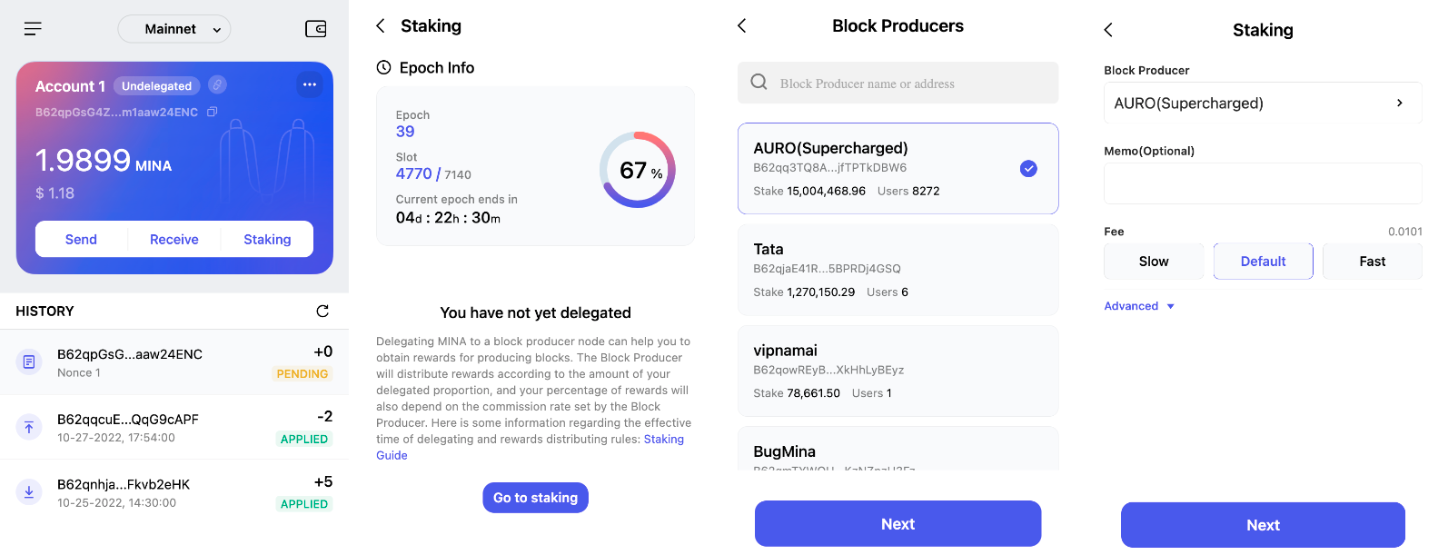
Screenshot of Mina Explorer


- [**Clorio Wallet**](https://clor.io) - Open the wallet, tap “*Staking Hub*”, select and confirm your validator, and enter your transaction fee and passphrase or private key.
Screenshot of Mina Explorer


- [**Ledger Hardware Wallet**](https://www.ledger.com/mina-wallet) - Follow the [instructions on creating a Ledger Mina account via Auro Wallet](https://www.ledger.com/coin/wallet/mina-protocol#learn-more), then see the instructions for staking MINA on Auro wallet above. - [**Pallad**](https://get.pallad.co/website) - Open the wallet, tap upper-right Menu button. Select "*Staking*" from the sidebar menu. Click "*Stake*", paste validator public key or use "*Find a validator*". Tap "*Next*", enter your spending password and submit to confirm the transaction.
Screenshot of Mina Explorer


:::note Mention of third-party wallets or exchanges is for informational purposes only and does not constitute an endorsement or guarantee. Please review each provider’s terms and regional availability before use. ::: ### Choosing a Validator Most wallets display a list of available validators with their commission rates and statistics. You can also: - Browse validators on [MinaScan](https://minascan.io/mainnet/validators/terms) - Ask the community in [Mina Discord](https://discord.gg/minaprotocol) - Check Block Producer’s performance on this [Uptime Tracker](https://uptime.minaprotocol.com/) When selecting a validator to delegate to, consider these factors: - **Commission Rate:** Validators charge a fee from block rewards before distributing to delegators. Lower commission means you keep more of your rewards, but reliable validators need sustainable fees to maintain quality infrastructure. - **Block Production Rate & Performance:** Check the validator's uptime and block production history. - **Reputation & Transparency:** Choose validators who are active on X or Discord with transparent communication about their operations. - **Network Decentralization:** Supporting smaller, reliable validators helps decentralize the network and improve security for everyone. ### Choosing a Validator Your delegation will become active after **1-2 weeks** (1-2 epochs). Here are some extra things to note: - **Checking Your Status:** Most wallets show your current delegation status, including: - Which validator you're delegated to - When your delegation becomes active - Your earned rewards - **Receiving Rewards:** Rewards are automatically credited to your account every epoch assuming your validator successfully produces blocks.. You don't need to claim them manually - they simply appear in your wallet balance. - **Changing Validators:** You can change validators anytime by submitting a new delegation transaction. The change will take effect after 1-2 epochs. There are no penalties for switching. - **Undelegating:** To stop delegating, you can delegate to yourself (your own public key) or simply let your current delegation remain inactive. Your MINA is always accessible regardless of delegation status. - **Transaction Fees:** When sending transactions on a blockchain, such as Mina, senders must include a transaction fee. Most wallets calculate a recommended fee automatically. --- url: /using-mina/how-to-send-and-receive --- # How to Send & Receive Learn how to send and receive MINA ### Prerequisites First, ensure you have [installed a Mina wallet](../using-mina/install-a-wallet). ### Receiving MINA To receive MINA, you must provide the unique address for your Mina account to the sender. Here’s how to find your address within common wallets: - [**Auro**](https://www.aurowallet.com) - Open the wallet, tap “*Receive*”, and tap “*Copy*” to share your address or QR code representing this address.

Screenshot of Auro Wallet


- [**Clorio Wallet**](https://clor.io) - Open the wallet and tap Copy icon on Clor.io at the top to copy your address. - [**Ledger Hardware Wallet**](https://www.ledger.com/mina-wallet) - Follow the [instructions on creating a Ledger Mina account via Auro Wallet](https://support.ledger.com/hc/en-us/articles/5458493215901-Creating-a-Ledger-MINA-account-via-Auro-Wallet?docs=true), then see the instructions for receiving MINA on Auro wallet above. - [**Pallad**](https://get.pallad.co/website) - Open the wallet, tap "*Receive*", and tap "*Copy to clipboard*" to share your address. Wallet's QR code is displayed as well.
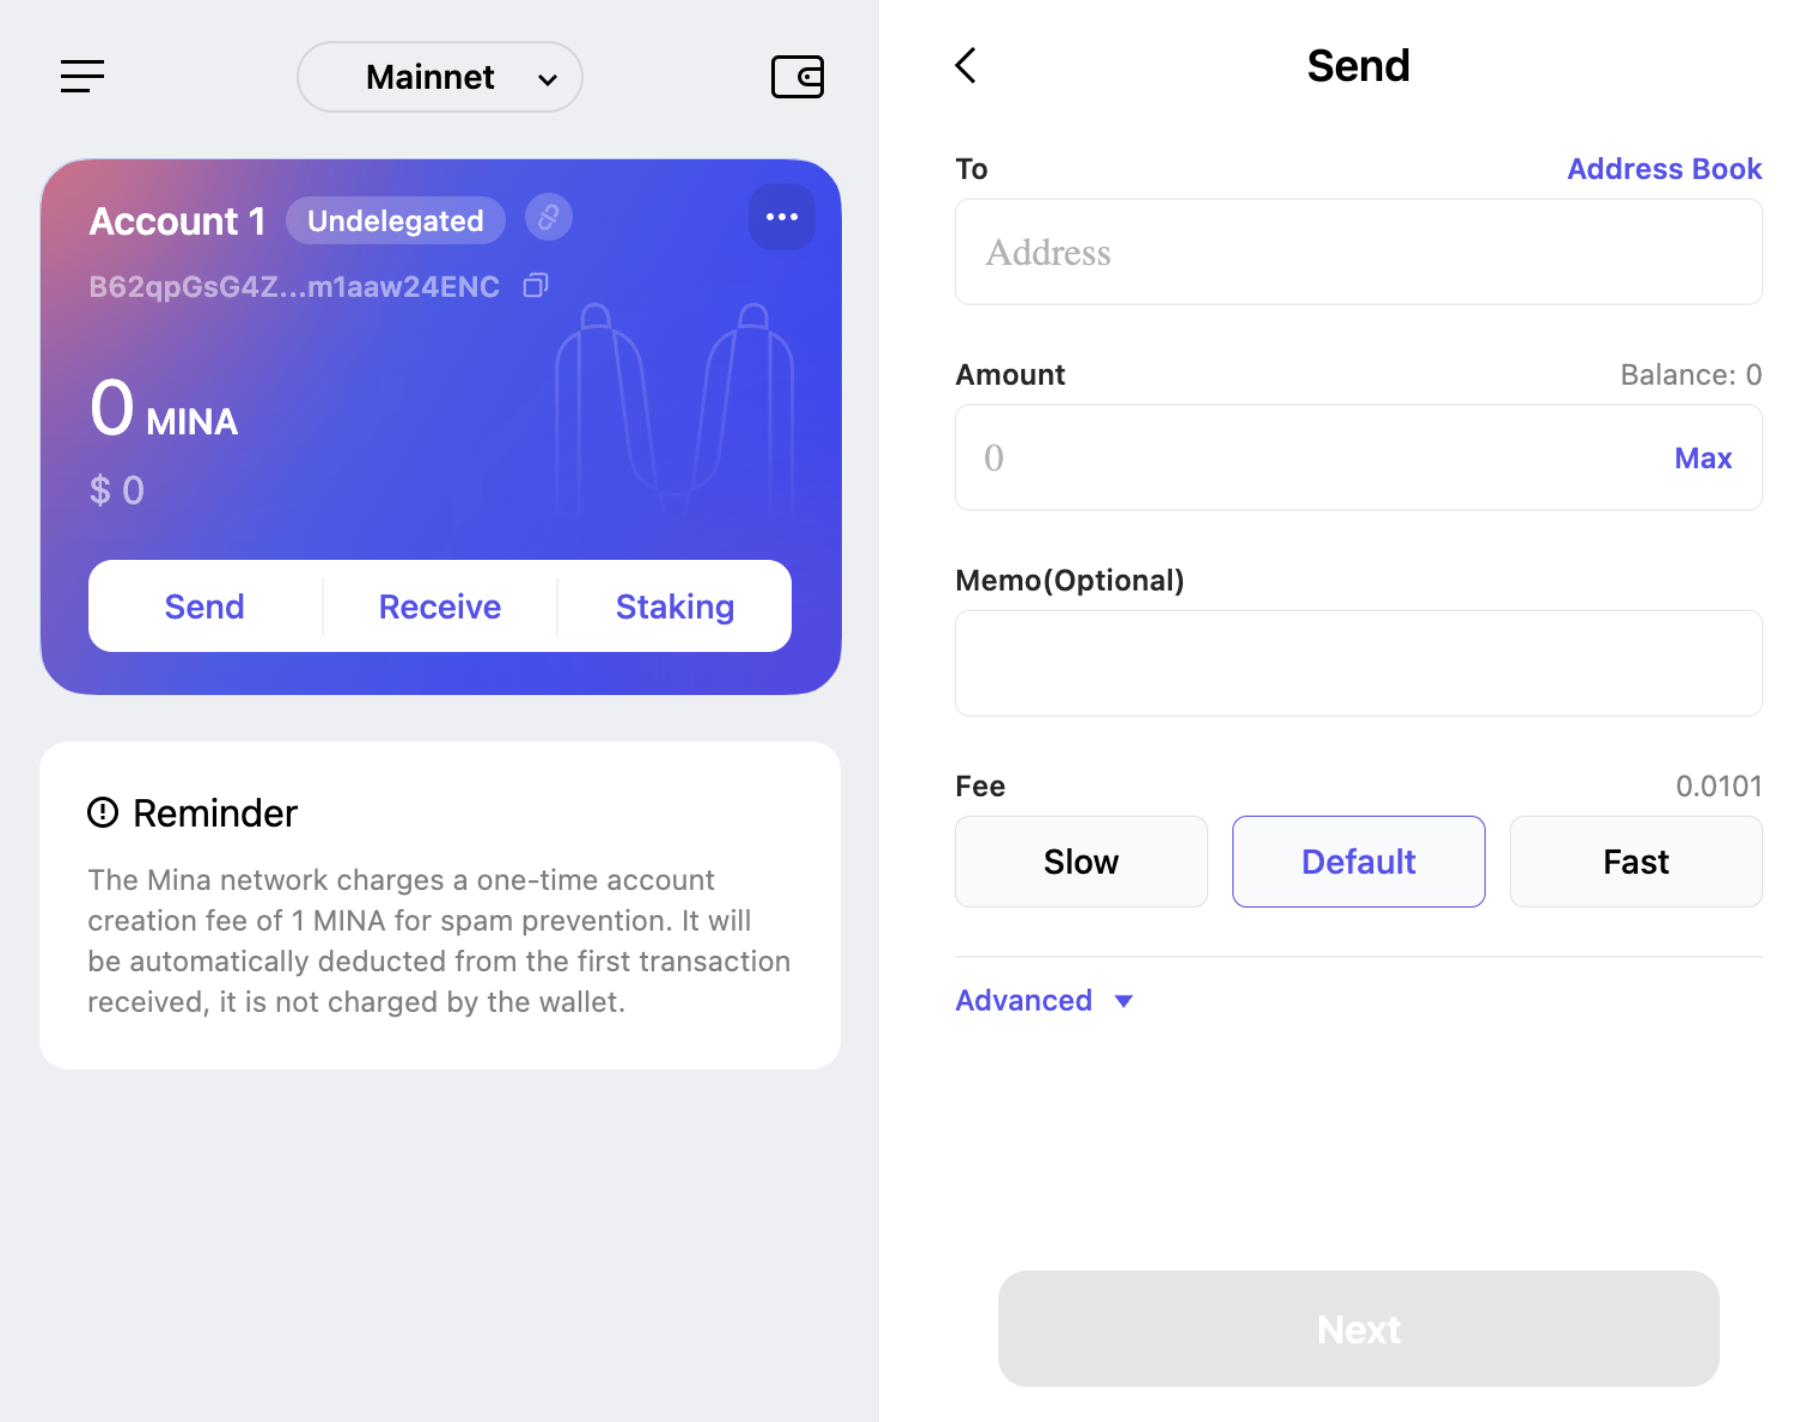
Screenshot of Pallad


:::note To prevent spam, the Mina network charges a one-time account creation fee of 1 MINA. This fee is automatically deducted from the first transaction received. ::: ### Sending MINA When sending MINA, always double check that you have the correct Mina address for the recipient. Remember that transactions on the Mina blockchain are final and irreversible. - [**Auro**](https://www.aurowallet.com) - Open the wallet, tap “*Send*”, enter in the address, amount, and fee, and tap “*Next*” then “*Confirm*”.

Screenshot of Auro Wallet


- [**Clorio Wallet**](https://clor.io) - Open the wallet, tap “*Send TX*”, and enter in the address, memo, amount, and fee, tap “*Preview*”, and enter in the nonce then tap “*Confirm*”. - [**Ledger Hardware Wallet**](https://www.ledger.com/mina-wallet) - Follow the [instructions on creating a Ledger Mina account via Auro Wallet](https://support.ledger.com/hc/en-us/articles/5458493215901-Creating-a-Ledger-MINA-account-via-Auro-Wallet?docs=true), then see the instructions for sending MINA on Auro wallet above. - [**Pallad**](https://get.pallad.co/website) - Open the wallet, tap "*Send*". Enter address and amount, and tap "*Next*". Enter your spending password and submit to confirm the transaction.

Screenshot of Pallad


:::note When sending transactions on a blockchain, such as Mina, senders must include a transaction fee. Most wallets calculate a recommended fee. You can also view a suggested fee amount based on current network transaction volume at this community-created [Gas Station website](https://fees.mina.tools/). ::: ### Viewing your transction on a blockchain explorer You can view your transactions using one of the community-run blockchain explorers: - [MinaScan](https://minascan.io/) - [Minataur](https://minataur.net/) - [MinaSearch](https://minasearch.com/) (in development by Granola)
Screenshot of Mina Explorer
--- url: /using-mina/how-to-use-zkapp --- :::info The maximum number of zkApp transactions per block is currently capped at 24. This restriction will be gradually lifted after the Mainnet upgrade. ::: # How to Use a zkApp Learn how to interact with a zero knowledge smart contract ### Prerequisites 1. Install a zkApp-compatible [Mina wallet](../using-mina/install-a-wallet). 2. Make sure that your Mina wallet contains MINA to pay for transaction fees. :::note The Mina community has created a variety of different wallets. Only the [Auro Wallet for Chrome](https://www.aurowallet.com) supports interactions with zkApps currently. ::: ### Instructions 1. Visit the zkApp in a web browser. For example, `mycoolzkapp.com`. 2. Interact with the zkApp as intended. For example, make a move in a game, enter in your age, and so on. 3. Click the confirmation button to send the transaction to the Mina network. 4. In your Mina browser wallet extension, confirm the transaction. 5. Done! Congratulations. Your transaction will be processed by the Mina network and, when accepted into a block, will update the zkApp's on-chain state. ### Check the zkApp transaction To confirm that your zkApp transaction has been successfully processed, view the clickable transaction hash shown by the wallet on a block explorer. --- url: /using-mina/install-a-wallet --- # Install a Wallet Learn about wallets you can use to send and receive MINA. The Mina community has created a variety of different wallets. You can send and receive MINA using any of these wallets, currently the Auro Wallet for Chrome and MinaPortal support interactions with zkApps. - [Auro Wallet (Chrome, Firefox, iOS, & Android)](https://www.aurowallet.com) - [Clorio Wallet (Windows, MacOS, Linux, and online)](https://clor.io) - [Ledger Mina Protocol wallet](https://www.ledger.com/mina-wallet) For instructions, see the [Ledger Hardware Wallet](../using-mina/ledger-hardware-wallet) doc. - [MinaPortal, a MetaMask Snap](https://minaportal.sotatek.works/) To learn more, see the [MinaPortal wiki](https://github.com/sotatek-dev/mina-snap/wiki) . - [Pallad (Chrome & Brave side panel)](https://get.pallad.co/website) :::note To prevent spam, the Mina network charges a one-time account creation fee of 1 MINA. This fee is automatically deducted from the first transaction received. ::: ### Wallet for Node Operators The Mina CLI also provides the ability to store, send, and receive MINA. However, this method is intended only for Mina node operators and we do **not** recommend this as a wallet for typical users. View the [Mina CLI docs](/node-operators/reference/mina-cli-reference) to learn more. ### Next Steps Now that you've learned how to set up a wallet, you can learn [how to send and receive MINA](../using-mina/how-to-send-and-receive). --- url: /using-mina/ledger-hardware-wallet --- # Ledger Hardware Wallet Ledger has added support for Mina to their Nano S and Nano X hardware wallets. Install the Mina application on your hardware device to store your funds and interact with the Mina blockchain. :::info Please note that it's not yet possible to sign zkApp transactions using a Ledger wallet. ::: The Mina app supports the following operations: - Generating key pairs - Signing payment transactions - Signing delegation transaction The Mina app does **not** support the following operations: - Signing zkApp transactions - Native LedgerLive wallet integrations (instead, you can use third-party wallets) You can download the Mina app to your Ledger Nano S or Nano X using the instructions below. ## Installing the Mina app Before you get started, download [Ledger Live](https://www.ledger.com/ledger-live/download) if you have not done so already: Make sure your Ledger firmware is on the latest version supporting Mina. 1. Connect and unlock your Ledger device. 2. Open the **Manager** in [Ledger Live](https://support.ledger.com/hc/en-us/articles/4404382258961?docs=true). 3. Allow the manager on your device. 4. Search for **Mina** in the app catalog. 5. Click the **Install** button. Your device displays **Processing...**. 6. After the download is completed, Ledger Live displays **Installed**.
![Example banner](/img/LedgerLive.png)
:::tip A few reminders regarding hardware wallets: - Make sure to backup your secret pneumonomic phrase - Keep your ledger up-to-date ::: ## Troubleshooting **Why does signing a transaction take so long?**
Since Mina uses new cryptography and Ledger does not have hardware acceleration support, you may experience that signing with the Mina app takes longer than other wallets. We hope that this cryptography is supported by Ledger in the future. **Why don't I see the option to update my firmware?**
If your Nano X firmware does not offer an option to upgrade to the latest version, it means your device is in the process of getting staged for the update. Just wait 1 or 2 days to see if the option is available. If not, reach out to Ledger support. ## Next Steps Congratulations! Now that you have installed Mina’s Ledger app, you can start using your Ledger and connect to one of Mina’s Ledger supported wallets: - [Aurowallet.com](https://www.aurowallet.com/) - [Clor.io](https://clor.io/) If you need help or have questions about Ledger, join the [#ledger-hardware](https://discord.com/channels/484437221055922177/733755408161833040) channel on Mina Protocol Discord. --- url: /welcome --- # Welcome --- url: /zkapps/advanced/experimental --- # Experimental features Some new features are considered experimental before they are production-ready. :::experimental Experimental features are clearly marked and link to this page. ::: Exposing experimental features gives you an opportunity to try our newest features sooner. In return, your feedback helps us make sure that our new features are reliable and useful. ## Feedback We appreciate any and all feedback you want to provide. The best place to provide feedback and ask questions is on [Mina Protocol Discord](https://bit.ly/MinaDiscord). To ask zkApps questions and engage with other developers building zkApps with o1js, use the [#zkapps-developers](https://discord.com/channels/484437221055922177/915745847692636181) channel. Experimental features are in active development and your feedback is especially appreciated. - The feature may have bugs - The feature may be changed, deprecated, or removed - All documentation for the feature explicitly states that the feature is experimental --- url: /zkapps/advanced/zkapps-for-ethereum-developers --- # zkApps for Ethereum Developers Mina and Ethereum are both decentralized, programmable, layer-one blockchains, but they are designed in fundamentally different ways. The Ethereum network verifies transaction execution by having every node execute every transaction. While this design solves a real problem, it also imposes some severe limitations on privacy and scalability. The Mina Protocol works differently. It verifies transactions (and previous blocks) cryptographically using recursive zero knowledge proofs. Smart contract code is written in TypeScript and executes off chain. Mina nodes need to verify only a small proof in order to validate the associated execution. Better still, the proof does not reveal any information about the underlying computation, meaning developers can choose whether their inputs and outputs should be public or private, depending on the requirements of their application. ## At a Glance
Ethereum Smart Contracts Mina zkApps
Language Smart contracts are written in Solidity. zkApp smart contracts are written using o1js (a TypeScript library).
Execution Environment Smart contracts run on every Ethereum node. zkApps run client side in a user’s web browser, and publish only a small validity proof which is verified by the Mina nodes.
Transaction Cost Execution costs are variable, and determined using a gas model. Execution costs are small, and constant because the Mina nodes are verifying the same size proof regardless of the amount of client-side computation.
Application Storage Ethereum is designed around the idea that storage, and computation are inherently coupled; all state must live on every Ethereum node. Mina’s design allows state, and computation to be decoupled so that application state can live anywhere; developers can choose a solution that fits their cost/security requirements best.
Developer Tooling New developer tools with unusual patterns like Hardhat, and Truffle are needed in order to manage the deployment of Ethereum smart contracts. The zkApp CLI manages scaffolding, linting, testing, and deployment using common JavaScript/TypeScript tools you are already familiar with.
Scaling Ethereum nodes must execute every transaction directly making horizontal scaling hard. Mina’s recursive zero knowledge proofs allow snark-workers to compress the blockchain, and developers to compress transactions using native rollups for exponential scaling.
Consensus Ethereum nodes must download the entire block history (~700GB) in order to verify the current finalized chain state. Mina clients can verify the current finalized state using a single 22KB recursive zero knowledge proof.
## Example Code ```ts export class Add extends SmartContract { /* The state decorator tells o1js to store/retrieve num from the Mina blockchain */ /* The Field type represents elements of a finite field (similar to uint256 for practical purposes, but loops back to 1 after overflowing) */ @state(Field) num = State(); // Initialize the contract (similar to a constructor in Solidity) init() { super.init(); // Set num equal to a Field element of value 1 on contract deployment this.num.set(Field(1)); } /* The method decorator tells o1js to be ready to generate a proof of execution any time this method is called */ @method async update() { // Get the state of num from the Mina blockchain and set it to currentState const currentState = this.num.get(); /* Calling add instead of using the JS infix addition operator enables o1js to prove that the addition is done correctly */ const newState = currentState.add(2); /* Set the state of num on the Mina blockchain equal to newState (this state update will not happen unless the transaction is accompanied by a valid proof of execution) */ this.num.set(newState); } } ``` ## How does Mina bridge to Ethereum? Mina proofs are small and easy to verify; this means that any Turing complete blockchain (like Ethereum) can validate the entire Mina state in a single transaction using a bridge contract. These are a bit different from existing bridging solutions because they don't require additional security assumptions. Think of them as full Mina nodes that are implemented in smart contracts on other chains. They validate the Mina state in exactly the same way a Mina block producer would and expose Mina directly to any other contract. The Nil Foundation is working on the [first of these bridges](https://verify.mina.nil.foundation/walkthrough/index.html) for Ethereum and other EVM-compatible networks. ### Have another question? Reach out in the [#zkapps-developers](https://discord.com/channels/484437221055922177/915745847692636181) channel on Mina Protocol Discord. It's better when we learn together. --- url: /zkapps/faq --- # zkApps and o1js FAQ Answers to common questions about zkApps (zero knowledge apps) and o1js, a TypeScript library for writing zk smart contracts. ### How do I stay up to date with zkApps and o1js? Follow the official o1Labs channels: - Twitter/X [@o1_labs](https://twitter.com/o1_labs) - o1Labs [Blog](https://www.o1labs.org/), especially the [What's New in o1js](https://www.o1labs.org/blog?topics=o1js) monthly updates ### Where can I ask questions and contribute answers? [Mina Protocol Discord](https://discord.gg/minaprotocol) is the most popular place where Mina enthusiasts and technical contributors gather. Join us in these zkApps channels: * [#zkapps-developers](https://discord.com/channels/484437221055922177/915745847692636181) to meet other developers building zkApps with o1js * [#zkapps-general](https://discord.com/channels/484437221055922177/910549624413102100) to ask general questions about zkApps, how to use a zkApp, and so on * [#zkapps-questions](https://discord.com/channels/484437221055922177/1047214314349658172) to ask zkApps-related questions and see Q&A history ### What files do I use to write zkApps? There are many approaches to building a smart contract. For the zkApp tutorials, most examples follow this convention: - `index.ts`: The entry point of your project that imports all smart contract classes you want access to and exports them to your smart contract. - `main.ts`: How you interact with the smart contract. For example, the `import` statement brings in objects and methods from `o1js` that you use to interact with your smart contract. - `.ts`: Your specific smart contract logic. ### Where can I find the o1js API reference documentation? See the autogenerated [o1js reference](https://docs.o1labs.org/o1js/api-reference/Introduction) documentation with doc comments, like the [Provable](https://docs.o1labs.org/o1js/api-reference/type-aliases/Provable) module. ### What is ZkProgram? A general-purpose API for creating zk proofs. A ZkProgram is similar to a zkApp smart contract but isn't tied to an on-chain account. ### What is the difference between `getActions` and `fetchActions`? Use the appropriate module to work with the live network or with historical archive nodes: - [getActions](https://docs.o1labs.org/o1js/api-reference/namespaces/Mina/functions/getActions) works with the blockchain network - [fetchActions](https://docs.o1labs.org/o1js/api-reference/namespaces/Mina/functions/fetchActions) works with archive nodes ### Does o1js compile my JavaScript code to an arithmetic circuit? No, o1js **does NOT compile into anything else**. In contrast to other zk ecosystems, o1js is just a JS library. It creates zk circuits from user code by _executing_ that code. If you have a smart contract with a `@method async myMethod()`, for example, o1js simply calls `myMethod();` during proof generation. This works because o1js sets up some global state - a "circuit" - where it collects variables and constraints. The use of functions like `Field.mul` or `Bool.assertEquals` inside your smart contract methods add corresponding variables and constraints to the global circuit. This has some implications: - To turn your logic into a proof, you must use o1js built-in datatypes such as `Field` and use the o1js functions that operate on them, like `Field.mul()`. - A statement like `x.mul(y)` adds a generic PLONK gate to your circuit and returns a variable that you can use in further statements that get wired to the multiplication gate. - Some o1js methods allow you to convert normal JavaScript datatypes into `Field` elements and back, such as `Encoding.stringToFields()`. Methods like this that don't add anything to your circuit are typically clarified in a doc comment. - Conventional JavaScript code such as `'hello world'.split('').join(' ')` that doesn't use o1js built-ins are not included in your zk proof since it doesn't add anything to your circuit. - Why? Because it doesn't call any of the functions that build the circuit. - There's nothing wrong with having non-circuit code inside your method, as long as you're aware of what it's (not) doing. - It's fine to use if-statements, for-loops, arrays, objects, and any other JavaScript language constructs to facilitate writing circuits. However, be aware that these flexible constructs don't allow you to overcome the static nature of circuits. This example asserts that a Field element `x` is not equal to `5`, `10` or `15`: ```ts // good for (let y of [5, 10, 15]) { x.equals(y).assertFalse(); } ``` The previous for-loop example just stitches together a fixed number of o1js commands, which is fine. However, the following snippet, where the loop's length is determined from user input, won't work: ```ts // bad @method async myMethod(x: Field, n: Field) { let n0 = Number(n.toString()); // nope for (let y = 0; y < n0; y += 5) { x.equals(y).assertFalse(); } } ``` This example fails for two reasons: 1. `n.toString()` can't be used in circuit code at all. It throws an error during `SmartContract.compile()` because during `compile()`, variables like `n` don't have any JS values attached to them; they represent abstract variables used to build up an abstract arithmetic circuit. So, in general, you can't use any of the methods that read out the JS value of your Field elements: `Field.toString()`, `Field.toBigInt()`, `Bool.toBoolean()` etc. 2. More subtly, your methods must create the same constraints every time because a proof cannot be verified against a verification key for a differing set of constraints. The code above adds `x.equals(y).assertFalse()` _on condition of_ the value of `n` which leads to constraints varying between executions of the proof. ### Why is the variable currentState set to a value retrieved from the blockchain and then immediately compared to that value? As represented in the tutorial example code: ```TypeScript const currentState = this.num.get(); this.num.requireEquals(currentState); ``` - The first line of code executes before the proof is generated. - The second line of code creates a precondition that is checked when the proof is sent in a transaction to the blockchain to be verified. This ensures that the transaction fails if the value of the field in question has changed. ### Can I pass hex values into Fields? Yes, just pass in the appropriate BigInt literal. `Field(0x1337)` ### Can I pass arguments to the SmartContract init method? The best practice is no. To test something with more than one initialization state, you can set the state by passing arguments to another user-defined method. ### Can I use TypeScript enums? You can try! We experimented with this, so it might generate unconstrained functionality. ### How can I use the Field type? Are there specific reasons I want to specify the `Field` type? All provable types are built using the type `Field`. For efficiency, use `Field` only when you do not need to take advantage of the properties of the other provable types in o1js. ### What does the @method decorator do? It allows the method to be invoked by a user interacting with the smart contract. You can check out the compiled JavaScript in `./build/src` to see exactly what's going on. ### How can you enforce that an account update must be signed by the account owner? Use the `requireSignature` command. See the [requireSignature](https://docs.o1labs.org/o1js/api-reference/classes/SmartContract#requiresignature) Method reference. ### How do I configure who has the authority to interact and make changes to a specific part of an account? Permissions determine who has the authority to interact and make changes to a specific part of a smart contract. See [Permissions](https://docs.o1labs.org/o1js/zkapps/permissions). ### How are proofs generated in the Mina Protocol? [Kimchi](https://minaprotocol.com/blog/kimchi-the-latest-update-to-minas-proof-system) is the main machinery that generates the recursive proofs that allow the Mina blockchain to remain of a fixed size of about 22 KB. See [Proof systems](https://o1-labs.github.io/proof-systems/). ### Are there proof generation scenarios when recursive proofs are not needed? Yes. It is possible to use the Kimchi proof system without the Pickles recursion layer. See [Pickles](https://o1-labs.github.io/proof-systems/specs/pickles.html?highlight=pickl#pickles) in the Mina book. ### Which curves are used by the Mina Protocol to generate proofs? Pasta curves (Pallas and Vesta). See [Pasta Curves](https://o1-labs.github.io/proof-systems/specs/pasta.html?highlight=curves#pasta-curves) in the Mina book. ### When do I use Provable conditional logic? Are there situations in which I would not want to use the Provable versions? If the conditional logic is not part of your provable code, you do not need to use Provable conditional statements. --- url: /zkapps/front-end-integration-guides/angular --- # Angular Integration Guide ## Install a Wallet - Install a wallet that supports zkApp transactions. For this tutorial, we’ll use **Auro Wallet** (v2.3.1). [Download it here](https://www.aurowallet.com/). - Add the Auro Wallet browser extension. - Open the extension and follow the steps to create a new wallet. - Click **"Mainnet"** at the top of the extension view, then select **"Show Testnet"** from the menu. After that, select **"Devnet"**. - Using Devnet will allow us to interact with a test version of the Mina network without needing to spend real Mina to pay for transaction fees.
Enable testnets on Auro

- Fund your wallet using the [Mina Faucet](https://faucet.minaprotocol.com/). - You'll need to wait one block (~90 seconds) to see the change in balance reflected on chain. You can use [Minascan](https://minascan.io/devnet) to track the status of your transaction.
Enable testnets on Auro

## Initialize the Project - Install the Angular CLI globally: ```bash npm install -g @angular/cli@19 ``` - Create a new Angular project by running: ```bash ng new ``` - Configure the project - For **Which stylesheet format would you like to use?**, select CSS. - For **Do you want to enable Server-Side Rendering (SSR) and Static Site Generation (SSG/Prerendering)? (y/N)**, choose **No**. - Install the `o1js` library: ```bash cd npm install o1js@2 ``` - Start the local development server. - This command runs `ng serve` which we will further configure by changing `options` under the `serve` build target in `angular.json`. ```bash npm run start ``` ## Create the ZkApp Contract - Navigate out of the demo project directory and install the `zkapp-cli` globally: ```bash cd ../ npm install -g zkapp-cli@0.22.3 ``` - Initialize a new zkapp with the CLI. When prompted to create a UI project, select **none**. ```bash zk project add ``` - Change into the newly created `add` directory and build the contract: ```bash cd add npm run build ``` - We've already deployed an instance of the default `Add` contract to Devnet at [B62qnTDEeYtBHBePA4yhCt4TCgDtA4L2CGvK7PirbJyX4pKH8bmtWe5](https://minascan.io/devnet/account/B62qnTDEeYtBHBePA4yhCt4TCgDtA4L2CGvK7PirbJyX4pKH8bmtWe5) so you won't need to deploy the contract you just created. You'll still need to include the contract code in your project so that it can be compiled into a verification key and proving key. - The proving key enables users to generate proofs of valid contract execution directly in their browsers. A user can run a contract call locally, create a proof of its execution using the proving key, and then publish the proof on-chain to update the zkApp’s state. Since the verification key is stored on-chain, the network will accept a transaction sent to this address if it includes a proof generated with the proving key that matches the on-chain verification key. ## Call Contracts - Move back into the Angular project. - To interact with the deployed `Add` contract, we’ll add code to fetch the current state and initiate a transaction. This code will execute only in the browser, so we'll add it to `afterNextRender` in the constructor of `src/app/app.component.ts`. - `afterNextRender` only runs after the Angular component has fully rendered. - The Auro wallet injects a Mina provider into the global context. It is accessible as `window.mina`. ```tsx @Component({ selector: 'app-root', standalone: true, imports: [RouterOutlet], templateUrl: './app.component.html', styleUrl: './app.component.css' }) export class AppComponent { // replace with your project name! title = ''; constructor() { afterNextRender(async () => { const {Mina, PublicKey, fetchAccount} = await import('o1js'); const {Add} = await import('../../../add'); // connect the Mina instance to testnet Mina.setActiveInstance(Mina.Network('https://api.minascan.io/node/devnet/v1/graphql')); // we've already deployed the Add contract on testnet at this address // https://minascan.io/devnet/account/B62qnTDEeYtBHBePA4yhCt4TCgDtA4L2CGvK7PirbJyX4pKH8bmtWe5 const zkAppAddress = `B62qnTDEeYtBHBePA4yhCt4TCgDtA4L2CGvK7PirbJyX4pKH8bmtWe5`; await fetchAccount({publicKey: zkAppAddress}); const zkApp = new Add(PublicKey.fromBase58(zkAppAddress)); // Read state from the testnet Add contract console.log(`Reading state of add contract at ${zkAppAddress}: num=${zkApp.num.get()}`); try { // retrieve the injected mina provider if it exists const mina = (window as any).mina; const walletKey: string = (await mina.requestAccounts())[0]; console.log(`Injected mina provider address: ${walletKey}`); await fetchAccount({publicKey: PublicKey.fromBase58(walletKey)}); console.log("Compiling Add"); await Add.compile(); console.log("Compiled Add"); // send a transaction with the injected Mina provider const transaction = await Mina.transaction(async () => { await zkApp.update(); }); await transaction.prove(); const {hash} = await mina.sendTransaction({ transaction: transaction.toJSON(), }); // display the link to the transaction const transactionLink = `https://minascan.io/devnet/tx/${hash}`; console.log(`View transaction at ${transactionLink}`); } catch (e: any) { console.error(e.message); if (e.message.includes("Cannot read properties of undefined (reading 'requestAccounts')")) { console.error("Is Auro installed?"); } else if (e.message.includes("Please create or restore wallet first.")) { console.error("Have you created a wallet?"); } else if (e.message.includes("User rejected the request.")) { console.error("Did you grant the app permission to connect to your wallet?"); } else { console.error("An unknown error occurred:", e); } } }); } } ``` - The above code: - Connects Mina to a Devnet node so transactions are broadcasted to Devnet. - Requests the user's address from the mina provider injected into the browser context by the wallet. - Compiles the `Add` zkApp contract to generate and cache the proving key, which will allow the app to create proofs for transactions. - Creates a zkapp transaction calling `update` on the `Add` contract. - Proves the transaction using the proving key which o1js has internally cached. - Prompts the user to broadcast the transaction to the network with their wallet. - Now run the application in your browser with `npm run start` (which executes `ng serve`) and open the browser console. - Approve the connection request displayed in Auro. ## SharedArrayBuffer Headers for `ng serve` - You'll see that some of the code works, like the on-chain state retrieval, but compiling a zkapp fails with `DataCloneError: Failed to execute 'postMessage' on 'Worker': SharedArrayBuffer transfer requires self.crossOriginIsolated`. - `SharedArrayBuffer` is a JavaScript object that lets different threads share memory. Since o1js's proving is very computationally intensive, we us WASM workers for parallel processing in the browser. - For security reasons, `SharedArrayBuffer` needs certain headers to be set. These prevent cross origin resources (scripts and content loaded from external domains, iframes, and popups) from accessing shared memory. - Cross-Origin-Opener-Policy (COOP) must be set to `"same-origin"` to prevents cross-origin resources from accessing the main document’s memory. - Cross-Origin-Embedder-Policy (COEP) must be set to `"require-corp"` to restrict the way cross origin resources can be loaded by the main document. They'll either need to be from the same origin or include the `Cross-Origin-Resource-Policy: cross-origin` header. - Depending on how the application is being run, there are different ways to set these headers. Running the application locally with `ng serve` uses `@angular-devkit/build-angular:dev-server"` which we can configure in the project's `angular.json` file at `/projects//architect/serve/configurations/development`. - Architect is Angular's task runner, the entries (called build targets) under `architect` each represent tasks that the Angular CLI can run (`ng build`, `ng serve`, `ng test`, etc). The `builder` property of each target specifies the program that Architect should run to execute the task. The `options` can be used to supply parameters to the builder, and the `configurations`specifies a custom set of options for different target configurations (development, production, etc). - Running `ng serve` locally runs the `@angular-devkit/build-angular:dev-server` builder, and in its options object we can specify custom headers specifying the headers required for `SharedArrayBuffer` as follows: ```json "serve": { "builder": "@angular-devkit/build-angular:dev-server", + "options": { + "headers": { + "Cross-Origin-Opener-Policy": "same-origin", + "Cross-Origin-Embedder-Policy": "require-corp" + } + }, "configurations": { "production": { "buildTarget": "angular-demo:build:production" }, "development": { "buildTarget": "angular-demo:build:development" } }, "defaultConfiguration": "development" }, ``` - Restart the server with `npm run start` and view the application in the browser again - the `SharedArrayBuffer` error should be gone! ## Loading o1js - We still have another error: `Uncaught ReferenceError: __async is not defined`. - This one comes from the way Angular bundles dependencies internally. We'll address it by supplying our own custom webpack config which will exclude o1js from the bundle generated by Angular. Then we'll copy o1js into our static assets directory so it's served with the app and use import maps to import o1js directly. ### Create a Custom Webpack Config - Start by creating a custom webpack config by adding a file `webpack.config.js` at the root of your project with the following contents: ```jsx module.exports = { externals: { 'o1js': 'o1js' } }; ``` ### Update Builders to Use Custom Webpack - Install builders which support using custom webpack configs - Angular's default builder will ignore the webpack file. ```bash npm install @angular-builders/custom-webpack@19 ``` - Update the `serve` and `build` build targets to use the `@angular-builders/custom-webpack` builders and load the file. - In `angular.json` under `/projects//architect/build`, replace the default builder `"builder": "@angular-devkit/build-angular:application",` with `"builder": "@angular-builders/custom-webpack:browser"`. - rename the `browser` property to `main` in `options`. - add `"customWebpackConfig": { "path": "./webpack.config.js" },` to `options`. - In `angular.json` under `/projects//architect/serve`, replace the default builder `"builder": "@angular-devkit/build-angular:dev-server",` with `"builder": "@angular-builders/custom-webpack:dev-server"`. - The changes to your build targets should look like this: ```json "architect": { "build": { - "builder": "@angular-devkit/build-angular:application", + "builder": "@angular-builders/custom-webpack:browser", "options": { + "customWebpackConfig": { "path": "./webpack.config.js" }, "outputPath": "dist/angular-demo", "index": "src/index.html", - "browser": "src/main.ts", + "main": "src/main.ts", "polyfills": [ "zone.js" ], "tsConfig": "tsconfig.app.json", "assets": [ { "glob": "**/*", "input": "public" } ], "styles": [ "src/styles.css" ], "scripts": [] }, "configurations": { ... }, "defaultConfiguration": "production" }, "serve": { - "builder": "@angular-devkit/build-angular:dev-server", + "builder": "@angular-builders/custom-webpack:dev-server", "options": { "headers": { "Cross-Origin-Opener-Policy": "same-origin", "Cross-Origin-Embedder-Policy": "require-corp" } }, "configurations": { ... }, "defaultConfiguration": "development" }, ``` ### Copy o1js into Static Assets - Now we'll write a script to copy o1js into `public` where our static assets are served along with the application and then import it directly with an `importmap`. - Add a script to `package.json` that copies o1js from `node_modules` to a new directory at `public/lib/o1js`. - Files under public are served with the app, so the file itself will be available at `http://localhost:4200/lib/o1js/index.js`. ```json "copy-libs": "mkdir -p public/lib/o1js && cp node_modules/o1js/dist/web/index.js public/lib/o1js/index.js" ``` - Add the `copy-o1js-lib` task to the build script and the start script. ```json "build": "npm run copy-libs && ng build", "start": "npm run copy-libs && ng serve" ``` - Add `public/lib` to `.gitignore`. ### Load o1js with an `importmap` - Above the closing `` tag in `src/index.html` add these scripts to import o1js from `public/lib/o1js`: ```html ... ``` - Now instead of importing o1js as a regular npm dependency, we declare it as a top level variable in app component knowing that it will exist in the global context of the browser at runtime. Add the following to the top of `src/app.component.ts`: ```tsx // at the top of the file: declare var o1js: typeof o1jsTypes; ``` - Remove the import of o1js inside of `afterNextRender` and replace it with this: ```tsx - const {Mina, PublicKey, fetchAccount} = await import('o1js'); + const {Mina, PublicKey, fetchAccount} = o1js; ``` ## Running the App Locally - Congratulations! The app should work as expected when served with `npm run start` (`ng serve`). - Restart the application with `npm run start`. - Verify that `Set the global o1js instance: Module {…}` was logged in the console, indicating that o1js was successfully loaded from our public assets. - Verify that the current `num` on the `Add` zkapp is logged, meaning that we're successfully reading state from the contract at `B62qnTDEeYtBHBePA4yhCt4TCgDtA4L2CGvK7PirbJyX4pKH8bmtWe5` on Devnet. - Verify that "Compiled Add" is logged, meaning that the SDK has successfully generated a proving key for the `Add` zkapp. - If you're connected to Devnet and your account is funded with Devnet tokens, you should be be able to broadcast a successful transaction calling `update` on the zkapp. After a few minutes, the state change associated with the transaction will take effect on chain and you'll see `num` increase when you reload the page! ## Deploying to GitHub Pages - Now we'll set the app up for deployment to GitHub pages. - Publish your project to a GitHub repository with the same name. - Run `ng deploy` and select GitHub Pages. ```bash ng deploy ``` - Add `baseHref` to `options` under `build` in angular.json with the name of your GitHub repository. - **Do not remove the slashes!** ```json "baseHref": "//" ``` - Create a deploy script in package.json which copies the required libraries ```json "deploy": "npm run copy-libs && ng deploy --dir=dist/" ``` - Deploy the app. ```bash npm run deploy ``` - You can view deployment details at `https://github.com///actions` and your live site at `https://.github.io//`. ## SharedArrayBuffer in Deployed Instance - View the site and open the browser console. You'll see the same error about the SharedArrayBuffer from before! The headers set previously apply only to `ng serve`, so we’ll set them up for GitHub Pages. - Install `coi-serviceworker`. ```bash npm install coi-serviceworker@^0.1.7 ``` - Update the script that copies `o1js` to `public` to also include the `coi-serviceworker` file: ```json "copy-libs": "mkdir -p public/lib/o1js && cp node_modules/o1js/dist/web/index.js public/lib/o1js/index.js && cp node_modules/coi-serviceworker/coi-serviceworker.min.js public/coi-serviceworker.min.js" ``` - Import it in your `index.html` file right above the o1js importmap script. ```html ``` - Redeploy the application with the `COIServiceWorker` files. ```bash npm run deploy ``` ## Congratulations, you’ve developed and deployed a zkApp UI with Angular! Next steps include learning to use web workers to prevent computationally expensive operations like `compile` from blocking the UI thread, handling events, and building more complex zkApp contracts! --- url: /zkapps/front-end-integration-guides/next --- # Next JS Integration Guide ## Initialize the Project We will follow the project initialization workflow from the [NextJS docs](https://nextjs.org/docs/app/getting-started/installation). This tutorial uses version 15, but the same concepts should apply to all versions of Next. - Create a new project by running: ```bash npx create-next-app@15.1.4 ``` For this tutorial, I have selected the following options: ``` ✔ What is your project named? … next-js-integration-guide ✔ Would you like to use TypeScript? … Yes ✔ Would you like to use ESLint? … Yes ✔ Would you like to use Tailwind CSS? … Yes ✔ Would you like your code inside a `src/` directory? … Yes ✔ Would you like to use App Router? (recommended) … Yes ✔ Would you like to use Turbopack for `next dev`? … No ✔ Would you like to customize the import alias (`@/*` by default)? … No ``` - Install o1js For this tutorial, we are using o1js version 2. ```bash npm i o1js@^2 ``` - Make sure that everything is working by running the development server ```bash npm run dev ``` ## Configure the app for effective o1js usage This section will walk through the basics of configuring a Next.js app to work with o1js. The two main points are: - Set the COOP and COEP headers so that o1js can communicate with the shared array buffer used by WASM - This is strictly necessary for o1js to work in browers, whether or not you choose to use web workers - Set up some web worker infrastructure so that long-running o1js computation does not block rendering your site ### Update headers in next config To set the COOP and COEP headers correctly in next, edit your `next.config.ts` file to match the snippet below: ```ts const nextConfig: NextConfig = { async headers() { return [ { source: "/(.*)", headers: [ { key: "Cross-Origin-Opener-Policy", value: "same-origin", }, { key: "Cross-Origin-Embedder-Policy", value: "require-corp", }, ], }, ]; }, }; export default nextConfig; ``` #### (Alternative) Update Headers in Vercel Config If you plan to deploy to vercel only, then you can configure the headers in `vercel.json` instead of `next.config.ts`. Here is an example of how to do that: ```json { "headers": [ { "source": "/(.*)", "headers": [ { "key": "Cross-Origin-Embedder-Policy", "value": "require-corp" }, { "key": "Cross-Origin-Opener-Policy", "value": "same-origin" } ] } ] } ``` The Next JS config method will work on all deployment platforms, including Vercel. ### Use Comlink to create a worker We strongly recommend using web workers in your o1js-enabled apps. Comlink is a package which wraps web workers in a convenient API, and I will use it for this guide, but any way of using web workers that you're comfortable with will work. To use Comlink, first install it: ```bash npm i comlink ``` Then, create a worker, and a workerClient file. For this app, I will call the files `todoListWorker.ts` and `todoListWorkerClient.ts`. ```bash touch src/app/todoListWorker.ts src/app/todoListWorkerClient.ts ``` For now, let's put some boilerplate in these files: ```ts // todoListWorker.ts export const api = { async sayHi() { return "Hello from the worker!"; } }; Comlink.expose(api); ``` ```ts // todoListWorkerClient.ts export default class TodoListWorkerClient { worker!: Worker; remoteApi: Comlink.Remote; constructor() { const worker = new Worker(new URL("./todoListWorker.ts", import.meta.url), { type: "module", }); this.remoteApi = Comlink.wrap(worker); } async sayHi() { return await this.remoteApi.sayHi(); } } ``` ### Set any page that needs access to the web worker to 'use client' mode Only client-side rendered code will have access to web workers. Server-rendered components don't have access to browser features. In order to make use of web workers, tell next that your component should be client-rendered with `'use client'` on `page.tsx`. ```ts // page.tsx 'use client' // <---- Add this line to tell next to render this page client-side export default function Home() { return ( ``` Then, import the web worker and confirm that it is working: ```ts 'use client' export default function Home() { /** * Add this code to the top of the page confirm that the worker is functioning */ const workerClient = new TodoListWorkerClient(); workerClient.sayHi().then((message) => { console.log(message); }); return ( //... ``` Confirm that you see the message logged in your browser by opening the dev tools (F12) and looking for 'Hello from the worker!'. Now we have our web worker set up and we're ready to add logic to our app! ## Write the provable code that you want to execute in browser The rest of the guide will go through specifically how to write a todolist program with o1js and run it in the browser using the Next.js config that we just set up. The first step is writing a `ZkProgram`. `ZkProgram` is how proofs are created in o1js. Generating the proof is done in javascript, either in node, or in a browser, and verifying the proof can be done in javascript as well, or on a network like Mina, Protokit or Zeko. Let's get started by creating a new file called `zkTodoList.ts` and describing our program: ```bash mkdir -p src/lib && touch src/lib/zkTodoList.ts ``` ```ts // zkTodoList.ts export { IndexedMerkleMap8, ZkTodoList, ZkTodoListProof }; class IndexedMerkleMap8 extends Experimental.IndexedMerkleMap(8) {} const ZkTodoList = ZkProgram({ name: "TodoList", publicOutput: IndexedMerkleMap8, methods: {}, }); class ZkTodoListProof extends ZkProgram.Proof(ZkTodoList) {} ``` - `class IndexedMerkleMap8 extends Experimental.IndexedMerkleMap(8) {}` - This line creates the class we will use to store our todo list - IndexedMerkleMap(8) means a merkle map with 2^8 leaves that can be accessed by index - `publicOutput: IndexedMerkleMap8,` - This line defines the type of the output of the proof as our indexed merkle map class - So every proof of the contents of a todolist will export the merkle map that it is valid for Next let's add the data structure for a todo item. We want to track the text of the todo and the status, whether it's been completed or not. ```ts export { IndexedMerkleMap8, Todo, // <---- Add this line to export the Todo class ZkTodoList, ZkTodoListProof }; class IndexedMerkleMap8 extends Experimental.IndexedMerkleMap(8) {} // Add this class to represent a todo item as a provable struct class Todo extends Struct({ text: CircuitString, status: Bool, }) { hash() { return Poseidon.hash([this.text.hash(), this.status.toField()]); } } const ZkTodoList = ZkProgram({ ``` Finally, let's add methods to our program to handle initializing, adding a todo, and completing a todo. ```ts const ZkTodoList = ZkProgram({ name: "TodoList", publicOutput: IndexedMerkleMap8, methods: { /** * init creates a proof of an empty merkle map, representing an empty todo list */ init: { privateInputs: [], method: async () => { const publicOutput = new IndexedMerkleMap8(); return { publicOutput }; }, }, /** * addTodo inserts a new todo into the merkle map at the given index */ addTodo: { privateInputs: [SelfProof, Field, Todo], method: async ( p: SelfProof, index: Field, todo: Todo ) => { p.verify(); const publicOutput = p.publicOutput.clone(); publicOutput.insert(index, todo.hash()); return { publicOutput }; }, }, /** * completeTodo marks a todo at a given index as completed */ completeTodo: { privateInputs: [SelfProof, Field, Todo], method: async ( p: SelfProof, index: Field, todo: Todo ) => { p.verify(); const publicOutput = p.publicOutput.clone(); publicOutput.get(index).assertEquals(todo.hash()); todo.status = Bool(true); publicOutput.update(index, todo.hash()); return { publicOutput }; }, }, }, }); ``` That should do it for our ZkProgram! Let's get back to the web application and integrate this new feature. ## Wrap ZkProgram functionality in the web worker Back in our web worker, we will now want to expose the funcitonality of the todo list program to the Next.js application. Since we already set the worker up properly, this part is very straightforward. We simply need to import the zk program and write new methods for the worker that correspond to the features. We will also track some state in the web worker for convenience. ```ts // todoListWorker.ts IndexedMerkleMap8, Todo, ZkTodoList, ZkTodoListProof, } from "../lib/zkTodoList"; export type TodoObjectRepr = { text: string; status: boolean; }; const state = { merkleMap: null as IndexedMerkleMap8 | null, objectRepr: {} as Record, proof: null as ZkTodoListProof | null, index: 0, }; export const api = { async init() { console.time("Compiling zkTodoList"); await ZkTodoList.compile(); console.timeEnd("Compiling zkTodoList"); const initialProof = await ZkTodoList.init(); state.proof = initialProof.proof; state.merkleMap = initialProof.proof.publicOutput; }, async addTodos(todos: Array) { if (!state.proof) { throw new Error("Proof not initialized"); } let i = 0; while (todos.length > 0) { const text = todos.shift()!; console.log("Adding todo", i, text); const todo = new Todo({ text: CircuitString.fromString(text), status: Bool(false), }); const index = Field(state.index + 1); const proof = await ZkTodoList.addTodo(state.proof, index, todo); state.merkleMap = proof.proof.publicOutput; state.index++; i++; state.objectRepr[state.index] = { text, status: false }; state.proof = proof.proof; } }, async completeTodo(index: number) { if (!state.proof || !state.merkleMap) { throw new Error("Proof not initialized"); } try { const todoHash = state.merkleMap.get(Field(index)); console.log("Completing todo", index, todoHash); } catch (e) { throw new Error("Todo not found"); } const todoRepr = state.objectRepr[index]; if (!todoRepr) { throw new Error("Todo not found"); } if (todoRepr.status) { throw new Error("Todo already completed"); } const todo = new Todo({ text: CircuitString.fromString(todoRepr.text), status: Bool(todoRepr.status), }); const text = todo.text.toString(); const proof = await ZkTodoList.completeTodo( state.proof, Field(index), new Todo({ text: CircuitString.fromString(text), status: Bool(false), }) ); todoRepr.status = true; state.merkleMap = proof.proof.publicOutput; state.objectRepr[index] = todoRepr; state.proof = proof.proof; }, async completeTodos(indices: Array) { for (const index of indices) { console.log("Completing todo", index); await this.completeTodo(index); } }, getTodo(index: number) { return state.objectRepr[index]; }, getTodos() { return state.objectRepr; }, }; Comlink.expose(api); ``` And add the relevant wrappers to the worker client. ```ts // todoListWorkerClient.ts export default class TodoListWorkerClient { worker!: Worker; remoteApi: Comlink.Remote; constructor() { const worker = new Worker(new URL("./todoListWorker.ts", import.meta.url), { type: "module", }); this.remoteApi = Comlink.wrap(worker); } async init() { await this.remoteApi.init(); } async addTodos(todos: Array) { await this.remoteApi.addTodos(todos); } async completeTodos(indices: Array) { await this.remoteApi.completeTodos(indices); } async getTodo(index: number) { return await this.remoteApi.getTodo(index); } async getTodos() { return await this.remoteApi.getTodos(); } } ``` ## Applying the UI For the final step, let's create a couple simple components to round out our application. Let's create some files. These components will render our pending and proven todo items. The pending items are stored in react state until we add them to the proven data by calling the web worker client. This improves performance by not having to wait for the proof to be generated every time an action is taken. ```bash mkdir -p src/components touch src/components/PendingTodoItem.tsx src/components/PendingTodosQueue.tsx src/components/ProvenTodoItem.tsx src/components/ProvenTodosQueue.tsx ``` ```tsx // PendingTodoItem.tsx export default function PendingTodoItem({ todo }: { todo: string }) { return (
  • {todo}

  • ); } ``` ```tsx // PendingTodosQueue.tsx export default function TodosQueue({ title, subheading, todos }: { title: string, subheading: string, todos: Array }) { return (

    {title}

    {subheading}

  • Todo

    • {todos.map((todo, index) => ( ))}
    ); } ``` ```tsx // ProvenTodoItem.tsx export default function ProvenTodoItem({ todo, index, completeTodo }: { todo: TodoObjectRepr, index: number, completeTodo: (index: number) => void }) { return (
  • {todo.text}

    {todo.status ? "✅" : "❌"}

    {index}

    {todo.status ? (

    Already complete!

    ) : ()}
  • ); } ``` ```tsx // ProvenTodosQueue.tsx export default function ProvenTodosQueue({ title, subheading, todos, completeTodo }: { title: string, subheading: string, todos: Record, completeTodo: (index: number) => void }) { return (

    {title}

    {subheading}

  • Todo

    Status

    Index

    Actions

    • {Object.entries(todos).map(([index, todo]) => { console.log(index, todo); return ( ); })}
    ); } ``` Now that these files are created, let's use them in our main `page.tsx`. ```tsx // page.tsx "use client"; export default function Home() { const [todoListWorkerClient, setTodoListWorkerClient] = useState(null); const [hasBeenInitialized, setHasBeenInitialized] = useState(false); const [workerIsBusy, setWorkerIsBusy] = useState(false); const [todoList, setTodoList] = useState | null>(null); const [newTodo, setNewTodo] = useState(""); const [newTodosQueue, setNewTodosQueue] = useState([]); const [pendingCompleteTodosQueue, setPendingCompleteTodosQueue] = useState([]); const [logMessages, setLogMessages] = useState([]); const logContainerRef = useRef(null); const isInitializingRef = useRef(false); const initializeWorker = async (worker: TodoListWorkerClient) => { setLogMessages((prev) => [...prev, "Compiling zk program..."]); const timeStart = Date.now(); await worker.init(); const todos = await worker.getTodos(); setLogMessages((prev) => [...prev, `Zk program compiled in ${Date.now() - timeStart}ms`]); setTodoList(todos); setHasBeenInitialized(true); isInitializingRef.current = false; }; const setup = async () => { setWorkerIsBusy(true); if (!todoListWorkerClient) { setLogMessages((prev) => [...prev, "No worker client found, creating new one..."]); const workerClient = new TodoListWorkerClient(); setTodoListWorkerClient(workerClient); setLogMessages((prev) => [...prev, "Worker client created"]); isInitializingRef.current = true; await initializeWorker(workerClient); } else if (!hasBeenInitialized && !isInitializingRef.current) { isInitializingRef.current = true; await initializeWorker(todoListWorkerClient); } setWorkerIsBusy(false); }; useEffect(() => { setup(); }, [hasBeenInitialized, todoListWorkerClient]); useEffect(() => { if (logContainerRef.current) { logContainerRef.current.scrollTop = logContainerRef.current.scrollHeight; } }, [logMessages]); const addTodo = async () => { setNewTodosQueue([...newTodosQueue, newTodo]); setLogMessages((prev) => [...prev, `Added todo to pending queue: ${newTodo.substring(0, 10)}...`]); setNewTodo(""); }; const resolveTodosQueue = async () => { setLogMessages((prev) => [...prev, "Proving pending todos queue..."]); setWorkerIsBusy(true); const timeStart = Date.now(); await todoListWorkerClient!.addTodos(newTodosQueue); const todos = await todoListWorkerClient!.getTodos(); setTodoList(todos); setWorkerIsBusy(false); setLogMessages((prev) => [...prev, `Todos queue proven in ${Date.now() - timeStart}ms!`]); setNewTodosQueue([]); }; const completeTodo = async (index: number) => { if(!todoList) return; setLogMessages((prev) => [...prev, `Marking todo ${index} for completion...`]); setPendingCompleteTodosQueue([...pendingCompleteTodosQueue, index]); }; const resolveCompleteTodosQueue = async () => { setLogMessages((prev) => [...prev, "Proving pending complete todos queue..."]); setWorkerIsBusy(true); const timeStart = Date.now(); await todoListWorkerClient!.completeTodos(pendingCompleteTodosQueue); const todos = await todoListWorkerClient!.getTodos(); setTodoList(todos); setWorkerIsBusy(false); setLogMessages((prev) => [...prev, `Complete todos queue proven in ${Date.now() - timeStart}ms!`]); setPendingCompleteTodosQueue([]); }; return (

    Todo List with o1js and Next JS!

    This is a demo site built with o1js and Next JS. Follow along with step by step instructions for how to build this site{" "} here!

    Console Log

      {logMessages.map((message, index) => (
    • {message}
    • ))}
    setNewTodo(e.target.value)} />
    todoList![index].text)} />
    {hasBeenInitialized ? ( todoList !== null && (
    ) ) : (
    Waiting for zk circuit to compile...
    )}
    ); } ``` ## Deployment Now that we have a complete app, here are the steps to deploy. We will cover deployment to Vercel. Deploying a Next JS app to Vercel is quite easy! You will need a github repository with the code. If you've been following along with this guide, you can use the repo that you've already built, or you can fork the reference implementation [on Github](https://github.com/o1-labs-XT/next-js-integration-example). You can follow the instructions about linking your repo to Vercel and deploying it [here](https://nextjs.org/learn-pages-router/basics/deploying-nextjs-app/deploy). In the Vercel UI, you simply import your Github repo, and it will deploy automatically. ### Troubleshooting #### Build Failure Make sure that running `npm run build` locally works before deploying. If it doesn't, fix the error locally, then push your changes to git, and they will be automatically redeployed. --- url: /zkapps/o1js/basic-concepts --- # o1js Basic Concepts o1js is a TypeScript (TS) library for writing general-purpose zero knowledge (zk) programs and writing zk smart contracts for Mina. ## Field Field elements are the basic unit of data in zero knowledge proof programming. Each field element can store a number up to almost 256 bits in size. You can think of a field element as a `uint256` in Solidity. :::note For the cryptography inclined, the exact max value that a field can store is: 28,948,022,309,329,048,855,892,746,252,171,976,963,363,056,481,941,560,715,954,676,764,349,967,630,336. ::: For example, in typical programming, you might use: `const sum = 1 + 3`. In o1js, you write this as: `const sum = new Field(1).add(new Field(3))` This can be simplified as: `const sum = new Field(1).add(3)` Note that the `3` is auto-promoted to a field type to make this cleaner. ## Built-in data types Some common data types you may use are: ```ts new Bool(x); // accepts true or false new Field(x); // accepts an integer, or a numeric string if you want to represent a number greater than JavaScript can represent but within the max value that a field can store. new UInt64(x); // accepts a Field - useful for constraining numbers to 64 bits new UInt32(x); // accepts a Field - useful for constraining numbers to 32 bits PrivateKey, PublicKey, Signature; // useful for accounts and signing new Group(x, y); // a point on our elliptic curve, accepts two Fields/numbers/strings Scalar; // the corresponding scalar field (different than Field) CircuitString.from('some string'); // string of max length 128 ``` In the case of `Field` and `Bool`, you can also call the constructor without `new`: ```ts let x = Field(10); let b = Bool(true); ``` ## Conditionals Traditional conditional statements are not supported by o1js: ```ts // this will NOT work if (foo) { x.assertEquals(y); } ``` Instead, use the o1js built-in `Circuit.if()` method, which is a ternary operator: ```ts const x = Circuit.if(new Bool(foo), a, b); // behaves like `foo ? a : b` ``` ## Functions Functions work as you would expect in TypeScript. For example: ```ts function addOneAndDouble(x: Field): Field { return x.add(1).mul(2); } ``` ## Common methods Some frequently used common methods are: ```ts let x = new Field(4); // x = 4 x = x.add(3); // x = 7 x = x.sub(1); // x = 6 x = x.mul(3); // x = 18 x = x.div(2); // x = 9 x = x.square(); // x = 81 x = x.sqrt(); // x = -9 let b = x.equals(8); // b = Bool(false) b = x.greaterThan(8); // b = Bool(true) b = b.not().or(b).and(b); // b = Bool(true) b.toBoolean(); // true let hash = Poseidon.hash([x]); // takes array of Fields, returns Field let privKey = PrivateKey.random(); // create a private key let pubKey = PublicKey.fromPrivateKey(privKey); // derive public key let msg = [hash]; let sig = Signature.create(privKey, msg); // sign a message sig.verify(pubKey, msg); // Bool(true) ``` For a full list, see the [o1js reference](https://docs.o1labs.org/o1js/api-reference/Introduction). --- url: /zkapps/o1js/bitwise-operations --- # Bitwise Operations Bitwise operations manipulate individual bits within a binary representation of a number. They can, at times, resemble boolean operations but apply to a sequence of bits instead of booleans. Bitwise operations are generally available in most programming languages, including TypeScript. o1js provides versions of them that operate on `Field` elements and result in the necessary circuit constraints to generate a zero knowledge proof of the computation. This is especially useful when implementing hashing algorithms such as SHA256. In o1js, bitwise operations and their attendant helper functions are implemented as [gadgets](/zkapps/o1js/gadgets). Bitwise operations: - [and()](#and) - [not()](#not) - [xor()](#xor) - [leftShift32()](#leftshift32) - [leftShift64()](#leftshift64) - [rightShift64()](#rightshift64) - [rotate32()](#rotate32) - [rotate64()](#rotate64) Helper functions: - [addMod32()](#addmod32) - [divMod32()](#divmod32) - [rangeCheck32()](#rangecheck32) - [rangeCheck64()](#rangecheck64) - [multiRangeCheck()](#multirangecheck) - [compactMultiRangeCheck()](#compactmultirangecheck) ## and() ```ts and(a: Field, b: Field, length: number) => Field ``` The bitwise `and()` gadget is a provable equivalent to the [bitwise AND (&)](https://developer.mozilla.org/en-US/docs/Web/JavaScript/Reference/Operators/Bitwise_AND) operator in JavaScript. It receives two `Field` elements and compares the corresponding pairs of bits from the binary representation of each. The comparison returns 1 only if both bits are 1 and returns 0 if either bit is not 1. This results in a new binary number, which is returned as a `Field` element. For details about the implementation, see [AND](https://o1-labs.github.io/proof-systems/specs/kimchi.html?highlight=gates#and) in the Mina book. The `length` parameter: - Specifies how many bits to compare. - Adds more constraints for larger numbers. Example: ```ts let a = Field(3); // ... 000011 let b = Field(5); // ... 000101 let c = Gadgets.and(a, b, 2); // ... 000001 c.assertEquals(1); ``` ## not() ```ts not(a: Field, length: number, checked: boolean) => Field ``` The bitwise `not()` gadget is a provable equivalent to the [Bitwise NOT (~)](https://developer.mozilla.org/en-US/docs/Web/JavaScript/Reference/Operators/Bitwise_NOT) operator in JavaScript. It receives a `Field` element and negates each bit of its binary representation, turning all the 1s into 0s and all the 0s into 1s. It essentially flips all the bits in a `Field` element. This results in a new binary number, which is returned as a `Field` element. The implementation varies depending on whether the input length is checked. Not checking the input length is more efficient. The input is subtracted from an all-ones bitmask (where all the bits in a binary sequence are set to 1). The tradeoff is that you need to know the input length up front. This is safe when the input `Field` is the result of some other proven operation with a known output length. When the input length is checked, however, the [xor()](#xor) gadget is reused. An all-ones bitmask of equal length to the input `Field` is supplied as the second argument. This results in the same operation with proven input length and more constraints. The input `Field` must be 254 bits or less. The `length` parameter: - Specifies how many bits to negate. - Adds more constraints for larger numbers. The `checked` parameter: - Specifies whether to check the length of the input. - Defaults to `false`. For details about the implementation, see [NOT](https://o1-labs.github.io/proof-systems/specs/kimchi.html?highlight=gates#not) in the Mina book. Example: ```ts let a = Field(0b0101); let b = Gadgets.not(a,4,true); b.assertEquals(0b1010); ``` ## xor() ```ts xor(a: Field, b: Field, length: number) => Field ``` The `xor()` gadget is a provable equivalent to the [Bitwise XOR (^)](https://developer.mozilla.org/en-US/docs/Web/JavaScript/Reference/Operators/Bitwise_XOR) operator in JavaScript. It receives two `Field` elements and compares the corresponding pairs of bits from the binary representation of each. The comparison returns 1 if the bits differ and 0 if they are the same. This results in a new binary number, which is returned as a `Field` element. The `length` parameter: - Specifies how many bits to compare. - Adds more constraints for larger numbers. For details about the implementation, see [XOR](https://o1-labs.github.io/proof-systems/specs/kimchi.html?highlight=gates#xor-1) in the Mina book. Example: ```ts let a = Field(0b0101); let b = Field(0b0011); let c = Gadgets.xor(a, b, 4); // xor-ing 4 bits c.assertEquals(0b0110); ``` ## leftShift32() ```ts leftShift32(field: Field, bits: number) => Field ``` The `leftShift32()` gadget is a provable equivalent to the [Left shift (<<)](https://developer.mozilla.org/en-US/docs/Web/JavaScript/Reference/Operators/Left_shift) operator in JavaScript. It moves the bits of a binary number to the left by the specified number of `bits`. Any bits that fall off the left side are discarded. 0s are padded in from the right. It returns a new `Field` element that is range-checked to 32 bits. The input `Field` must not exceed 32 bits in size. You can use [rangeCheck32](#rangecheck32) to ensure this. Example: ```ts const x = Provable.witness(Field, () => Field(0b001100)); // 12 in binary const y = Gadgets.leftShift32(x, 2); // left shift by 2 bits y.assertEquals(0b110000); // 48 in binary ``` ## leftShift64() ```ts leftShift64(field: Field, bits: number) => Field ``` The `leftShift64()` gadget is a provable equivalent to the [Left shift (<<)](https://developer.mozilla.org/en-US/docs/Web/JavaScript/Reference/Operators/Left_shift) operator in JavaScript. It moves the bits of a binary number to the left by the specified number of `bits`. Any bits that fall off the left side are discarded. 0s are padded in from the right. It returns a new `Field` element that is range-checked to 64 bits. The input `Field` must not exceed 64 bits in size. You can use [rangeCheck64](#rangecheck64) to ensure this. Example: ```ts const x = Provable.witness(Field, () => Field(0b001100)); // 12 in binary const y = Gadgets.leftShift64(x, 2); // left shift by 2 bits y.assertEquals(0b110000); // 48 in binary const xLarge = Provable.witness(Field, () => Field(12345678901234567890123456789012345678n)); Gadgets.leftShift64(xLarge, 32); // throws an error since input exceeds 64 bits ``` ## rightShift64() ```ts rightShift64(field: Field, bits: number) => Field ``` The `rightShift64()` gadget is a provable equivalent to the [Right shift (>>)](https://developer.mozilla.org/en-US/docs/Web/JavaScript/Reference/Operators/Right_shift) operator in JavaScript. It moves the bits of a binary number to the right by the specified number of `bits`. Any bits that fall off the right side are discarded. 0s are padded in from the left. It returns a new `Field` element. The input `Field` must not exceed 64 bits in size. You can use [rangeCheck64](#rangecheck64) to ensure this. Example: ```ts const x = Provable.witness(Field, () => Field(0b001100)); // 12 in binary const y = Gadgets.rightShift64(x, 2); // right shift by 2 bits y.assertEquals(0b000011); // 3 in binary const xLarge = Provable.witness(Field, () => Field(12345678901234567890123456789012345678n)); Gadgets.rightShift64(xLarge, 32); // throws an error since input exceeds 64 bits ``` ## rotate32() ```ts rotate32(field: Field, bits: number, direction: 'left' | 'right' = 'left') { return rotate32(field, bits, direction); }, ``` The `rotate32()` gadget performs provable bit rotation on 32-bit numbers. It is similar to left shift and right shift, except the bits that fall off the end wrap around to reappear on the opposite side instead of being discarded. It accepts a `Field` element, the number of `bits` to rotate, and a `direction` of left or right. The default direction is left. The input `Field` must not exceed 32 bits in size. You can use [rangeCheck32](#rangecheck32) to ensure this. For implementation details, see [ROTATION](https://o1-labs.github.io/proof-systems/specs/kimchi.html?highlight=gates#rotation) in the Mina book. Example: ```ts const x = Provable.witness(Field, () => Field(0b001100)); const y = Gadgets.rotate32(x, 2, 'left'); // left rotation by 2 bits const z = Gadgets.rotate32(x, 2, 'right'); // right rotation by 2 bits y.assertEquals(0b110000); z.assertEquals(0b000011); const xLarge = Provable.witness(Field, () => Field(12345678901234567890123456789012345678n)); Gadgets.rotate32(xLarge, 32, "left"); // throws an error since input exceeds 32 bits ``` ## rotate64() ```ts rotate64(field: Field, bits: number, direction: 'left' | 'right' = 'left') { return rotate64(field, bits, direction); }, ``` The `rotate64()` gadget performs provable bit rotation on 32-bit numbers. It is similar to left shift and right shift, except the bits that fall off the end wrap around to reappear on the opposite side instead of being discarded. It accepts a `Field` element, the number of `bits` to rotate, and a `direction` of left or right. The default direction is left. The input `Field` must not exceed 64 bits in size. You can use [rangeCheck64](#rangecheck64) to ensure this. For implementation details, see [ROTATION](https://o1-labs.github.io/proof-systems/specs/kimchi.html?highlight=gates#rotation) in the Mina book. Example: ```ts const x = Provable.witness(Field, () => Field(0b001100)); const y = Gadgets.rotate64(x, 2, 'left'); // left rotation by 2 bits const z = Gadgets.rotate64(x, 2, 'right'); // right rotation by 2 bits y.assertEquals(0b110000); z.assertEquals(0b000011); const xLarge = Provable.witness(Field, () => Field(12345678901234567890123456789012345678n)); Gadgets.rotate64(xLarge, 32, "left"); // throws an error since input exceeds 64 bits ``` ## addMod32() ```ts addMod32(a: Field, b: Field) => Field ``` The `addMod32()` helper performs addition that overflows on 32-bit numbers, much like the `int32` type. It returns the result of addition modulo `2^32` in a new `Field` element. The input `Field`s must not exceed 32 bits in size. You can use [rangeCheck32](#rangecheck32) to ensure this. Example: ```ts let a = Field(8n); let b = Field(1n << 32n); Gadgets.addMod32(a, b).assertEquals(Field(8n)); ``` ## divMod32() ```ts divMod32(field: Field) => { remainder: Field, quotient: Field } ``` The `divMod32()` helper performs division modulo `2^32`, decomposing a `Field` element into two 32-bit limbs, `remainder` and `quotient`. It returns a tuple of two `Field` elements. The helper asserts that the input is no larger than 64 bits in size and that both outputs are no larger than 32 bits in size. It is, therefore, unnecessary to perform range checks. Example: ```ts let n = Field((1n << 32n) + 8n) let { remainder, quotient } = Gadgets.divMod32(n); // remainder = 8, quotient = 1 n.assertEquals(quotient.mul(1n << 32n).add(remainder)); ``` ## rangeCheck32() ```ts rangeCheck32(x: Field) => void ``` The `rangecheck32()` helper asserts that the input `Field` does not exceed 32 bits in size. Note that small, negative inputs are interpreted as large integers close to the field size and will not pass the 32-bit check. To prove that a value lies in the int32 range `[-2^31, 2^31)`, you can use `rangeCheck32(x.add(1n << 31n))`. Example: ```ts const x = Provable.witness(Field, () => Field(12345678n)); Gadgets.rangeCheck32(x); // successfully proves 32-bit range const xLarge = Provable.witness(Field, () => Field(12345678901234567890123456789012345678n)); Gadgets.rangeCheck32(xLarge); // throws an error since input exceeds 32 bits ``` ## rangeCheck64() ```ts rangeCheck64(x: Field) => void ``` The `rangecheck64()` helper asserts that the input `Field` does not exceed 64 bits in size. Note that small, negative inputs are interpreted as large integers close to the field size and will not pass the 64-bit check. To prove that a value lies in the int64 range `[-2^63, 2^63)`, use `rangeCheck64(x.add(1n << 63n))`. Example: ```ts const x = Provable.witness(Field, () => Field(12345678n)); Gadgets.rangeCheck64(x); // successfully proves 64-bit range const xLarge = Provable.witness(Field, () => Field(12345678901234567890123456789012345678n)); Gadgets.rangeCheck64(xLarge); // throws an error since input exceeds 64 bits ``` ## multiRangeCheck() ```ts multiRangeCheck([x, y, z]: [Field, Field, Field]) => void ``` The `multiRangeCheck()` helper asserts that all three input `Field`s do not exceed 88 bits in size. This is done more efficiently than the standalone range check helpers. The 3x88-bit range check supports BigInts up to 264 bits, which is enough for foreign field multiplication with moduli up to 2^259. Example: ```ts const x = Provable.witness(Field, () => Field(12345678n)); const y = Provable.witness(Field, () => Field(12345678n)); const z = Provable.witness(Field, () => Field(12345678n)); const xLarge = Provable.witness(Field, () => Field(12345678901234567890123456789012345678n)); Gadgets.multiRangeCheck([x, y, z]); // succeeds Gadgets.multiRangeCheck([xLarge, y, z]); // fails ``` ## compactMultiRangeCheck() ```ts compactMultiRangeCheck(xy: Field, z: Field) => [Field, Field, Field]; ``` The `compactMultiRangeCheck()` helper is a variant of [multiRangeCheck](#multirangecheck) where the first two inputs `x` and `y` are passed in combined form `xy = x + 2^88*y`. It splits `x` and `y`, performs the range check, and returns `x`, `y`, and `z` separately. Example: ```ts let [x, y, z] = Gadgets.compactMultiRangeCheck([xy, z]); ``` --- url: /zkapps/o1js/circuit-writing-primer --- # Overview of the circuit-writing features in o1js o1js is a library for writing zk circuits in TypeScript. While many high-level features are abstracted away from the circuit level, this article will focus specifically on the tools that are specific to the unique nature of writing circuits. ## What even is a zk circuit? For our purposes, you can think of a zk circuit as a set of gates, which we can give an input and produce a deterministic output. We can prove the correct output of the circuit without revealing the inputs. o1js produces `kimchi` proofs. Kimchi is defined in detail in the [Mina Book](https://o1-labs.github.io/proof-systems/specs/kimchi.html), including specifications for each type of gate that is supported. Generally speaking, each type of gate represents a specific algebraic expression, and the values in the row represent coeffecients of that expression. ## What are the implications of writing a circuit? One of the challenges when approaching circuit-writing is understanding how the nature of a circuit differs from most common programming paradigms. There is no equivalent to `JUMP` or `GOTO` in a circuit. The implication of this for the developer is there is no way to branch or dynamically loop in o1js. There are some workarounds to these limitations that we will discuss, but it's important to understand the fundamental limitation. The tradeoff for these limitations is that circuits can be proven to be executed correctly. Practically all applications built with o1js should be designed with this tradeoff in mind. "How does proving correct execution of this program provide value?" is a question you should ask about any ZkApp design built with o1js. ## Witnesses In a circuit, a witness is kind of like a blank space that is purposefully left to be filled in by the prover. The size and shape of a witness must be known at the time of circuit creation, but the value does not need to be known until the prover generates a proof. It's like a function argument in Typescript, but much more strict. When you write provable code, you may explicitly create a witness of a certain type, and some classes in o1js will implicitly create witnesses for convenience. ## Understanding your circuit What do we mean when we say that o1js is used to "build a circuit"? Well, there is a complicated build process that combs through your TypeScript code and generates a set of constraints. But there is a _simple_ way to visualize the output. ### Provable.constraintSystem Circuits, aka contraint systems, can be summarized in o1js with a helper function from the `Provable` namespace. ```ts let boundCS = await Provable.constraintSystem(() => { const anyField = Provable.witness(Field, () => Field(1001)); const lowerBound = anyField.greaterThanOrEqual(1000); const upperBound = anyField.lessThanOrEqual(9999); lowerBound.and(upperBound).assertTrue(); }); console.log(boundCS); ``` ```sh rows: 56, digest: '4567a98430470b1709fab57843059246', gates: [ { type: 'Generic', wires: [Array], coeffs: [Array] }, { type: 'RangeCheck0', wires: [Array], coeffs: [Array] }, { type: 'RangeCheck0', wires: [Array], coeffs: [Array] }, { type: 'RangeCheck1', wires: [Array], coeffs: [] }, .... { type: 'Generic', wires: [Array], coeffs: [Array] }, { type: 'Generic', wires: [Array], coeffs: [Array] }, { type: 'Generic', wires: [Array], coeffs: [Array] } ], publicInputSize: 0, print: [Function: print], summary: [Function: summary] ``` You see, `Provable.constraintSystem` lets us visualize our entire circuit. When using `Provable.constraintSystem`, witnesses need to be explicitly created for any input data. This is easily verified by updating the code: ```ts let boundCS = await Provable.constraintSystem(() => { const anyField = Field(1001); const lowerBound = anyField.greaterThanOrEqual(1000); const upperBound = anyField.lessThanOrEqual(9999); lowerBound.and(upperBound).assertTrue(); }); console.log(boundCS); ``` ```sh rows: 0, digest: '4f5ddea76d29cfcfd8c595f14e31f21b', gates: [], publicInputSize: 0, print: [Function: print], summary: [Function: summary] ``` As you can see, there is no circuit this time because the input `const anyField = Field(1001);` is not explicitly witnessed in. One added benetit of checking your code with `Provable.constraintSystem` is that it can help you verify that your circuit is actually provable. Some of the common mistakes people make that result in non-provable circuits will show `0` rows and an empty `gates` array. ### analyzeMethods Both `SmartContract` and `ZkProgram` expose the method `analyzeMethods`. This is a convenience method that will go through each provable method on the defined class, and summarize the circuit that it creates. ```ts const MyProgram = ZkProgram({ name: 'MyProgram', publicInput: Field, publicOutput: Field, methods: { add: { privateInputs: [Field], method: async (publicValue: Field, privateValue: Field) => { privateValue.assertGreaterThan(10); return { publicOutput: publicValue.add(privateValue) }; }, }, mul: { privateInputs: [Field], method: async (publicValue: Field, privateValue: Field) => { return { publicOutput: publicValue.mul(privateValue) }; }, }, }, }); console.log(await MyProgram.analyzeMethods()); ``` ```sh { add: { rows: 20, digest: '4aa07dbc03b8ead435d938812ff79575', gates: [ [Object], [Object], [Object], [Object], [Object], [Object], [Object], [Object], [Object], [Object], [Object], [Object], [Object], [Object], [Object], [Object], [Object], [Object], [Object], [Object] ], publicInputSize: 0, print: [Function: print], summary: [Function: summary] }, mul: { rows: 1, digest: '2a840c03f4e37242a8056a4aa536358c', gates: [ [Object] ], publicInputSize: 0, print: [Function: print], summary: [Function: summary] } } ``` With `analyzeMethods`, you see that the witnesses are created automatically by the declarative method syntax. ## Branching logic and loops ### Provable If Because we lack a `JUMP` or `GOTO` type of behavior in the proof system, traditional if statements won't work. In fact, we absolutely cannot skip _executing_ part of a function based on an if statement. Luckily, we can still set the value of a variable based on a condition using `Provable.if`. It works like this: ```ts const x = Provable.if(new Bool(true), Field(1), Field(2)); // x is always equal to Field(1) const y = Provable.if(a.greaterThan(b), Field(1), Field(2)); // y will be Field(1) if a > b, Field(2) otherwise let z = Field(0); // z will _always_ be Field(3) because both branches are executed!!! Provable.if(a.greaterThan(b), (z = z.add(Field(1))), (z = z.add(Field(2)))); ``` ### Provable Array Unbounded arrays are not possible in a circuit, so TypeScript arrays cannot be used. o1js provides an alternative, `Provable.Array`, which is a fixed-size array that can be used in a circuit. This is a very convenient tool because it allows for using loop syntax, instead of forcing the developer to repeat code. Be careful when using `Provable.Array` because the rules still apply. You can't use conditional logic to break out of a loop. So each and every iteration will occur in every proof. When dealing with an array size like 100 or more, the costs associated with iterating so many times can become expensive. ```ts const MyArray = Provable.Array(Field, 5); const MyArrayProgram = ZkProgram({ name: 'MyArrayProgram', publicOutput: Field, methods: { hash: { privateInputs: [MyArray], method: async (myArray: Field[]) => { return { publicOutput: Poseidon.hash(myArray) }; }, }, equivalent: { privateInputs: [Field, Field, Field, Field, Field], method: async (a: Field, b: Field, c: Field, d: Field, e: Field) => { return { publicOutput: Poseidon.hash([a, b, c, d, e]) }; }, }, }, }); const analysis = await MyArrayProgram.analyzeMethods(); console.log('hash: ', { rows: analysis.hash.rows, digest: analysis.hash.digest, }); console.log('equivalent: ', { rows: analysis.equivalent.rows, digest: analysis.equivalent.digest, }); ``` ```sh hash: { rows: 38, digest: 'ac5f1fd447da277f66bcbbe6f46a22f8' } equivalent: { rows: 38, digest: 'ac5f1fd447da277f66bcbbe6f46a22f8' } ``` ### What happens if I don't follow the rules? In the case of conditional logic, we _can_ still generate a valid circuit. But the circuit will ignore the branching. In these cases, the javascript will execute with a dummy value, and whatever conditional branches the dummy value goes down, that will be the circuit. If we edit the implementation of the hash method above to include a condition on the input length, it will appear to be valid... ```ts hash: { privateInputs: [MyArray], method: async (myArray: Field[]) => { if (myArray.length !== 5) { return { publicOutput: Field(0) }; } else { return { publicOutput: Poseidon.hash(myArray) }; } }, }, ``` ```sh hash: { rows: 38, digest: 'ac5f1fd447da277f66bcbbe6f46a22f8' } ``` Note that the circuit did not change at all, because even though we appear to have added a branch, the dummy value has a length of 5, so the other branch is simply discarded. If we try to call this method with an input of greather than or fewer than 5 elements, we will _not_ succeed in producing a valid proof. We will get an error for attempting to break the rules. ```ts await MyArrayProgram.compile(); const p = await MyArrayProgram.hash([Field(10)]); ``` ```sh Error: Error when witnessing in hash, argument 0: Expected witnessed values of length 5, got 1. at exists (o1js/src/lib/provable/core/exists.ts:32:11) at Object.witness (o1js/src/lib/provable/types/witness.ts:32:14) at main (o1js/src/lib/proof-system/zkprogram.ts:845:30) ``` The same intuition applies for looping a variable number of times. Instead of the witness being the wrong size, the circuit will have the wrong gates. The result is the same: the _javascript_ is valid, and may lull you into a sense of security, but you need to apply your circuit-writing knowledge to create valid programs. ## More Resources These sources heavily influenced the preceding article and go into more depth about circuits in o1js: - Check out [Mastermind at 5 Levels](https://github.com/o1-labs-XT/mastermind-zkApp) for a practical example of how to implement thees concepts to build a game. - Read Yunus' article ["Let's Prove"](https://docs.google.com/document/d/1JQPypqNc7nIRbY0c_5zHFI5TbvbCTe1neiSTPxfLmWA/edit?tab=t.0), a complete guide to o1js. --- url: /zkapps/o1js/custom-tokens --- # Custom Token API You can use o1js to perform common token operations, such as minting, burning, and sending tokens. ## Minting Minting generates new tokens whereby the zkApp updates the balance of an account by adding the newly created tokens to it. Minted tokens can be sent to any existing account in the ledger. To mint new tokens using a zkApp, this example of the `this.token` property on the `SmartContract` class shows how a zkApp can mint tokens to another account: ```ts class MintExample extends SmartContract { ... @method mintNewTokens(receiverAddress: PublicKey) { this.token.mint({ address: receiverAddress, amount: 100_000, }); } } ``` This example snippet defines a smart contract called `MintExample` with a method called `mintNewTokens`. Using `this.token`, the smart contract specifies the address to mint new tokens for as well as the amount. ## Burning Burning tokens is the opposite of minting. Burning tokens deducts the balance of a certain address by the specified amount. The following examples show how a zkApp can burn tokens of another account: ```ts class BurnExample extends SmartContract { ... @method burnTokens(addressToDecrease: PublicKey) { this.token.burn({ address: addressToDecrease, amount: 100_000, }); } } ``` This example snippet defines a smart contract called `BurnExample` with a method called `burnTokens`. Similar to minting, the `this.token` property calls the `burn()` method. This specifies the amount of tokens to burn for the specified address. A zkApp cannot burn more tokens than the specified account has. An error is thrown and no such transaction is made. ## Sending To send a custom token, use the `send()` method available on `this.token`. This example shows how a zkApp can approve sending tokens between two accounts: ```ts class SendExample extends SmartContract { ... @method sendTokens( senderAddress: PublicKey, receiverAddress: PublicKey, amount: UInt64 ) { this.token.send({ to: receiverAddress, from: senderAddress, amount, }); } } ``` This example snippet defines a smart contract called `SendExample` with a method called `sendTokens()`. Then, in the same fashion, as minting and burning, the `this.token` property calls the `send()` method. For a comprehensive example of how to use custom tokens with a zkApp, see the custom token example provided in [token.test.ts](https://github.com/o1-labs/o1js/blob/main/src/lib/token.test.ts). ## Proof Authorization When a zkApp interacts with a custom token that it did not originally create, the calling zkApp must get authorization from the [token owner](#token-owner). A token owner approves a transaction using a **proof**. ### Proof Authorization Proof authorization is a more flexible way for a token owner to approve a custom token transfer. If two separate accounts want to trade a specific custom token, the token owner can provide a proof that the transaction is valid. This allows the token owner to approve a transaction without signing it. To allow for proof authorization by the token owner, the child zkApp that is requesting authorization must provide a way for the token owner to inspect the changes it wants to make and verify that they are valid. Token owner contracts have the power to inspect child account updates to enforce custom token rules. For example, a token owner contract could enforce that a child zkApp can send tokens only to a specific address. Token owner contracts can inspect the updates that a child zkApp wants to make by using a combination of `Experimental.Callback` and `this.approve`. The first thing that a token contract must do is generate the account updates that a child zkApp wants to make. The child zkApp wraps a function around `Experimental.Callback` which contains the changes it wants to make. The token owner can then execute that function with `this.approve` and inspect the changes that the child zkApp wants to make. This example shows how a zkApp can approve a transaction between two accounts by calling a specified `SmartContract` method: ```ts /** * This TokenContract class is used to create a custom token * and acts as the token owner of the custom token */ class TokenContract extends SmartContract { ... /** * 'sendTokens()' sends tokens from `senderAddress` to `receiverAddress`. * * It does so by deducting the amount of tokens from `senderAddress` by * authorizing the deduction with a proof. It then creates the receiver * from `receiverAddress` and sends the amount. */ @method sendTokens( senderAddress: PublicKey, receiverAddress: PublicKey, amount: UInt64, callback: Experimental.Callback ) { // approves the callback which deductes the amount of tokens from the sender let senderAccountUpdate = this.approve(callback); // Create constraints for the sender account update and amount let negativeAmount = Int64.fromObject( senderAccountUpdate.body.balanceChange ); negativeAmount.assertEquals(Int64.from(amount).neg()); let tokenId = this.token.id; // Create receiver accountUpdate let receiverAccountUpdate = Experimental.createChildAccountUpdate( this.self, receiverAddress, tokenId ); receiverAccountUpdate.balance.addInPlace(amount); } } class ZkAppB extends SmartContract { /* * This method is used to get authorization from the token owner. Remember, * the token owner is the one who created the custom token. To debit their * balance, we must get authorization from the token owner */ @method approveSend(amount: UInt64) { this.balance.subInPlace(amount); } } let tx = await Local.transaction(feePayer, () => { let amount = UInt64.from(1_000) // Create a callback inside the transaction that calls the approveSend method. // This will be executed by the token owner to get authorization. let approveSendingCallback = Experimental.Callback.create( zkAppB, 'approveSend', [amount] ); // Here, we call the token contract with the callback tokenZkApp.sendTokens(zkAppBAddress, account1Address, amount, approveSendingCallback); }); await tx.prove(); tx.sign([zkAppBKey]); await tx.send(); ``` The result of this example is `zkAppB` sending tokens to `account1Address` and `account1Address` receiving tokens from `zkAppB`. The transaction is approved by the token owner without the token owner having to sign the transaction. For another example of how to approve a transaction with a zkApp, see this [authorization example](https://github.com/o1-labs/o1js/blob/main/src/examples/zkapps/token_with_proofs.ts) provided. ## Understanding Important Terms If your zkApp interacts with custom tokens, be sure you understand the following essential terms: ### Token id Token ids are unique identifiers that are used to distinguish between different types of custom tokens. Custom token identifiers are globally unique across the entire network. Token ids are derived from a zkApp. To check the token id of a zkApp, use the `this.token.id` property. ### Token Accounts Token accounts are like regular accounts, but they hold a balance of a specific custom token instead of MINA. A token account is created from an existing account but is specified by a public key _and_ a token id. If an existing account receives a transaction that is specified by a custom token, a token account for that public key and token id is created if it does not exist. Token accounts are specific for each type of custom token, meaning that a single public key can have many different types of token accounts. A token account is automatically created for a public key whenever an existing account receives a transaction denoted with a custom token. When a token account is created for the first time, an account creation fee must be paid the same as creating a new standard account. In addition to sending custom tokens, a **token owner account** can mint and burn custom tokens. A token owner account is the governing zkApp account for a specific custom token. ### Token Owner A token owner is an account that creates, facilitates, and governs how a custom token is to be used. Concretely, the token owner is the account that created the custom token and is the only account that can mint and burn tokens. In addition to being the only account that can mint and burn tokens, the token owner is the only account that can approve sending tokens between two accounts. If two accounts want to send tokens to each other, the token owner must approve the transaction. The token owner generates the changes the two accounts want to make and can then make assertions about those changes. The token owner can approve the transaction with a proof. --- url: /zkapps/o1js/ecdsa --- # ECDSA ECDSA, or Elliptic Curve Digital Signature Algorithm, is a cryptographic algorithm used to sign and verify messages. It is used in many blockchains, including Ethereum, to sign transactions. ECDSA works with different elliptic curves. Bitcoin and Ethereum both use the [secp256k1](/glossary#secp256k1) curve. ## Why ECDSA? To interact with other blockchains and verify data from the outside world, o1js needs to be able to verify signatures. ECDSA is a widely used algorithm that is supported by many libraries and tools. For example, Ethereum transactions are signed using ECDSA over the secp256k1 curve. As a zkApp developer, when you want to verify an Ethereum transaction and make a statement about it, you must be able to verify the signature of the transaction which is why ECDSA is important for zkApps. ## Basic usage The ECDSA gadget is used to verify ECDSA signatures. The gadget takes as input the message, the signature, and the public key of the signer. It outputs a `Bool` indicating whether the signature is valid. Before you can verify a signature, you must initiate the gadget with a curve configuration. To initiate the curve: ```ts // create a secp256k1 curve class Secp256k1 extends createForeignCurve(Crypto.CurveParams.Secp256k1) {} ``` By default, o1js exports a set of predefined curves. You can use the `createForeignCurve` function to create a curve from a `CurveParams` object. The `CurveParams` object contains the parameters of the curve, such as the modulus, the generator, and the parameters `a` and `b` of the curve equation `y^2 = x^3 + ax + b`. The namespace `Crypto.CurveParams` exports predefined curves, such as `Pallas`, `Vesta`, and `Secp256k1`. ```ts // predefined curve parameters CurveParams: { Secp256k1: CurveParams; Pallas: CurveParams; Vesta: CurveParams; } ``` This example uses `Secp256k1` as used in Ethereum. Now that you have a curve, you can create an instance of the ECDSA gadget: ```ts // create an instance of ECDSA over secp256k1, previously specified class Ecdsa extends createEcdsa(Secp256k1) {} ``` Before you can verify a signature, you must create one by signing a message. Messages are of type `Bytes`, see [Bytes - API reference](https://docs.o1labs.org/o1js/api-reference/functions/Bytes). To sign a message, use the `sign` function of the `Ecdsa` class. Note that signing is not a provable operation, only verifying is. ```ts // a private key is a random scalar of secp256k1 let privateKey = Secp256k1.Scalar.random(); let publicKey = Secp256k1.generator.scale(privateKey); // create a message, for a detailed explanation of `Bytes` take a look at the Keccak overview let message = Bytes32.fromString('cat'); // sign a message - this is not a provable method! let signature = Ecdsa.sign(message.toBytes(), privateKey.toBigInt()); ``` Finally, you can verify the signature using the `verify` method: ```ts // verify the signature, returns a Bool indicating whether the signature is valid or not let isValid: Bool = signature.verify(message, publicKey); ``` See the o1js repository for an [example](https://github.com/o1-labs/o1js/tree/main/src/examples/crypto/ecdsa) of how to use ECDSA. ### ECDSA - API reference ```ts // create a secp256k1 curve from a set of predefined parameters class Secp256k1 extends createForeignCurve(Crypto.CurveParams.Secp256k1) {} // create an instance of ECDSA over secp256k1 class Ecdsa extends createEcdsa(Secp256k1) {} // a private key is a random scalar of secp256k1 - not provable! let privateKey = Secp256k1.Scalar.random(); // a public key is a point on the curve let publicKey = Secp256k1.generator.scale(privateKey); // sign an array of bytes - not provable! let signature = Ecdsa.sign(bytes, privateKey.toBigInt()); // sign a hash of a message - not provable! let signature = Ecdsa.signHash(hash, privateKey.toBigInt()); // verify a signature let isValid: Bool = signature.verify(message, publicKey); // verify a hash of a message let isValid: Bool = signature.verifyHash(hash, publicKey); // create a signature from a hex string let signature = Ecdsa.fromHex('6f6d6e69627573206f6e206120636174...'); // create a signature from s and r, which can be of type `AlmostForeignField`, `Field3`, `bigint` or `number` let signature = Ecdsa.fromScalars({ r, s }); // convert a signature into a r and s of type bigint let { r, s } = signature.toBigInt(); ``` --- url: /zkapps/o1js/foreign-fields --- # Foreign Field Arithmetic A foreign field is a [finite field](https://en.wikipedia.org/wiki/Modular_arithmetic) different from the native field of the proof system. o1js exposes operations like modular addition and multiplication that work in any finite field of size less than `2^259`. Foreign fields are useful for implementing cryptographic algorithms in provable code. For example, you use them for verification of Ethereum-compatible ECDSA signatures. ## Why foreign fields? The core data type in o1js is `Field` that represents the field that is _native to the proof system_. In other words, addition and multiplication of Fields are the fundamental operations upon which all provable code is built. Because a lot of cryptography uses finite fields, o1js natively supports several cryptographic algorithms with high efficiency. See classes and modules like [Poseidon](https://docs.o1labs.org/o1js/api-reference/variables/Poseidon), [PublicKey](https://docs.o1labs.org/o1js/api-reference/classes/PublicKey), [PrivateKey](https://docs.o1labs.org/o1js/api-reference/classes/PrivateKey), [Signature](https://docs.o1labs.org/o1js/api-reference/classes/Signature), and [Encryption](https://docs.o1labs.org/o1js/api-reference/namespaces/Encryption). However, these classes and modules are not compatible with the cryptography used in the wider world: `Signature.verify()` doesn't let you verify a signed JWT or email, and `Encryption.decrypt()` won't help you with your WhatsApp messages. That's because these methods use different finite fields than the native Field that was chosen primarily to enable efficient zk proofs. Here is where foreign fields come in: They let you perform algorithms that connect your zkApp with the outside world of cryptography. Foreign fields come with an efficiency hit compared to the native Field, but the heavily engineered foreign fields are efficient enough to unlock many interesting use cases. ## Basic usage This section provides a brief overview of how to use foreign fields. For more details, refer to the [API reference](https://docs.o1labs.org/o1js/api-reference/classes/ForeignField) or the doc comments on each method. The entry point for using foreign fields is the `createForeignField()` function: ```ts class Field17 extends createForeignField(17n) {} ``` The only parameter that `createForeignField()` takes is the modulus or size of the field. This code example passes in `17n` so that `Field17` allows you to perform arithmetic modulo 17: ```ts let x = Field17.from(16); x.assertEquals(-1); // 16 = -1 (mod 17) x.mul(x).assertEquals(1); // 16 * 16 = 15 * 17 + 1 = 1 (mod 17) ``` As modulus, any number of up to 259 bits is supported. This means that `ForeignField` can be used for many elliptic curve algorithms (where bit sizes are often just below 256) but not for RSA with its typical bit size of 2048. Notably, the modulus does not have to be a prime number. For example, you can create a `UInt256` class where the modulus is `2^256`: ```ts class UInt256 extends createForeignField(1n << 256n) {} // and now you can do arithmetic modulo 2^256! let a = UInt256.from(1n << 255n); let b = UInt256.from((1n << 255n) + 7n); a.add(b).assertEquals(7); ``` The base type that is common to classes created by `createForeignField()` is `ForeignField`: ```ts // ... let zero: ForeignField = Field17.from(0); let alsoZero: ForeignField = UInt256.from(0); ``` `ForeignField` supports the basic arithmetic operations: ```ts x.add(x); // addition x.sub(2); // subtraction x.neg(); // negation x.mul(3); // multiplication x.div(x); // division x.inv(); // inverse ``` Note that these operations are performed modulo the field size. So, `Field17.from(1).div(2)` gives 9 because `2 * 9 = 18 = 1 (mod 17)`. `ForeignField` also comes with a few other provable methods: ```ts x.assertEquals(y); // assert x == y x.assertLessThan(2); // assert x < 2 let bits = x.toBits(); // convert to a `Bool` array of size log2(modulus); Field17.fromBits(bits); // convert back ``` And there are non-provable methods for converting to and from JS values: ```ts let y = SmallField.from(5n); // convert from bigint or number y.toBigInt() === 5n; // convert to bigint ``` As usual, you can find more information about each method in the [API reference](https://docs.o1labs.org/o1js/api-reference/classes/ForeignField). ## Three kinds of foreign fields If the basic usage examples look straightforward, here is where it gets a bit complicated. For each `ForeignField` class created with `createForeignField()`, there are actually three different variants: _unreduced_, _almost reduced_, and _canonical_. You find the variants as static properties on the class; they are themselves classes: ```ts let x = new Field17.Unreduced(0); let y = new Field17.AlmostReduced(0); let z = new Field17.Canonical(0); ``` Unreduced field elements just have the `ForeignField` type. For the other two variants, there are narrower base types that are common to each variant: ```ts y satisfies AlmostReducedField; z satisfies CanonicalField; ``` In the following section, you learn when to use the different variants, and how to convert between them. You don't need to remember all of it, though: The type system guides you to use the right variant in each situation. ### Unreduced fields Most arithmetic operations return unreduced fields: ```ts let z = x.add(x); assert(z instanceof Field17.Unreduced); ``` In short, **unreduced** means that a value can be larger than the modulus. For example, if `x` has the value 16, it is valid for `x.add(x)` to contain the value 32. The addition is correct modulo 17, but doesn't guarantee a result smaller than 17. :::note Unreduced doesn't usually mean that the underlying witness is larger than the modulus. It just means that it is not _proved_ to be smaller. A malicious prover _could_ make it larger by slightly modifying their local version of o1js and creating a proof with that version. ::: Unreduced fields can be added and subtracted, but not multiplied or divided: ```ts z.add(1).sub(x); // works assert((z as any).mul === undefined); // z.mul() is not defined assert((z as any).inv === undefined); assert((z as any).div === undefined); ``` ### Almost reduced fields To do multiplication, you need almost reduced fields. You can convert to them by using `.assertAlmostReduced()`: ```ts let zAlmost = z.assertAlmostReduced(); assert(zAlmost instanceof SmallField.AlmostReduced); ``` Now you can do multiplication and division: ```ts let zz = zAlmost.mul(zAlmost); // zAlmost.mul() is defined // but .mul() returns an unreduced field again: assert(zz instanceof SmallField.Unreduced); // zAlmost.inv() is defined, and returns an almost reduced field: assert(zAlmost.inv() instanceof SmallField.AlmostReduced); ``` It can be convenient to require almost reduced fields as inputs to your smart contract. To do that, create a class that can also serve as a type and use its `.provable` property when passing to the state decorator: ```ts class AlmostField17 extends Field17.AlmostReduced {} class MyContract extends SmartContract { @state(AlmostField17.provable) x = State(); @method async myMethod(y: AlmostField17) { let x = y.mul(2); this.x.set(x.assertAlmostReduced()); } } ``` #### What does almost reduced mean? The definition of almost reduced is somewhat technical. The main motivation is to guarantee that the way you prove modular multiplication is sound. That is definitely true for field elements `< 2^259`. (Recall that the modulus is required to be `< 2^259`.) However, you actually prove a stronger condition, which saves a few constraints in some places: `z` is **almost reduced** modulo `f`, if `z >> 176` is smaller or equal than `f >> 176`. (`>>` means a [right shift](https://en.wikipedia.org/wiki/Arithmetic_shift).) :::note Example: Assume `x` is a `UInt256` holding the value `2^130`. After computing `z = x.mul(x)`, it is valid for `z` to be `2^260`. However, by calling `z.assertAlmostReduced()`, you prove that `z` is smaller than `2^259` and safe to use in another multiplication. According to the stronger definition, you even have `z < 2^256`. ::: Why is `AlmostReducedField` exposed as a separate type, instead of _always_ proving conditions necessary for multiplication? Because that would take up additional constraints! `ForeignField` is built to allow you to use the minimum amount of constraints in a way that is safely guided by the type system. See [minimizing constraints](#minimizing-constraints) for more details. ### Canonical fields Canonical fields are the strictest variant. They are guaranteed to be smaller than the modulus. When you create fields from constants, they always get fully reduced. The type signature of `ForeignField.from()` reflects this and returns a canonical field: ```ts let constant = Field17.from(16); assert(constant instanceof Field17.Canonical); // these also work, because `from()` takes the input mod 17: Field17.from(100000000n) satisfies CanonicalForeignField; Field17.from(-1) satisfies CanonicalForeignField; ``` You can convert any field to canonical by calling `.assertCanonical()`: ```ts let zCanonical = z.assertCanonical(); assert(zCanonical instanceof Field17.Canonical); ``` Canonical fields are a special case of almost reduced fields at the type level: ```ts constant satisfies AlmostForeignField; constant.mul(constant); // works ``` The cheapest way to prove that an existing field element is canonical is to show that it is equal to a constant: ```ts let zCanonical = z.assertEquals(3); assert(zCanonical instanceof Field17.Canonical); ``` An operation that is only possible on canonical fields is the boolean equality check: ```ts let xCanonical = x.assertCanonical(); let yCanonical = y.assertCanonical(); let isEqual = xCanonical.equals(yCanonical); ``` Inputs must be canonical for `equals()` because the operation checks for strict equality, not equality modulo the field size. Note that being strictly unequal does not imply being unequal as field elements, so `equals()` on non-canonical fields would be error-prone. ## Minimizing constraints Follow these strategies to minimize constraints. #### `assertAlmostReduced()` Here is a trick to save constraints when you need to "almost reduce" many field elements: Always reduce them in _batches of 3_. For example, do this when doing many multiplications in a row: ```ts let z1 = x.mul(7); let z2 = x.add(11); let z3 = x.sub(13); let [z1r, z2r, z3r] = Field17.assertAlmostReduced(z1, z2, z3); z1r.mul(z2r); z2r.div(z3r); ``` `assertAlmostReduced()` takes any number of inputs, but is the most efficient with multiples of 3. For example: - 1 input takes 4.5 constraints - 2 inputs take 5 constraints - 3 inputs take 5.5 constraints #### `sum()` Another opportunity to save constraints is when many additions or subtractions are performed in a row. Instead of doing something like `x.add(y).sub(z)`, use `ForeignField.sum()`: ```ts // u = x + y - z let u = Field17.sum([x, y, z], [1, -1]); ``` The second argument is a list of signs: either 1 or -1, depending on whether you want to add or subtract the corresponding value. So, the 1 in this example means "add x and y", and the -1 means "subtract z". To give a few more examples: ```ts // u = x - y - z let u = Field17.sum([x, y, z], [-1, -1]); // u = 2*x + y let u = Field17.sum([x, x, y], [1, 1]); // u = -3*z let u = Field17.sum([0, z, z, z], [-1, -1, -1]); ``` Doing small multiplications like `-3*z` like this is more efficient than using `mul()` for the task. `sum()` uses 6 constraints for the first two summands but only 1 constraint per additional summand. --- url: /zkapps/o1js/gadgets --- # Gadgets Gadgets are small, reusable low-level building blocks that simplify the process of creating new cryptographic primitives. Most gadgets build upon custom gates and act as low-level accelerators in the proof system. In o1js, you can import these provable and helper methods from the `Gadgets` namespace: - [Bitwise Operations](/zkapps/o1js/bitwise-operations) - [Foreign Field Arithmetic](/zkapps/o1js/ecdsa) See the type declaration for [Gadgets](https://docs.o1labs.org/o1js/api-reference/variables/Gadgets) in the o1js Reference documentation. --- url: /zkapps/o1js --- :::info To protect end users and ensure your zkApps are secure, consider the information at [Security and zkApps](/zkapps/writing-a-zkapp/introduction-to-zkapps/secure-zkapps) while architecting your solution and consider a third-party security audit before deploying to Mina mainnet. ::: # Introduction to o1js o1js is a TypeScript library for: - Writing general-purpose zero knowledge (zk) programs - Writing zk smart contracts for Mina This is TypeScript code that you might write when using o1js: ```ts function knowsPreimage(preimage: Field) { let hash = Poseidon.hash([preimage]); hash.assertEquals(expectedHash); } const expectedHash = 0x1d444102d9e8da6d566467defcc446e8c1c3a3616d059facadbfd674afbc37ecn; ``` In a zkApp, this code can be used to prove that you know a secret value whose hash is publicly known without revealing the secret. The code is plain TypeScript and is executed as normal TypeScript. You might call o1js an _embedded domain-specific language (DSL)_. o1js provides data types and methods that are _provable_: You can prove their execution. In the example code, `Poseidon.hash()` and `Field.assertEquals()` are examples of provable methods. Proofs are _zero knowledge_, because they can be verified without learning their inputs and execution trace. Selected parts of the proof can be made public, if it suits your application. o1js is a general-purpose zk framework that gives you the tools to create zk proofs. It lets you write arbitrary zk programs leveraging a rich set of built-in provable operations, like basic arithmetic, hashing, signatures, boolean operations, comparisons, and more. Use the o1js framework to write zkApps on Mina, smart contracts that execute client-side and have private inputs. All of the o1js framework is packaged as a single TypeScript library that can be used in major web browsers and Node.js. The best way to get started with o1js is [using the zkApp CLI](/zkapps/writing-a-zkapp/introduction-to-zkapps/how-to-write-a-zkapp). You can also install o1js from npm with `npm i o1js`. Start your o1js journey by learning about [basic zk programming concepts](/zkapps/o1js/basic-concepts). ## Audits of o1js * [**Veridise external audit (Q3 2024)**](https://github.com/o1-labs/o1js/blob/a09c5167c4df64f879684e5af14c59cf7a6fce11/audits/VAR_o1js_240318_o1js_V3.pdf). We engaged Veridise, a security auditing company, to do a full audit of o1js version 1. Veridise spent 39 person-weeks reviewing o1js in depth, and all issues of medium severity and higher were fixed. * [**Internal audit (Q1 2024)**](https://github.com/o1-labs/o1js/files/15192821/Internal.o1js.audit.Q1.2024.pdf). In March 2024, the o1js team spent roughly two person-weeks to conduct an internal audit of parts of the o1js code base. The audit focused on reviewing core provable code. A number of issues were found and fixed. Please see our page on [Security and zkApps](/zkapps/writing-a-zkapp/introduction-to-zkapps/secure-zkapps) for more information on ensuring your zkApp is secure. --- url: /zkapps/o1js/indexed-merkle-map --- :::experimental The Indexed Merkle Map API is currently an experimental feature. ::: # Indexed Merkle Map Similar to a Merkle Tree, a Merkle Map allows referencing off-chain data by storing a single hash, also known as the root. A Merkle Map is a wrapper around a [Merkle Tree](https://docs.o1labs.org/o1js/basic-types/merkle-trees). Both data structures are analogous, but instead of using an index to set a leaf in a tree, a Merkle Map uses a key in a map. ## Design The Indexed Merkle Map is an improved version of the [MerkleMap](/zkapps/tutorials/common-types-and-functions#merkle-map), offering enhanced efficiency and usability: - **Reduced Constraints:** Uses 4-8x fewer constraints than `MerkleMap`. - **Provable Code Integration:** Unlike `MerkleTree` and `MerkleMap`, the high-level API of `IndexedMerkleMap` is usable within provable code. :::note The `Indexed Merkle Map` can have a height of at most `52`, whereas the `Merkle Map` has a larger height fixed at `256`. ::: ## Utilizing Indexed Merkle Map ### Prerequisites The `IndexedMerkleMap` API is accessible within the `Experimental` namespace. To use the API, import `Experimental` from o1js version 1.5.0 or higher. ```ts const { IndexedMerkleMap } = Experimental; ``` ### Instantiating an Indexed Merkle Map Given a height, you can instantiate an Indexed Merkle Map by extending the base class. The height determines the capacity of the map; the maximum number of leaf nodes it can contain. ```ts const height = 31; class IndexedMerkleMap31 extends IndexedMerkleMap(height) {} ``` In this example, `IndexedMerkleMap31` is a Merkle map capable of holding up to 2(31−1) leaves; approximately 1 billion entries. ### Indexed Merkle Map - API reference For an example, see the `IndexedMerkleMap` [API reference](https://docs.o1labs.org/o1js/api-reference/namespaces/Experimental/functions/IndexedMerkleMap) in o1js. ## Additional Resources For more details and examples, please refer to the following GitHub resources: - [Indexed Merkle Tree: o1js PR#1666](https://github.com/o1-labs/o1js/pull/1666) - [IndexedMerkleMap: Support 0 and -1 Keys: o1js PR#1671](https://github.com/o1-labs/o1js/pull/1671) - [Mastermind zkApp Example Using Indexed Merkle Map](https://github.com/o1-labs-XT/mastermind-zkApp/tree/level3) --- url: /zkapps/protokit --- # Protokit ## Introduction to Protokit Protokit is a **development framework for building zkApps** requiring shared state. Built on top of o1js, Protokit simplifies the developer experience, increases throughput, and decreases latency by orchestrating state transitions between an off-chain sequencer and the Mina L1. Further features, such as runtime abstractions and merkelized data storage, provide components out of the box that zkApp developers would otherwise have to build on top of o1js. **Please note that Protokit is in alpha, and settlement support with reorgs is still in progress.** :::info Protokit dramatically simplifies the development experience for Mina's [Actions & Reducers](https://docs.minaprotocol.com/zkapps/writing-a-zkapp/feature-overview/actions-and-reducer), enabling zkApp developers to build more complex applications. ::: ## Key benefits of using Protokit **Concurrency:** Solves concurrency issues for applications with shared state through a novel hybrid execution model. **Performance**: Improves throughput (TPS) and latency on block production while maintaining Mina L1’s security. **Developer Experience:** Saves developers writing thousands of lines of code by providing an integrated, verifiable storage solution. **Flexibility:** Provides a modular architecture that developers can easily customize for their own application’s needs. **Zero Knowledge:** Uses the same primitives and proofs as o1js, so Protokit code is provable and compatible with the Mina blockchain by design. ## When to use Protokit Protokit is well-suited for high-throughput zkApps with multiple concurrent users and applications requiring shared state. Use Protokit for: * DEXes * Lending protocols * Gaming * Lotteries * NFT marketplaces * Anything that needs a shared state Choosing [which Protokit mode to use](https://docs.minaprotocol.com/zkapps/zkapp-development-frameworks) (Based Sequencing or Hybrid Sequencing mode) depends on what you’re looking to optimize for in your own zkApp. Start here: * [zkApp development frameworks (when to use Protokit vs. o1js)](https://docs.minaprotocol.com/zkapps/zkapp-development-frameworks) * [Developer documentation](https://protokit.dev/docs/what-is-protokit) * [Protokit repository](https://github.com/proto-kit) * [Starter Kit](https://github.com/proto-kit/starter-kit) --- url: /zkapps/roadmap --- # zkApps and o1js Roadmap High-level overview of features available now, next, and later o1js banner To stay up to date with zkApps and o1js, follow the [o1Labs blog posts](https://www.o1labs.org/blog). --- url: /zkapps/standards --- # Standards for the Mina Ecosystem ## Standards Process Standards for Mina are established through an rfc/rfp process: rfcs can be opened in the [Core Grants repository](https://github.com/MinaFoundation/Core-Grants). After discussion on an rfc has concluded, development work can be performed either internally, or by community members after going through an rfp process and receiving a grant. Below, we list standards that have been established for Mina. ## Established Standards ### Fungible tokens We have released a standard implementation for fungible tokens on Mina. It allows for defining rules for minting tokens upon deployment. Tokens can be transferred, either by calling a `transfer` method of the token contract, or by manually constructing transactions from individual account updates. This enables interoperability with third party contracts. The standard implementation can be found on [Github](https://github.com/MinaFoundation/mina-fungible-token). Documentation around how to use the standard can be found [here](https://minafoundation.github.io/mina-fungible-token/introduction.html). The fungible token implementation separates out the rules for minting tokens into a separate admin contract. This is to allow custom rules without modifications to the token contract itself. Note that if you do modify the token contract, third parties such as wallets that want to integrate your token will need to integrate your modification into their own codebase. It is thus recommended to use the standard token contract when possible, and only modify the admin contract. --- url: /zkapps/tutorials/01-hello-world --- # Tutorial 1: Hello World This Hello World tutorial helps you get started with o1js, zkApps, and programming with zero knowledge proofs. In this step-by-step tutorial, you learn to code a zkApp from start to finish. You will: - Write a basic smart contract that stores a number as on-chain state. - The contract logic allows this number to be replaced only by its square; for example, 3 -> 9 -> 81, and so on. - Create a project using the [zkApp CLI](https://www.npmjs.com/package/zkapp-cli) - Write your smart contract code - Use a simulated local Mina blockchain to interact with your smart contract. Later tutorials introduce more concepts and patterns. The full source code for this tutorial is provided in the [examples/zkapps/01-hello-world](https://github.com/o1-labs/docs2/tree/main/examples/zkapps/01-hello-world) directory on GitHub. While you're there, give the `/docs2` repository a star so that other zk developers can learn to build a zkApp! :::info To prevent copying line numbers and command prompts as shown in the examples, use the copy code to clipboard button that appears at the top right of the snippet box when you hover over it. ::: ## Prerequisites Ensure your environment meets the [Prerequisites](/zkapps/tutorials#prerequisites) for zkApp Developer Tutorials. In particular, make sure you have the zkApp CLI installed: ```sh $ npm install -g zkapp-cli ``` ## Create a new project Now that you have the tooling installed, you can start building your application. 1. Create or change to a directory where you have write privileges. 1. Now, create a project using the `zk project` command: ```sh $ zk project 01-hello-world ``` The `zk project` command has the ability to scaffold the UI for your project. For this tutorial, select `none`: ```sh ? Create an accompanying UI project too? … next svelte nuxt empty > none ``` The expected output is: ```sh ✔ Create an accompanying UI project too? · none ✔ UI: Set up project ✔ Initialize Git repo ✔ Set up project ✔ NPM install ✔ NPM build contract ✔ Set project name ✔ Git init commit Success! Next steps: cd 01-hello-world git remote add origin git push -u origin main ``` The `zk project` command creates the `01-hello-world` directory that contains the scaffolding for your project, including tools such as the Prettier code formatting tool, the ESLint static code analysis tool, and the Jest JavaScript testing framework. 1. Change into the `01-hello-world` directory and list the contents: ```sh $ cd 01-hello-world $ ls ``` The output shows these results: ```sh LICENSE README.md babel.config.cjs build config.json jest-resolver.cjs jest.config.js keys node_modules package-lock.json package.json src tsconfig.json ``` For this tutorial, you run commands from the root of the `01-hello-world` directory as you work in the `src` directory on files that contain the TypeScript code for the smart contract. Each time you make updates, then build or deploy, the TypeScript code is compiled into JavaScript in the `build` directory. ### Prepare the project Start by deleting the default files that come with the new project. 1. To delete the old files: ```sh $ rm src/Add.ts $ rm src/Add.test.ts $ rm src/interact.ts ``` 1. Now, create the new files for your project: ```sh $ zk file src/Square $ touch src/main.ts ``` - The `zk file` command created the `src/Square.ts` and `src/Square.test.ts` test files. - This tutorial does not include writing tests, so you just use the `main.ts` file as a script to interact with the smart contract and observe how it works. In later tutorials, you learn how to interact with a smart contract from the browser, like a typical end user. 1. Now, open `src/index.ts` in a text editor and change it to look like: ```ts src/index.ts 1 import { Square } from './Square.js'; 2 3 export { Square }; ``` The `src/index.ts` file contains all of the exports you want to make available for consumption from outside your smart contract project, such as from a UI. ## Write the zkApp Smart Contract Now, the fun part! Write your smart contract in the `src/Square.ts` file. Line numbers are provided for convenience. A final version of the smart contract is provided in the [Square.ts](https://github.com/o1-labs/docs2/blob/main/examples/zkapps/01-hello-world/src/Square.ts) example file. This part of the tutorial walks you through the `Square` smart contract code already completed in the `src/Square.ts` example file. ### Copy the example This tutorial describes each part of the completed code in the [Square.ts](https://github.com/o1-labs/docs2/blob/main/examples/zkapps/01-hello-world/src/Square.ts) example file. 1. First, open the [Square.ts](https://github.com/o1-labs/docs2/blob/main/examples/zkapps/01-hello-world/src/Square.ts) example file. 1. Copy the entire contents of the file into your smart contract in the `src/Square.ts` file. Now you are ready to review the imports in the smart contract. ### Imports The `import` statement brings in other packages and dependencies to use in your smart contract. :::info All functions used inside a smart contract must operate on o1js compatible data types: `Field` types and other types built on top of `Field` types. :::info ```ts src/Square.ts 1 import { 2 Field, 3 SmartContract, 4 state, 5 State, 6 method, 7 } from 'o1js'; ``` These items are: - `Field`: The native number type in o1js. You can think of field elements as unsigned integers. Field elements are the most basic type in o1js. All other o1js-compatible types are built on top of field elements. - `SmartContract`: The class that creates zkApp smart contracts. - `state`: A convenience decorator used in zkApp smart contracts to create references to state stored on-chain in a zkApp account. - `State`: A class used in zkApp smart contracts to create state stored on-chain in a zkApp account. - `method`: A convenience decorator used in zkApp smart contracts to create smart contract methods like functions. Methods that use this decorator are the end user's entry points to interacting with a smart contract. ### Smart contract class Now, review the smart contract in the `src/Square.ts` file. The smart contract called `Square` has one element of on-chain state named `num` of type `Field` as defined by following code: ```ts src/Square.ts 8 9 export class Square extends SmartContract { 10 @state(Field) num = State(); 11 12 } ``` zkApps can have up to 32 fields of on-chain state. Each field stores up to 32 bytes (technically, 31.875 bytes or 255 bits) of arbitrary data. A later tutorial covers options for off-chain state. Now, this code adds the `init` method to set up the initial state of the smart contract on deployment: ```ts src/Square.ts 8 9 export class Square extends SmartContract { 10 @state(Field) num = State(); 11 12 init() { 13 super.init(); 14 this.num.set(Field(3)); 15 } ``` Since this code extends `SmartContract` that has its own initialization to perform, calling `super.init()` invokes this function on the base class. Then, `this.num.set(Field(3))` initializes the on-chain state `num` to a value of `3`. You can optionally specify permissions. See [setPermissions](https://docs.o1labs.org/o1js/api-reference/classes/SmartContract) in the o1js Reference documentation. Finally, this code adds the `update()` function: ```ts src/Square.ts 14 this.num.set(Field(3)); 15 } 16 17 @method async update(square: Field) { 18 const currentState = this.num.get(); 19 this.num.requireEquals(currentState); 20 square.assertEquals(currentState.mul(currentState)); 21 this.num.set(square); 22 } 23 } ``` The function name `update` is arbitrary, but it makes sense for this example. Notice how the `@method` decorator is used because it is intended to be invoked by end users by using a zkApp UI, or as in this case, the `main.ts` script. This method contains the logic by which end users are allowed to update the zkApp's account state on chain. A zkApp account is an account on the Mina blockchain where a zkApp smart contract is deployed. A zkApp account has a verification key associated with it. In this example, the code specifies: - If the user provides a number (for example, 9) to the `update()` method that is the square of the existing on-chain state referred to as `num` (for example, 3), then update the `num` value that is stored on-chain to the provided value (in this case, 9). - If the user provides a number that does not meet these conditions, they are unable to generate a proof or update the on-chain state. These update conditions are accomplished by using assertions within the method. When a user invokes a method on a smart contract, all assertions must be true to generate the zero knowledge proof from that smart contract. The Mina network accepts the transaction and updates the on-chain state only if the attached proof is valid. This assertion is how you can achieve predictable behavior in an off-chain execution model. Notice that `get()` and `set()` methods are used for retrieving and setting on-chain state. - A smart contract retrieves the on-chain account state when it is first invoked if at least one `get()` exists within it. - Similarly, using `set()` changes the transaction to indicate that changes to this particular on-chain state are updated only when the transaction is received by the Mina network if it contains a valid authorization (usually, a valid authorization is a proof). The logic also uses the `.mul()` method for multiplication of the values stored in `Field` types. You can view all available [methods](https://docs.o1labs.org/o1js/api-reference/classes/Field#methods) in the o1js Reference documentation. You remember that functions in your smart contract must operate on o1js compatible data types: `Field` types and other types built on top of `Field` types. Because a smart contract is really a zero knowledge circuit, functions from random npm packages work inside a smart contract only if the functions the contract provides operate on o1js-compatible data types. Importantly, data passed as an input to a smart contract method in o1js is private and never seen by the network. You can also store data publicly on-chain when needed, like `num` in this example. A later tutorial covers an example that leverages privacy. Congratulations, you have reviewed the complete smart contract code. ## Interact with a smart contract Next, write a script that interacts with your smart contract. As before, the complete [main.ts](https://github.com/o1-labs/docs2/blob/main/examples/zkapps/01-hello-world/src/main.ts) example file is provided. Follow these steps to build the `main.ts` file so you can interact with the smart contract. ### Imports For this tutorial, the `import` statement brings in items from `o1js` that you use to interact with your smart contract. 1. Copy the following lines from [main.ts](https://github.com/o1-labs/docs2/blob/main/examples/zkapps/01-hello-world/src/main.ts) example file into the `src/main.ts` file: ```ts src/main.ts 1 import { Square } from './Square.js'; 2 import { Field, Mina, PrivateKey, AccountUpdate } from 'o1js'; ``` These import items are: - `Field`: The same o1js unsigned integer type that you learned earlier. - `Mina`: A simulated local Mina blockchain to deploy the smart contract to so you can interact with it as a user would. - `PrivateKey`: A class with functions for manipulating private keys. - `AccountUpdate`: A class that generates a data structure that can update zkApp accounts. ### Simulated Local Blockchain Using a simulated local blockchain speeds up development and tests the behavior of your smart contract locally. Later tutorials cover how to use a lightweight Mina network (Lightnet) to test your zkApp before you deploy to live networks. :::info - The term _simulated local blockchain_ refers to the local testing blockchain you use in the first phase of testing as described here. - The term _Lightnet_ is used to describe the lightweight Mina network (Lightnet) that is a more accurate representation of the Mina blockchain. See [Testing zkApps with Lightnet](/zkapps/writing-a-zkapp/introduction-to-zkapps/testing-zkapps-lightnet). ::: To initialize your simulated local blockchain, add the following code from the [main.ts](https://github.com/o1-labs/docs2/blob/main/examples/zkapps/01-hello-world/src/main.ts) example file to `src/main.ts`: ```ts src/main.ts 4 const useProof = false; 5 6 const Local = await Mina.LocalBlockchain({ proofsEnabled: useProof }); 7 Mina.setActiveInstance(Local); 8 9 const deployerAccount = Local.testAccounts[0]; 10 const deployerKey = deployerAccount.key; 11 const senderAccount = Local.testAccounts[1]; 12 const senderKey = senderAccount.key; ``` Tip: To preserve line numbers in your local `main.ts` file, add blank lines as needed after you copy the code snippets. This simulated local blockchain provides pre-funded accounts. Add these lines to create local test accounts with test MINA (tMINA) to use for this tutorial: ```ts src/main.ts 16 // ---------------------------------------------------- 17 18 // Create a public/private key pair. The public key is your address and where you deploy the zkApp to 19 const zkAppPrivateKey = PrivateKey.random(); 20 const zkAppAddress = zkAppPrivateKey.toPublicKey(); ``` ### Build and run the smart contract Now that the Square smart contract is complete, these commands run your project as a simulated local blockchain. To compile the TypeScript code into JavaScript: ```sh $ npm run build ``` To run the JavaScript code: ```sh $ node build/src/main.js ``` You have the option to combine these commands into one line: ``` npm run build && node build/src/main.js ``` - The `npm run build` command creates JavaScript code in the `build` directory. - The `&&` operator links two commands together. The second command runs only if the first command is successful. - The `node build/src/main.js` command runs the code in `src/main.ts`. ### Initialize your smart contract To initialize your smart contract, add more code from the [main.ts](https://github.com/o1-labs/docs2/blob/main/examples/zkapps/01-hello-world/src/main.ts) example file to the `src/main.ts` file. All smart contracts that you create with the zkApp CLI use similar code: - Create a public/private key pair; the public key is an address on the Mina network where you deploy the zkApp to - Create an instance of your smart contract `Square` and deploy it to `zkAppAddress` - Get the initial state of `Square` after deployment Comments break down each stage: ```ts src/main.ts 21 22 // create an instance of Square - and deploy it to zkAppAddress 23 const zkAppInstance = new Square(zkAppAddress); 24 const deployTxn = await Mina.transaction(deployerAccount, async () => { 25 AccountUpdate.fundNewAccount(deployerAccount); 26 await zkAppInstance.deploy(); 27 }); 28 await deployTxn.sign([deployerKey, zkAppPrivateKey]).send(); 29 30 // get the initial state of Square after deployment 31 const num0 = zkAppInstance.num.get(); 32 console.log('state after init:', num0.toString()); ``` Try running this command again: ```sh $ npm run build && node build/src/main.js ``` The expected output is: ```sh > 01-hello-world@0.1.0 build > tsc state after init: 3 ``` ### Update your zkApp account with a transaction To update your local zkApp account with a transaction, add the following code to the `src/main.ts` file: ```ts src/main.ts 33 34 // ---------------------------------------------------- 35 36 const txn1 = await Mina.transaction(senderAccount, async () => { 37 await zkAppInstance.update(Field(9)); 38 }); 39 await txn1.prove(); 40 await txn1.sign([senderKey]).send(); 41 42 const num1 = zkAppInstance.num.get(); 43 console.log('state after txn1:', num1.toString()); ``` This code creates a new transaction that attempts to update the field to the value `9`. Because of the rules in the `update()` function that is called on the smart contract, this command succeeds when you run it again: ```sh $ npm run build && node build/src/main.js ``` The expected output is: ```sh > 01-hello-world@0.1.0 build > tsc state after init: 3 state after txn1: 9 ``` ### Add a transaction that fails It's time to do some testing. To add a transaction that fails, add more code from the [main.ts](https://github.com/o1-labs/docs2/blob/main/examples/zkapps/01-hello-world/src/main.ts) example file to the `src/main.ts` file. The contract logic allows the number that is stored as on-chain state to be replaced only by its square. Now that `num` is in state `9`, updating is possible only with `81`. To test a failure, add these next lines of code from the `src/main.ts` file and change the state to `75` in `zkAppInstance.update(Field(75))`: ```ts src/main.ts 44 45 // ---------------------------------------------------- 46 47 try { 48 const txn2 = await Mina.transaction(senderAccount, async () => { 49 await zkAppInstance.update(Field(75)); 50 }); 51 await txn2.prove(); 52 await txn2.sign([senderKey]).send(); 53 } catch (error: any) { 54 console.log(error.message); 55 } 56 const num2 = zkAppInstance.num.get(); 57 console.log('state after txn2:', num2.toString()); ``` Try running this command again: ```sh $ npm run build && node build/src/main.js ``` The expected output is: ```sh > 01-hello-world@0.1.0 build > tsc state after init: 3 state after txn1: 9 Field.assertEquals(): 75 != 81 state after txn2: 9 ``` And finally, be sure to change your `main.ts` file to include the correct update to change the state to `81` in `zkAppInstance.update(Field(81))`. Run this command again: ```sh $ npm run build && node build/src/main.js ``` The expected output is: ```sh > 01-hello-world@0.1.0 build > tsc state after init: 3 state after txn1: 9 state after txn2: 81 ``` ## Follow along You can follow along in this video as cryptographer, David Wong, learns how to code a Hello World project. The video is provided for educational purposes and uses earlier versions of the zkApp CLI and o1js, so there are some differences. The Hello World tutorial always uses the most recent version of the zkApp CLI and o1js. ## Conclusion Congratulations! You have successfully completed all of the steps to build your first zkApp with o1js. Check out [Tutorial 2: Private Inputs and Hash Functions](private-inputs-hash-functions) to learn how to use private inputs and hash functions with o1js. Find more tutorials and resources in the [zkApps docs](/zkapps/writing-a-zkapp). --- url: /zkapps/tutorials/02-private-inputs-hash-functions --- # Tutorial 2: Private Inputs and Hash Functions In the [Hello World](hello-world) tutorial, you built a basic zkApp smart contract with o1js with a single state variable that could be updated if you knew the square of that number. In this tutorial, you learn about private inputs and hash functions. With a zkApp, a smart contract user's local device generates one or more zero knowledge proofs, which are then verified by the Mina network. Each method in a o1js smart contract corresponds to constructing a proof. All inputs to a smart contract are private by default. Inputs are never seen by the blockchain unless you store those values as on-chain state in the zkApp account. In this tutorial, you build a smart contract with a piece of private state that can be modified if a user knows the private state. ## Prerequisites This tutorial has been tested with [zkApp CLI](https://www.npmjs.com/package/zkapp-cli) version `0.20.1`. Ensure your environment meets the [Prerequisites](/zkapps/tutorials#prerequisites) for zkApp Developer Tutorials. ## Create a project 1. Create or change to a directory where you have write privileges. 2. Create a project by using the `zk project` command: ```sh $ zk project 02-private-inputs-and-hash-functions ``` The `zk project` command has the ability to scaffold the UI for your project. For this tutorial, select `none`: ``` ? Create an accompanying UI project too? … next svelte nuxt empty > none ``` The expected output is: ```sh ✔ Create an accompanying UI project too? · none ✔ UI: Set up project ✔ Initialize Git repo ✔ Set up project ✔ NPM install ✔ NPM build contract ✔ Set project name ✔ Git init commit Success! Next steps: cd 02-private-inputs-and-hash-functions git remote add origin git push -u origin main ``` The `zk project` command creates the `02-private-inputs-and-hash-functions` directory that contains the scaffolding for your project, including tools such as the Prettier code formatting tool, the ESLint static code analysis tool, and the Jest Javascript testing framework. 1. Change into the `02-private-inputs-and-hash-functions` directory and list the contents: ```sh $ cd 02-private-inputs-and-hash-functions $ ls ``` The output shows these results: ```sh LICENSE README.md babel.config.cjs build config.json jest-resolver.cjs jest.config.js keys node_modules package-lock.json package.json src tsconfig.json ``` For this tutorial, you run commands from the root of the `02-private-inputs-and-hash-functions` directory as you work in the `src` directory on files that contain the TypeScript code for the smart contract. Each time you make updates, then build or deploy, the TypeScript code is compiled into JavaScript in the `build` directory. ### Prepare the project Start by deleting the default files that come with the new project. 1. To delete the default generated files: ```sh $ rm src/Add.ts $ rm src/Add.test.ts $ rm src/interact.ts ``` 1. Now, create the new files for your project: ```sh $ zk file src/IncrementSecret $ touch src/main.ts ``` - The `zk file` command created the `src/IncrementSecret.ts` file and the `src/IncrementSecret.test.ts` test file. - However, this tutorial does not include writing tests, so you just use the `main.ts` file as a script to interact with the smart contract and observe how it works. 1. Now, open `src/index.ts` in a text editor and change it to look like: ```ts import { IncrementSecret } from './IncrementSecret.js'; export { IncrementSecret }; ``` The `src/index.ts` file contains all of the exports you want to make available for consumption from outside your smart contract project, such as from a UI. ### Copy the example files This tutorial relies on the completed code in the [02-private-inputs-and-hash-functions/src/](https://github.com/o1-labs/docs2/blob/main/examples/zkapps/02-private-inputs-and-hash-functions/src/) example files. 1. First, open the [IncrementSecret.ts](https://github.com/o1-labs/docs2/blob/main/examples/zkapps/02-private-inputs-and-hash-functions/src/IncrementSecret.ts) example file. 1. Copy the entire contents of the file into your smart contract in the `IncrementSecret.ts` file. 1. Next, open the [main.ts](https://github.com/o1-labs/docs2/blob/main/examples/zkapps/02-private-inputs-and-hash-functions/src/main.ts) example file. 1. Copy the entire contents of the file into your smart contract in the `main.ts` file. Now you are ready to review the imports in the smart contract. ## Write the smart contract Now we'll build the smart contract for our application. ### Imports The `import` statement in the `IncrementSecret.ts` file brings in other packages and dependencies to use in your smart contract. :::info All functions used inside a smart contract must operate on o1js compatible data types: `Field` types and other types built on top of `Field` types. :::info ```ts ignore 1 import { Field, SmartContract, state, State, method, Poseidon } from 'o1js'; ``` ### Exports The smart contract called `IncrementSecret` has one element of on-chain state named `x` of type `Field` as defined by following code: ```ts ignore ... 3 export class IncrementSecret extends SmartContract { 4 @state(Field) x = State(); 5 } ``` This code adds the basic structure for the smart contract. You are familiar with the import and export code from [Tutorial 01: Hello World](hello-world). ### Initial State The `initState()` method is intended to run once to set up the initial state on the zkApp account. ```ts ignore ... 5 6 @method async initState(salt: Field, firstSecret: Field) { 7 this.x.set(Poseidon.hash([ salt, firstSecret ])); 8 } ``` The `initState()` method accepts your secret and adds a `salt` value. These inputs to the `initState()` method are private to whoever initializes the contract. The zkApp account on the chain does not reveal what the values `firstSecret` or `salt` actually are. ### Update the State This method updates the state: ```ts ignore ... 9 10 @method async incrementSecret(salt: Field, secret: Field) { 11 const x = this.x.get(); 12 this.x.requireEquals(x); 13 14 Poseidon.hash([ salt, secret ]).assertEquals(x); 15 this.x.set(Poseidon.hash([ salt, secret.add(1) ])); 16 } 17 } ``` Mina uses the Poseidon hash function that is optimized for fast performance inside zero knowledge proof systems. The Poseidon hash function takes in an array of Fields and returns a single Field as output. This smart contract uses a secret number and the second Field, `salt`. The `incrementSecret()` method checks that the hash of the salt and the secret is equal to the current state `x`: - If this is the case, add `1` to the secret and set `x` to the hash of the salt and this new secret. - o1js creates a proof of this fact and a JSON description of the state updates to be made on the zkApp account, such as to store the new hash value. - Together, this forms a transaction that can be sent to the Mina network to update the zkApp account. Because zkApp smart contracts are run off chain, your salt and secret remain private and are never transmitted anywhere. Only the result, updating `x` on-chain state to `hash([ salt, secret + 1])` is revealed. Because the salt and secret can't be deduced from their hash, they remain private. ### About the `salt` argument Cryptographic salt adds an additional layer of security to a smart contract. The extra `salt` argument prevents a possible attack on the smart contract. If you just use `secret`, the contract is vulnerable to discovery by an attacker. An attacker could try hashing likely secrets and then check if the hash matches the hash stored in the smart contract. If the hash were to match, then the attacker knows they have discovered the secret. This scenario is particularly concerning if the secret is likely to be within a particular subset of possible values, say between 1 and 10,000. In that case, with just 10,000 hashes, the attacker could discover the secret. Adding salt as a second input to the contract code makes it harder for an attacker to reverse engineer the code and gain access to the contract. Salt makes the contract more secure and helps protect the data stored within it. For optimal security, the salt is known only to you and is typically random. ## Main The `src/main.ts` file is similar to the Hello World tutorial. For a full version, see [main.ts](https://github.com/o1-labs/docs2/blob/main/examples/zkapps/02-private-inputs-and-hash-functions/src/main.ts). For this tutorial, the key parts to discuss are initializing our contract and using the poseidon hash. The smart contract initialization this time is: ```ts ignore ... 24 const salt = Field.random(); ... 28 const deployTxn = await Mina.transaction(deployerAccount, async () => { 29 AccountUpdate.fundNewAccount(deployerAccount); 30 await zkAppInstance.deploy(); 31 await zkAppInstance.initState(salt, Field(750)); 32 }); 33 await deployTxn.prove(); ... ``` Note that the `initState()` method accepts the salt and the secret. In this case, the secret is the number `750`. This code creates a user transaction to update the on-chain state: ```ts ... 42 const txn1 = await Mina.transaction(senderAccount, async () => { 43 await zkAppInstance.incrementSecret(salt, Field(750)); 44 }); ... ``` Call the zkApp smart contract with both the salt and the secret (the number `750`). Because zkApp smart contracts are executed locally, neither the secret nor the salt are part of the transaction. Instead, the transaction includes only the proof that the update was called in such a way that all assertions passed and an update to the on-chain state `x` where the hash value is stored. After the transaction is processed by the Mina network, `x` is the value of `Poseidon.hash([ salt, Field(750).add(1) ])`. The underlying salt and secret are not revealed. Try running `main`: ```sh $ npm run build && node build/src/main.js ``` The output looks something like this: ```text state after init: 3116464240601550031577632290308565252747064306168758166756574536757280262269 state after txn1: 15333363135506653312218020664441564145350761288169575380089681962972642150348 ``` The `state` strings are different because `Field.random()` generates the salt. ## Conclusion Congratulations! You built a smart contract that uses privacy and hash functions. To deploy zkApps to a live network, see [Tutorial 3: Deploy to a Live Network](deploying-to-a-network). --- url: /zkapps/tutorials/03-deploying-to-a-network --- # Tutorial 3: Deploy to a Live Network In previous tutorials, you learned how to deploy and execute transactions on a local network. In this tutorial, you will use the `zk config` command to create the deploy alias, request tMINA funds to pay for transaction fees, and deploy zkApp to a live network. This tutorial reuses the `Square` contract that you created in [Tutorial 1: Hello World](hello-world). ## Prerequisites This tutorial has been tested with: - [zkApp CLI](https://www.npmjs.com/package/zkapp-cli) version `0.20.1` - [o1js](https://www.npmjs.com/package/o1js) version `1.1.0`. Ensure your environment meets the [Prerequisites](/zkapps/tutorials#prerequisites) for zkApp Developer Tutorials. If you have earlier versions of the zkApp CLI and o1js installed, be sure to [Update the zkApp CLI](/zkapps/writing-a-zkapp/introduction-to-zkapps/install-zkapp-cli#update-the-zkapp-cli) to the latest version: ```sh npm update -g zkapp-cli ``` ## Create a project 1. Create or change to a directory where you have write privileges. 2. Create a project by using the `zk project` command: ```sh $ zk project 03-deploying-to-a-live-network ``` The `zk project` command has the ability to scaffold the UI for your project. For this tutorial, select `none`: ``` ? Create an accompanying UI project too? … next svelte nuxt empty > none ``` The expected output is: ```sh ✔ Create an accompanying UI project too? · none ✔ UI: Set up project ✔ Initialize Git repo ✔ Set up project ✔ NPM install ✔ NPM build contract ✔ Set project name ✔ Git init commit Success! Next steps: cd 03-deploying-to-a-live-network git remote add origin git push -u origin main ``` The `zk project` command creates the `03-deploying-to-a-live-network` directory that contains the scaffolding for your project, including tools such as the Prettier code formatting, the ESLint static code analysis, and the Jest JavaScript testing framework. 1. Change into the `03-deploying-to-a-live-network` directory. For this tutorial, you run commands from the root of the `03-deploying-to-a-live-network` directory as you work in the `src` directory on files that contain the TypeScript code for the smart contract. Each time you make updates, then build or deploy, the TypeScript code is compiled into JavaScript in the `build` directory. ### Prepare the project Start by deleting the default files that come with the new project. 1. Delete the default generated files: ```sh $ rm src/Add.ts $ rm src/Add.test.ts $ rm src/interact.ts ``` 1. Copy the `src/Square.ts` and `src/index.ts` files from the files of the first tutorial [01-hello-world/src](https://github.com/o1-labs/docs2/tree/main/examples/zkapps/01-hello-world/src) to your local `03-deploying-to-a-live-network/src` directory. If prompted, replace existing files. Now that your smart contract is in place, you are ready to deploy your zkApp to Devnet. ## zkApp CLI You installed the zkApp CLI as part of the [Prerequisites](/zkapps/tutorials#prerequisites), so you already have the tools to manage deployments. In some cases, you might need to create a custom account for your zkApp, programmatically parameterize a zkApp before you initialize it, or create a smart contract programmatically for users as part of an application. For details, please see [Interacting with zkApps server-side](/zkapps/tutorials/interacting-with-zkapps-server-side). ## Deploy the smart contract The `config.json` configuration file contains the configuration to deploy your zkApp. This file was automatically created during the project scaffold with the `zk project` command. However, the generated configuration file does not yet contain the deploy alias. ### Deploy alias The `zk config` command prompts guide you to create a deploy alias in your project `config.json` file. You can have one or more deploy aliases for your project. A deploy alias consists of: - A self-describing name that can be anything. Using naming patterns is helpful when you have more than one deploy alias. - The target network kind (`Testnet`, `Mainnet` or custom network kind id) - The Mina GraphQL API URL that defines the network that receives your deploy transaction and broadcasts it to the appropriate Mina network (Testnet, Devnet, Mainnet, and so on) - The transaction fee (in MINA) to use when deploying - Two key pairs: - A key pair for the zkApp account. Public and private keys to use in your application are automatically generated in `keys/.json`. - A key pair to use as a fee payer account for updates and deployments. Public and private keys are stored on your local computer and can be used across multiple projects. - Fee payer account alias - A fee payer account is required, you can choose to use an existing account or create a new fee payer account. 1. To configure your deploy alias, run the `zk config` command and respond to the prompts: ```sh $ zk config ``` For this tutorial on Devnet, use: - Deploy alias name: `devnet` This tutorial uses `devnet`, but the deploy alias name can be anything and does not have to match the network name. - Target network kind: `Testnet` - Mina GraphQL API URL: `https://api.minascan.io/node/devnet/v1/graphql` - Transaction fee to use when deploying (in MINA): `0.1` 1. When prompted to choose an account to pay transaction fees, select: ```text Use a different account (select to see options) ``` If this is the first time you are running the `zk config` command, you see these options: ```text > Recover fee payer account from an existing base58 private key Create a new fee payer key pair ``` A third option to choose another saved fee payer account is shown only if you have multiple cached fee payer accounts. 1. Select to create a new fee payer key pair: ```sh Create a new fee payer key pair NOTE: the private key will be stored in plain text on this computer. ``` Please mind the note above and **do not** use the fee payer account that holds a substantial amount of MINA. 1. When prompted, give an alias to your new fee payer key pair. For this tutorial, use `03-deploy`: ```sh ✔ Create an alias for this account · 03-deploy ``` Your key pairs and deploy alias are created: ```sh ✔ Create fee payer key pair at ${HOME}/.cache/zkapp-cli/keys/03-deploy.json ✔ Create zkApp key pair at keys/devnet.json ✔ Add deploy alias to config.json Success! Next steps: - If this is the testnet, request tMINA at: https://faucet.minaprotocol.com/?address= - To deploy zkApp, run: `zk deploy devnet` ``` 1. Request funds from the Testnet Faucet to fund your fee payer account. Follow the prompts to request tMINA. To get funds on the Devnet, use the URL that was shown in the zkApp CLI output: - Visit `https://faucet.minaprotocol.com/?address=` - Choose the corresponding network you're going to deploy your zkApp to (`Devnet` in this case) - And click the **Request** button Before proceeding to the next step, wait a few minutes for the next block to include your transaction, so that tMINA becomes available for the fee payer account. 1. To deploy your project execute the following command: ```sh $ zk deploy ``` 1. At the interactive prompt, select the `devnet` deploy alias: ```text ? Which deploy alias would you like to deploy to? … > devnet ``` A verification key for your smart contract is generated (takes 10-30 seconds). The deploy process is output: ```text ✔ Build project ✔ Generate build.json ✔ Choose smart contract Only one smart contract exists in the project: Square Your config.json was updated to always use this smart contract when deploying to this deploy alias. ✔ Generate verification key (takes 10-30 sec) ✔ Build transaction ``` 1. Review and confirm the details of the transaction: ```text ✔ Confirm to send transaction |-----------------|-------------------------------------------------| | Deploy alias | devnet | |-----------------|-------------------------------------------------| | Network kind | testnet | |-----------------|-------------------------------------------------| | URL | https://api.minascan.io/node/devnet/v1/graphql | |-----------------|-------------------------------------------------| | Fee payer | Alias : 03-deploy | | | Account : B62... | |-----------------|-------------------------------------------------| | zkApp | Smart contract: Square | | | Account : B62... | |-----------------|-------------------------------------------------| | Transaction fee | 0.1 Mina | |-----------------|-------------------------------------------------| ``` When prompted, type `yes` to confirm and send the transaction to the network. ```text ✔ Send to network Success! Deploy transaction sent. Next step: Your smart contract will be live (or updated) at B62... as soon as the transaction is included in a block: https://minascan.io/devnet/tx/?type=zk-tx ``` 1. To see the zkApp transaction and navigate to accounts involved you can follow the transaction link provided to you in zkApp CLI output. Or use the [Minascan](https://minascan.io) explorer to search for the account with deployed zkApp. ## Success After the transaction is included in a block, your smart contract is deployed! - The Mina account used to deploy the zkApp now contains the verification key associated with this smart contract. You ran the `zk config` command to: - Create a deploy alias - Create a fee payer key pair at `${HOME}/.cache/zkapp-cli/keys/03-deploy.json` - Create a zkApp key pair at `keys/devnet.json` You requested tMINA to fund your fee payer account and pay your deploy transaction fees. Use the remaining tMINA to keep building and testing. You ran the `zk deploy` command to: - Generate a verification key for your smart contract - Add send the deploy transaction to the network Congratulations! To test, configure, and deploy your zkApp on a local representation of the Mina blockchain, see [Testing zkApps with Lightnet](/zkapps/writing-a-zkapp/introduction-to-zkapps/testing-zkapps-lightnet). ## About the Smart Contract Transactions Because this tutorial used the smart contract from `Tutorial 1: Hello World`, the smart contract's `editState` permissions require that the transaction must contain a valid zk proof that was created by the private key associated with this zkApp account. - When a user interacts with this smart contract by providing a proof, the proof is generated locally on the user's device and included in a transaction. - When the transaction is submitted to the network, the proof is checked to ensure it is correct and matches the on-chain verification key. - After the transaction is accepted, the proof and transaction are recursively proved and bundled into Mina's recursive zero knowledge proof. When you change the smart contract code, the associated verification key also changes. Use the same steps to redeploy your zkApp. For a typical smart contract, permissions are set to only allow proof authorization. You learn more about setting permissions in the later tutorials. ## Video Watch this tutorial for a step-by-step guide and extra explanations on how to deploy a zkApp. The video is provided for educational purposes and uses earlier versions of the zkApp CLI and o1js, so there are some differences. This tutorial is tested with a specific version of the zkApp CLI and o1js. ## Conclusion Congratulations! You have successfully deployed a smart contract to a live network. Check out [Tutorial 4: Build a zkApp UI in the Browser with React](zkapp-ui-with-react) to implement a browser UI that interacts with a smart contract. --- url: /zkapps/tutorials/04-zkapp-ui-with-react --- # Tutorial 4: Build a zkApp UI in the Browser with React You're making excellent progress in your zkApp journey: - In the [Hello World](hello-world) tutorial, you built a basic zkApp smart contract with o1js. - In [Tutorial 3: Deploy to a Live Network](deploying-to-a-network), you used the `zk` commands to deploy your zkApp. In this tutorial, you are going to implement a browser UI using `Next.js` that interacts with a smart contract. ## Prerequisites - Make sure you have the latest version of the zkApp CLI installed: ```sh $ npm install -g zkapp-cli ``` - Ensure your environment meets the [Prerequisites](/zkapps/tutorials#prerequisites) for zkApp Developer Tutorials. - The Auro Wallet browser extension wallet that supports interactions with zkApps. See [Install a Wallet](/using-mina/install-a-wallet) and create a MINA account. This tutorial has been tested with: - [zkApp CLI](https://www.npmjs.com/package/zkapp-cli) version `0.21.6` - [o1js](https://www.npmjs.com/package/o1js) version `1.8.0` - [Auro Wallet](https://www.aurowallet.com/) version `2.2.15` ## High-Level Overview In this tutorial, you create a new GitHub repository so you can deploy the UI to GitHub Pages. You use example code and the zkApp CLI to build an application that: 1. Loads a public key from an extension-based wallet. 1. Checks if the public key has funds and if not, directs the user to the Faucet. 1. Connects to the example zkApp `Add` smart contract that is already deployed on Devnet (or other network) at a fixed address. 1. Implements a button that sends a transaction. 1. Implements a button that requests the latest state of the smart contract. 1. Deploys the zkApp to GitHub Pages. Like previous tutorials, you use the provided [example files](https://github.com/o1-labs/docs2/blob/main/examples/zkapps/04-zkapp-browser-ui/) so you can focus on the React implementation itself. ## Create a project You can have the `zk project` command scaffold the UI for your project. 1. Create or change to the directory where you have write privileges. 1. Create a project by using the `zk project` command: ```sh $ zk project 04-zkapp-browser-ui ``` To scaffold the UI for your project with the `Next.js` React framework, select `next`: ```sh ? Create an accompanying UI project too? … > next svelte nuxt empty none ``` 1. If you are prompted to install the required Next packages, press **y** to proceed. 1. Select **yes** at the `? Do you want to set up your project for deployment to Github Pages? …` prompt. 1. If you are prompted to install the required Next packages, press **y** to proceed. 1. Select **No** at the `? Would you like to use ESLint with this project?` prompt. 1. Select **No** at the `? Would you like to use Tailwind CSS with this project?` prompt. Your UI is created in the project directory: `04-zkapp-browser-ui/ui` with two directories: - `contracts`: The smart contract code - `ui`: Where you write the UI code For this tutorial, you run commands from the root of the `04-zkapp-browser-ui/ui` directory. You work in the `ui/app` directory on TypeScript files that contain the UI code. Each time you make updates, then build or deploy, the TypeScript code is compiled into JavaScript in the `build` directory. ### Install the dependencies When you ran the `zk project` command, your UI was created in the project directory: `04-zkapp-browser-ui/ui`. The project has two sub-directories: - `contracts`: The smart contract code - `ui`: The UI application code The dependencies in each sub-directory are installed automatically by the zkApp CLI. ## Create a repository To interact with a deployed zkApp UI on GitHub pages, you must create a GitHub repository. Go ahead and create your repository now. For other projects, you can name your GitHub repository anything you want. For this tutorial, use `04-zkapp-browser-ui`. 1. Go to [https://github.com/new](https://github.com/new). 1. For the **Repository name**, enter `04-zkapp-browser-ui`. 1. Optionally, add a description and a README. Your project repository is ready to use. ### Preparing the project Start by deleting the default `page.tsx` file that comes with a new project so that you have a clean project to work with. 1. In the `04-zkapp-browser-ui/ui` directory: ```sh $ rm app/page.tsx ``` ### Install UI dependencies This tutorial uses the `comlink` package to integrate web workers into the React application. Comlink simplifies communication between the main thread and web workers by abstracting the `postMessage` API, allowing you to call functions in the worker as if they were local. In the `04-zkapp-browser-ui/ui` directory, install `comlink` by running the following command: ```sh $ npm install comlink ``` To learn more about `comlink` , read the [documentation](https://www.npmjs.com/package/comlink). ### Download helper files Because o1js code is computationally intensive, it's helpful to use web workers. A web worker handles requests from users to ensure the UI thread isn't blocked during long computations like compiling a smart contract or proving a transaction. 1. Download the helper files from the `examples/zkapps/04-zkapp-browser-ui` directory on GitHub: - [zkappWorker.ts](https://github.com/o1-labs/docs2/blob/main/examples/zkapps/04-zkapp-browser-ui/ui/app/zkappWorker.ts) - [zkappWorkerClient.ts](https://github.com/o1-labs/docs2/blob/main/examples/zkapps/04-zkapp-browser-ui/ui/app/zkappWorkerClient.ts) 1. Move the files to your local `04-zkapp-browser-ui/ui/app` directory. 1. Review each helper file to see how they work and how you can extend them for your own zkApp. - `zkappWorker.ts` is the web worker code - `zkappWorkerClient.ts` is the client code that is run from React to interact with the web worker ### Download the main browser UI logic file The example project has a completed app. The `page.tsx` file is the entry file for your application and contains the main logic for the browser UI that is ready to deploy to GitHub Pages. 1. Download the [page.tsx](https://github.com/o1-labs/docs2/blob/main/examples/zkapps/04-zkapp-browser-ui/ui/app/page.tsx) example file. 1. Move the `page.tsx` file to your local `04-zkapp-browser-ui/ui/app` directory. ## Build the default contract This tutorial uses the default contract `Add` that is always scaffolded with the `zk project` command. To build the default contract so that it can be used with UI application, run this command from the `04-zkapp-browser-ui/contracts` directory: ```sh $ npm run build ``` Outside of this tutorial, the workflow for building your own zkApp is to edit files in the `contracts` folder, rebuild the contract, and then access it from your UI application code. ## Implement the UI The UI application has several components: the React page itself and the code that uses o1js. ### Setup web workers The web worker code resides in the `04-zkapp-browser-ui/ui/app/zkappWorker.ts` file. Here, you define the functions that will be executed in the worker thread. #### Defining State The state object holds references to the zkApp Instance, Add contract instance, and the transactions. ```ts ignore const state = { AddInstance: null as null | typeof Add, zkappInstance: null as null | Add, transaction: null as null | Transaction, }; ``` ##### Defining functions that will run in the worker thread These functions perform tasks such as setting up the network instance, loading and compiling the smart contract, fetching accounts, interacting with the smart contract, and handling transactions. The functions will run in the web worker thread to ensure the UI thread is not blocked during long computations. ```ts ignore export const api = { async setActiveInstanceToDevnet() { const Network = Mina.Network('https://api.minascan.io/node/devnet/v1/graphql'); console.log('Devnet network instance configured'); Mina.setActiveInstance(Network); }, async loadContract() { const { Add } = await import('../../contracts/build/src/Add.js'); state.AddInstance = Add; }, async compileContract() { await state.AddInstance!.compile(); }, async fetchAccount(publicKey58: string) { const publicKey = PublicKey.fromBase58(publicKey58); return fetchAccount({ publicKey }); }, async initZkappInstance(publicKey58: string) { const publicKey = PublicKey.fromBase58(publicKey58); state.zkappInstance = new state.AddInstance!(publicKey); }, async getNum() { const currentNum = await state.zkappInstance!.num.get(); return JSON.stringify(currentNum.toJSON()); }, async createUpdateTransaction() { state.transaction = await Mina.transaction(async () => { await state.zkappInstance!.update(); }); }, async proveUpdateTransaction() { await state.transaction!.prove(); }, async getTransactionJSON() { return state.transaction!.toJSON(); }, }; ``` #### Expose functions to the main thread with `comlink` ```ts ignore // Expose the API to be used by the main thread Comlink.expose(api); ``` #### Creating the worker client - The web worker client code resides in the `04-zkapp-browser-ui/ui/app/zkappWorkerClient.ts` file. Here you create a client in the main thread that interacts with the web worker. - `worker` is a reference to the web worker instance and `remoteApi` is a reference to a proxy object that provides typesafe access to the worker's API methods. ```ts export default class ZkappWorkerClient { worker: Worker; // Proxy to interact with the worker's methods as if they were local remoteApi: Comlink.Remote; ``` In the constructor create a new Worker instance pointing to the `zkappWorker.ts` file. ```ts constructor() { // Initialize the worker from the zkappWorker module const worker = new Worker(new URL('./zkappWorker.ts', import.meta.url), { type: 'module' }); ``` With `Comlink.wrap`, create a proxy object `remoteApi` that provides typesafe access the worker's API methods. ```ts // Wrap the worker with Comlink to enable direct method invocation this.remoteApi = Comlink.wrap(this.worker); ``` Define methods in the ZkappWorkerClient class that call the corresponding method on `remoteApi`, effectively forwarding the calls to the worker. ```ts async setActiveInstanceToDevnet() { return this.remoteApi.setActiveInstanceToDevnet(); } async loadContract() { return this.remoteApi.loadContract(); } async compileContract() { return this.remoteApi.compileContract(); } async fetchAccount(publicKeyBase58: string) { return this.remoteApi.fetchAccount(publicKeyBase58); } async initZkappInstance(publicKeyBase58: string) { return this.remoteApi.initZkappInstance(publicKeyBase58); } async getNum(): Promise { const result = await this.remoteApi.getNum(); return Field.fromJSON(JSON.parse(result as string)); } async createUpdateTransaction() { return this.remoteApi.createUpdateTransaction(); } async proveUpdateTransaction() { return this.remoteApi.proveUpdateTransaction(); } async getTransactionJSON() { return this.remoteApi.getTransactionJSON(); } ``` ### Environment configuration - In `04-zkapp-browser-ui/ui/app/page.tsx` ```ts ignore let transactionFee = 0.1; const ZKAPP_ADDRESS = 'B62qpXPvmKDf4SaFJynPsT6DyvuxMS9H1pT4TGonDT26m599m7dS9gP'; ``` The smart contract that the UI interacts with in this tutorial has been deployed to the Devnet and the public key is stored in the `ZKAPP_ADDRESS` variable. If you experience problems with the deployed contract, you can [deploy](deploying-to-a-network) the `Add` contract included in the `contracts` folder yourself to any other network. When deployed, replace `ZKAPP_ADDRESS` variable with the public key of your own deployed zkApp. - In `04-zkapp-browser-ui/ui/app/zkappWorker.ts` ```ts ignore async setActiveInstanceToDevnet() { const Network = Mina.Network('https://api.minascan.io/node/devnet/v1/graphql'); console.log('Devnet network instance configured'); Mina.setActiveInstance(Network); }, ``` Depending on the network you are going to work with you might want to consider changing the GraphQL endpoint in the `setActiveInstanceToDevnet` function. Mind the supported networks by `Auro Wallet` though. :::info In this example, the `o1js` code is included in a client component and executed on the client side using an effect after the page loads. If you're integrating `o1js` within a server component, be aware that Next.js's caching mechanism might cause `o1js` to return outdated data. To prevent this, you can disable caching by adding `export const revalidate = 0;` to your component. For more details, refer to the [Next.js caching documentation](https://nextjs.org/docs/app/building-your-application/caching#opting-out-2). ::: ### Add state These `04-zkapp-browser-ui/ui/app/page.tsx` statements creates mutable state that you can reference in the UI. The state updates as the application runs: ```ts ignore ... const [zkappWorkerClient, setZkappWorkerClient] = useState(null); const [hasWallet, setHasWallet] = useState(null); const [hasBeenSetup, setHasBeenSetup] = useState(false); const [accountExists, setAccountExists] = useState(false); const [currentNum, setCurrentNum] = useState(null); const [publicKeyBase58, setPublicKeyBase58] = useState(''); const [creatingTransaction, setCreatingTransaction] = useState(false); const [displayText, setDisplayText] = useState(''); const [transactionlink, setTransactionLink] = useState(''); ... ``` To learn more about `useState` hooks, see [built-in React hooks](https://react.dev/reference/react/hooks#state-hooks) in the React API reference documentation. ### zkApp setting up This `04-zkapp-browser-ui/ui/app/page.tsx` code adds a functions to set up zkApp: - The Boolean `hasBeenSetup` ensures that the react feature `useEffect` is run only once. To learn more about `useEffect` hooks, see [useEffect](https://react.dev/reference/react/useEffect) in the React API reference documentation. - This code also sets up your web worker client that interacts with the web worker running o1js code to ensure the computationally heavy o1js code doesn't block the UI thread. #### Load web worker and setup Mina active instance ```ts ignore ... displayStep('Loading web worker...') const zkappWorkerClient = new ZkappWorkerClient(); setZkappWorkerClient(zkappWorkerClient); await new Promise((resolve) => setTimeout(resolve, 5000)); displayStep('Done loading web worker') await zkappWorkerClient.setActiveInstanceToDevnet(); ... ``` #### Connect Auro Wallet and setup fee payer account ```ts ignore ... const mina = (window as any).mina; if (mina == null) { setHasWallet(false); displayStep('Wallet not found.'); return; } const publicKeyBase58: string = (await mina.requestAccounts())[0]; setPublicKeyBase58(publicKeyBase58); displayStep(`Using key:${publicKeyBase58}`); displayStep('Checking if fee payer account exists...'); const res = await zkappWorkerClient.fetchAccount( publicKeyBase58, ); const accountExists = res.error === null; setAccountExists(accountExists); ... ``` #### Import the contract code, instantiate zkApp instance, compile the contract and fetch zkApp state ```ts ignore ... await zkappWorkerClient.loadContract(); displayStep('Compiling zkApp...'); await zkappWorkerClient.compileContract(); displayStep('zkApp compiled'); await zkappWorkerClient.initZkappInstance(ZKAPP_ADDRESS); displayStep('Getting zkApp state...'); await zkappWorkerClient.fetchAccount(ZKAPP_ADDRESS); const currentNum = await zkappWorkerClient.getNum(); setCurrentNum(currentNum); console.log(`Current state in zkApp: ${currentNum}`); ... ``` #### Update the state of the React application ```ts ignore ... setHasBeenSetup(true); setHasWallet(true); setDisplayText(''); ... ``` ### Run the React app Execute the following commands being within the `04-zkapp-browser-ui/ui/` directory. 1. To start the development server and serve your UI application at the URL `localhost:3000`: ```sh $ npm run dev ``` You can also change the default port by starting the dev server with the `--port` CLI argument. For example, to start the dev server on port `8001`, run: ```sh $ npm run dev -- --port 8001 ``` The zkApp UI in the web browser shows the current state of the zkApp and has buttons to send a transaction and get the latest zkApps on-chain state. Your browser refreshes automatically when you update the source code. 1. If prompted, request the funds from the Testnet Faucet service to fund your fee payer account. 1. And in the second terminal window: ```sh $ npm run ts-watch ``` This command starts the installed TypeScript compiler (`tsc`) with `--watch` parameter, with the ability to react to compilation status. ### Wait for the fee payer account to be funded Now that the UI setup is finished, a new useEffect waits for the fee payer account to be funded if it didn't before by checking the account presence in ledger. Don't forget that if the account has been newly created, it must be funded from the Faucet. ```ts ignore ... useEffect(() => { const checkAccountExists = async () => { if (hasBeenSetup && !accountExists) { try { for (;;) { displayStep('Checking if fee payer account exists...'); const res = await zkappWorkerClient!.fetchAccount(publicKeyBase58); const accountExists = res.error == null; if (accountExists) { break; } await new Promise((resolve) => setTimeout(resolve, 5000)); } } catch (error: any) { displayStep(`Error checking account: ${error.message}`); } } setAccountExists(true); }; checkAccountExists(); }, [zkappWorkerClient, hasBeenSetup, accountExists]); ... ``` ### Let UI buttons do some useful work These functions will be triggered on buttons press. ```ts ignore ... const onSendTransaction = async () => { setCreatingTransaction(true); displayStep('Creating a transaction...'); console.log('publicKeyBase58 sending to worker', publicKeyBase58); await zkappWorkerClient!.fetchAccount(publicKeyBase58); await zkappWorkerClient!.createUpdateTransaction(); displayStep('Creating proof...'); await zkappWorkerClient!.proveUpdateTransaction(); displayStep('Requesting send transaction...'); const transactionJSON = await zkappWorkerClient!.getTransactionJSON(); displayStep('Getting transaction JSON...'); const { hash } = await (window as any).mina.sendTransaction({ transaction: transactionJSON, feePayer: { fee: transactionFee, memo: '', }, }); const transactionLink = `https://minascan.io/devnet/tx/${hash}`; setTransactionLink(transactionLink); setDisplayText(transactionLink); setCreatingTransaction(true); }; const onRefreshCurrentNum = async () => { try { displayStep('Getting zkApp state...'); await zkappWorkerClient!.fetchAccount(ZKAPP_ADDRESS); const currentNum = await zkappWorkerClient!.getNum(); setCurrentNum(currentNum); console.log(`Current state in zkApp: ${currentNum}`); setDisplayText(''); } catch (error: any) { displayStep(`Error refreshing state: ${error.message}`); } }; ``` ### Take care of the page markup ```ts ignore ... let auroLinkElem; if (hasWallet === false) { const auroLink = 'https://www.aurowallet.com/'; auroLinkElem = (
    Could not find a wallet.{' '} Install Auro wallet here
    ); } const stepDisplay = transactionlink ? ( View transaction ) : ( displayText ); let setup = (
    {stepDisplay} {auroLinkElem}
    ); let accountDoesNotExist; if (hasBeenSetup && !accountExists) { const faucetLink = `https://faucet.minaprotocol.com/?address='${publicKeyBase58}`; accountDoesNotExist = ( ); } let mainContent; if (hasBeenSetup && accountExists) { mainContent = (
    Current state in zkApp: {currentNum?.toString()}{' '}
    ); } return (
    {setup} {accountDoesNotExist} {mainContent}
    ); ``` The UI has three sections: - `setup` lets the user know when the zkApp has finished loading. - `accountDoesNotExist` gives the user a link to the Faucet if their account hasn't been funded. - `mainContent` shows the current zkApp on-chain state and buttons to let users interact with zkApp. The buttons allow the user to create transaction in order to update on-chain zkApp state and refresh the current on-chain zkApp state. That's it for the code review! If you've been using `npm run dev`, you can now interact with the UI application on [`localhost:3000`](http://localhost:3000). ## Deploying the application to GitHub Pages Before you can deploy your project to GitHub Pages, you must push it to a new GitHub repository that you've created at the beginning of this tutorial. - The GitHub repo must have the same name as the project name. - In this tutorial, the project name is `04-zkapp-browser-ui`. - The `zk project` command created the correct project name strings in the `next.config.js` and `src/pages/reactCOIServiceWorker.ts` files. To deploy the UI: 1. Change to the `04-zkapp-browser-ui/ui/` directory. 1. Run the `deploy` script by executing the following command: ```sh npm run deploy ``` Scripts defined in the `04-zkapp-browser-ui/ui/package.json` file do the work to build your application and publish it to the GitHub Pages. After the command completion your zkApp UI will be available at: ``` https://.github.io/04-zkapp-browser-ui/ ``` where `` is your GitHub username. ## Conclusion Congratulations! You built a React UI for your zkApp that allows users to interact with deployed smart contract. You can build UI for your zkApps using other frameworks like `SvelteKit` and `NuxtJS`. You are ready to continue with [Tutorial 5: Common Types and Functions](common-types-and-functions) to learn about different o1js types you can use in your zkApps. --- url: /zkapps/tutorials/05-common-types-and-functions --- # Tutorial 5: Common Types and Functions In previous tutorials, you learned how to deploy smart contracts to the network interact with them from a React UI and NodeJS. In this tutorial, you learn about types you can use when building with o1js. Earlier tutorials mostly use the `Field` type. o1js provides other higher-order types built from Fields that are useful for zkApp development and expand the possibilities for more applications. The [example project](https://github.com/o1-labs/docs2/tree/main/examples/zkapps/05-common-types-and-functions/src) includes a [main.ts](https://github.com/o1-labs/docs2/blob/main/examples/zkapps/05-common-types-and-functions/src/main.ts) file that shows all of the concepts presented in this tutorial, along with smart contracts showing more advanced usage of some of the concepts, particularly Merkle Trees. ## Prerequisites This tutorial has been tested with: - [zkApp CLI](https://www.npmjs.com/package/zkapp-cli) version `0.20.1` - [o1js](https://www.npmjs.com/package/o1js) version `1.1.0`. Ensure your environment meets the [Prerequisites](/zkapps/tutorials#prerequisites) for zkApp Developer Tutorials. ## Basic Types Five basic types are derived from Fields: - [Bool](https://docs.o1labs.org/o1js/api-reference/classes/Bool) - [UInt32](https://docs.o1labs.org/o1js/api-reference/classes/UInt32) - [UInt64](https://docs.o1labs.org/o1js/api-reference/classes/UInt64) - [Int64](https://docs.o1labs.org/o1js/api-reference/classes/Int64) - [Character](https://docs.o1labs.org/o1js/api-reference/classes/Character) Each type has the usual programming language semantics. For example, the following code: ```ts const num1 = UInt32.from(40); const num2 = UInt64.from(40); const num1EqualsNum2: Bool = num1.toUInt64().equals(num2); console.log(`num1 === num2: ${num1EqualsNum2.toString()}`); console.log(`Fields in num1: ${num1.toFields().length}`); // -------------------------------------- const signedNum1 = Int64.from(-3); const signedNum2 = Int64.from(45); const signedNumSum = signedNum1.add(signedNum2); console.log(`signedNum1 + signedNum2: ${signedNumSum}`); console.log(`Fields in signedNum1: ${signedNum1.toFields().length}`); // -------------------------------------- const char1 = Character.fromString('c'); const char2 = Character.fromString('d'); const char1EqualsChar2: Bool = char1.toField().equals(char2.toField()); console.log(`char1: ${char1}`); console.log(`char1 === char2: ${char1EqualsChar2.toString()}`); console.log(`Fields in char1: ${Character.toFields(char1).length}`); ``` This result prints to the console when the code is run: ``` num1 === num2: true Fields in num1: 1 signedNum1 + signedNum2: 42 Fields in signedNum1: 2 char1: c char1 === char2: false Fields in char1: 1 ``` ## More Advanced Types Four advanced types are: - [CircuitString](https://docs.o1labs.org/o1js/api-reference/classes/CircuitString) - [PrivateKey](https://docs.o1labs.org/o1js/api-reference/classes/PrivateKey) - [PublicKey](https://docs.o1labs.org/o1js/api-reference/classes/PublicKey) - [Signature](https://docs.o1labs.org/o1js/api-reference/classes/Signature) All arguments passed into smart contracts must be arguments o1js can consume. You cannot pass normal strings. Instead, you must pass in strings that are wrapped to be compatible with circuits. This is accomplished with `Struct`. The default `CircuitString` has a maximum length of 128 characters because o1js types must be fixed length. However, the `CircuitString` API abstracts this restriction away and can be used like a dynamic length string with the maximum length caveat. You can create custom types to build your own strings, modified to whatever length you want. A brief example of custom types: ```ts const str1 = CircuitString.fromString('abc..xyz'); console.log(`str1: ${str1}`); console.log(`Fields in str1: ${CircuitString.toFields(str1).length}`); // -------------------------------------- const zkAppPrivateKey = PrivateKey.random(); const zkAppPublicKey = zkAppPrivateKey.toPublicKey(); const data1 = Character.toFields(char2).concat(signedNumSum.toFields()); const data2 = Character.toFields(char1).concat(CircuitString.toFields(str1)); const signature = Signature.create(zkAppPrivateKey, data2); const verifiedData1 = signature.verify(zkAppPublicKey, data1).toString(); const verifiedData2 = signature.verify(zkAppPublicKey, data2).toString(); console.log(`private key: ${zkAppPrivateKey.toBase58()}`); console.log(`public key: ${zkAppPublicKey.toBase58()}`); console.log(`Fields in private key: ${zkAppPrivateKey.toFields().length}`); console.log(`Fields in public key: ${zkAppPublicKey.toFields().length}`); console.log(`signature verified for data1: ${verifiedData1}`); console.log(`signature verified for data2: ${verifiedData2}`); console.log(`Fields in signature: ${signature.toFields().length}`); ``` And the console output: ``` str1: abc..xyz Fields in str1: 128 private key: EKF714j3wgH3tuuQncL93ruQFbJGnhDzfWossAHUp15PdATKE7Ka public key: B62qrhsTdExJDAxQx76V1mc13ibzikpmNaNRShTG3MWedCXESBhQ2Ch Fields in private key: 2 Fields in public key: 2 signature verified for data1: false signature verified for data2: true Fields in signature: 3 ``` Observe and follow best practices for your key security. Make sure that you never use the private key in this example output, or any private key that's publicly accessible, in a real application. There are 255 Fields in a private key and 256 Fields in a signature. If you are curious about the reason for this, the answer is cryptographic in nature: Elliptic curve scalars are most efficiently represented in a SNARK as an array of bits, and the bit length of these scalars is 255. ## Struct You can create your own compound data types with the special [Struct](https://docs.o1labs.org/o1js/api-reference/functions/Struct) type. Define a Struct as one or more data types that o1js understands. For example, Field, higher-order types built into o1js based on Field, or other Struct types defined by you. You can also define methods on your Struct to act upon this data type. The following example demonstrates how to use `Struct` to implement a `Point` structure and an array of points of length 8 structure. In o1js, programs are compiled into fixed-sized circuits. This means that data structures it consumes must also be a fixed size. To meet the fixed-size requirement, this code declares the array in `Points8` structure to be a static size of 8. ```ts class Point extends Struct({ x: Field, y: Field }) { static add(a: Point, b: Point) { return { x: a.x.add(b.x), y: a.y.add(b.y) }; } } const point1 = { x: Field(10), y: Field(4) }; const point2 = { x: Field(1), y: Field(2) }; const pointSum = Point.add(point1, point2); console.log(`pointSum Fields: ${Point.toFields(pointSum)}`); class Points8 extends Struct({ points: [Point, Point, Point, Point, Point, Point, Point, Point], }) {} const points = new Array(8) .fill(null) .map((_, i) => ({ x: Field(i), y: Field(i * 10) })); const points8: Points8 = { points }; console.log(`points8 JSON: ${JSON.stringify(points8)}`); ``` The console output: ``` pointSum Fields: 11,6 points8 Fields: {"points":[{"x":"0","y":"0"},{"x":"1","y":"10"},{"x":"2","y":"20"},{"x":"3","y":"30"},{"x":"4","y":"40"},{"x":"5","y":"50"},{"x":"6","y":"60"},{"x":"7","y":"70"}]} ``` ## Control Flow Two functions help do control flow in o1js: - Provable.if Similar to a ternary in JavaScript - Provable.switch Similar to a switch case statement in JavaScript You can write conditionals inside o1js with these functions. For example: ```ts const input1 = Int64.from(10); const input2 = Int64.from(-15); const inputSum = input1.add(input2); const inputSumAbs = Provable.if( inputSum.isPositive(), inputSum, inputSum.mul(Int64.minusOne) ); console.log(`inputSum: ${inputSum.toString()}`); console.log(`inputSumAbs: ${inputSumAbs.toString()}`); const input3 = Int64.from(22); const input1largest = input1 .sub(input2) .isPositive() .and(input1.sub(input3).isPositive()); const input2largest = input2 .sub(input1) .isPositive() .and(input2.sub(input3).isPositive()); const input3largest = input3 .sub(input1) .isPositive() .and(input3.sub(input2).isPositive()); const largest = Provable.switch( [input1largest, input2largest, input3largest], Int64, [input1, input2, input3] ); console.log(`largest: ${largest.toString()}`); ``` With output: ``` inputSum: -5 inputSumAbs: 5 largest: 22 ``` Both branches are executed when using `Provable.if`, like in a JavaScript ternary. Because o1js is creating a zk circuit, there is no primitive for `if` statements where only one branch is executed. ## Assertions and Constraints o1js functions are compiled to generate circuits. When a transaction is proven in o1js, the proof is that the program logic is computed according to the written program, and all assertions are holding true. In previous tutorials, you learned `a.assertEquals(b)`. The `.assertTrue()` is available on the Bool class. Circuits in o1js have a fixed maximum size. Each operation performed in a function counts towards this maximum size. This maximum size is equivalent to: - about 5,200 hashes on two fields - about 2,600 hashes on four fields - about `2^17` field multiplies - about `2^17` field additions If a program is too large to fit into these constraints, it can be broken up into multiple recursive proof verifications. See [Recursion](https://docs.o1labs.org/o1js/advanced-concepts/recursion). ## Merkle Trees You can use [Merkle trees](https://docs.o1labs.org/o1js/api-reference/classes/MerkleTree) to manage large amounts of data within a circuit. The power of Merkle trees is demonstrated in the [05-common-types-and-functions/src](https://github.com/o1-labs/docs2/tree/main/examples/zkapps/05-common-types-and-functions/src) reference project for this tutorial. See the [BasicMerkleTreeContract.ts](https://github.com/o1-labs/docs2/blob/main/examples/zkapps/05-common-types-and-functions/src/BasicMerkleTreeContract.ts) contract and [main.ts](https://github.com/o1-labs/docs2/blob/main/examples/zkapps/05-common-types-and-functions/src/main.ts) that demonstrates how contracts interact with Merkle trees and how to construct them. The first step is to import `MerkleTree`: ```ts ... MerkleTree, ... } from 'o1js' ``` To create Merkle trees in your application: ```ts const height = 20; const tree = new MerkleTree(height); ``` The height variable determines how many leaves are available to the application. For example, a height of 20 leads to a tree with `2^(20-1)`, or 524,288 leaves. Merkle trees in smart contracts are stored as the hash of the Merkle tree's root. Smart contract methods that update the Merkle root can take a _witness_ of the change as an argument. The [MerkleMapWitness](https://docs.o1labs.org/o1js/api-reference/classes/MerkleMapWitness) represents the Merkle path to the data for which inclusion is being proved. A contract stores the root of a Merkle tree, where each leaf stores a number, and the smart contract has an `update` function that adds a number to the leaf. For example, to put a condition on a leaf update, the `update` function checks that the number added was less than 10: ```ts ... @state(Field) treeRoot = State(); ... @method async initState(initialRoot: Field) { this.treeRoot.set(initialRoot); } @method async update( leafWitness: MerkleWitness20, numberBefore: Field, incrementAmount: Field ) { const initialRoot = this.treeRoot.get(); this.treeRoot.requireEquals(initialRoot); incrementAmount.assertLt(Field(10)); // check the initial state matches what we expect const rootBefore = leafWitness.calculateRoot(numberBefore); rootBefore.assertEquals(initialRoot); // compute the root after incrementing const rootAfter = leafWitness.calculateRoot( numberBefore.add(incrementAmount) ); // set the new root this.treeRoot.set(rootAfter); } ``` The code to interact with the smart contract: ```ts // initialize the zkapp const zkApp = new BasicMerkleTreeContract(basicTreeZkAppAddress); await BasicMerkleTreeContract.compile(); // create a new tree const height = 20; const tree = new MerkleTree(height); class MerkleWitness20 extends MerkleWitness(height) {} // deploy the smart contract const deployTxn = await Mina.transaction(deployerAccount, async () => { AccountUpdate.fundNewAccount(deployerAccount); await zkApp.deploy(); // get the root of the new tree to use as the initial tree root await zkApp.initState(tree.getRoot()); }); await deployTxn.prove(); deployTxn.sign([deployerKey, basicTreeZkAppPrivateKey]); const pendingDeployTx = await deployTxn.send(); /** * `txn.send()` returns a pending transaction with two methods - `.wait()` and `.hash` * `.hash` returns the transaction hash * `.wait()` automatically resolves once the transaction has been included in a block. this is redundant for the LocalBlockchain, but very helpful for live testnets */ await pendingDeployTx.wait(); const incrementIndex = 522n; const incrementAmount = Field(9); // get the witness for the current tree const witness = new MerkleWitness20(tree.getWitness(incrementIndex)); // update the leaf locally tree.setLeaf(incrementIndex, incrementAmount); // update the smart contract const txn1 = await Mina.transaction(senderPublicKey, async () => { await zkApp.update( witness, Field(0), // leafs in new trees start at a state of 0 incrementAmount ); }); await txn1.prove(); const pendingTx = await txn1.sign([senderPrivateKey, basicTreeZkAppPrivateKey]).send(); await pendingTx.wait(); // compare the root of the smart contract tree to our local tree console.log( `BasicMerkleTree: local tree root hash after send1: ${tree.getRoot()}` ); console.log( `BasicMerkleTree: smart contract root hash after send1: ${zkApp.treeRoot.get()}` ); ``` In this example, leaves are fields. However, you can put more variables in a leaf by hashing an array of fields and setting a leaf to that hash. This complete example is in the [project directory](https://github.com/o1-labs/docs2/tree/main/examples/zkapps/05-common-types-and-functions/src). A more advanced example `LedgerContract` implements a basic ledger of tokens, including checks that the sender has signed their transaction and that the amount the sender has sent matches the amount the receiver receives. ## Merkle Map See the API reference documentation for the [MerkleMap](https://docs.o1labs.org/o1js/api-reference/classes/MerkleMap) class you can use to implement key-value stores. The API for Merkle Maps is similar to Merkle Trees, just instead of using an index to set a leaf, one uses a key: ```ts const map = new MerkleMap(); const key = Field(100); const value = Field(50); map.set(key, value); console.log('value for key', key.toString() + ':', map.get(key)); ``` Which prints: ``` value for key 100: 50 ``` It can be used inside smart contracts with a witness, similar to merkle trees ```ts ... @state(Field) mapRoot = State(); ... @method async init(initialRoot: Field) { this.mapRoot.set(initialRoot); } @method async update( keyWitness: MerkleMapWitness, keyToChange: Field, valueBefore: Field, incrementAmount: Field, ) { const initialRoot = this.mapRoot.get(); this.mapRoot.requireEquals(initialRoot); incrementAmount.assertLt(Field(10)); // check the initial state matches what we expect const [ rootBefore, key ] = keyWitness.computeRootAndKey(valueBefore); rootBefore.assertEquals(initialRoot); key.assertEquals(keyToChange); // compute the root after incrementing const [ rootAfter, _ ] = keyWitness.computeRootAndKey(valueBefore.add(incrementAmount)); // set the new root this.treeRoot.set(rootAfter); } ``` With (abbreviated) code to interact with it, similar to the Merkle tree example above: ```ts const map = new MerkleMap(); const rootBefore = map.getRoot(); const key = Field(100); const witness = map.getWitness(key); ... // update the smart contract const txn1 = await Mina.transaction(deployerAccount, async () => { await zkapp.update( contract.update( witness, key, Field(50), Field(5) ); ); }); ... ``` You use [MerkleMaps](https://docs.o1labs.org/o1js/api-reference/classes/MerkleMap) to implement many useful patterns. For example: - A key value store from public keys to booleans, of token accounts to whether they've participated in a voted yet. - A nullifier that privately tracks if an input was used, without revealing it. ## Conclusion Congratulations! You have finished reviewing more common types and functions in o1js. With this, you should now be capable of writing many advanced smart contracts and zkApps. To use more data from your zkApp, check out [Tutorial 6](offchain-storage) to learn how to use off-chain storage. --- url: /zkapps/tutorials/06-offchain-storage --- # Tutorial 6: Off-Chain Storage In [Tutorial 5: Common Types and Functions](common-types-and-functions), you learned how to use Merkle trees to refer to large amounts of data stored off-chain. This tutorial presents a library and pattern to store Merkle trees off-chain and store only the tree's root hash on-chain. This approach is a step towards unlocking a larger set of applications that require off-chain storage. Future solutions can provide other decentralized options for zkApps that require more trustless solutions. :::experimental This proposed solution to off-chain storage is experimental and is used only for education purposes. ::: This tutorial provides a single-server solution to data storage for prototyping zkApps and building zkApps where some trust guarantees are reasonable. The solution proposed in this learning tutorial is appropriate for development, but is not recommended for zkApps that require trustlessness. The single-server solution for prototyping is intended as one of several options for data availability on Mina. Mina doesn't offer an out-of-the-box solution for off-chain storage. ## Why Off-Chain Storage? When you build an application for testing and local use, you can build and store a Merkle root locally. However, when you build a production-ready, distributed zkApp, you need more than this. All users that interact with your zkApp must be able to retrieve and modify the latest state. Any data that modifies a zkApp must be available somewhere for others users to access. ### Off-Chain Storage and Decentralization Solutions to storage span a large spectrum from inexpensive and more centralized to more expensive and more decentralized. The decentralized solutions are more expensive due to replicating and proving stored data. Your off-chain storage needs depend on the zkApp you are building and the guarantees you want that zkApp to have. Solutions under exploration: 1. A single-server storage solution, presented here. 2. A multi-server storage solution that can be run by multiple parties for stronger trust guarantees. 3. A solution that leverages storage on modular blockchains. 4. A future hard fork to add purchasable on-chain data storage to Mina. 5. A future hard fork to add data-storage committees to Mina for horizontally scalable storage. ### Single-Server Off-Chain Storage This tutorial implementation is the single-server off-chain storage solution. The library provides a REST server that anyone can run to store data for one or multiple zkApps and a zkApp library to check on-chain if changes have been backed by the server. This implementation requires a trust assumption for zkApps that use it: both developers and users must trust whoever is running the server. This trust assumption makes it useful for prototyping applications that need off-chain storage and for putting applications into production where these trust assumptions are reasonable. This implementation is not appropriate for zkApps where a trustless solution is needed. To learn more about this implementation and see how it works, see the [experimental-zkapp-offchain-storage](https://github.com/o1-labs/docs2/tree/main/examples/zkapps/06-offchain-storage/experimental-zkapp-offchain-storage) library. ### Grant Opportunity to Develop Single-Server Off-Chain Storage Mina Foundation values contributions. You can improve this library to make it more decentralized and useful in production. This development opportunity seeks a developer to start with the library presented here, improve it, make it more decentralized, and run instances for the community. If you are interested in this grant opportunity, send an email to [build@minaprotocol.com](mailto:build@minaprotocol.com). Suggested improvements: - Eliminate DDOS vulnerability by adding a token that limits storage requests. - Do not store trees for a smart contract if that contract is misconfigured in a way to prevent cleaning up old data. - Add support to the client library for connecting to multiple storage servers, enabling correctness under a majority-honest assumption. - Switch the project to a more scalable database implementation (for example, Redis). - Write an implementation for an automatically scalable service (for example, Cloudflare). ## Implement a Project Using Off-Chain Storage The sample code for this project is provided at [examples/zkapps/06-offchain-storage/contracts](https://github.com/o1-labs/docs2/tree/main/examples/zkapps/06-offchain-storage/offchain-storage-zkapp/contracts) with a focus on: - [src/main.ts](https://github.com/o1-labs/docs2/blob/main/examples/zkapps/06-offchain-storage/offchain-storage-zkapp/contracts/src/main.ts) - [src/NumberTreeContract.ts](https://github.com/o1-labs/docs2/blob/main/examples/zkapps/06-offchain-storage/offchain-storage-zkapp/contracts/src/NumberTreeContract.ts) This project implements a Merkle tree where: - Each leaf is either empty or stores a number (an o1js field), which is the data. - Updates to the tree can update a leaf if the new number in the leaf is greater than the old number. - The root of the tree is stored on-chain. - The tree itself is stored on an off-chain storage server. ## Prerequisites - Make sure you have the latest version of the zkApp CLI installed: ```sh $ npm install -g zkapp-cli ``` - Ensure your environment meets the [Prerequisites](/zkapps/tutorials#prerequisites) for zkApp Developer Tutorials. This tutorial has been tested with: - [zkApp CLI](https://www.npmjs.com/package/zkapp-cli) version `0.11.2` - [o1js](https://www.npmjs.com/package/o1js) version `0.12.1` ## Create the project 1. Create or change to a directory where you have write privileges. 1. Create a project by using the `zk project` command: ```sh $ zk project 06-off-chain-storage ``` The `zk project` command has the ability to scaffold the UI for your project. For this tutorial, select `none`: ``` ? Create an accompanying UI project too? … next svelte nuxt empty > none ``` ## Project structure The `zk project` command creates the `06-off-chain-storage` directory that contains the scaffolding for your project. The files in the `src` directory files contain the TypeScript code for the smart contract. Each time you make updates, then build or deploy, the TypeScript code is compiled into JavaScript in the `build` directory. For all projects, you run `zk` commands from the root of your project directory. ## Prepare the project 1. Change to the project directory, delete the existing files, and create a new `src/NumberTreeContract` smart contract, and a `main.ts` file: ```sh $ cd 06-off-chain-storage $ rm src/Add.ts $ rm src/Add.test.ts $ rm src/interact.ts $ zk file src/NumberTreeContract $ touch src/main.ts ``` 1. Edit `index.ts` to import and export your new smart contract: ```ts import { NumberTreeContract } from './NumberTreeContract.js'; export { NumberTreeContract }; ``` 1. Now, add the experimental library for the off-chain storage server: ```sh $ npm install experimental-zkapp-offchain-storage --save ``` 1. Install the `xmlhttprequest-ts` TypeScript wrapper for the built-in HttpClient to emulate the browser XMLHttpRequest object: ```sh $ npm install --save xmlhttprequest-ts ``` This project uses this for network requests when running from Node.js where the browser's XMLHttpRequest is not available by default. ### Run your storage server When you start this experimental local storage server, a `database.json` file is created in the current directory to store data for this tutorial. In a new terminal window, run this command from the root directory of your project: ```sh $ node node_modules/experimental-zkapp-offchain-storage/build/src/storageServer.js ``` ## Implement the smart contract A full copy of the [NumberTreeContract.ts](https://github.com/o1-labs/docs2/blob/main/examples/zkapps/06-offchain-storage/offchain-storage-zkapp/contracts/src/NumberTreeContract.ts) example file is provided. 1. Open `NumberTreeContract.ts` in your editor. 1. Start by adding the imports: ```ts ignore SmartContract, Field, MerkleTree, state, State, method, DeployArgs, Signature, PublicKey, Permissions, Bool, } from 'o1js'; OffChainStorage, MerkleWitness8, } from 'experimental-zkapp-offchain-storage'; ... ``` Notice that you import some items from `experimental-zkapp-offchain-storage`: The `OffChainStorage` object contains the functions for interacting with off-chain storage: - `getPublicKey`: A function to get the storage server's public key. This key is also stored in smart contracts to identify what storage server is storing the smart contract's off-chain data. - `get`: A function for fetching the data for a Merkle tree from the storage server, given the root of the tree. - `requestStore`: A function to request storing a tree on the storage server. Returns a proof that the storage server has stored this tree. - `assertRootUpdateValid`: A function used in smart contracts to prove updates to the smart contract's currently stored tree root result in a tree root that is being stored by the storage server. - `mapToTree`: A storage function to convert maps to trees. Internally the storage server is using maps from tree indices to leafs. The `MerkleWitness8` is a type of Merkle tree witness required for o1js to use the same instances of the witness cross-library. Other types of Merkle trees are available for input, such as `MerkleWitness32` and `MerkleWitness256`. 3. Now, set up your smart contract: ```ts ignore ... export class NumberTreeContract extends SmartContract { @state(PublicKey) storageServerPublicKey = State(); @state(Field) storageNumber = State(); @state(Field) storageTreeRoot = State(); deploy(args: DeployArgs) { super.deploy(args); this.account.permissions.set({ ...Permissions.default(), editState: Permissions.proofOrSignature(), }); } @method async initState(storageServerPublicKey: PublicKey) { this.storageServerPublicKey.set(storageServerPublicKey); this.storageNumber.set(Field(0)); const emptyTreeRoot = new MerkleTree(8).getRoot(); this.storageTreeRoot.set(emptyTreeRoot); } ... ``` This code adds three pieces of state to the contract: - The public key of the storage server - The storageNumber used to ensure the storage server is actively storing states - The root of the Merkle tree Initialize the zkApp state for these three values by setting: - The public key of the storage server - The storage number to 0 - Storing the root of an empty tree 4. Continuing, add the code for the `update` function on the smart contract: ```ts ignore ... @method async update( leafIsEmpty: Bool, oldNum: Field, num: Field, path: MerkleWitness8, storedNewRootNumber: Field, storedNewRootSignature: Signature ) { const storedRoot = this.storageTreeRoot.get(); this.storageTreeRoot.assertEquals(storedRoot); let storedNumber = this.storageNumber.get(); this.storageNumber.assertEquals(storedNumber); let storageServerPublicKey = this.storageServerPublicKey.get(); this.storageServerPublicKey.assertEquals(storageServerPublicKey); let leaf = [oldNum]; let newLeaf = [num]; // newLeaf can be a function of the existing leaf newLeaf[0].assertGreaterThan(leaf[0]); const updates = [ { leaf, leafIsEmpty, newLeaf, newLeafIsEmpty: Bool(false), leafWitness: path, }, ]; const storedNewRoot = OffChainStorage.assertRootUpdateValid( storageServerPublicKey, storedNumber, storedRoot, updates, storedNewRootNumber, storedNewRootSignature ); this.storageTreeRoot.set(storedNewRoot); this.storageNumber.set(storedNewRootNumber); } } ``` This code gets and asserts the current state of the contract, and then performs the update. First, check that the new leaf is greater than the old leaf. Then, check the update itself. In this example, perform a single update to the tree. However, you can chain updates together with multiple witnesses to change the tree more than once in a single call to the storage server. To assert the update is valid, use a `assertRootUpdateValid` call from the `OffChainStorage` library. This checks that when the update is applied to the tree represented by the existing on-chain tree root, the data for the new tree is being stored by the storage server. That completes the smart contract! ## Implementing `main.ts` Since much of the logic in the `main.ts` file is repeated from earlier tutorials, this tutorial reviews just the relevant parts. 1. Download the [main.ts](https://github.com/o1-labs/docs2/blob/main/examples/zkapps/06-offchain-storage/offchain-storage-zkapp/contracts/src/main.ts) example file. 1. Move it to the local `/06-off-chain-storage/src` folder. 1. Open it in your editor. The `main.ts` file contains logic for running the contract locally and for deploying and interacting with it on Devnet. This is a useful pattern when developing a new contract. ### Connect to the off-chain storage server To try your contract on Devnet, deploy the contract as usual with `zk deploy`. In `main.ts`, set `useLocal` to false. Add the name of your config to the end of your call to `node main.js`. This code connects to the storage server on port 3001 and get its public key: ```ts ... const storageServerAddress = 'http://localhost:3001'; const serverPublicKey = await OffChainStorage.getPublicKey( storageServerAddress, NodeXMLHttpRequest ); ... ``` In a real application, you would run the storage server on an externally exposed machine, and change this address from `localhost` to match the storage server. ### updateTree function Now, review the `updateTree` function in [main.ts](https://github.com/o1-labs/docs2/blob/main/examples/zkapps/06-offchain-storage/offchain-storage-zkapp/contracts/src/main.ts). The goal in this function is to: 1. Get the currently stored tree from the storage server 2. Select a random leaf 3. Change the value at that leaf to a bigger number 4. Create a transaction that performs this update. To start, get the existing tree: ```ts ... async function updateTree() { const index = BigInt(Math.floor(Math.random() * 4)); // get the existing tree const treeRoot = await zkapp.storageTreeRoot.get(); const idx2fields = await OffChainStorage.get( storageServerAddress, zkappPublicKey, treeHeight, treeRoot, NodeXMLHttpRequest ); const tree = OffChainStorage.mapToTree(treeHeight, idx2fields); const leafWitness = new MerkleWitness8(tree.getWitness(BigInt(index))); ... ``` Next, get the current root stored in the contract and request the data for that root from the storage server. Then, convert that data from a map to a Merkle tree and get a witness for a random index of the Merkle tree. Continuing: ```ts ... // get the prior leaf const priorLeafIsEmpty = !idx2fields.has(index); let priorLeafNumber: Field; let newLeafNumber: Field; if (!priorLeafIsEmpty) { priorLeafNumber = idx2fields.get(index)![0]; newLeafNumber = priorLeafNumber.add(3); } else { priorLeafNumber = Field(0); newLeafNumber = Field(1); } ... ``` This code checks if the leaf is empty and shapes the update accordingly. If the leaf was empty, set it to one. Otherwise, set the leaf to whatever used to be there, plus 3. ```ts ... const [storedNewStorageNumber, storedNewStorageSignature] = await OffChainStorage.requestStore( storageServerAddress, zkappPublicKey, treeHeight, idx2fields, NodeXMLHttpRequest ); ... ``` Finally, request that the storage server stores the data. If successful, a new storage number and a signature is returned and can be used for updating the smart contract. ### Call the smart contract To call the smart contract: ```ts ... const doUpdate = () => { zkapp.update( Bool(priorLeafIsEmpty), priorLeafNumber, newLeafNumber, leafWitness, storedNewStorageNumber, storedNewStorageSignature ); }; if (useLocal) { const updateTransaction = await Mina.transaction( { sender: feePayerKey.toPublicKey(), fee: transactionFee }, () => { doUpdate(); } ); updateTransaction.sign([zkappPrivateKey, feePayerKey]); await updateTransaction.prove(); await updateTransaction.send(); ``` That completes the review of the code to interact with the experimental off-chain storage server. ## Conclusion This tutorial introduced an experimental solution that builds a smart contract that leverages off-chain storage. Next, check out [Tutorial 7: Oracles](/zkapps/tutorials/oracle) to learn how to use Oracles to pull in data from the outside world into your zkApp. --- url: /zkapps/tutorials/07-oracle --- # Tutorial 7: Oracles You can use an oracle when your smart contract needs to consume data from the outside world. Learn about zkOracles in this 5-minute video: ## Prerequisites - Make sure you have the zkApp CLI installed: ```sh $ npm install -g zkapp-cli ``` - Ensure your environment meets the [Prerequisites](/zkapps/tutorials#prerequisites) for zkApp Developer Tutorials. This tutorial has been tested with: - [zkApp CLI](https://www.npmjs.com/package/zkapp-cli) version `0.20.1` - [o1js](https://www.npmjs.com/package/o1js) version `1.1.0`. ## High-Level Overview In this tutorial, you are going to build an oracle that retrieves data from the REST API and you also are going to write the smart contract that consumes information from this oracle. 1. Retrieve data from the REST API that provides mock credit score information for two users: one with a high credit score (user with `id=1`) and one with a low credit score (users with `id > 1`). 1. The smart contract consumes this information and allows users to prove their credit score is above a certain threshold (for example, higher than 700). Using the smart contract, users can generate an attestation that their credit score is above a certain value. To maintain their privacy, users can prove this fact to a third party without sharing the exact credit score or other personal information. This tutorial uses a mock credit score API as the data source and provides a foundation to create an oracle for any type of data. Just alter the code to query data from whatever source you need, any other REST API, for example. ## How Oracles Work Oracles connect blockchain smart contracts with the outside world to get data on chain. Mina smart contract computation run off-chain and make it possible to prove that the expected computation was run on private data without revealing the data itself. When the smart contract consumes data from a third-party source, you want to verify that this data is authentic and was provided by the expected source. The [Mina roadmap](https://minaprotocol.com/mina-roadmap) includes `zkOracles` to allow a zkApp to consume data trustlessly from any HTTPS data source. The oracle design described in this tutorial is typically operated by the zkApp developer. The oracle fetches and signs the desired data, and then a zkApp can consume this data and verify the signature to ensure that the data was provided by the expected source. Data providers can also operate as response signers like the one described to provide users with an oracle that does not require them to trust an intermediary. In other words, if a credit score or other data provider chooses to sign response data themselves, users can consume data from that source without trusting anybody besides the data provider they already trust to provide correct data. ### Design This simple oracle design: - Fetches data from the desired REST API source - Signs it using a Mina-compatible private key - Returns the data, signature, and public key associated with the private key - Allows the signature to be verified by the zkApp ### Code You can view the complete [oracle logic code](https://github.com/o1-labs/docs2/blob/main/examples/zkapps/07-oracles/oracle/app/api/credit-score/route.ts) and the corresponding `Next.js` project [here](https://github.com/o1-labs/docs2/tree/main/examples/zkapps/07-oracles/oracle). This oracle uses the [Vercel Functions](https://vercel.com/docs/functions). You don't have to dive into the code now, since the code is commented to explain each step so you can build something similar for yourself! You can adapt this code to create oracles for other API sources. For example, if you want your smart contract to ingest price feed data from an exchange, query the exchange API, sign the results, and return a response in the following response format. ### Response Format The oracle returns a JSON-formatted response with these top-level properties: - `data`: An object of the information you are interested in and can have any form. - `signature`: A signature for the `data` object created using the oracle operator's private key. Smart contracts use this signature to verify that data was provided by the expected source. - `publicKey`: The public key of the oracle is the same for all requests to this oracle. The following example is a response from the oracle for the user with the `id` of `1`. In the real world, this `id` might be a social security number or a similar identifier. Notice that the data property contains their credit score and user id. The demo oracle for user with id `1` is available at https://07-oracles.vercel.app/api/credit-score?user=1 and shows this response: ```json { "data": { "id": 1, "creditScore": 787 }, "signature": "7mXGPCbSJUiYgZnGioezZm7GCy46CEUbgcCH9nrJYXQQiwwVrA5wemBX4T1XFHUw62oR2324QNnkUVXW6yYQLsPsqxZ3nsYR", "publicKey": "B62qoAE4rBRuTgC42vqvEyUqCGhaZsW58SKVW4Ht8aYqP9UTvxFWBgy" } ``` The user with an `id` of `2` has a credit score that is below the threshold specified in the smart contract. The demo oracle for user with id `2` with a lower credit score is available at https://07-oracles.vercel.app/api/credit-score?user=2 and shows this response: ```json { "data": { "id": 2, "creditScore": 536 }, "signature": "7mXXnqMx6YodEkySD3yQ5WK7CCqRL1MBRTASNhrm48oR4EPmenD2NjJqWpFNZnityFTZX5mWuHS1WhRnbdxSTPzytuCgMGuL", "publicKey": "B62qoAE4rBRuTgC42vqvEyUqCGhaZsW58SKVW4Ht8aYqP9UTvxFWBgy" } ``` While the first user has a credit score of `787`, the second user has a credit score of `536`. The `signature` is also changed. This makes sense because the payload is different from what is received in the first response. Finally, notice that the `publicKey` is the same because in each case we are querying data from the same provider. ## Generate a key pair for your oracle You can generate the Mina-compatible public/private key pair for your oracle by executing the following command: ```sh npm run keygen ``` This command runs the code in the [keygen.js](https://github.com/o1-labs/docs2/blob/main/examples/zkapps/07-oracles/oracle/scripts/keygen.js) file. This file is the part of the oracle `Next.js` application, source code of which is available [here](https://github.com/o1-labs/docs2/tree/main/examples/zkapps/07-oracles/oracle). ## Smart Contract Now that you have an oracle that returns signed data, you can write a smart contract that uses this data. ### Create a project 1. Create or change to a directory where you have write privileges. 1. Create a project by using the `zk project` command: ```sh $ zk project --ui none 07-oracles ``` This command will scaffold the zkApp project skipping the UI part since we don't need it. 1. Change into the `07-oracles` directory. For this tutorial, you run commands from the root of the `07-oracles` directory. Each time you make changes, then build or deploy, the TypeScript code is compiled into JavaScript in the `build` directory. ### Prepare the project The files in the `src` directory contain the TypeScript code for the smart contract. 1. Delete the default generated files by running: ```sh $ rm src/Add.ts $ rm src/Add.test.ts $ rm src/interact.ts ``` 1. Create the `OracleExample.ts` file and generate the corresponding test file: ```sh $ zk file OracleExample ``` 1. Change `src/index.ts` to: ```ts import { OracleExample } from './OracleExample.js'; export { OracleExample }; ``` ### Write the smart contract You can find the complete code for this smart contract [here](https://github.com/o1-labs/docs2/blob/main/examples/zkapps/07-oracles/contracts/src/OracleExample.ts). Paste the following content into the `src/OracleExample.ts` file: ```ts Field, SmartContract, state, State, method, PublicKey, Signature, } from 'o1js'; // The public key of our trusted data provider const ORACLE_PUBLIC_KEY = 'B62qoAE4rBRuTgC42vqvEyUqCGhaZsW58SKVW4Ht8aYqP9UTvxFWBgy'; export class OracleExample extends SmartContract { // Define zkApp state // Define zkApp events init() { // Initialize zkApp state super.init(); // Specify that caller should include signature with tx instead of proof this.requireSignature(); } @method async verify(id: Field, creditScore: Field, signature: Signature) { // Get the oracle public key from the zkApp state // Evaluate whether the signature is valid for the provided data // Check that the signature is valid // Check that the provided credit score is 700 or higher // Emit an event containing the verified user's id } } ``` This completes the basic setup for the smart contract. For details on the `init()` method, see [Tutorial 1: Hello World](hello-world). ### On-Chain State The smart contract stores the public key for the oracle that you retrieve data from as the on-chain state. This makes the public key available when end users run the smart contract. The smart contract then uses this public key to verify the signature of the data to confirm it came from the expected source. In the `src/OracleExample.ts` file: ```ts // Define zkApp state @state(PublicKey) oraclePublicKey = State(); ``` Use the `init` method to initialize the `oraclePublicKey` to the credit score oracle's public key. ```ts init() { // Initialize zkApp state super.init(); // Set the oracle public key as zkApp on-chain state this.oraclePublicKey.set(PublicKey.fromBase58(ORACLE_PUBLIC_KEY)); // Specify that caller should include signature with tx instead of proof this.requireSignature(); } ``` ### Emit Events The smart contract checks that a user has a credit score above a certain threshold. But, how can the user prove it? To expose the result to the outside world, you can emit events. Events allow smart contracts to publish arbitrary messages that anybody can verify without requiring them to be stored in the state of a zkApp account. This property makes events ideal for communication with other parties of your application that don't live on-chain, like the UI or even an external service. This code adds an `events` object to the smart contract class to define the names and types of the events it can emit: ```ts // Define zkApp events events = { verified: Field, }; ``` ### Define the verify() method Next you would like to verify that user's credit score is above `700`. The `verify()` method is defined like any other TypeScript method, except that it must have the `@method` decorator in front of it that tells o1js that this method can be invoked by users when they interact with the smart contract. ```ts @method async verify(id: Field, creditScore: Field, signature: Signature) { ... } ``` Pass in these arguments: - `id`: The id of the user whose credit score is requested to prevent bad actors from querying somebody else's data and claiming it as their own. - `creditScore`: The credit score of the user that is a number between 350 and 800 (this tutorial uses mock credit scores). - `signature`: A cryptographic signature of oracle's `data` object (`id` and `creditScore`). This is what the smart contract uses to verify that the data was provided by the expected source. The `verify()` method does not return any values or change any contract state. It only emits a `verified` event with the user's id if their credit score is above 700. ### Fetch the oracle's public key To get the oracle's public key from the on-chain state, verify the signature of data from the oracle: ```ts // Get the oracle public key from the zkApp state const oraclePublicKey = this.oraclePublicKey.get(); this.oraclePublicKey.requireEquals(oraclePublicKey); ``` The `requireEquals()` method invocation ensures that the public key that is retrieved at execution time is the same as the public key that exists within the zkApp account on the Mina network when the transaction is processed by the network. ### Verify the signature To ensure that the signature was from our expected source, verify that the signature on the oracle's `data` object (`id` and `creditScore`) is valid for the expected public key. This code returns true if the signature is valid, and false if it is not. ```ts // Evaluate whether the signature is valid for the provided data const validSignature = signature.verify(oraclePublicKey, [id, creditScore]); ``` You always want to make it impossible to generate a valid zero knowledge proof if `validSignature` is false. You can do this with `assertTrue()`. If the signature is invalid, this throws an exception and makes it impossible to generate a valid zero knowledge proof and proceed with transaction creation. ```ts // Check that the signature is valid validSignature.assertTrue(); ``` ### Verify the credit score is 700 or higher You want the `verify()` method to emit an event only if the user's credit score is 700 or higher. To ensure that this condition is met, call `assertGreaterThanOrEqual()` (assert greater than or equal to) on `creditScore`. ```ts // Check that the provided credit score is 700 or higher creditScore.assertGreaterThanOrEqual(Field(700)); ``` These assert methods create a constraint that makes it impossible for users to generate a valid zero knowledge proof unless their condition is met. Without a valid zero knowledge proof (or a signature) it's impossible to generate a valid Mina transaction. Users can call the smart contract method and send a valid transaction only if they have a valid signature from the expected oracle and a credit score 700 or above. ### Emit a verified event With this foundation, you can emit a verified event. - The first argument to `emitEvent()` is an arbitrary string name, because a smart contract could emit more than one type of event. - The second argument can be any value, as long as it matches the type defined for the event. In this case, the event has the `Field` type, but it could be a more complicated type built on `Fields`, if the situation called for it. Emitted events can be fetched using the [Archive-Node-API](/zkapps/writing-a-zkapp/feature-overview/fetch-events-and-actions). ```ts // Emit an event containing the verified user's id this.emitEvent('verified', id); ``` ## Test your smart contract You can find the complete code for the smart contract tests [here](https://github.com/o1-labs/docs2/blob/main/examples/zkapps/07-oracles/contracts/src/OracleExample.test.ts). When you ran the `zk file OracleExample` command, the zkApp CLI automatically generated a test file `src/OracleExample.test.ts`. To add tests, paste the following code in the `OracleExample.test.ts` file: ```ts Field, Mina, PrivateKey, PublicKey, AccountUpdate, Signature, } from 'o1js'; let proofsEnabled = false; // The public key of our trusted data provider const ORACLE_PUBLIC_KEY = 'B62qoAE4rBRuTgC42vqvEyUqCGhaZsW58SKVW4Ht8aYqP9UTvxFWBgy'; describe('OracleExample', () => { let deployerAccount: Mina.TestPublicKey, deployerKey: PrivateKey, senderAccount: Mina.TestPublicKey, senderKey: PrivateKey, zkAppAddress: PublicKey, zkAppPrivateKey: PrivateKey, zkApp: OracleExample; beforeAll(async () => { if (proofsEnabled) await OracleExample.compile(); }); beforeEach(async () => { const Local = await Mina.LocalBlockchain({ proofsEnabled }); Mina.setActiveInstance(Local); deployerAccount = Local.testAccounts[0]; deployerKey = deployerAccount.key; senderAccount = Local.testAccounts[1]; senderKey = senderAccount.key; zkAppPrivateKey = PrivateKey.random(); zkAppAddress = zkAppPrivateKey.toPublicKey(); zkApp = new OracleExample(zkAppAddress); }); async function localDeploy() { const txn = await Mina.transaction(deployerAccount, async () => { AccountUpdate.fundNewAccount(deployerAccount); await zkApp.deploy(); }); await txn.prove(); // this tx needs .sign(), because `deploy()` adds an account update that requires signature authorization await txn.sign([deployerKey, zkAppPrivateKey]).send(); } it('generates and deploys the `OracleExample` smart contract', async () => { await localDeploy(); const oraclePublicKey = zkApp.oraclePublicKey.get(); expect(oraclePublicKey).toEqual(PublicKey.fromBase58(ORACLE_PUBLIC_KEY)); }); describe('hardcoded values', () => { it('emits an `id` event containing the users id if their credit score is above 700 and the provided signature is valid', async () => { await localDeploy(); const id = Field(1); const creditScore = Field(787); const signature = Signature.fromBase58( '7mXGPCbSJUiYgZnGioezZm7GCy46CEUbgcCH9nrJYXQQiwwVrA5wemBX4T1XFHUw62oR2324QNnkUVXW6yYQLsPsqxZ3nsYR' ); const txn = await Mina.transaction(senderAccount, async () => { await zkApp.verify(id, creditScore, signature); }); await txn.prove(); await txn.sign([senderKey]).send(); const events = await zkApp.fetchEvents(); const verifiedEventValue = events[0].event.data.toFields(null)[0]; expect(verifiedEventValue).toEqual(id); }); it('throws an error if the credit score is below 700 even if the provided signature is valid', async () => { await localDeploy(); const id = Field(1); const creditScore = Field(536); const signature = Signature.fromBase58( '7mXXnqMx6YodEkySD3yQ5WK7CCqRL1MBRTASNhrm48oR4EPmenD2NjJqWpFNZnityFTZX5mWuHS1WhRnbdxSTPzytuCgMGuL' ); expect(async () => { const txn = await Mina.transaction(senderAccount, async () => { await zkApp.verify(id, creditScore, signature); }); }).rejects; }); it('throws an error if the credit score is above 700 and the provided signature is invalid', async () => { await localDeploy(); const id = Field(1); const creditScore = Field(787); const signature = Signature.fromBase58( '7mXPv97hRN7AiUxBjuHgeWjzoSgL3z61a5QZacVgd1PEGain6FmyxQ8pbAYd5oycwLcAbqJLdezY7PRAUVtokFaQP8AJDEGX' ); expect(async () => { const txn = await Mina.transaction(senderAccount, async () => { await zkApp.verify(id, creditScore, signature); }); }).rejects; }); }); describe('actual API requests', () => { it('emits an `id` event containing the users id if their credit score is above 700 and the provided signature is valid', async () => { await localDeploy(); const response = await fetch( 'https://07-oracles.vercel.app/api/credit-score?user=1' ); const data = await response.json(); const id = Field(data.data.id); const creditScore = Field(data.data.creditScore); const signature = Signature.fromBase58(data.signature); const txn = await Mina.transaction(senderAccount, async () => { await zkApp.verify(id, creditScore, signature); }); await txn.prove(); await txn.sign([senderKey]).send(); const events = await zkApp.fetchEvents(); const verifiedEventValue = events[0].event.data.toFields(null)[0]; expect(verifiedEventValue).toEqual(id); }); it('throws an error if the credit score is below 700 even if the provided signature is valid', async () => { await localDeploy(); const response = await fetch( 'https://07-oracles.vercel.app/api/credit-score?user=2' ); const data = await response.json(); const id = Field(data.data.id); const creditScore = Field(data.data.creditScore); const signature = Signature.fromBase58(data.signature); expect(async () => { const txn = await Mina.transaction(senderAccount, async () => { await zkApp.verify(id, creditScore, signature); }); }).rejects; }); }); }); ``` To run the tests: 1. Save the `OracleExample.test.ts` file. 1. Run `npm i`. 1. Run `npm run test`. Note that writing a test that calls an API is generally not a best practice, but it's convenient for the sake of this tutorial. You can also mock your HTTP requests. Congratulations! You have just built a simple oracle using o1js and the Mina blockchain. You can find the complete code for this example [here](https://github.com/o1-labs/docs2/tree/main/examples/zkapps/07-oracles). --- url: /zkapps/tutorials/08-custom-tokens --- # Tutorial 8: Custom Tokens In this tutorial, you learn to create custom tokens. Mina comes with native support for custom tokens. Each account on Mina can also have tokens associated with it. To create a new token, one creates a smart contract, which becomes the manager for the token, and uses that contract to set the rules around how the token can be mint, burned, and sent. The manager account may also set a token symbol for its token, such as in this example, `MYTKN`. Uniqueness is not enforced for token names. Instead the public key of the manager account is used to identify tokens. In this tutorial, you review smart contract code that creates and manages new tokens. The full example code is provided in the [08-custom-tokens/src/](https://github.com/o1-labs/docs2/tree/main/examples/zkapps/08-custom-tokens/src) example files. For reference, a more extensive example, including all the ways to interact with token smart contracts, is provided in [token.test.ts](https://github.com/o1-labs/o1js/blob/main/src/lib/token.test.ts). ## Prerequisites - Make sure you have the latest version of the zkApp CLI installed: ```sh $ npm install -g zkapp-cli ``` - Ensure your environment meets the [Prerequisites](/zkapps/tutorials#prerequisites) for zkApp Developer Tutorials. This tutorial has been tested with: - [zkApp CLI](https://www.npmjs.com/package/zkapp-cli) version `0.16.0` - [o1js](https://www.npmjs.com/package/o1js) version `0.15.3` ## Create the project 1. Create or change to a directory where you have write privileges. 1. Create a project by using the `zk project` command: ```sh $ zk project 08-custom-tokens ``` The `zk project` command has the ability to scaffold the UI for your project. For this tutorial, select `none`: ``` ? Create an accompanying UI project too? … next svelte nuxt empty > none ``` ## Prepare the project 1. Change to the project directory, delete the existing files, and create a new `src/BasicTokenContract` smart contract, and a `index.ts` file: ```sh $ cd 08-custom-tokens $ rm src/Add.ts $ rm src/Add.test.ts $ rm src/interact.ts $ zk file src/BasicTokenContract $ touch src/index.ts ``` 1. Edit `index.ts` to import and export your new smart contract: ```ts import { BasicTokenContract } from './BasicTokenContract.js'; export { BasicTokenContract }; ``` ## Create the project 1. Create or change to a directory where you have write privileges. 1. Create a project by using the `zk project` command: ```sh $ zk project 08-custom-tokens ``` The `zk project` command has the ability to scaffold the UI for your project. For this tutorial, select `none`: ``` ? Create an accompanying UI project too? … next svelte nuxt empty ❯ none ``` ## Prepare the project 1. Change to the project directory, delete the existing files, and create a new `src/BasicTokenContract` smart contract, and a `index.ts` file: ```sh $ cd 08-custom-tokens $ rm src/Add.ts $ rm src/Add.test.ts $ rm src/interact.ts $ zk file src/BasicTokenContract $ touch src/index.ts ``` 1. Edit `index.ts` to import and export your new smart contract: ```ts import { BasicTokenContract } from './BasicTokenContract.js'; export { BasicTokenContract }; ``` ## Basic Token Example To create a token manager smart contract, create a normal smart contract whose methods call special functions that manipulate tokens. A full copy of the [BasicTokenContract.ts](https://github.com/o1-labs/docs2/blob/main/examples/zkapps/08-custom-tokens/src/BasicTokenContract.ts) is provided. ### Imports and smart contract structure First, bring in imports and set up the structure for the smart contract. The single state variable `totalAmountInCirculation` tracks how many tokens exist. ```ts SmartContract, state, State, method, DeployArgs, Permissions, UInt64, PublicKey, Signature, } from 'o1js'; const tokenSymbol = 'MYTKN'; export class BasicTokenContract extends SmartContract { @state(UInt64) totalAmountInCirculation = State(); deploy(args: DeployArgs) { super.deploy(args); const permissionToEdit = Permissions.proof(); this.account.permissions.set({ ...Permissions.default(), editState: permissionToEdit, setTokenSymbol: permissionToEdit, send: permissionToEdit, receive: permissionToEdit, }); } ``` ### init() and mint() methods Next, add an init method and a method that mints tokens. - Set the token symbol (MYTKN) in the `init()` method. - To start tracking the amount in circulation, set it to zero. - Write a function to mint new tokens and send them to a recipient. This function checks that a signature has been provided by the zkApp account, so that only the zkApp account can call the `mint()` method. - In the `mint()` method, track how many tokens are in existence. ```ts @method async init() { super.init(); this.account.tokenSymbol.set(tokenSymbol); this.totalAmountInCirculation.set(UInt64.zero); } @method async mint( receiverAddress: PublicKey, amount: UInt64, adminSignature: Signature ) { let totalAmountInCirculation = this.totalAmountInCirculation.get(); this.totalAmountInCirculation.requireEquals(totalAmountInCirculation); let newTotalAmountInCirculation = totalAmountInCirculation.add(amount); adminSignature .verify( this.address, amount.toFields().concat(receiverAddress.toFields()) ) .assertTrue(); this.token.mint({ address: receiverAddress, amount, }); this.totalAmountInCirculation.set(newTotalAmountInCirculation); } ``` ### Send function Finally, write a send function. - Holders of the MYTKN token call the `sendTokens()` method to send tokens to other Mina accounts. ```ts @method async sendTokens( senderAddress: PublicKey, receiverAddress: PublicKey, amount: UInt64 ) { this.token.send({ from: senderAddress, to: receiverAddress, amount, }); } } ``` That completes a review of a basic token. ## Examples To see an example of interacting with this contract, see [main.ts](https://github.com/o1-labs/docs2/blob/main/examples/zkapps/08-custom-tokens/src/main.ts). To see an example of putting rules around a token, see this [example](https://github.com/o1-labs/docs2/blob/main/examples/zkapps/08-custom-tokens/src/WhitelistedTokenContract.ts) of a token with whitelist gating so that public keys can interact with it. ## Building zkApps that interact with Tokens With zkApps, you can also build smart contracts that interact with tokens. For example, swapping one token for another or taking deposits of Mina tokens. For now, see this [example](https://github.com/o1-labs/o1js/blob/main/src/examples/zkapps/dex/dex.ts) of a zkApp implementing an AMM-based DEX. ## Conclusion You have finished reviewing the steps to build a smart contract to manage a token. You learned how to build a smart contract that places custom rules over tokens. To learn more, see [Custom Token API](/zkapps/writing-a-zkapp/feature-overview/custom-tokens). Check out [Tutorial 9: Recursion](/zkapps/tutorials/recursion) to learn how to use recursive ZKPs with o1js, to implement zkRollups, large computations, and more. --- url: /zkapps/tutorials/09-recursion --- # Tutorial 9: Recursion One of the most powerful features of zkApps is [recursion](https://docs.o1labs.org/o1js/advanced-concepts/recursion). With recursion, you can realize composability between zero knowledge proofs. Recursion unlocks many powerful technical abilities, such as creating high-throughput applications, creating proofs of large computations, and constructing multi-party proofs. ### Scaling Throughput with zkRollups and App Chains Verifying large amounts of information is usually challenging for blockchains. With zero knowledge proofs (ZKPs), and particularly recursive ZKPs, this becomes far easier. By leveraging recursive verification, it is possible to easily construct zkRollups and app chains. This tutorial provides an example of a simple zkRollup. Recursive composition gives you the flexibility to handle live demand by letting you choose between a high tree height (higher throughput, but logarithmically slower latency) and a lower tree height (lower throughput, but faster latency). You can modify the depth of the tree to handle whatever traffic is present on the network while still offering optimal latency to commit transactions back to the chain. For an example of an app chain, one could imagine an on-chain trading pair that uses an order book. Rolling up the transactions for the application with zero knowledge proofs lets the app handle the expensive computations of keeping buy and sell orders sorted while still posting complete verification to the chain. This tutorial guides you through a review of a simple zkRollup example that can be used to implement a zkRollup or an app chain. ### Scaling Proof Size Recursive ZKPs allow you to construct very large transactions that wouldn't otherwise be possible. For example, recursive ZKPs can be used to prove the output of a machine learning (ML) model to prove an inference is genuinely generated by a model or, for a more computationally intensive case, to verify that a model has been trained on a particular dataset. ### Off-chain, multi-party proof construction Recursive ZKPs also make it easy to allow multiple parties to construct transactions. One or more parties can recursively update a ZKP and its associated public state to accomplish off-chain proof construction. When the multi-party stage is completed, that state and its proof can then be sent as part of an on-chain transaction or used as part of an off-chain application leveraging ZKPs. ## ZkProgram Example You build recursive zkApps with [ZkProgram](https://docs.o1labs.org/o1js/api-reference/functions/ZkProgram), the o1js general purpose API for creating zero knowledge proofs. A ZkProgram is similar to zkApp smart contracts but isn't tied to an on-chain account. Proofs generated using a ZkProgram can be passed into zkApp smart contracts for them to verify recursively. They can even be passed recursively into their own functions for off-chain recursive composition. The following example code for the ZkProgram tutorial is provided in the [main.ts](https://github.com/o1-labs/docs2/blob/main/examples/zkapps/09-recursion/src/main.ts) file on GitHub. While you're there, give the `/docs2` repository a star so that other zk developers can learn to build a zkApp! ## Prerequisites Ensure your environment meets the [Prerequisites](/zkapps/tutorials#prerequisites) for zkApp Developer Tutorials. In particular, make sure you have the zkApp CLI installed: ```sh $ npm install -g zkapp-cli ``` ## Create a new project Now that you have the tooling installed, you can start building your application. 1. Create or change to a directory where you have write privileges. 1. Now, create a project using the `zk project` command: ```sh $ zk project 09-recursion ``` As you learned in earlier tutorials, the `zk project` command creates the `09-recursion` directory that contains the scaffolding for your project. 1. Change into the `09-recursion` directory. Like all projects, you run `zk` commands from the root of the `09-recursion` directory as you work in the `src` directory on files that contain the TypeScript code for the smart contract. Each time you make updates, then build or deploy, the TypeScript code is compiled into JavaScript in the `build` directory. ### Prepare the project Like earlier tutorials, you can prepare your project by deleting the default files that come with the new project and creating a smart contract called `Add`. Open `src/index.ts` in a text editor and import the `Add` smart contract, like: ```ts src/index.ts export { Add }; ``` ## Write the ZkProgram Now, the fun part! Write your smart contract in the `src/Add.ts` file. A final version of the smart contract is provided in the [Add.ts](https://github.com/o1-labs/docs2/blob/main/examples/zkapps/09-recursion/src/Add.ts) example file. ### Copy the example Use the existing code in the [Add.ts](https://github.com/o1-labs/docs2/blob/main/examples/zkapps/09-recursion/src/Add.ts) example file. 1. First, open the [Add.ts](https://github.com/o1-labs/docs2/blob/main/examples/zkapps/09-recursion/src/Add.ts) example file. 1. Copy the file's entire contents into your project `src/Add.ts` file. ### Imports The `import` statement brings in other packages and dependencies to use in your ZkProgram. :::info All functions used inside a ZkProgram must operate on o1js compatible data types: `Field` types and other types built on top of `Field` types. :::info ```ts src/Add.ts ``` These items are: - `Field`: The native number type in o1js. You can think of `Field` elements as unsigned integers. Field elements are the most basic type in o1js. All other o1js-compatible types are built on top of `Field` elements. - `SelfProof`: The class in o1js that extends the `Proof` class and allows you to pass in a proof of a circuit in one of its own methods. - `ZkProgram`: The o1js general purpose API for creating zero knowledge proofs. A ZkProgram is similar to zkApp smart contracts but isn't tied to an on-chain account. - `verify`: Verifies the signature using a message and the corresponding `PublicKey`. ### ZkProgram To create a ZkProgram, start with the `init()` method. - For each method, declare the inputs it will receive. - The first argument of a ZkProgram method is always the state of the ZkProgram, named `publicInput` since it is public. ```ts export const Add = ZkProgram({ name: 'add-example', publicInput: Field, methods: { init: { privateInputs: [], async method(state: Field) { state.assertEquals(Field(0)); }, }, }, }); ``` Add another method that takes an existing proof, adds a new number to it, and produces a new proof: ```ts addNumber: { privateInputs: [SelfProof, Field], async method( newState: Field, earlierProof: SelfProof, numberToAdd: Field ) { earlierProof.verify(); newState.assertEquals(earlierProof.publicInput.add(numberToAdd)); }, }, ``` Use recursion to combine two proofs: ```ts add: { privateInputs: [SelfProof, SelfProof], async method( newState: Field, earlierProof1: SelfProof, earlierProof2: SelfProof ) { earlierProof1.verify(); earlierProof2.verify(); newState.assertEquals( earlierProof1.publicInput.add(earlierProof2.publicInput) ); }, }, ``` To use ZkProgram, compile it and then call methods on it: ```ts async function main() { console.log('compiling...'); const { verificationKey } = await Add.compile(); console.log('making proof 0'); const { proof: proof0 } = await Add.init(Field(0)); console.log('making proof 1'); const { proof: proof1 } = await Add.addNumber(Field(4), proof0, Field(4)); console.log('making proof 2'); const { proof: proof2 } = await Add.add(Field(4), proof1, proof0); console.log('verifying proof 2'); console.log('proof 2 data', proof2.publicInput.toString()); const ok = await verify(proof2.toJSON(), verificationKey); console.log('ok', ok); } main(); ``` Verification of the proof can occur off-chain using the `verify()` method. This is useful for applications where you want to prove something to an off-chain entity. ## Voting Example Another example of off-chain multi-party proof construction with recursive ZKPs is provided in the [vote.ts](https://github.com/o1-labs/docs2/blob/main/examples/zkapps/09-recursion/src/vote.ts) example file. ## Using ZkProgram in Smart Contracts After you build a recursive ZKP, use a method on a smart contract to settle the proof to the Mina blockchain. Build a zkRollup to use ZkProgram from a smart contract. This example code builds a zkRollup to operate over a MerkleMap of accounts that each store a number. The update rule increments the value stored at an account - though you could imagine using more substantial rules to implement a particular application. The zkApp will store the Merkle root of this MerkleMap of accounts on chain. Updates occur only when authorized by a recursive zero knowledge proof generated by the ZkProgram. This zkRollup design is flexible to how much compute is being demanded of it (for latency) and allows it to scale to arbitrary numbers of proofs (for throughput). On a single machine, the example code does not offer a high throughput. However, you can achieve very high throughputs by switching the mapreduce here for a mapreduce that runs over tens or hundreds of machines. In fact, you can achieve any level of throughput as long as you're willing to incur `log(N)` latency when constructing the proof of N transactions. The following code for the ZkProgram part of a rollup is provided in the [rollup.ts](https://github.com/o1-labs/docs2/blob/main/examples/zkapps/09-recursion/src/rollup.ts) example file. A community-contributed implementation distributes compute over AWS instances in this [proof_aggregator](https://github.com/Trivo25/proof_aggregator) example. ### Set up ZkProgram ```ts class RollupState extends Struct({ initialRoot: Field, latestRoot: Field, }) { static createOneStep( initialRoot: Field, latestRoot: Field, key: Field, currentValue: Field, incrementAmount: Field, merkleMapWitness: MerkleMapWitness ) { const [witnessRootBefore, witnessKey] = merkleMapWitness.computeRootAndKey(currentValue); initialRoot.assertEquals(witnessRootBefore); witnessKey.assertEquals(key); const [witnessRootAfter] = merkleMapWitness.computeRootAndKey( currentValue.add(incrementAmount) ); latestRoot.assertEquals(witnessRootAfter); return new RollupState({ initialRoot, latestRoot, }); } ``` A proof generated by the `merge()` method indicates there is a valid sequence of transactions (for example, the applications of `oneStep`): - Get from an `initialRoot`, the root of a MerkleMap - To a `latestRoot` root of the Merkle map after transactions are applied ### Consume the proofs To consume these proofs in a smart contract (`SmartContract`) that uses the recursive proof to update its internal state: ```ts class RollupContract extends SmartContract { @state(Field) state = State(); deploy(args: DeployArgs) { super.deploy(args); this.setPermissions({ ...Permissions.default(), editState: Permissions.proofOrSignature(), }); } @method async initStateRoot(stateRoot: Field) { this.state.set(stateRoot); } @method async update(rollupStateProof: RollupProof) { const currentState = this.state.get(); this.state.requireEquals(currentState); rollupStateProof.publicInput.initialRoot.assertEquals(currentState); rollupStateProof.verify(); this.state.set(rollupStateProof.publicInput.latestRoot); } } ``` ### Verify the value at account is incremented Fill in the previous methods, particularly `oneStep()` and `createOneStep()`. This step of the rollup checks that the value at an account was incremented by a particular amount. - The code computes an updated state inside the recursive SNARK by calling `RollupState.createOneStep()`. - Then, asserting that the new state of the recursive SNARK is equivalent to the computed state. - Inside `createOneStep()`, a single step of the rollup is created. ```ts class RollupState extends Struct({ ... }) { static createOneStep( initialRoot: Field, latestRoot: Field, key: Field, currentValue: Field, incrementAmount: Field, merkleMapWitness: MerkleMapWitness, ) { const [ witnessRootBefore, witnessKey ] = merkleMapWitness.computeRootAndKey(currentValue); initialRoot.assertEquals(witnessRootBefore); witnessKey.assertEquals(key); const [ witnessRootAfter, _ ] = merkleMapWitness.computeRootAndKey(currentValue.add(incrementAmount)); latestRoot.assertEquals(witnessRootAfter); return new RollupState({ initialRoot, latestRoot }); } ... } const Rollup = ZkProgram({ name: "rollup-example", publicInput: Field, methods: { oneStep: { privateInputs: [ Field, Field, Field, Field, Field, MerkleMapWitness ], method( state: RollupState, initialRoot: Field, latestRoot: Field, key: Field, currentValue: Field, incrementAmount: Field, merkleMapWitness: MerkleMapWitness ) { const computedState = RollupState.createOneStep( initialRoot, latestRoot, key, currentValue, incrementAmount, merkleMapWitness ); RollupState.assertEquals(computedState, state); } }, ``` The `createOneStep()` method returns a proof that acts as the leaf in a tree of recursive proofs. To use this rollup, first you construct all of the leafs in parallel then recursively merge these leafs until you get a proof for the entire sequence. This parallel merging gives the high throughput properties for the rollup. You can reimplement the example code for more substantial functionality, just by changing `createOneStep()`. For example, to implement a DEX zkRollup that uses an orderbook change the code to: - Update buy/sell orders on an order book - Execute those buy/sell orders - Add a queue of tokens to move to the app chain in the smart contract - Add a queue of tokens to move out of the app chain in the ZkProgram ## Conclusion You learned about: - Recursion with zkApps, both on-chain and off-chain - Potential use cases to create high-throughput applications - Larger proof sizes - Create multi-party proof constructions Recursive zero knowledge proofs can help you build powerful zkApps. Check out [Tutorial 10: Account Updates](/zkapps/tutorials/account-updates) to learn about account updates, the underlying structure of zkApps, and how they enable permissions, preconditions, and composability. --- url: /zkapps/tutorials/10-account-updates --- # Tutorial 10: Account Updates The fundamental data structure that Mina transactions are built from is called an _account update_. Account updates are a flexible and powerful data structure that can express all kinds of updates, events, and preconditions you use to develop smart contracts. :::info Mesa Upgrade The account updates limit has been increased from ~6 to **16 segments per transaction**. See the [Mesa upgrade overview](/network-upgrades/mesa/glossary#larger-zkapp-transactions--mip9) for more details. ::: Each zkApp transaction constructed by o1js is composed of one or more [AccountUpdate](https://docs.o1labs.org/o1js/api-reference/classes/AccountUpdate) classes, which are a set of instructions for the Mina network to perform, such as altering on-chain state, emitting an event, and so on. Each `AccountUpdate` can make assertions about its account, apply updates to its account, and make assertions about its child `AccountUpdates`. Transactions are structured as a list of trees of `AccountUpdates` applied with a [pre-order traversal](https://en.wikipedia.org/wiki/Tree_traversal). ## Permissions, Preconditions, and Composability Permissions, preconditions, composability, and tokens are the core features of zkApps that are implemented using `AccountUpdates`. To learn more, see these o1js docs: - [Permissions](https://docs.o1labs.org/o1js/zkapps/permissions) - [On-Chain Values](https://docs.o1labs.org/o1js/advanced-concepts/ZkApps/onChainPreconditions) In this tutorial, you learn the essential account update features. ## AccountUpdate contents The `AccountUpdate` class is a set of instructions for the Mina network. It includes preconditions (conditions that must be true for the account update to be applied) and a list of state updates that need to be authorized by a signature or proof. Each [AccountUpdate](https://docs.o1labs.org/o1js/api-reference/classes/AccountUpdate) class has these components: - `PublicKey`: The account address for the account update - `TokenId`: A unique hash representing the custom token. Defaults to the MINA TokenId (`1`). Together, `PublicKey` and `TokenId` uniquely identify an account on the Mina network. - `Preconditions`: Conditions that must be true for the account update to be applied. Corresponds to assertions in an o1js method. - `Updates`: Things changed by the account update, such as including the zkApp state, permissions, and verification key. - `BalanceChange`: Any changes to the balance - `Authorization`: How the zkApp is authorized; must be a proof (corresponding to the verification key on the account), a signature, or none. See [Authorizations](/zkapps/writing-a-zkapp/introduction-to-zkapps/interact-with-mina). Other `AccountUpdate` components are available to use, but are not covered in this tutorial: - `MayUseToken`: Whether the zkApp has permissions to manipulate its token. - `Layout`: Allows for assertions about the structure of an `AccountUpdate`. ## Account updates for a non-upgradable zkApp If the verification key cannot be changed, the zkApp smart contract is considered non-upgradeable. The `setVerificationKey` permission sets the ability to change the verification key of the account. Now, you can start building an example zkApp to explore permissions, preconditions, and composability with `AccountUpdates`. ### Visualize transactions To visualize transactions, use the `mina-transaction-visualizer` library. Install this library to use in your own zkApp: ```sh npm install mina-transaction-visualizer --save ``` ## Smart Contracts In this tutorial, you build two smart contracts: - `ProofsOnlyZkApp`: Non-upgradeable proof only - `SecondaryZkApp`: the other zkApp The full source code for this tutorial is provided in the [examples/zkapps/10-account-updates](https://github.com/o1-labs/docs2/tree/main/examples/zkapps/10-account-updates) directory on GitHub. ### Non-upgradeable proof only The full example code is provided in the [examples/zkapps/10-account-updates/src/ProofsOnlyZkApp.ts](https://github.com/o1-labs/docs2/tree/main/examples/zkapps/10-account-updates/src/ProofsOnlyZkApp.ts) file. Goal: Configure this zkApp to be modifiable only by using proofs. For this example, the zkApp is not upgradable after it is deployed. This means that while the zkApp developer owns the private key to initially deploy the zkApp, after its first deployment, the zkApp requires proof authorization and consequently can be updated only transactions that fulfill the zkApp smart contract logic. The private key is no longer useful for anything. This zkApp has methods that call other methods to let you explore the impacts to a transaction's account updates. 1. Start by adding the main contents of the zkApp: ```ts export class ProofsOnlyZkApp extends SmartContract { @state(Field) num = State(); @state(Field) calls = State(); async deploy() { await super.deploy(); this.account.permissions.set({ ...Permissions.default(), setDelegate: Permissions.proof(), setPermissions: Permissions.proof(), setVerificationKey: { auth: Permissions.proof(), txnVersion: TransactionVersion.current(), }, setZkappUri: Permissions.proof(), setTokenSymbol: Permissions.proof(), incrementNonce: Permissions.proof(), setVotingFor: Permissions.proof(), setTiming: Permissions.proof(), }); } @method async init() { this.account.provedState.getAndRequireEquals(); this.account.provedState.get().assertFalse(); super.init(); this.num.set(Field(1)); this.calls.set(Field(0)); } ... ``` This code configures the zkApp as described and initializes the zkApp with the values you want. By asserting that `provedState` is `false` in `init()`, you ensure that `init()` cannot be called again after the zkApp is set up during the initial deployment. Without this assertion, your zkApp could be reset by anyone calling the `init()` method on your zkApp. :::tip This assertion is a recommended best practice for most zkApps. ::: 1. Next, add two functions: ```ts ... @method async add(incrementBy: Field) { this.account.provedState.getAndRequireEquals(); this.account.provedState.get().assertTrue(); const num = this.num.getAndRequireEquals(); this.num.set(num.add(incrementBy)); await this.incrementCalls(); } @method async incrementCalls() { this.account.provedState.getAndRequireEquals(); this.account.provedState.get().assertTrue(); const calls = this.calls.getAndRequireEquals(); this.calls.set(calls.add(Field(1))); } ... ``` These methods also assert `provedState` is `true` to ensure the zkApp was initialized as expected because `provedState` becomes true after `init()` is invoked. :::tip This assertion is a recommended best practice for most zkApps. ::: The `add()` method calls the `incrementCalls()` method. You can see how this is reflected in the `add()` transaction's `AccountUpdate` structure. 1. Finally, add one more function, `callSecondary()`, that calls a different zkApp: ```ts ... @method async callSecondary(secondaryAddr: PublicKey) { this.account.provedState.getAndRequireEquals(); this.account.provedState.get().assertTrue(); const secondaryContract = new SecondaryZkApp(secondaryAddr); const num = this.num.getAndRequireEquals(); await secondaryContract.add(num); // NOTE this gets the state at the start of the transaction this.num.set(secondaryContract.num.get()); await this.incrementCalls(); } } ``` The `callSecondary()` method takes the address of the other zkApp, `SecondaryZkApp`, and calls a method on it. Note that the impact of calling that method occurs after this set of AccountUpdates—so when you call `secondaryContract.num.get()`, it gets the value before this transaction is applied. Finally, look briefly at [SecondaryZkApp.ts](https://github.com/o1-labs/docs2/tree/main/examples/zkapps/10-account-updates/src/SecondaryZkApp.ts) that contains: ```ts export class SecondaryZkApp extends SmartContract { @state(Field) num = State(); async deploy() { await super.deploy(); this.account.permissions.set({ ...Permissions.default(), }); } @method async init() { this.account.provedState.getAndRequireEquals(); this.account.provedState.get().assertFalse(); super.init(); this.num.set(Field(12)); } @method async add(incrementBy: Field) { this.account.provedState.getAndRequireEquals(); this.account.provedState.get().assertTrue(); const num = this.num.getAndRequireEquals(); this.num.set(num.add(incrementBy)); } } ``` You declare functions for initializing the account and the `add()` method that is called from the earlier `ProofOnlyZkApp`. ### Running Your Smart Contracts and Visualizing the AccountUpdates Now it's time to learn about the [main.ts](https://github.com/o1-labs/docs2/tree/main/examples/zkapps/10-account-updates/src/main.ts) file that creates transactions with the earlier smart contracts and the account update visualizations it creates. 1. Import the transaction visualizer: ```ts ... import { showTxn, saveTxn, printTxn } from 'mina-transaction-visualizer'; ... ``` This provides three functions: ```ts // creates a png file of a transaction, and opens it in a local image viewer async showTxn(txn: Mina.Transaction, name: string, legend: Legend) // creates a png file of a transaction, and saves it to a path saveTxn(txn: Mina.Transaction, name: string, legend: Legend, path: string) // prints a nicely formatted view of a transaction printTxn(txn: Mina.Transaction, name: string, legend: Legend) // with legend type, to replace public keys with human readable strings: type Legend = { [pk: string]: string }; ``` 1. Next, define the legend as follows: ```ts const legend = { [proofsOnlyAddr.toBase58()]: 'proofsOnlyZkApp', [secondaryAddr.toBase58()]: 'secondaryZkApp', [deployerAccount.toBase58()]: 'deployer', }; ``` 1. Create and send a deploy transaction, then visualize it: ```ts const deployTxn = await Mina.transaction(deployerAccount, async () => { AccountUpdate.fundNewAccount(deployerAccount, 2); await proofsOnlyInstance.deploy(); await secondaryInstance.deploy(); }); await deployTxn.prove(); deployTxn.sign([deployerKey, proofsOnlySk, secondarySk]); await showTxn(deployTxn, 'deploy_txn', legend); await deployTxn.send(); ``` This yields the following visualization of `deployTxn`. This [visualization](/img/tutorial-10-deploy_txn.png) is best viewed in a new tab. The deploy transaction includes 5 accountUpdates represented as ovals. Described from left to right; 1. Takes the new account fee from the deployer for deploying the zkApps. Note the `-2` on the `balanceChange` field. 2. Deploys the `proofsOnlyZkApp` instance. Note the permissions are all set to the values in the zkApp's `deploy` field, and the `preconditions` asserting the nonce, so the transaction can't be applied more than once. 3. Initializes the `proofsOnlyZkApp`. Note the precondition that it can't already be in a proved state. 4. Deploys an instance of `secondaryZkApp`. Note the permissions here are set to default values, in contrast to the deployment in the `proofsOnlyZkApp` example. 5. Initializes the `secondaryZkApp` instance. When the transaction is run on chain, these account updates are checked by the Mina network and applied if valid. Each `AccountUpdate` class includes either a proof corresponding to the verification key in the zkApp account on-chain or a signature corresponding to the zkApp address. In this case, only proof authorization is allowed. ### Call `add()` on `proofsOnlyZkApp` 1. Call `add()` on your instance of `proofsOnlyZkApp`: ```ts const txn1 = await Mina.transaction(deployerAccount, async () => { await proofsOnlyInstance.add(Field(4)); }); await txn1.prove(); await showTxn(txn1, 'txn1', legend); await txn1.send(); ``` This returns the following visualization of `txn1`: See download link [here](/img/tutorial-10-txn1.png). ### Two AccountUpdates Now there are two AccountUpdates: - The parent corresponds to the `add()` method call - The child corresponds to the `this.incrementCalls()` call that the parent makes. One update is the child because it was called from the parent, which also implies that the parent has the child included as part of its proof. To learn more about parent/child account updates, see [Signing transactions and explicit account updates](/zkapps/writing-a-zkapp/introduction-to-zkapps/interact-with-mina#signing-transactions-and-explicit-account-updates) in the Payment to zkApp example. As a reminder, this update corresponds to code: ```ts ... @method async add(incrementBy: Field) { this.account.provedState.getAndRequireEquals(); this.account.provedState.get().assertTrue(); const num = this.num.getAndRequireEquals(); this.num.set(num.add(incrementBy)); await this.incrementCalls(); } @method async incrementCalls() { this.account.provedState.getAndRequireEquals(); this.account.provedState.get().assertTrue(); const calls = this.calls.getAndRequireEquals(); this.calls.set(calls.add(Field(1))); } ... ``` View the [account updates visualization](/img/tutorial-10-deploy_txn.png) again. - The first AccountUpdate sets the state of `appState[0]` to `5` — corresponding to the value passed to `this.num.set()` in the `add()` method. - In the second AccountUpdate, `appState[1]` is set to `1`—corresponding to the value passed to `this.calls.set()` in the `incrementCalls()` contract. Finally, call `callSecondary` on your instance of `proofsOnlyZkApp`: ```ts const txn2 = await Mina.transaction(deployerAccount, async () => { await proofsOnlyInstance.callSecondary(secondaryAddr); }); await txn2.prove(); await showTxn(txn2, 'txn2', legend); await saveTxn(deploy_txn, 'deploy_txn', legend, './txn2.png'); await txn2.send(); ``` This returns the following visualization of `txn2`: This [txn2 visualization](/img/tutorial-10-txn2.png) is best viewed in a new tab. And a quick reminder of the code for `callSecondary()`: ```ts @method async callSecondary(secondaryAddr: PublicKey) { this.account.provedState.getAndRequireEquals(); this.account.provedState.get().assertTrue(); const secondaryContract = new SecondaryZkApp(secondaryAddr); const num = this.num.getAndRequireEquals(); await secondaryContract.add(num); // NOTE this gets the state at the start of the transaction this.num.set(secondaryContract.num.get()); await this.incrementCalls(); } ``` This call produces three accountUpdates: - `callSecondary()` (the parent) - `secondaryZkApp.add()` (the left child) - `incrementCalls()` (the right child) As described in the code comment, `callSecondary` sets `this.num` to `12` which is the value of `secondaryContract` at the "start" of the transaction. ## Conclusion Congratulations! You have explored the core features of AccountUpdates and learned about visualizing the AccountUpdates for a set of transactions. You can build more complicated transactions that involve multiple zkApps. This tutorial builds a foundational understanding of how o1js and zkApps work to enable permissions, preconditions, and composability. --- url: /zkapps/tutorials/anonymous-message-board --- # Anonymous Message Board Tutorial This example shows you how to put building zkApp ideas into practice as you walk through designing and implementing of a semi-anonymous messaging protocol. In this tutorial, you build a smart contract that allows users to publish messages semi-anonymously. - The contract allows a specific set of users to create new messages but does not disclose which user creates the message. - This semi-anonymous messaging leverages one aspect of a person's identity without revealing exactly who they are. An example use case for this semi-anonymous contract is to enable a DAO member to make credible statements on behalf of their DAO without revealing their specific individual identity. ## Prerequisites Ensure your environment meets the [Prerequisites](/zkapps/tutorials#prerequisites) for zkApp Developer Tutorials. In particular, make sure you have the zkApp CLI installed: ```sh $ npm install -g zkapp-cli ``` This tutorial has been tested with: - [zkApp CLI](https://www.npmjs.com/package/zkapp-cli) version `0.20.1` - [o1js](https://www.npmjs.com/package/o1js) version `1.1.0` ## Create the message-board project 1. Create or change to a directory where you have write privileges. 1. Create a project using the `zk project` command: ```sh $ zk project --ui none message-board ``` The `zk project` command creates a directory with a new project template that is fully set up and ready for local development. Like all zk projects, a git repository is initialized in the project directory. By convention, the `main` branch is the default branch. 1. Change to the project directory: ```sh cd message-board ``` For this tutorial, you run commands from the root of the `message-board` directory as you work in the `src` directory on files that contain the TypeScript code for the smart contract. Each time you make updates, then build or deploy, the TypeScript code is compiled into JavaScript in the `build` directory. See the included [README](https://github.com/o1-labs/docs2/blob/main/examples/zkapps/anonymous-message-board/README.md) file with usage instructions. ### Prepare the project Example smart contract files come with the new project, you can delete them if you want. 1. Optional: Delete the example files not used in this tutorial: ```sh $ rm -rf src/* ``` 1. To create the `src/message.ts` file: ```sh $ zk file message ``` 1. Copy the entire contents of the [message.ts](https://github.com/o1-labs/docs2/blob/main/examples/zkapps/anonymous-message-board/src/message.ts) example file into your local `message-board/src/message.ts` file. ```ts import { Field, SmartContract, state, State, method, PrivateKey, PublicKey, Poseidon, } from 'o1js'; // These private keys are exported so that experimenting with the contract is // easy. Three of them (the Bobs) are used when the contract is deployed to // generate the public keys that are allowed to post new messages. Jack's key // is never added to the contract. So he won't be able to add new messages. In // real life, we would only use the Bobs' public keys to configure the contract, // and only they would know their private keys. export const users = { Bob: PrivateKey.fromBase58( 'EKFAdBGSSXrBbaCVqy4YjwWHoGEnsqYRQTqz227Eb5bzMx2bWu3F' ), SuperBob: PrivateKey.fromBase58( 'EKEitxmNYYMCyumtKr8xi1yPpY3Bq6RZTEQsozu2gGf44cNxowmg' ), MegaBob: PrivateKey.fromBase58( 'EKE9qUDcfqf6Gx9z6CNuuDYPe4XQQPzFBCfduck2X4PeFQJkhXtt' ), // This one says duck in it :) Jack: PrivateKey.fromBase58( 'EKFS9v8wxyrrEGfec4HXycCC2nH7xf79PtQorLXXsut9WUrav4Nw' ), }; export class Message extends SmartContract { // On-chain state definitions @state(Field) message = State(); @state(Field) messageHistoryHash = State(); @state(PublicKey) user1 = State(); @state(PublicKey) user2 = State(); @state(PublicKey) user3 = State(); init() { // Define initial values of on-chain state this.user1.set(users['Bob'].toPublicKey()); this.user2.set(users['SuperBob'].toPublicKey()); this.user3.set(users['MegaBob'].toPublicKey()); this.message.set(Field(0)); this.messageHistoryHash.set(Field(0)); } @method async publishMessage(message: Field, signerPrivateKey: PrivateKey) { // Compute signerPublicKey from signerPrivateKey argument const signerPublicKey = signerPrivateKey.toPublicKey(); // Get approved public keys const user1 = this.user1.get(); const user2 = this.user2.get(); const user3 = this.user3.get(); // Assert that signerPublicKey is one of the approved public keys signerPublicKey .equals(user1) .or(signerPublicKey.equals(user2)) .or(signerPublicKey.equals(user3)) .assertEquals(true); // Update on-chain message state this.message.set(message); // Compute new messageHistoryHash const oldHash = this.messageHistoryHash.get(); const newHash = Poseidon.hash([message, oldHash]); // Update on-chain messageHistoryHash this.messageHistoryHash.set(newHash); } } ``` This code serves as the scaffolding for the rest of the tutorial and contains a smart contract called `message` with two methods: - `init()` - Similar to the `constructor` in Solidity, it's where you define any set up that needs to happen before users begin interacting with the contract. - `publishMessage()` - The method that users invoke when they want to create a new message. The `@method` decorator tells o1js to: - Allow users to call this method - Generate a zero knowledge proof (ZKP) of its execution ### Define on-chain state Every Mina smart contract includes 32 on-chain state variables that each store almost 256 bits of information. In more complex smart contracts, these state variables can store commitments to off-chain storage (for example, commitments for the hash of a file, the root of a Merkle tree, and so on). For simplicity, this tutorial stores everything on-chain. :::note General purpose off-chain storage libraries are appropriate only for development. See [Tutorial 6: Off-Chain Storage](/zkapps/tutorials/offchain-storage). ::: In this smart contract, one state variable stores the last message. Another stores the hash of all the previous messages so a frontend can validate message history. Three more state variables can store user public keys. It's possible to store additional public keys by Merkelizing them, but for simplicity this tutorial uses only three keys: ```ts export class Message extends SmartContract { // On-chain state definitions @state(Field) message = State(); @state(Field) messageHistoryHash = State(); @state(PublicKey) user1 = State(); @state(PublicKey) user2 = State(); @state(PublicKey) user3 = State(); ``` The `@state(Field)` decorator tells o1js that the variable is stored on-chain as a `Field` type. For practical purposes, the `Field` type is similar to the `uint256` type in Solidity. It can store large integers and addition, subtraction, and multiplication all work as expected. The only caveats are division and what happens in the event of an overflow. To learn more about finite fields, see [Finite field arithmetic](https://en.wikipedia.org/wiki/Finite_field_arithmetic). It is not required to understand exactly how field arithmetic works for this tutorial. o1js also provides `UInt32`, `UInt64`, and `Int64` types. All o1js types are composed of the `Field` type, including `PublicKey` as shown in the previous example. ### Define the `init()` method The `init` method is similar to the `constructor` in Solidity. It's where you define any setup that needs to happen before users begin interacting with the contract. In this case, set the public keys of users who can post and initialize `message` and `messageHistoryHash` as zero. The front end interprets the zero value to mean that no messages have been posted yet. ```ts init() { // Define initial values of on-chain state this.user1.set(users['Bob'].toPublicKey()); this.user2.set(users['SuperBob'].toPublicKey()); this.user3.set(users['MegaBob'].toPublicKey()); this.message.set(Field(0)); this.messageHistoryHash.set(Field(0)); } ``` ### Define `publishMessage()` The `publishMessage` method allows an approved user to publish a message. The `@method` decorator makes this method callable by users so that they can interact with the smart contract. For this example, pass in `message` and `signerPrivateKey` arguments to check that the user holds a private key associated with one of the three on-chain public keys before allowing them to update the message: ```ts @method async publishMessage(message: Field, signerPrivateKey: PrivateKey) { ``` Note that all inputs are private by default and exist only on the user's local machine when the smart contract runs. The Mina network never sees private inputs. The smart contract sends only values that are stored as state to the Mina blockchain. This means that even though the value of the `message` argument is eventually public, the value of `signerPrivateKey` never leaves the user's machine as a result of interacting with the smart contract. ### Compute `signerPublicKey` from `signerPrivateKey` Now that you have the user's private key, you need to derive the associated public key to check it against the list of approved publishers. The `PrivateKey` type in o1js includes a `toPublicKey()` method: ```ts // Compute signerPublicKey from signerPrivateKey argument const signerPublicKey = signerPrivateKey.toPublicKey(); ``` To check if this public key matches one of the keys stored on-chain:. ```ts // Get approved public keys const user1 = this.user1.get(); const user2 = this.user2.get(); const user3 = this.user3.get(); ``` Calling the `get()` method retrieves these values from the zkApp account on-chain state. :::note o1js uses a single network request to retrieve all on-chain state values simultaneously. ::: Finally, check if `signerPublicKey` is equal to one of the allowed public keys contained in the `user` variables: ```ts // Assert that signerPublicKey is one of the approved public keys signerPublicKey .equals(user1) .or(signerPublicKey.equals(user2)) .or(signerPublicKey.equals(user3)) .assertEquals(true); ``` Notice the `equals()` and `or()` methods are used instead of the JavaScript operators (`===`, and `||`). The built-in o1js methods have the same effect, but they work with o1js types and their execution can be verified using a zero knowledge proof. `assertEquals(true)` at the end means that a valid proof is not generated unless `signerPublicKey` is equal to one of the pre-approved users. The Mina network rejects any transaction sent to a zkApp account that doesn't include a valid zero knowledge proof for that account. So it is impossible for users to post new messages unless they have a private key associated with one of the three pre-approved public keys. ### Update `message` Up to this point, the contract ensures that only approved users can call `publishMessage()`. When they do, the contract updates the on-chain `message` variable to their new message: ```ts // Update on-chain message state this.message.set(message); ``` The `set()` method asks the Mina nodes to update the value of their on-chain state, but only if the associated proof is valid. ### Update `messageHistoryHash` There's one more thing to do. If you want users to be able to keep track of what has been said, then you need to store a commitment to the message history on-chain. There are a few ways to do this, but the simplest way is to store a hash of your new `message` and your old `messageHistoryHash` every time you call `publishMessage`: ```ts // Compute new messageHistoryHash const oldHash = this.messageHistoryHash.get(); const newHash = Poseidon.hash([message, oldHash]); // Update on-chain state this.messageHistoryHash.set(newHash); ``` That's it! Save the file. Now, to make sure everything compiles: ```sh $ npm run build ``` If everything is correct, you see a new `./build` directory where the compiled version of your project lives that you can import into a user interface. ## Wrapping up This tutorial gives you a sense of what's possible with o1js. The messaging protocol you built is quite simple but also very powerful. You can use this basic pattern to create a whistleblower system, an anonymous NFT project, or even anonymous DAO voting. The main point is that o1js makes it easy for you to build things that don't intuitively seem possible. Zero knowledge proofs open the door to an entirely different way of thinking about the internet. We are so excited to see what people like you will build. Make sure to join the [#zkapps-developers](https://discord.com/channels/484437221055922177/915745847692636181) channel on Mina Protocol Discord. ## Keep going The logical next steps to extend this project include: - Allow users to pass signers into the `publishMessage()` method directly so that many different organizations can use a single contract. Hint: You'll have to store a commitment to the signers on-chain. - Allow users to pass an arbitrarily large number of signers into the `publishMessage()` method. - Store the message history in a Merkle tree so a user interface can quickly check a subset of the messages without evaluating the entire history. - Build a shiny front end! --- url: /zkapps/tutorials --- # zkApp Developer Tutorials zkApp developer tutorials are a hands-on walk-through of use cases that guide you to achieve a defined goal. o1js, fka. SnarkyJS, is a TypeScript (TS) library for writing general-purpose zk programs and writing zk smart contracts for Mina. To meet other developers building zkApps with o1js, participate in the [#zkapps-developers](https://discord.com/login?redirect_to=%2Fchannels%2F484437221055922177%2F915745847692636181) channel on Mina Protocol Discord. ## Prerequisites Each tutorial has been tested with the latest versions: - [zkApp CLI](https://www.npmjs.com/package/zkapp-cli) - [o1js](https://www.npmjs.com/package/o1js) o1js is automatically included when you create a project using the zkApp CLI. - Other dependencies as noted. ### Install the zkApp CLI To install the zkApp CLI: ```sh $ npm install -g zkapp-cli ``` To confirm successful installation: ```sh $ zk --version ``` ## Dependencies To use the zkApp CLI and o1js, your environment requires: - NodeJS v18 and later - NPM v10 and later - git v2 and later Use a package manager to install the required versions and upgrade older versions if needed. Package managers for the supported environments are: - MacOS [Homebrew](https://brew.sh/) - Windows [Chocolatey](https://chocolatey.org/) - Linux - apt, yum, and others On Linux, you might need to install a recent Node.js version by using NodeSource. Use [deb](https://github.com/nodesource/distributions#debinstall) or [rpm](https://github.com/nodesource/distributions#rpminstall) as recommended by the Node.js project. To verify your installed versions, use `npm -v`, `node -v`, and `git -v`. ## Tips The full source code for tutorials is provided in the [examples/zkapps/](https://github.com/o1-labs/docs2/tree/main/examples/zkapps/) directory on GitHub. While you're there, give the `/docs2` repository a star so that other zk developers can learn to build a zkApp! Line numbers are provided for convenience. To prevent copying line numbers and command prompts as shown in the tutorials, use the copy code to clipboard button that appears at the top right of the snippet box when you hover over it. ## Useful Resources The API Reference docs are a detailed resource that is useful after you have familiarized yourself with the basics. See the [o1js Reference](https://docs.o1labs.org/o1js/api-reference/Introduction) docs for an in-depth explanation of all the methods, properties, and interfaces available in o1js. See the o1Labs blog at https://www.o1labs.org/blog/. For updates about o1js, see https://www.o1labs.org/blog?topics=o1js. If you're just getting started, watch these step-by-step [zkApp Explainer Videos](https://www.youtube.com/playlist?list=PLItixFkgfjYFw6GPqu6vk4NmclOJpT9lE) that go over how to get started building zkApps. Each tutorial includes a link to the corresponding video. While you're on the Mina Foundation YouTube channel, select **Subscribe** so that new videos will show in your Subscriptions feed. --- url: /zkapps/tutorials/interacting-with-zkapps-server-side --- # Interacting with zkApps server-side While user-facing zkApps can be written for the browser, sometimes it is useful to interact with a zkApp server-side or on your own machine. For example, when initializing a zkApp using programmatically generated information, deploying a zkApp in custom ways, or writing scripts that create transactions depending on real-world (periodically updating an on-chain value with signed data, like a keeper for an oracle) or on-chain events. Interacting with zkApps server-side is useful for some use cases. For example, if you need to create a custom account for your zkApp to deploy a zkApp to a different key than the fee payer key. You can programmatically parameterize a zkApp before you initialize it. You can even create a smart contract programmatically for users as part of an application. ## Prerequisites Ensure your environment meets the [Prerequisites](/zkapps/tutorials#prerequisites) for zkApp Developer Tutorials. Before you start this tutorial, you must deploy a smart contract. To do this, read and complete [Tutorial 3: Deploy to a Live Network](deploying-to-a-network) that reuses the smart contract `Square` from [Tutorial 1: Hello World](hello-world). This tutorial has been tested with: - [zkApp CLI](https://www.npmjs.com/package/zkapp-cli) version `0.17.2` - [o1js](https://www.npmjs.com/package/o1js) version `0.16.2` ## Interact with the deployed Smart Contract Now that you successfully created and deployed your project following [Tutorial 3: Deploy to a Live Network](deploying-to-a-network), you can write a script to interact with the smart contract. ### Building on Tutorial 3 For this tutorial, you update the smart contract that you already built for [Tutorial 3: Deploy to a Live Network](/zkapps/tutorials/deploying-to-a-network). You run commands from the root of the `03-deploying-to-a-live-network` directory as you work in the `src` directory on files that contain the TypeScript code for the smart contract. Each time you make updates, then build or deploy, the TypeScript code is compiled into JavaScript in the `build` directory. ### Helper functions in utils.ts To make this more script convenient to write, use the provided helper functions. 1. Download the [utils.ts](https://github.com/o1-labs/docs2/blob/main/examples/zkapps/interacting-with-zkApps-server-side/src/utils.ts) file. 1. Place the file in the project `03-deploying-to-a-live-network/src` folder. 1. Read through the code to understand what it is doing to implement its functionality. The `utils.ts` file contains two functions: - `loopUntilAccountExists()` waits until an account exists on Devnet - `deploy()` programmatically deploys your zkApp ### Connect to a remote network 1. Download the [main.ts](https://github.com/o1-labs/docs2/blob/main/examples/zkapps/interacting-with-zkApps-server-side/src/main.ts) example file. 1. Because you are building on your earlier work, place the `main.ts` file in the project `03-deploying-to-a-live-network/src` folder. 1. Review the code that adds the imports and o1js setup: ```ts import { Square } from './Square.js'; import { Mina, PrivateKey } from 'o1js'; ``` 1. Now, set the active instance to the remote Devnet network. Earlier tutorials set the active instance to a simulated local blockchain, which is fast for development but only available on your local machine and is not decentralized. The connection is made through the GraphQL endpoint exposed by the Mina node connected to the Devnet network. By connecting to the remote Devnet network, you can provide smart contracts that are globally accessible and provide strong guarantees around state due to both Mina's decentralization and its succinct state proof. Review the code that connects to Devnet: ```ts ... const Network = Mina.Network( 'https://api.minascan.io/node/devnet/v1/graphql' ); Mina.setActiveInstance(Network); ... ``` 1. Set a transaction fee that you use to pay for access to sending transactions and deploying smart contracts on Mina. Transaction fees in code are declared as nanomina. Review the code that sets the default transaction fee to 0.1 MINA (100,000,000 nanomina): ```ts ... const transactionFee = 100_000_000; ... ``` This example connects to a remote RPC served by `minascan.io`. You could also run a Mina node locally and instead use its GraphQL endpoint. In other blockchains a local Mina node would be very heavyweight, but because Mina is succinct this is actually a reasonable option. See the Node Operator [Getting Started](/node-operators/block-producer-node/getting-started) docs. ### Public/private key pair You already generated a public/private key pair when you ran the `zk config` command to configure the deployment in [Tutorial 3: Deploy to a Live Network](/zkapps/tutorials/deploying-to-a-network#deploy-alias) the `zk config` command. The public/private key pair was created in `keys/devnet.json`. Public and private keys in Mina are commonly stored in Base58 for easily readability. In Mina, public keys start with `B62` and private keys start with `EK` for easy differentiability. 1. Still in the `main.ts` file, review the code that specifies that the name of the key file must be provided through an argument on the command line: (`process.argv[2]`): ```ts ... const transactionFee = 100_000_000; const deployAlias = process.argv[2]; const deployerKeysFileContents = fs.readFileSync( 'keys/' + deployAlias + '.json', 'utf8' ); const deployerPrivateKeyBase58 = JSON.parse( deployerKeysFileContents ).privateKey; const deployerPrivateKey = PrivateKey.fromBase58(deployerPrivateKeyBase58); const deployerPublicKey = deployerPrivateKey.toPublicKey(); const zkAppPrivateKey = PrivateKey.fromBase58( 'EKFTMuvTirzrwpeHP8RKe7bGufBGiKs27nTMzD5XyMV8NcK3upt2' ); ... ``` You can run this code now with: ```sh $ npm run build && node build/src/main.js devnet ``` The expected output is: ```text > 03-deploying-to-a-live-network@0.1.0 build > tsc state after init: 3 state after txn1: 9 Field.assertEquals(): 75 != 81 state after txn2: 9 state after txn3: 81 ``` - The `npm run build` command creates JavaScript code in the `build` directory. - The `&&` operator links two commands together. - The `node build/src/main.js` command runs the code in `src/main.ts`. - The keys are read from `keys/devnet.json`. The SmartContract is also deployed to the same account you deployed from, set with `zkAppPrivateKey = deployerPrivateKey`. Depending on the application, it can also be useful to have separate keys for the zkApp and deployer accounts. ### Wait for accounts to be ready Next, review the code that waits for the deployer account to be ready. In `main.ts`, the import to use the `loopUntilAccountExists()` function from `utils.ts` goes here: ```ts ... ``` Wait until the new deployment account exists. If the key created from the `zk deploy` command earlier in this tutorial has already been funded, then find the account and move on. If that transaction hasn't finished yet, then wait until that has completed. After the account is found, print out its nonce and its balance. This code compiles the smart contract and waits for it to be deployed: ```ts ... // ---------------------------------------------------- console.log('Compiling smart contract...'); let { verificationKey } = await Square.compile(); const zkAppPublicKey = zkAppPrivateKey.toPublicKey(); let zkapp = new Square(zkAppPublicKey); // Programmatic deploy: // Besides the CLI, you can also create accounts programmatically. This is useful if you need // more custom account creation - say deploying a zkApp to a different key than the fee payer // key, programmatically parameterizing a zkApp before initializing it, or creating Smart // Contracts programmatically for users as part of an application. await deploy(deployerPrivateKey, zkAppPrivateKey, zkapp, verificationKey); await loopUntilAccountExists({ account: zkAppPublicKey, eachTimeNotExist: () => console.log('waiting for zkApp account to be deployed...'), isZkAppAccount: true, }); let num = (await zkapp.num.fetch())!; console.log(`current value of num is ${num}`); // ---------------------------------------------------- ... ``` To do this, reuse the helper function `loopUntilAccountExists()` from `utils.js`. This time, pass in `isZkappAccount: true` checks if the account exists and that there is a verification key on the account. An existing verification key indicates that the zkApp has been successfully deployed. The smart contract was already deployed with `zk deploy` so a programmatic deploy is not required and is commented out here. If you want to see how this works, or it's useful for your application, see the code in [utils.ts](https://github.com/o1-labs/docs2/blob/main/examples/zkapps/interacting-with-zkApps-server-side/src/utils.ts). After the zkApp has been deployed, fetch the current value of `zkapp.num` (the on-chain defined on the `SmartContract`) and log it. If this is the first time you have run this script, the value is `3` because that's how it is set in the smart contract's `init()` function. The `init()` function is called automatically during the first deploy (not during re-deploys). ### Send an update transaction Finally, here is code that sends an update to the transaction. If the zkApp was just initialized, this calls an update on the newly initialized account. Otherwise, it calls an update on whatever the current account state happens to be. ```ts ... // ---------------------------------------------------- let transaction = await Mina.transaction( { sender: deployerPublicKey, fee: transactionFee }, async () => { await zkapp.update(num.mul(num)); } ); // fill in the proof - this can take a while... console.log('Creating an execution proof...'); let time0 = performance.now(); await transaction.prove(); let time1 = performance.now(); console.log(`creating proof took ${(time1 - time0) / 1e3} seconds`); // sign transaction with the deployer account transaction.sign([deployerPrivateKey]); console.log('Sending the transaction...'); let pendingTransaction = await transaction.send(); // ---------------------------------------------------- ... ``` To send an update transaction, perform the following steps: 1. Construct the transaction with `Mina.transaction`. This is where you call `zkapp.update()`, the custom method defined on the smart contract. 2. Create a proof of the transaction. This can take up to a minute. 3. Sign the transaction and send it to the network. When sending the transaction using `transaction.send()`, an object called `pendingTransaction` is returned and provides information about how the transaction went and waits for inclusion in a block: ```ts if (pendingTransaction.status === "rejected") { console.log('error sending transaction (see above)'); process.exit(0); } console.log( `See transaction at https://minascan.io/devnet/tx/${pendingTransaction.hash} Waiting for transaction to be included...` ); await pendingTransaction.wait(); console.log(`updated state! ${await zkapp.num.fetch()}`); ``` This code uses several functionalities of the pending transaction: - `pendingTransaction.status indicates the initial processing status of the transaction, with pending signifying that the transaction has been accepted for processing by the network, and rejected indicating that the transaction was immediately deemed invalid and rejected by the GraphQL endpoint. - `pendingTransaction.hash` is the transaction hash that you can use to look up the transaction in a block explorer. If the transaction failed, it returns `undefined`. - `pendingTransaction.wait()` is especially useful as it returns a promise that resolves whether a transaction is included into a block or rejected. This takes several minutes, so you might not want to block the main thread on this in a real application. Finally, after the transaction was successfully applied on the Mina blockchain, you can double-check that your state was updated by fetching it again with `zkapp.num.fetch()`. ## Conclusion You have finished writing a script to initialize the state and interact with it! You can also run this script multiple times to update `x` to its square. Check out other tutorials and documentation to keep going! --- url: /zkapps/writing-a-zkapp/feature-overview/custom-tokens --- :::info If you want to create a fungible token you can use the [fungible token standard](https://github.com/MinaFoundation/mina-fungible-token/blob/main/documentation/SUMMARY.md) which is built on top of the `TokenContract` class. :::info # Custom Tokens Blockchain applications have various use cases for custom tokens, including a real-world financial asset, stake in an on-chain protocol, or even skill points in a game. Most blockchains, like Ethereum, do not natively support custom tokens. You implement custom tokens as smart contracts on top of the execution layer of the underlying protocol. Token standards ensure the interoperability of applications on Etherum, these standardisations are agree upon in ERCs, Ethereum Request for customElements, such as the fungible token standard [ERC-20](https://ethereum.org/en/developers/docs/standards/tokens/erc-20/). The Ethereum community has created and agreed upon other reference implementations and standardisation that are audited and easy to configure, such as [ERC-721](https://ethereum.org/en/developers/docs/standards/tokens/erc-721/) for NFTs. Mina supports custom token functionality at a low level in the tech stack. Mina treats custom tokens almost the same way as the native MINA token. This approach offers the following benefits: - As a developer, you do not have to manage as many boilerplate contracts. - Developers don't need to keep track of accounts and balances themselves. - It is more secure because fewer vulnerabilities can result from incorrect configuration and deployment. Each account on Mina can have tokens associated with it. With zkApps, you build smart contracts that interact with tokens, such as swapping one token for another or depositing MINA tokens. A token manager smart contract is a standard smart contract with the `TokenContract` class that manipulates tokens. ## Token manager account The token manager account can set a token symbol (also called token name) for its token. For example, `MYTKN`. Uniqueness is not enforced for token names because the public key of the manager account is used to derive a unique identifier for each token. A token manager smart contract sets the rules around minting, burning, and sending the custom token: - Minting generates new tokens. The zkApp updates an account's balance by adding the newly created tokens to it. You can send minted tokens to any existing account in the network. - Burning tokens is the opposite of minting. Burning tokens deducts the balance of a certain address by the specified amount. A zkApp cannot burn more tokens than the specified account has. - Sending tokens between two accounts must be approved by a zkApp. ## TokenContract class Use the `TokenContract` class to perform common token operations, such as minting, burning, and sending tokens. In o1js, the `TokenContract` class is your blueprint for custom token implementations. As shown in this [example code](https://github.com/o1-labs/o1js/blob/main/src/lib/mina/token/token-contract.unit-test.ts#L13), you inherit from the `TokenContract` class: ```ts class ExampleTokenContract extends TokenContract { // your custom token implementation } ``` ## TokenContract API The `TokenContract` comes with a set of prebuilt methods and helpers to get you started in your token journey. The base token smart contract implements the following two APIs: - `Approvable` leaves the `approveBase()` method to be defined by the subclass - `Transferable` a wrapper around `Approvable` that deals with transfers of token Additionally, the token smart contract also comes with an `internal` namespace which contains helper methods that can be used from within a token contract only. ```ts TokenContract.internal: { /** * Mints token balance to `address`. Returns the mint account update. */ mint( address: PublicKey | AccountUpdate | SmartContract; amount: number | bigint | UInt64; ): AccountUpdate; /** * Burn token balance on `address`. Returns the burn account update. */ burn( address: PublicKey | AccountUpdate | SmartContract; amount: number | bigint | UInt64; ): AccountUpdate; /** * Move token balance from `from` to `to`. Returns the `to` account update. */ send( from: PublicKey | AccountUpdate | SmartContract; to: PublicKey | AccountUpdate | SmartContract; amount: number | bigint | UInt64; ): AccountUpdate; } ``` ### The Approvable API Each subclass token contract that inherits the default `TokenContract` must implement the core `approveBase()` method. It has the following signature: ```ts approveBase(forest: AccountUpdateForest): void; ``` The `TokenContract` also containts helper methods that make it easy to iterate through and approve a forest of child account updates. The usual implementation is as easy as this: ```ts @method async approveBase(forest: AccountUpdateForest) { this.checkZeroBalanceChange(forest); } ``` However, if you want to do a custom implementation for every child account update, you can utilize the `forEachUpdate()` method. ```ts @method async approveBase(updates: AccountUpdateForest) { let totalBalanceChange = Int64.zero; this.forEachUpdate(updates, (accountUpdate, usesToken) => { totalBalanceChange = totalBalanceChange.add( Provable.if(usesToken, accountUpdate.balanceChange, Int64.zero) ); // additional logic }); // prove that the total balance change is zero totalBalanceChange.assertEquals(0); } ``` The `Approvable` API also provides easy to use wrappers around `approveBase()`, such as the following: ```ts abstract class TokenContract extends SmartContract { /** * Approve a single account update (with arbitrarily many children). */ approveAccountUpdate(accountUpdate: AccountUpdate): Promise;; /** * Approve a list of account updates (with arbitrarily many children). */ approveAccountUpdates(accountUpdates: AccountUpdate[]): Promise;; /** * Transfer `amount` of tokens from `from` to `to`. */ transfer(from: PublicKey | AccountUpdate, to: PublicKey | AccountUpdate, amount: UInt64): Promise;; } ``` ### The Transferable API The `Transferable` API is a simple wrapper around the `Approvable` API. It implements the following method: ```ts abstract class TokenContract extends SmartContract { /** * Transfer `amount` of tokens from `from` to `to`. */ transfer( from: PublicKey | AccountUpdate, to: PublicKey | AccountUpdate, amount: UInt64 | number | bigint ): Promise; } ``` Which utlizses the `Approvable` API to send token from an account to another one. ## Custom Token Terminology If your zkApp interacts with custom tokens, here are the essential terms. ### Token id Token ids are unique identifiers that distinguish between different types of custom tokens. Custom token identifiers are globally unique across the entire network. Token ids are derived from a zkApp. To check the token id of a zkApp, use the `this.token.id` property. ### Token Accounts Token accounts are like regular accounts, but they hold a balance of a specific custom token instead of MINA. A token account is created from an existing account and is specified by a public key _and_ a token id. Token accounts are specific for each type of custom token, so a single public key can have many different token accounts. A token account is automatically created for a public key whenever an existing account receives a transaction denoted with a custom token. When a token account is created for the first time, an account creation fee must be paid the same as creating a new standard account. In addition to sending custom tokens, a **token owner account** can mint and burn custom tokens. A token owner account is the governing zkApp account for a specific custom token. ### Token Owner A token owner is an zkApp account that creates, facilitates, and governs how a custom token can be used. The token owner is the account that created the custom token and is the only account that can: - Mint tokens - Burn tokens - Approve sending tokens between two accounts --- url: /zkapps/writing-a-zkapp/feature-overview/fetch-events-and-actions --- # How to Fetch Events and Actions Events and Actions are two distinct mechanisms for logging information alongside a transaction: - Events are not meant for use within proofs directly, as they can't be predicated on inside proofs. Events are used to signal to UIs. You can also use events for reconstructing Merkle trees. - Actions can be accessed within provable code by using reducers. :::info Events and actions are not stored in the ledger and exist only on the transaction. :::info Since Mina nodes do not store historical network information and events and actions are not kept on-chain, emitted events and actions are preserved only in the archive node. Consequently, a zkApp can retrieve previously emitted events and actions from one or more Mina archive nodes. The Mina archive node offers the ability for node operators to store historical blockchain data using `PostgreSQL`. However, archive nodes do not expose a built-in API to query this data publicly. ## Using the Archive Node API with o1js There are two parts to using the archive node with o1js: - Archive node operators run the [Archive-Node-API](https://github.com/o1-labs/archive-node-api) to provide a GraphQL API from which zkApp smart contracts can retrieve events and actions. - o1js developers specify the archive node API endpoint during the network configuration to allow access to historical events and actions. The `Archive-Node-API` enables o1js to fetch events and actions. ## o1js network configuration If your smart contract needs to fetch events and/or actions from an archive node, provide an `archive` property in the configuration object passed to the `Mina.Network({mina: '...', archive: '...'})` where the `archive` property value is the URL for the `Archive-Node-API` service that you want to use. If this property does not exist, an error will occurs at the time of the events/actions fetching. For example: ```ts const Network = Mina.Network({ mina: 'https://api.minascan.io/node/devnet/v1/graphql', archive: 'https://api.minascan.io/archive/devnet/v1/graphql', }); Mina.setActiveInstance(Network); ``` ## Fetching Actions from an Archive Node Within your smart contract, you can use `getActions()` to retrieve actions emitted by your smart contract as part of previous transactions. ```ts class MyContract extends SmartContract { ... @method async getActionsExample() { // Get all actions for this zkApp let pendingActions = this.reducer.getActions({ fromActionState: actionsState, }); this.reducer.reduce( pendingActions, Field, (state: Field, action: Field) => { ... }, { state: counter, actionsState } ); } } ``` By default, `getActions()` retrieves all actions from the very first action emitted for that zkApp account. However, you can provide an object that contains an optional property named `fromActionState`, where the value is an `actionsState` to indicate the starting point of the actions to be retrieved and processed by your smart contract. For an end-to-end example of zkApp fetching actions from a running network and storing the action state within your zkApp account, see the voting app [example](https://github.com/o1-labs/o1js/blob/main/src/examples/zkapps/voting/voting.ts) file that is provided in the o1js repo. ### Fetching Events from an Archive Node Outside of smart contracts, you can use `fetchEvents()` to retrieve events emitted by your smart contract as part of previous transactions. ```ts const zkapp = new MyContract(address); // Fetch all events from zkapp starting at block 0 const events = await zkapp.fetchEvents(UInt32.from(0)); // Fetch all events starting at block 560 and ending at block 600 const events = await zkapp.fetchEvents(UInt32.from(560), UInt32.from(600)); // Fetch all events for a given address const fetchedEvents = await fetchEvents({ publicKey: 'B62qrfn5xxChtPGJne9HuDJZ4ziWVgWxeL3hntGBqMmf45p4hudo3tw', }); ``` By default, `fetchEvents()` retrieves all events from the very first event ever emitted for that zkApp account. Additionally, you can provide a starting block height and an ending block height as optional parameters to limit the range of events fetched. - If the ending block is not provided, `fetchEvents()` fetches all events up to the latest block. - If the starting block is not provided, it fetches all events from the beginning of the zkApp's history. To see an end-to-end example of zkApp fetching events from a running network, see the [example](https://github.com/o1-labs/o1js/blob/main/src/examples/zkapps/voting/run-berkeley.ts) file that is provided in the codebase repo. --- url: /zkapps/writing-a-zkapp/feature-overview/offchain-storage --- :::experimental Offchain storage is currently an experimental feature and is subject to change in the future. ::: # Offchain Storage One of Mina's unique features is its succinctness, both in computation and storage. To prevent state bloat and maintain Mina's efficiency and verifiability, we use offchain storage solutions for handling large volumes of data. In a previous section, we introduced the concept of on-chain Values. Since Mina currently only supports a total of 32 on-chain Field elements, we need to leverage offchain storage to extend that capacity. This approach maintains a provably secure connection between the on-chain smart contract and the off-chain data, such as that stored in an archive node. ## Design Presently, Offchain storage offers support for two types of state: `OffchainState.Field`, representing a single field of state, and `OffchainState.Map`, akin to the key-value maps found in JavaScript, like `let myMap = new Map();`. All offchain state resides within a single Merkle Map, which is essentially a wrapper around a [Merkle Tree](https://docs.o1labs.org/o1js/basic-types/merkle-trees). Practically speaking, there are no constraints on the number of state fields and maps that a developer can store in a smart contract using Offchain storage. Under this framework, [Actions and Reducer](https://docs.o1labs.org/o1js/zkapps/actions-and-reducers) are utilized to manage state changes, with actions dispatching state updates and reducers settling them. Additionally, a Merkle Tree is employed to maintain a provably secure commitment to the data, with the root stored on-chain. Prior to users accessing published state, it must first undergo settlement. Thanks to the design of Offchain storage, all state is recoverable from actions alone, eliminating the need for additional events or external data storage. ## Utilizing Offchain Storage ### Prerequisites The `OffchainState` API is accessible within the `Experimental` namespace. To use `OffchainState`, import `Experimental` from o1js version 1.9.1 or higher. ```ts const { OffchainState, OffchainStateCommitments } = Experimental; ``` ### Setting up Offchain Storage To integrate Offchain storage, developers must initially define an Offchain state configuration and a state proof type, then prepare the smart contract. The `OffchainState` configuration allows specification of the desired Offchain state type, including key-value pairs in a map and any additional required state. The `StateProof` type will subsequently be used to finalize published state changes using a recursive reducer and the `OffchainStateInstance` stores internal data such as which contract instance it is associated with and the Merkle trees of data. ```ts const offchainState = OffchainState({ players: OffchainState.Map(PublicKey, UInt64), totalScore: OffchainState.Field(UInt64), }); class StateProof extends offchainState.Proof {} const offchainStateInstance = offchainState.init(); ``` Developers also need to set the smart contract instance and assign it to the offchain storage. This also compiles the recursive Offchain zkProgram in the background and assigns the Offchain state to the smart contract instance property. ```ts let contract = new MyContract(contractAddress); contract.offchainState.setContractInstance(contract); // compile Offchain state program await offchainState.compile(); // compile smart contract await ExampleContract.compile(); ``` To settle the offchain state, an Offchain storage proof must be generated and provided to the smart contract's `settle()` method. This method automatically retrieves all pending actions (state changes) and resolves them using a recursive reducer. Finally, the proof is passed to the `settle()` method. ```ts let proof = await offchainState.createSettlementProof(); await Mina.transaction(sender, () => { // settle all outstanding state changes contract.settle(proof); }) .sign([sender.key]) .prove() .send(); ``` ### Configuring Your Smart Contract The smart contract requires a field containing a commitment to the offchain state. This field is used internally by the `OffchainState` methods and should not be written to by your smart contract logic. It is also required that an `offchainStateInstance` be assigned to the smart contract’s instance property to ensure correct offchain state management. ```ts class MyContract extends SmartContract { @state(OffchainState.Commitments) offchainStateCommitments = offchainState.emptyCommitments(); offchainState = offchainStateInstance; } ``` The contract also needs a `settle()` method to resolve all pending state updates. This method verifies a recursive proof to finalize all pending state changes, with the proof being generated before invoking the `settle()` method. ```ts class MyContract extends SmartContract { // ... @method async settle(proof: StateProof) { await offchainState.settle(proof); } } ``` :::note State is only available after it was settled via `settle()`! ::: ### Utilizing Offchain Storage Now developers can utilize Offchain storage in any of their smart contract methods, as demonstrated below: ```ts class MyContract extends SmartContract { // ... @method async useOffchainStorage(playerA: PublicKey) { // retrieve totalScore, returning an Option let totalScoreOption = await this.offchainState.fields.totalScore.get(); // unwrap the Option and return a default value if the entry if empty let totalScore = totalScoreOption.orElse(0n); // increment totalScore, set a precondition on the state // (if `from` is undefined, the precondition is that the field is empty) this.offchainState.fields.totalScore.update({ from: totalScoreOption, to: totalScore.add(1), }); // retrieve an entry from the map, returning an Option let playerOption = await this.offchainState.fields.players.get(playerA); // unwrap the player's score Option and return a default value if the entry is empty let score = playerOption.orElse(0n); // increment the player's score, set a precondition on the previous score this.offchainState.fields.players.update(playerA, { from: playerOption, to: score.add(1), }); } } ``` Currently, Offchain states of type Field support `field.get()` and `field.overwrite(newValue)`, while maps support `map.get(key)` and `map.overwrite(key, newValue)`. The `.overwrite()` method sets the value without taking into account the previous value. If the value is modified by multiple zkkApps concurrently, interactions that were applied earlier will simply be overwritten! All Offchain storage types also provide an `.update()` method which is a safe version of `.overwrite()`. The `.update()` method lets you define a precondition on the state that you want to update. If the precondition of the previous value does not match, the update will not be applied: ```ts field.update(config: { // `from` is the precondition on the previous state from: Option, // `to` is the new state to set to: T, }); ``` Note that the precondition is an `Option` type: setting it to `None` means that you require the field to not exist, while `Some(value)` requires that it exists and contains the `value`. The return value of `get()` is an `Option` with the same semantics, and can be passed to `update()` directly. Important: When `update()` fails due a mismatching precondition, _none_ of the state updates made in the same method call will be applied. This lets you safely write logic where multiple fields are linked and have to be updated in a consistent way, like in the example above where the total score has to be the sum of all player's scores. ## Additional Resources This feature remains experimental, indicating that it is currently under active development. For further insight into its implementation, please refer to the following pull requests and examples on GitHub: - [Experimental Offchain Storage part 1](https://github.com/o1-labs/o1js/pull/1630) - [Experimental Offchain Storage part 2](https://github.com/o1-labs/o1js/pull/1652) - [An end-to-end example utilizing Offchain storage](https://github.com/o1-labs/o1js/blob/main/src/lib/mina/v1/actions/offchain-contract-tests/ExampleContract.ts) --- url: /zkapps/writing-a-zkapp/feature-overview/time-locked-accounts --- # Time-Locked Accounts Time-locking allows you to pay someone in MINA or other custom tokens subject to a vesting schedule. Tokens are initially locked and become available for withdrawal only after a certain time or gradually according to a specific schedule. By default, accounts are not time-locked. The zkApp feature that enables time-locking is the `timing` field that is present on every account: ```ts type Account = { // ... timing: { isTimed: Bool; initialMinimumBalance: UInt64; cliffTime: UInt32; cliffAmount: UInt64; vestingPeriod: UInt32; vestingIncrement: UInt64; }; }; ``` - The `isTimed` field indicates whether this account is time-locked. The default value of `isTimed` is `false`. - The other fields are parameters with default values that allow you to define a vesting schedule in a very flexible manner. This graph shows how each of the timing properties affect the vesting schedule:
    Timing parameters
    - The red cross on the left marks the point in time where the `timing` field is set. - `isTimed` switches from `false` to `true`. - The orange line shows how the amount of unlocked tokens increases over time until it finally reaches its maximum value and stays flat. - At this point, `isTimed` flips from `true` back to `false` because no tokens remain locked. As shown, the maximum amount of unlocked tokens is defined by the `initialMinimumBalance`. The property is called `initialMinimumBalance` because, even though the tokens show up in the balance, they can't be withdrawn. The account has a a non-zero _minimum balance_. Initially, that minimum balance is equal to the amount of tokens locked -- so, that amount is the "initial minimum balance". Over time, the minimum balance decreases until it hits zero, which is the condition that makes `isTimed` false again. The other timing-related properties are: - `cliffTime`: The initial time period during which all tokens are locked (should be from the current slot onwards). Note that 'time' is measured in Mina by 'slots', where 1 slot is 90 seconds. - `cliffAmount`: The quantity of tokens to be unlocked when the cliff time has elapsed. If this amount is greater or equal the 'initial minimum balance', all tokens are unlocked after the cliff time elapses. - `vestingPeriod`: After the cliff time elapses, tokens can be set to unlock periodically at a fixed interval, by a fixed quantity. The vesting period is the length of that interval. - `vestingIncrement`: The quantity of tokens that are unlocked after each vesting period elapses. :::note Only one vesting schedule can be specified per account. The vesting schedule cannot be changed during the vesting period. Because of this restriction, the values of the timing fields cannot be changed when `isTimed` is set to `true`. After all tokens are unlocked and `isTimed` flips back to `false`, the account timing becomes mutable again. ::: ### Setting timing in o1js In o1js, `timing` is one of the account fields that can be updated by using an account update: ```ts accountUpdate.account.timing.set({ initialMinimumBalance, cliffTime, ...etc }); ``` When setting timing, all timing-related properties are required, except for `isTimed` which is automatically set by the protocol. ### Examples These examples show how to correctly implement several example use cases. #### Example 1: All tokens unlock after 1 week If you want all tokens to unlock after a certain time, then the only properties you need to consider are `initialMinimumBalance`, `cliffTime`, and `cliffAmount`. - Set `cliffAmount` equal to the `initialMinimumBalance` to ensure all tokens are unlocked when the cliff elapses. - Both `vestingPeriod` and `vestingIncrement` are unused, so set them to their default values, `1` and `0`: ```ts // example: 10 MINA to lock const tokensToLock = UInt64.from(10e9); // calculate 1 week in slots const cliffPeriod = UInt32.from((60 / 3) * 24 * 7); // fetch the current slot from the network const currentSlot = this.network.globalSlotSinceGenesis.get(); accountUpdate.account.timing.set({ initialMinimumBalance: tokensToLock, cliffTime: currentSlot + cliffPeriod, cliffAmount: tokensToLock, vestingPeriod: UInt32.from(1), // 0 is not allowed; default value is 1 vestingIncrement: UInt64.from(0), }); this.send({ to: accountUpdate, amount: tokensToLock }); ``` #### Example 2: Linear vesting over 1 year This example does not use a cliff, but vests a certain number of tokens linearly over 1 year. - Set the `vestingPeriod` to equivalent to 1 month defined in slots, so that new tokens are unlocked every month. - Set the `vestingIncrement` to the total amount divided by 12, so that the total amount is unlocked after 12 months. - Set both `cliffTime` and `cliffAmount` to 0. ```ts // example: 100000 MINA to lock const tokensToLock = UInt64.from(100000e9); // calculate 1 month in slots const vestingPeriod = UInt32.from(Math.round(((60 / 3) * 24 * 365) / 12)); // 1/12th of tokens unlocked every month const vestingIncrement = UInt64.from(Math.round(tokensToLock / 12)); accountUpdate.account.timing.set({ initialMinimumBalance: tokensToLock, cliffTime: UInt32.from(0), cliffAmount: UInt64.from(0), vestingPeriod, vestingIncrement, }); this.send({ to: accountUpdate, amount: tokensToLock }); ``` --- url: /zkapps/writing-a-zkapp --- # zkApps Overview
    Terminal screenshot of zkApp CLI command line interface.

    :::info To protect end users and ensure your zkApps are secure, consider the information at [Security and zkApps](/zkapps/writing-a-zkapp/introduction-to-zkapps/secure-zkapps) while architecting your solution and consider a third-party security audit before deploying to Mina mainnet. ::: :::info The maximum number of zkApp transactions per block is currently capped at **24**. This restriction will be gradually lifted after the Mainnet upgrade. ::: ### What are zkApps? zkApps (zero knowledge apps) are Mina Protocol smart contracts powered by zero knowledge proofs, specifically using zk-SNARKs. zkApps use an **off-chain execution** and mostly **off-chain state** model. This architecture allows for private computation and state that can be either private or public. zkApps can perform arbitrarily-complex computations off-chain while incurring only a flat fee to send the resulting zero knowledge proof to the chain for verification of this computation. This cost saving benefit is in contrast to other blockchains that run computations on-chain and use a variable gas-fee based model.
    Mina zkApp zero knowledge app architecture diagram

    To learn more, see [How zkApps Work](https://docs.o1labs.org/o1js/zkapps/intro). ### TypeScript zkApps are written in [TypeScript](https://www.typescriptlang.org/). TypeScript provides an easy, familiar language (JavaScript), but with type safety, making it easy to get started writing zkApps. If you're new to using TypeScript, check out this helpful 12-min introductory video [TypeScript - The Basics](https://www.youtube.com/watch?v=ahCwqrYpIuM). ### Learn more To learn more about developing zkApps, see [how zkApps work](https://docs.o1labs.org/o1js/zkapps/intro), [how to write a zkApp](/zkapps/writing-a-zkapp/introduction-to-zkapps/how-to-write-a-zkapp) and [zkApps for Ethereum Developers](/zkapps/advanced/zkapps-for-ethereum-developers). Try the [zkApps tutorials](/zkapps/tutorials/hello-world) to learn by doing! ### Get help and join the community Join the [#zkapps-developers](https://discord.com/channels/484437221055922177/915745847692636181) channel on Mina Protocol Discord. --- url: /zkapps/writing-a-zkapp/introduction-to-zkapps/getting-started-zkapps --- # zkApps Getting Started You can start writing zkApps with just a few steps. The focus of this Getting Started Guide is a high-level workflow to build and deploy quickly. ## High-Level Workflow 1. [Install or update the zkApp CLI](#1-install-or-update-the-zkapp-cli) 1. [Create a project](#2-create-a-project) 1. [Add testing code](#3-add-testing-code) 1. [Add functionality](#4-add-functionality) 1. [Create an integration test](#5-create-integration-test) 1. [Test locally](#6-test-locally) 1. [Test with Lightnet](#7-test-with-lightnet) 1. [Test with a live network](#8-test-with-a-live-network) ### 1. Install or update the zkApp CLI ```sh npm install -g zkapp-cli ``` The zkApp CLI provides project scaffolding, including dependencies such as [o1js](/zkapps/o1js), a test framework, code auto-formatting, linting, and more. See [zkApp CLI Installation](/zkapps/writing-a-zkapp/introduction-to-zkapps/install-zkapp-cli). ### 2. Create a project ```sh $ zk project ``` [o1js](/zkapps/o1js) is automatically installed when you generate a project using the zkApp CLI. A zkApp consists of a smart contract and a UI to interact with it. - To proceed without an accompanying UI project, select `none` when prompted. See [Option B: Start your own project](/zkapps/writing-a-zkapp/introduction-to-zkapps/how-to-write-a-zkapp#option-b-start-your-own-project). - To create a UI, select a framework and follow the prompts. See [How to Write a zkApp UI](/zkapps/writing-a-zkapp/introduction-to-zkapps/how-to-write-a-zkapp-ui). ### 3. Add testing code When you use the zkApp CLI to create a project, tests and examples are included. 1. See the `import` statements in the [Add.test.ts](https://github.com/o1-labs/zkapp-cli/blob/main/templates/project-ts/src/Add.test.ts#L1-L2) example file. 1. A simulated `LocalBlockchain` instance you can interact with is included in the [Add.test.ts](https://github.com/o1-labs/zkapp-cli/blob/main/templates/project-ts/src/Add.test.ts#L27-L28) example file. 1. In o1js, an array of 10 test accounts to pay fees and sign transactions are provided for the simulated `LocalBlockchain` instance. These can be accessed with `Local.testAccounts` as shown in the [Add.test.ts](https://github.com/o1-labs/zkapp-cli/blob/main/templates/project-ts/src/Add.test.ts#L29-L31) example file. The example uses the public/private key pairs of two of these accounts. The example uses these names, but the names can be anything: - `deployerAccount` deploys the smart contract - `senderAccount` pays transaction fees 1. Deploy the smart contract to the simulated `LocalBlockchain` instance that simulates a network for testing purposes. See the `localDeploy` function in the [Add.test.ts](https://github.com/o1-labs/zkapp-cli/blob/main/templates/project-ts/src/Add.test.ts#L38-L46) example file. ### 4. Add functionality Add the logic for your smart contract. 1. Start experimenting with iterative development to build and test one method at a time. Add functionality to the smart contract by implementing a `@method`. See `@method async update()` in the [Add.ts](https://github.com/o1-labs/zkapp-cli/blob/main/templates/project-ts/src/Add.ts#L20-L24) example file. 1. Build the smart contract: ```sh npm run build ``` 1. Invoke the `@method` you added or use new functionality in the test file. See the transaction code that invokes the `update()` method in the [Add.test.ts](https://github.com/o1-labs/zkapp-cli/blob/main/templates/project-ts/src/Add.test.ts#L57-L66) file. - If it works as expected with no errors, add more functionality. - If there are errors, look through the stack traces to find the source of the errors and update the contract to resolve them. ### 5. Create integration test - Create a Node.js script to run the smart contract and test it's functionality, similar to step [3. Add testing code](#3-add-testing-code). For an example, see the Node.js script that runs the Tic Tac Toe smart contract in the [run.ts](https://github.com/o1-labs/zkapp-cli/blob/main/examples/tictactoe/ts/src/run.ts) file. ### 6. Test locally - [Test zkApps locally](https://docs.o1labs.org/o1js/zkapps/local-development) with a simulated local blockchain. ### 7. Test with Lightnet - Use [Lightnet](/zkapps/writing-a-zkapp/introduction-to-zkapps/testing-zkapps-lightnet) to test your zkApp with an accurate representation of Mina blockchain. 1. Start Lightnet: ```sh zk lightnet start ``` The default settings start a single node that successfully serves the majority of testing requirements. 1. Verify the status of the local blockchain: ```sh zk lightnet status ``` 1. Communicate with the Mina Accounts-Manager service to fetch account details. - Mina Accounts-Manager is deployed to http://localhost:8181/ - Use HTTP endpoints to acquire, release, list, lock, and unlock accounts 1. Configure your zkApp for Lightnet blockchain. Use the endpoints provided by the `zk lightnet status` command. - Deploy name - Set the Mina GraphQL API URL to deploy to: http://localhost:8080/graphql - Set transaction fee to use when deploying (in MINA): 0.1 1. Deploy your zkApp to Lightnet: ```sh zk deploy ``` ### 8. Test with a live network {#8-test-with-a-live-network} To deploy the smart contract to the Testnet, run the `zk` commands from the directory that contains your smart contract. 1. Configure your zkApp. ```sh zk config ``` Follow the prompts to specify a deploy alias name (can be anything), URL to deploy to, fee (in MINA) to be used when sending your deploy transaction, and the fee payer account. For the Devnet, use: - Deploy alias name: `devnet` - Mina GraphQL API URL: `https://api.minascan.io/node/devnet/v1/graphql` - Transaction fee to use when deploying: `0.1` - Account to pay transaction fees: Create a new fee payer pair See [Add a deploy alias to config.json](/zkapps/writing-a-zkapp/introduction-to-zkapps/how-to-deploy-a-zkapp#add-a-deploy-alias-to-configjson). For other Testnets, use the details provided. 1. Choose a fee payer alias. A fee payer account is a developer account that is funded and can always pay fees immediately. When you configure a zkApp, you can choose to use a stored account or create a new fee payer account. - When prompted to choose an account to pay transaction fees, select to use a different account: ```sh Use a different account (select to see options) ``` If this is the first time you are running the `zk config` command, you see these options: ```text > Recover fee payer account from an existing base58 private key Create a new fee payer key pair ``` The option to choose another account is shown only if you have a cached fee payer account. - Next, select **Create a new fee payer key pair**: ```sh Create a new fee payer key pair NOTE: the private key will be stored in plain text on this computer. ``` - When prompted, give an alias to your new fee payer key pair. 1. Fund your fee payer account. Follow the prompts to request tMina. 1. Deploy to the Testnet. ```sh zk deploy ``` Follow the prompts. See [How to deploy a zkApp](/zkapps/writing-a-zkapp/introduction-to-zkapps/how-to-deploy-a-zkapp). 1. Create a script to interact with a live network. See the example files: - https://github.com/o1-labs/zkapp-cli/blob/main/templates/project-ts/src/interact.ts - https://github.com/o1-labs/o1js/blob/main/src/examples/zkapps/hello-world/run-live.ts 1. Run your script. For example: ```sh node build/src/interact.js ``` 1. Keep building and experimenting! After you add features to your contract, repeat [8. Test with a live network](#8-test-with-a-live-network) to test with a live network. ## Learn more To learn more about developing zkApps, see [how zkApps work](https://docs.o1labs.org/o1js/zkapps/intro), [how to write a zkApp](/zkapps/writing-a-zkapp/introduction-to-zkapps/how-to-write-a-zkapp), and [zkApps for Ethereum Developers](/zkapps/advanced/zkapps-for-ethereum-developers). Try the [zkApp Developer Tutorials](/zkapps/tutorials) for use cases that guide you to achieve a defined goal. ## Get help and join the community Join the [#zkapps-developers](https://discord.com/channels/484437221055922177/915745847692636181) channel on Mina Protocol Discord. --- url: /zkapps/writing-a-zkapp/introduction-to-zkapps/how-to-deploy-a-zkapp --- # How to Deploy a zkApp Before deploying, you must first define a few settings, such as which network you are deploying your zkApp to. ## Add a deploy alias to config.json First, change into the directory that contains your smart contract and then run the following command: ```sh $ zk config ``` When prompted, specify: - The name (can be anything) - The target network kind (`Testnet`, `Mainnet` or enter the custom network kind id) to deploy your zkApp to - The URL to send the deploy transaction to - Transaction fee (in MINA) to use when deploying - The fee payer account to pay transaction fees from For more details, see [deploy alias](/zkapps/tutorials/deploying-to-a-network#deploy-alias) section in corresponding tutorial. :::tip If your project contains multiple smart contracts (for example, `Foo` and `Bar`) that you intend to deploy to the same network, the best practice is to follow the naming convention such as `devnet-foo` and `devnet-bar` when naming your deploy aliases. You can change these alias names at any time by manually editing the `config.json` file. ::: You see the following output: ```sh $ zk config Add a new network: ✔ Create a name (can be anything): · devnet ✔ Choose the target network: · Testnet ✔ Set the Mina GraphQL API URL to deploy to: · https://api.minascan.io/node/devnet/v1/graphql ✔ Set transaction fee to use when deploying (in MINA): · 0.1 ✔ Choose an account to pay transaction fees: · Use stored account MyFeePayer (public key: B62...) ✔ Use stored fee payer MyFeePayer (public key: B62...) ✔ Create zkApp key pair at keys/devnet.json ✔ Add deploy alias to config.json Success! Next steps: - If this is the testnet, request tMINA at: https://faucet.minaprotocol.com/?address= - To deploy zkApp, run: `zk deploy devnet` ``` ## Request funds from the Faucet To deploy your zkApp, your fee payer account must have funds to pay for transaction fees. To get funds on the Devnet, use the URL that was shown in the zkApp CLI output: - Visit `https://faucet.minaprotocol.com/?address=` - Choose the corresponding network you're going to deploy your zkApp to (`Devnet` in this case) - And click the **Request** button Before proceeding to the next step, wait a few minutes for the next block to include your transaction, so that tMINA becomes available for the fee payer account. ## Deploy your smart contract To deploy your smart contract to the network, run the following command: ```sh $ zk deploy devnet ``` Among other activities, when running the deploy command, zkApp CLI computes the verification key for your zkApp. Computing verification key can take 10-30 seconds, so please be patient. The zkApp CLI shows the details of the process, such as the network name, the URL, and the smart contract to deploy. Finally, enter `yes` or `y` when prompted to confirm and send the deploy transaction. You see the following output: ```sh $ zk deploy devnet ✔ Build project ✔ Generate build.json ✔ Choose smart contract Only one smart contract exists in the project: Add Your config.json was updated to always use this smart contract when deploying to this network. ✔ Generate verification key (takes 10-30 sec) ✔ Build transaction ✔ Confirm to send transaction |-----------------|-------------------------------------------------| | Deploy alias | devnet | |-----------------|-------------------------------------------------| | Network kind | testnet | |-----------------|-------------------------------------------------| | URL | https://api.minascan.io/node/devnet/v1/graphql | |-----------------|-------------------------------------------------| | Fee payer | Alias : MyFeePayer | | | Account : B62... | |-----------------|-------------------------------------------------| | zkApp | Smart contract: Add | | | Account : B62... | |-----------------|-------------------------------------------------| | Transaction fee | 0.1 Mina | |-----------------|-------------------------------------------------| Are you sure you want to send (yes/no)? · y ✔ Send to network Success! Deploy transaction sent. Next step: Your smart contract will be live (or updated) at B62... as soon as the transaction is included in a block: https://minascan.io/devnet/tx/?type=zk-tx ``` After a few minutes, the transaction is included in the next block. To see the zkApp transaction and navigate to accounts involved you can follow the transaction link provided to you in zkApp CLI output. Or use the [Minascan](https://minascan.io) explorer to search for the account with deployed zkApp. ## Next Steps Now that you've learned how to deploy a smart contract, you can learn [how to write the UI for your zkApp](how-to-write-a-zkapp-ui). --- url: /zkapps/writing-a-zkapp/introduction-to-zkapps/how-to-write-a-zkapp-ui --- # How to Write a zkApp UI A zkApp consists of a smart contract and a UI to interact with it. To allow users to interact with your smart contract in a web browser, you typically want to build a website UI. You can write the UI with any framework like React, Vue, or Svelte, or with plain HTML and JavaScript. ## Using one of the provided UI framework scaffolds When you create a project using the zkApp CLI, you can choose a supported UI framework to be scaffolded as a part of your zkApp project. For example, Next.js, Sveltkit, or Nuxt.js. ## Adding your smart contract as a dependency of the UI You can use one of the provided scaffolding options and add your smart contract to an existing frontend, a different UI framework, or a plain HTML and JavaScript website. ### Specify the smart contracts to import The `index.ts` file is the entry point of your project that imports all smart contract classes you want access to and exports them to your smart contract. This pattern allows you to specify which smart contracts are available to import when consuming your project from npm within your UI. In `index.ts`: ```ts export { YourSmartContract }; ``` ### Local development To test iteratively and use your smart contract within your UI project during local development, you can use [npm link](https://docs.npmjs.com/cli/v8/commands/npm-link). This local use allows for rapid development without having to publish your project to npm. 1. To change into your smart contract project directory: ```sh cd ``` 1. To create the symlinks: ```sh npm link ``` where `your-package-name` is the `name` property used in your _smart contract's_ `package.json`. For example, the `name` property in `package.json` for the `sudoku` example project that you created in [How to Write a zkApp](/zkapps/writing-a-zkapp/introduction-to-zkapps/how-to-write-a-zkapp) is `sudoku`. To create the symlinks for `sudoku`: ```sh npm link sudoku ``` 1. To import the smart contracts into your UI project, add the import statement to the `index.ts` file: ```ts import { YourSmartContract } from 'your-package-name';` ``` For example, to import the `sudoku` example project, your `index.ts` file is: ```ts import { SudokuZkApp } from './sudoku.js'; export { SudokuZkApp }; ``` 1. After you make changes to your project files, be sure to build your project so that the changes are reflected in the smart contract consumed by your UI project: ```sh npm run build ``` ### Publish to npm for production 1. Create an npm account. If you don't already have an account, go to npm [Sign Up](https://www.npmjs.com/signup). 1. Login to npm: ```sh npm login ``` When prompted, enter your username, password, and email address. 1. To publish your package from the root of your smart contract project directory: ```sh npm publish ``` Package names must be unique. An error occurs if the package name already exists. To use a different package name, change the `name` property in the `package.json` file. To check existing package names on npm, use the [npm search](https://docs.npmjs.com/cli/v7/commands/npm-search) command. To avoid naming collisions, npm allows you to publish scoped packages: `@your-username/your-package-name`. See [Introduction to packages and modules](https://docs.npmjs.com/packages-and-modules/introduction-to-packages-and-modules) in the npm reference docs. ### Consuming your smart contract in your UI After you have published your smart contract to npm, you can add it to any UI framework by importing the package. 1. Install your smart contract package from the root of your UI project directory: ```sh npm install your-package-name ``` If you published a scoped npm package: ```sh npm install @your-username/your-project-name ``` 1. Import your smart contract package into the UI using: ```ts import { YourSmartContract } from ‘your-package-name’; ``` where `YourSmartContract` is the named export that you chose in your smart contract. :::tip For a more performant UI, render your UI before importing and loading your smart contract so the o1js wasm workers can perform initialization without blocking the UI. For example, if your UI is built using React, instead of a top level import, load the smart contract in a `useEffect` to give the UI time to render its components before loading o1js. ::: ### Loading your contract with React ```ts useEffect(() => { (async () => { const { YourSmartContract } = await import('your-package-name'); })(); }, []); ``` ### Loading your contract with Svelte ```ts onMount(async () => { const { YourSmartContract } = await import('your-package-name'); }); ``` ### Loading your contract with Vue ```ts onMounted(async () => { const { YourSmartContract } = await import('your-package-name'); }); ``` ### Enabling COOP and COEP headers To load o1js code in your UI, you must set the [COOP](https://developer.mozilla.org/en-US/docs/Web/HTTP/Headers/Cross-Origin-Opener-Policy) and [COEP](https://developer.mozilla.org/en-US/docs/Web/HTTP/Headers/Cross-Origin-Embedder-Policy) headers. These headers enable o1js to use [SharedArrayBuffer](https://developer.mozilla.org/en-US/docs/Web/JavaScript/Reference/Global_Objects/SharedArrayBuffer) that o1js relies on to enable important WebAssembly (Wasm) features. - Set `Cross-Origin-Opener-Policy` to `same-origin`. - Set `Cross-Origin-Embedder-Policy` to `require-corp`. You can enable these headers in a number of different ways. If you deploy your UI to a host such as [Vercel](https://vercel.com/) or [Cloudflare Pages](https://pages.cloudflare.com/), you can set these headers in a custom configuration file. Otherwise, set these headers in the server framework of your choice (for example, Express for JavaScript). ### Set headers for Vercel If your app will be hosted on Vercel, set the headers in [`vercel.json`](https://vercel.com/docs/project-configuration). ```json { "headers": [ { "source": "/(.*)", "headers": [ { "key": "Cross-Origin-Opener-Policy", "value": "same-origin" }, { "key": "Cross-Origin-Embedder-Policy", "value": "require-corp" } ] } ] } ``` ### Set headers for Cloudflare Pages To host your app on Cloudflare Pages, set the headers in a [`_headers` file](https://developers.cloudflare.com/pages/platform/headers/). ``` /* Cross-Origin-Opener-Policy: same-origin Cross-Origin-Embedder-Policy: require-corp ``` ### Connecting your zkApp with a user's wallet The Mina community has created a variety of different wallets. Only the [Auro Wallet for Chrome](https://www.aurowallet.com) supports interactions with zkApps. To interact with your zkApp, users of your zkApp must have the Auro Wallet installed: - `window.mina` is automatically available in the user's browser environment. - Your zkApp uses this object to interact with the wallet. 1. Install the Chrome extension for [Auro Wallet](https://chrome.google.com/webstore/detail/auro-walletmina-protocol/cnmamaachppnkjgnildpdmkaakejnhae). 2. Get accounts. To fetch a user's list of Mina accounts, use the `requestAccounts()` method: ```ts let accounts; try { // Accounts is an array of string Mina addresses. accounts = await window.mina.requestAccounts(); // Show first 6 and last 4 characters of user's Mina account. const display = `${accounts[0].slice(0, 6)}...${accounts[0].slice(-4)}`; } catch (err) { // If the user has a wallet installed but has not created an account, an // exception will be thrown. Consider showing "not connected" in your UI. console.log(err.message); } ``` It is useful to indicate if the user's wallet is successfully connected to your zkApp: 3. Send a transaction. After your user interacts with your zkApp, you can sign and send the transaction using `sendTransaction()`. You receive a transaction ID as soon as the Mina network has received the proposed transaction. However, this does not guarantee that the transaction is accepted in the network into an upcoming block. ```ts try { // This is the public key of the deployed zkapp you want to interact with. const zkAppAddress = 'B62qq8sm7JdsED6VuDKNWKLAi1Tvz1jrnffuud5gXMq3mgtd'; const tx = await Mina.transaction(async () => { const YourSmartContractInstance = new YourSmartContract(zkAppAddress); await YourSmartContractInstance.foo(); }); await tx.prove(); const { hash } = await window.mina.sendTransaction({ transaction: tx.toJSON(), feePayer: { fee: '', memo: 'zk', }, }); console.log(hash); } catch (err) { // You may want to show the error message in your UI to the user if the transaction fails. console.log(err.message); } ``` The convention is to show the error message in your UI. :::info For details about the Mina Provider API, see the [Mina Provider](https://docs.aurowallet.com/general/reference/api-reference/mina-provider-api) API Reference docs. ::: ### Display assertion exceptions in your UI If an assertion exception occurs while a user interacts with any of your smart contract methods, you want to capture this error and display a helpful message for the user in your UI. 1. Use a try-catch statement to catch exceptions when a user invokes a method on your smart contract. 2. Use a switch-case statement to identify which exception was thrown. Add a matching case for each unique assertion within your method. To assist with this error handling, consider setting custom error messages for your assertions while writing the smart contract. For example: `INSUFFICIENT_BALANCE`. 3. Display a helpful error message for the user within your UI, like: ```ts try { YourSmartContract.yourMethod(); } catch (err) { let uiErrorMessage; switch (err.message) { // A custom error thrown within YourSmartContract.yourMethod() // when there is an insufficient balance. case 'INSUFFICIENT_BALANCE': // Set a helpful message to show the user in the UI. uiErrorMessage = 'Your account has an insufficient balance for this transaction'; break; // etc } } ``` --- url: /zkapps/writing-a-zkapp/introduction-to-zkapps/how-to-write-a-zkapp --- # How to Write a zkApp A zkApp consists of a smart contract and a UI to interact with it. Write your smart contract using the [zkApp CLI](https://www.npmjs.com/package/zkapp-cli/). First, install the zkApp CLI: ```sh npm install -g zkapp-cli ``` See [zkApp CLI Installation](/zkapps/writing-a-zkapp/introduction-to-zkapps/install-zkapp-cli). ## Start a project Now that you have the zkApp CLI installed, you can start with an example or create your own project. Example projects do not create an accompanying UI. ### Option A: Start with an example (recommended) Examples are based on the standard project structure and provide additional files in the `/src` directory. 1. Create the example project: ```sh zk example ``` The command prompts you to select an example project: ```text ? Choose an example … > sudoku tictactoe ``` Select the `sudoku` example project. The created project includes the example files (the smart contract) and the example test files in the project's `src` directory. 1. View the files that were created: - Change to the `sudoku` directory. - Run the `ls` command Or open the directory in a code editor, such as VS Code. 1. This example zkApp includes the `sudoku.test.ts` test file. To run tests and see the tests pass: ```sh npm run test ``` To rerun tests automatically after you save changes to your code, you can run the tests in watch mode: ```sh npm run testw ``` 1. Now that you have confirmed that tests run correctly, you can compile your TypeScript into JavaScript in the project `/build` directory. To build the example: ```sh npm run build ``` - The `npm run build` command builds the TypeScript files in `sudoku/src` that contain the code for the smart contract. - This build command compiles the TypeScript code into JavaScript in the `sudoku/build` directory. 1. Configure your zkApp: ```sh zk config ``` The command prompts guide you to add a deploy alias to your project `config.json` file. 1. Define a name for the deploy alias. For this example, use: ```text devnet ``` The deploy alias name does not have to match the network name. 1. Choose the target network kind: ```text Testnet ``` 1. Set the Mina GraphQL API URL to deploy to: ```text https://api.minascan.io/node/devnet/v1/graphql ``` 1. Set the transaction fee to use when deploying: ```text 0.1 ``` 1. When prompted to choose an account to pay transaction fees, select: ```text Use a different account (select to see options) ``` If this is the first time you are running the `zk config` command, you see these options: ```text > Recover fee payer account from an existing base58 private key Create a new fee payer key pair ``` The option to choose another account is shown only if you have a cached fee payer account. 1. Select to create a new fee payer key pair: ```sh Create a new fee payer key pair NOTE: the private key will be stored in plain text on this computer. ``` A fee payer account is a developer account that can always pay fees immediately for local testing. Do not use an account that holds a substantial amount of MINA. 1. When prompted to create an alias for this account, give an alias to your new fee payer key pair: ```text testnet-fees ``` Your key pairs and deploy alias are created. 1. Fund the fee payer account. After you fund the fee payer account, you can use to to pay fees across multiple zkApps. Follow the prompts to request tMINA to fund your fee payer account. For this example, your MINA address is populated on the Testnet Faucet. tMINA arrives at your address when the next block is produced (~90 seconds). 1. Deploy to Testnet: ```sh zk deploy ``` Follow the prompts to select the `devnet` deploy alias and confirm that you want to send the transaction. Your smart contract transaction is pending until the transaction is included in a block. 1. To view your transaction, click the block explorer link. For example: `https://minascan.io/devnet/tx/?type=zk-tx` For details, see [How to Deploy a zkApp](how-to-deploy-a-zkapp). ### Option B: Start your own project Instead of using a provided example, you can follow these steps to create your own project. 1. Create your own project: ```sh zk project ``` The created project includes the smart contract files in the project's `src/` directory. 1. Select an accompanying UI framework, if any: ```text ? Create an accompanying UI project too? … > next svelte nuxt empty none ``` For your selected UI framework, follow the prompts. See [How to Write a zkApp UI](/zkapps/writing-a-zkapp/introduction-to-zkapps/how-to-write-a-zkapp-ui). To see the files that were created, change to the project (whatever you called ``) directory and run the `ls` command or open the directory in a code editor, such as VS Code. 1. When you use the zkApp CLI to create a project, the default `Add` smart contract is included along with the `Add.test.ts` test files. ```sh npm run test ``` To rerun tests automatically after you save changes to your code, you can run the tests in watch mode: ```sh npm run testw ``` 1. To compile your TypeScript into JavaScript in the project `/build` directory, build the example: ```sh npm run build ``` The `npm run build` command builds the TypeScript files in `yourproject/src` that contain the code for the smart contract. This build command compiles the TypeScript code into JavaScript in the `yourproject/build` directory. 1. Configure your zkApp: ```sh zk config ``` The command prompts guide you to add a deploy alias to your project `config.json` file. 1. To configure your deploy alias, follow the prompts: - Create a (deploy alias) name: _yourprojecttestnet_ - Choose the target network: `Testnet` - Set the Mina GraphQL API URL: `https://api.minascan.io/node/devnet/v1/graphql` - Set transaction fee to use when deploying (in MINA): `0.1` - Choose an account to pay transaction fees: - `Create a new fee payer key pair` - Create an alias for this account: _yourdeployalias_ Your key pair and deploy alias are created. 1. Fund your fee payer account. Follow the prompts to request tMina. 1. Deploy to Testnet: ```sh zk deploy yourprojecttestnet ``` Follow the prompts. To learn more about deploying, see [How to Deploy a zkApp](how-to-deploy-a-zkapp). ## Writing your smart contract zkApps are written in TypeScript using o1js. o1js is a TypeScript library for writing smart contracts based on zero knowledge proofs for the Mina Protocol. o1js is automatically included when you create a project using the zkApp CLI. To get started writing zkApps, begin with these o1js docs: - [Basic concepts](/zkapps/o1js/basic-concepts) - [Interacting with Mina](/zkapps/writing-a-zkapp/introduction-to-zkapps/interact-with-mina) A basic smart contract example is generated when you created a zk project. The high-level smart contract code workflow is: 1. Import `o1js`. See the `import` statement in the [Add.ts](https://github.com/o1-labs/zkapp-cli/blob/main/templates/project-ts/src/Add.ts#L1) file. 1. Extend the `SmartContract` class. See the exported `class` in the [Add.ts](https://github.com/o1-labs/zkapp-cli/blob/main/templates/project-ts/src/Add.ts#L12) file. For guided steps to create your first zkApp, start with [Tutorial 1: Hello World](/zkapps/tutorials/hello-world). For comprehensive details about the o1js API, see the [o1js reference](https://docs.o1labs.org/o1js/api-reference/Introduction). ## Next Steps Now that you've learned how to write and operate a basic smart contract, you can learn about [Testing zkApps Locally](https://docs.o1labs.org/o1js/zkapps/local-development). --- url: /zkapps/writing-a-zkapp/introduction-to-zkapps/install-zkapp-cli --- # zkApp CLI Installation Install and use the zkApp CLI to scaffold, write, test, and deploy zkApps (zero knowledge apps) for Mina Protocol using recommended best practices. :::tip To build zero knowledge apps that use [o1js](/zkapps/o1js), you only need to install the zkApp CLI. o1js is automatically included when you create a project using the zkApp CLI. In the root of your project directory, use `zk system` to show the system information with installed versions of zkApp CLI and o1js. ::: ### Dependencies - NodeJS v18 and later - NPM v10 and later - git v2 and later If you have a later version of a dependency, install the required version using the package manager for your system: - MacOs [Homebrew](https://brew.sh/) - Windows [Chocolatey](https://chocolatey.org/) - Linux (apt, yum, and others) As recommended by the Node.js project, you might need to install a recent Node.js version using NodeSource binary distributions: [Debian](https://github.com/nodesource/distributions#debinstall), [rpm](https://github.com/nodesource/distributions#rpminstall). To verify your installed versions of dependencies, use `node -v`, `npm -v`, and `git -v`. ## Usage To see usage information for all of the zkApp CLI commands: ```sh $ zk --help ``` ## Install the zkApp CLI To install the latest version: ```sh npm install -g zkapp-cli ``` To confirm successful installation: ```sh $ zk --version ``` ## Update the zkApp CLI You are prompted to install the new version if you are running an earlier zkApp CLI minor version. For example, if you are running version 0.12.1, but the current version is 0.13.0, you are prompted to update. You are not prompted to update if you are using an earlier patch version. For example, you are not notified to upgrade when you are running 0.12.0, and the current version is 0.13.1. To update to the latest version of the zkApp CLI: ```sh npm update -g zkapp-cli ``` --- url: /zkapps/writing-a-zkapp/introduction-to-zkapps/interact-with-mina --- # Interacting With Mina Now that you know about writing zkApp methods, it's time to learn how users can call these methods. ## Transactions Recall that smart contracts execute off-chain. The result of an off-chain execution is a _transaction_ that can be sent to the Mina network to apply the changes made by the smart contract. In this section, you learn what a transaction looks like and how to create one. ## Account updates The fundamental data structure that Mina transactions are built from is called an _account update_. An account update always contains updates to one specific on-chain account. For example, if you transfer MINA from one account to another, the balance on two accounts is updated – the sender and the receiver. Therefore, sending MINA requires two account updates. Account updates are a flexible and powerful data structure that can express all kinds of updates, events, and preconditions you use to develop smart contracts. ## Transaction structure A _transaction_ is a JSON object of the form: ```ts { feePayer, accountUpdates: [...], memo } ``` - `feePayer` is a special account update with a slightly simpler structure. - In particular, it contains a `fee` field, which must be used to specify the transaction fee. - `accountUpdates` is a list of normal account updates that make up the bulk of the transaction. - `memo` is an encoded string that can be used to attach an arbitrary short message. You create transactions in o1js by calling `Mina.transaction(...)`, which takes the sender (a public key) and a callback that contains your transaction logic: ```ts const sender = PublicKey.fromBase58('B62..'); // the user address const zkapp = new MyContract(address); // MyContract is a SmartContract const tx = await Mina.transaction(sender, async () => { await zkapp.myMethod(someArgument); }); ``` In this example, the transaction calls a single `SmartContract` method called `myMethod`. You can inspect the transaction by printing it to the console, in JSON format: ```ts console.log(tx.toJSON()); ``` This command outputs a massive JSON object with many fields, most of which are set to their default value. Inspecting transactions becomes easier if you print them in a condensed format, as follows: ```ts console.log(tx.toPretty()); ``` Depending on the logic of `myMethod()`, the output is something like: ```ts [ { publicKey: '..VeLh', fee: '0', nonce: '0', authorization: '..EzRQ', }, { label: 'MyContract.myMethod()', publicKey: '..Nq6w', update: { appState: '["1",null,null,null,null,null,null,null]' }, preconditions: { account: '{"state":["0",null,null,null,null,null,null,null]}', }, authorizationKind: 'Proof', authorization: undefined, }, ]; ``` This output includes several essential things to learn about transactions. First of all, this is an array with two entries -- the two account updates that make up this transaction. The first entry is always the fee payer, whose public key was passed in as `sender`. For the `fee`, which you didn't specify, o1js filled in 0; the `authorization` was filled with a dummy signature. In a user-facing zkApp, you typically don't care about setting those values – instead, you create a transaction like this in the browser and pass it on to the user's wallet. The wallet replaces your fee payer with one that represents the user account, with the user's settings for the fee. It would also fill the `authorization` field with a signature created from the user's private key. See [connecting your zkApp with a user's wallet](/zkapps/writing-a-zkapp/introduction-to-zkapps/how-to-write-a-zkapp-ui#connecting-your-zkapp-with-a-users-wallet). The second account update has the `'MyContract.myMethod()'` label. The update corresponds to the method call. An `@method` call always results in the creation of an account update – an update to the zkApp account itself. Other fields in this account update are: - `publicKey` – the zkApp address (like other non-human-readable strings, this is truncated by `tx.toPretty()`) - `update: { appState: [...] }` – shows how the method updates the on-chain state, using `this..set()`. The names and pretty types defined using `@state` are removed in this representation, showing a raw list of 32 field elements or `null` for state fields that aren't updated. - `preconditions: { account: { state: [...] } }` – similar to the `update`, one entry per field of on-chain state for the preconditions created with `this..requireEquals()`. This example accepts transactions only if the first of the 32 state fields equals 0. The `null` values mean that no condition is set on the other 31 state fields. - `authorizationKind: 'Proof'` – indicates this account update must be authorized with a proof. Proof authorization is the default when calling a zkApp method, but not necessarily for other account updates. - `authorization: undefined` – the proof needed on this update isn't there yet. You learn how to add it in a minute. Note that there are many more fields that account updates can have, but `tx.toPretty()` prints only the fields with actual content. Also, not all of the fields must be present. For example, if a zkApp doesn't set a state, the `update` field might be missing. In that case, strictly speaking, it wouldn't be an "update" in the sense that the account is modified. The term "account update" is used for simplicity. As you might have noticed, account updates aren't created in a very explicit manner. Instead, o1js gives you an imperative API, with "commands" like `state.set()`, to create and modify account updates in a transaction. In the end, the entire transaction is sent to the network as one atomic update. If something fails – for example, one of the account updates has insufficient authorization – the _entire_ transaction is rejected and doesn't get applied. This is in contrast to an EVM contract, where the initial steps of a method call could succeed even if the method fails at a later step. ## Creating proofs Finally, here's how to create zero knowledge proofs! ```ts await MyContract.compile(); // this might take a while // ... const tx = await Mina.transaction(sender, async () => { await zkapp.myMethod(someArgument); }); await tx.prove(); // this might take a while ``` This example code includes two new operations: - `MyContract.compile()` creates prover and verification keys from your smart contract.[^1] You must create the keys before you can create any proofs. - `tx.prove()` goes through your transaction and creates proofs for all the account updates that came from method calls. [^1]: The name `compile()` is a metaphor for what this function does: creating prover and verifier functions from your code. It doesn't refer to literal "compilation" of JS into a circuit representation. The circuit representation of your code is created by _executing_ it, not by compiling it. Also, the prover function still includes the execution of your JS code as one step. Both of these heavy cryptographic operations can take between a few seconds and a few minutes, depending on the amount of logic you're proving and on how fast your machine is. If you print the transaction again with `tx.toPretty()`, it now has the proof as a Base64 string inside the `authorization` field: ```ts [ // ... { label: 'MyContract.myMethod()', // ... authorization: { proof: '..KSkp' }, }, ]; ``` ## How proofs link to account updates You might wonder: what, exactly, is proved? How is the proof linked to the account update it is part of? The proof attests to two different things: - The execution of `myMethod()` - The public input of that execution Recall that all method arguments are _private inputs_. So, the verifier doesn't get to see them, and the proof doesn't say anything about them (it only says that there were _some_ private inputs that satisfied all constraints). However, a zk proof can also have a public input. In the case of zkApps, **the public input is the account update** that is passed in implicitly with `tx.prove()`. The prover function (smart contract logic) creates its own account update and constrains it to equal the public input. The public input is data that is shared between the prover and verifier: - The verifier passes in the public input when verifying it. - The proof is valid only if it was created with _the same public input_. The proof attests to the validity of exactly this account update. If you change the account update before sending it to the Mina network, the proof is no longer valid. The only valid account updates for a zkApp account are the ones created according to the logic of your smart contract. This core concept is why zkApp smart contracts execute on the client side. ## Example: Payment from a zkApp To learn more about account updates, see the example for paying out MINA from a zkApp. To send MINA, use `this.send()` from a smart contract method: ```ts class MyContract extends SmartContract { @method async payout(amount: UInt64) { // TODO: logic that determines whether the user is allowed to claim this amount this.send({ to: this.sender, amount }); } } ``` The `@method async payout()` pays out a given amount of nanoMINA to the sender of the transaction, which you get with `this.sender`. In a real zkApp, you would add conditions to this method to determine who can call it with which amounts. To call this method in a transaction and print the result: ```ts const MINA = 1e9; const tx = await Mina.transaction(sender, async () => { await zkapp.payout(UInt64.from(5 * MINA)); }); await tx.prove(); console.log(tx.toPretty()); ``` :::info MINA amounts, in all o1js APIs and elsewhere in the protocol, are always denominated in nanoMINA = `10^(-9)` MINA, which is why you set `const MINA = 1e9`. ::: The transaction now has three account updates: ```ts [ { // fee payer }, { label: 'MyContract.payout()', publicKey: '..Nq6w', balanceChange: { magnitude: '5000000000', sgn: 'Negative' }, authorizationKind: 'Proof', authorization: { proof: '..KSkp' }, }, { publicKey: '..VeLh', balanceChange: { magnitude: '5000000000', sgn: 'Positive' }, callDepth: 1, caller: '..umxw', authorizationKind: 'None_given', }, ]; ``` - The zkApp update with label `'MyContract.payout()'` has a negative `balanceChange` of 5 billion (= 5 MINA). This makes sense, because you are sending MINA away from the zkApp account. - An additional account update has a corresponding positive balance change – the user account that receives MINA. Two quick observations: - You didn't explicitly create the receiver account update. It was created, and attached to the transaction, by calling `this.send()`. o1js tries to abstract away the low-level language of account updates where possible and give you intuitive commands to create the right ones. However, you might sometimes have to create account updates explicitly. - The user update has `authorizationKind: 'None_given'`. That means the update is not authorized. This is possible because it doesn't include any changes that require authorization: It just receives MINA. You can send someone MINA without their permission. In general, there are three kinds of authorizations that an account update can have: a proof, a signature, or none. You learn more about signatures in the next section. You can find more details in [Permissions](https://docs.o1labs.org/o1js/zkapps/permissions). ## Account update tree structures Next, observe that the user account update has a `callDepth: 1`. This is because the update was created from within a zkApp call. Account updates, displayed as a flat list here, are implicitly structured as a _list of trees_. Updates with a call depth of 1 or higher are child nodes of another update in that list of trees. In this case, the zkApp (sender) account update is at the top level (`callDepth: 0`) and the user (receiver) account update is a child of it. So, what does this tree structure mean? Recall that the zkApp account update is public input to its proof. Now, the fully general version of that statement is: **In a tree of account updates, all nodes are public inputs to the proof of the root node.** (If there is such a proof. This also holds for sub-trees of each tree.) Concretely, in this example, both the zkApp account update and the user account update are public input to the zkApp method call. Intuitively, the public input means that the zkApp can "see" and constrain the update as part of its proof. Here, it means that no one can change the public key of the receiver, or amount they receive, without making the proof invalid. The update can contain only what the method specified. All of this is true because `this.send()` placed the receiver update at call depth 1, under the zkApp update. As a counter example: The fee payer is never part of the public input. It can be anything without affecting the validity of the proof. A key takeaway is: If you want something to become part of your proof, you must put it inside your `@method`. ## Signing transactions and explicit account updates To recap the workflow covered so far: You write a smart contract, and then create a transaction to call the smart contract. You've seen how this transaction consists of account updates that are created by o1js. The next example shows how an account update is created explicitly. You'll also learn how to use signatures for authorizing updates to user accounts. To continue the [Payment from a zkApp example](#example-payment-from-a-zkapp) in the other direction: make a deposit from the user into the zkApp. Payments made from a user account require a signature by the user. Here's the smart contract code: ```ts class MyContract extends SmartContract { @method async deposit(amount: UInt64) { let senderUpdate = AccountUpdate.create(this.sender); senderUpdate.requireSignature(); senderUpdate.send({ to: this, amount }); // TODO: logic that gives the user something in return for the deposit } } ``` To unpack what happens here, the first line of the method creates a new, empty account update for the sender account: ```ts let senderUpdate = AccountUpdate.create(this.sender); ``` - `AccountUpdate` is the class in o1js that represents account udpates. - `AccountUpdate.create()` instantiates this class and attaches the update to the current transaction at the same level where `create` is called. If it is called inside an `@method`, the `AccountUpdate` is created as a child (public input) of the zkApp update. The next line specifies that the update must be authorized with a signature: ```ts senderUpdate.requireSignature(); ``` You can also use a shortcut for `AccountUpdate.create()` and `requireSignature()` in a single command: ```ts let senderUpdate = AccountUpdate.createSigned(this.sender); // create + requireSignature ``` Finally, use `.send()` on the sender `AccountUpdate` to deposit into the zkApp with the same API as `this.send()`: ```ts senderUpdate.send({ to: this, amount }); ``` Note that instead of an address as the `to` field, pass in `this`, which is a `SmartContract`, so that `.send()` doesn't create an additional update, but uses the one already created for our zkApp. A transaction for calling this method looks like: ```ts [ { // fee payer }, { label: 'MyContract.deposit()', balanceChange: { magnitude: '5000000000', sgn: 'Positive' }, // ... }, { publicKey: '..VeLh', balanceChange: { magnitude: '5000000000', sgn: 'Negative' }, callDepth: 1, useFullCommitment: true, caller: '..umxw', authorizationKind: 'Signature', authorization: undefined, }, ]; ``` The third account update is the one created with `AccountUpdate.create()`. Two changes to the update were caused by calling `requireSignature()`: - `useFullCommitment: true`, not explained here but has to do with replay protection when using signatures. - `authorizationKind: 'Signature'` Finally, `authorization: undefined` indicates that the signature is not provided yet. In a user-facing zkApp, user signatures are typically added by a wallet, not within o1js. In that case, the missing signature is expected. However, in tests or when calling zkApps from a Node.js script, you must add the signatures with `tx.sign([...privateKeys])`, called after `Mina.transaction` on the finished transaction. For example: ```ts const sender = senderPrivateKey.toPublicKey(); // public key from sender's private key const tx = await Mina.transaction(sender, async () => { await zkapp.deposit(UInt64.from(5 * MINA)); }); await tx.prove(); tx.sign([senderPrivateKey]); // senderKey is a PrivateKey ``` - The example shows how to derive the sender's public key, `sender`, from its private key, `senderPrivateKey`. - `.sign()` goes through the transaction and adds signatures on all account updates that: - Need a signature - Whose public key matches one of the private keys that were provided `.sign()` takes an array, so you could provide multiple private keys for signing. In this example, two account updates are signed with `tx.sign()`: The fee payer and the depositor account update. Both have the `sender` public key on them that matches `senderPrivateKey.toPublicKey()`. :::tip o1js allows you to load and store private and public keys in Base58 format. To create the sender private key in a script: ```ts const senderPrivateKey = PrivateKey.fromBase58('EKEQc95...'); ``` In a real server-side deployment, you probably want to load keys from a file or environment variable, instead of hard-coding them in your source code. ::: Recall that account updates can have three types of authorization: - Proof authorization – used for zkApp accounts when you do an `@method` call. Proofs are verified against the on-chain verification key. - Signature authorization – used to update user accounts. Signatures are verified against the account's public key. - No authorization – used on updates which don't require authorization. For example, positive balance changes. These are common defaults. The full source of truth is set by the _account permissions_, see [Permissions](https://docs.o1labs.org/o1js/zkapps/permissions). Using permissions, account owners can decide on a fine-grained level which type of authorization is required on which kinds of updates. Permissions are checked every time an account update tries to interact with an account. ## Sending transactions The final step of creating a transaction is sending it to the network. Like signing, in a user-facing zkApp this transaction is usually handled by a wallet. You can use this workflow for testing and scripting. To send a transaction, you must specify what network to interact with by specifying a "Mina instance" at the beginning of your script: ```ts const Network = Mina.Network('https://example.com/graphql'); Mina.setActiveInstance(Network); ``` The network URL must be a GraphQL endpoint that exposes a compatible GraphQL API. This URL determines where transactions are sent and where o1js gets account information from when _creating_ transactions. For example, when you do something like `this..get()` in your smart contract, the Mina instance is asked for the account using `Mina.getAccount`, which in turn causes the account to be fetched from the GraphQL endpoint. To send a transaction, use `tx.send()`: ```ts // set Mina instance const Network = Mina.Network('https://example.com/graphql'); Mina.setActiveInstance(Network); // create the transaction, add proofs and signatures const tx = await Mina.transaction(sender, async () => { // ... }); await tx.prove(); tx.sign([senderPrivateKey]); // send transaction await tx.send(); ``` The output of `tx.send()` can be used to: - Wait for inclusion of this transaction in a block - Get the transaction hash, which lets you look up the pending transaction on a block explorer ```ts // send transaction, log transaction hash let pendingTx = await tx.send(); console.log(`Got pending transaction with hash ${pendingTx.hash}`); // wait until transaction is included in a block await pendingTx.wait(); // our account updates are applied on chain! ``` In addition to `Mina.Network`, you can also use a simulated local blockchain for local testing: ```ts const Local = Mina.LocalBlockchain(); Mina.setActiveInstance(Local); ``` Doing this means setting up a fresh, local ledger that is pre-filled with a couple of accounts with funds that you have access to. "Sending" a transaction here just means applying your account updates to that local simulated Mina instance. This is helpful for testing, especially because account updates go through the same validation logic locally that they would on-chain. Fun fact: The `LocalBlockchain` instance literally uses the same OCaml code for transaction validation and application that the Mina node uses; it's compiled to JavaScript with [js_of_ocaml](https://github.com/ocsigen/js_of_ocaml). You can learn more about testing in [Test zkApps Locally](https://docs.o1labs.org/o1js/zkapps/local-development). --- url: /zkapps/writing-a-zkapp/introduction-to-zkapps/secure-zkapps --- # Security and zkApps On this page, you will find guidance for how to think about security when building zkApps. We also provide a list of best practices and common pitfalls to help you avoid vulnerabilities. ## Auditing your zkApp Apart from acquiring a solid understanding of security aspects of zkApps, we recommend that critical applications also get audited by independent security experts. There has been an internal audit of the o1js code base already, [the results of which you can find here](/zkapps/o1js#audits-of-o1js). You can also see the results of a third-party audit, performed by Veridise, [here](https://github.com/o1-labs/o1js/blob/a09c5167c4df64f879684e5af14c59cf7a6fce11/audits/VAR_o1js_240318_o1js_V3.pdf). ## Attack model The first and most important step for zkApp developers is to understand the attack model of zkApps, which differs from traditional web apps in important ways. In essence, there are two new kinds of attack: 1. **Adversarial environment**: Like smart contracts in general, zkApps are called in an environment that you don't control. For example, you have to make sure that your zkApps is not misbehaving when passed particular method inputs, or when used as part of transactions different than you intended. The caller chooses how and with what inputs to call your zkApp, not you; and they might use this opportunity to exploit your application. 2. **Underconstrained proofs**: Successfully "calling" a zkApp really just means getting a proof accepted onchain which is valid against your zkApp's verification key. Such a proof could, for example, be created using a _modified_ version of your zkApp code. This will work only if the modification doesn't change any of your constraints -- the logic that forms the proof. Hence, you have to take care that your zkApp code _correctly proves_ everything it needs to prove; unproved logic can be changed at will by a malicious prover. Note how the first point (adversarial environment) is relevant in all kinds of permissionless systems, like smart contracts. The second point, which can be seen as a special case of the first, is specific to the zkApp model. In classical smart contracts, you can rely on the fact that the code you deploy is exactly the code that is executed; in offchain-executed zkApps, you can't. While having your code modified due to underconstrained proofs sounds scary, we emphasize that most of the attack surface here is covered by o1js itself. It's o1js' job that when you call `a.assertLessThan(b)`, you prove that `a < b` under all circumstances; and the o1js team dedicates a lot of resources to the security of its standard library. The explicit goal is that when using o1js in an idiomatic way, you shouldn't have to worry about underconstrained logic. That story changes when you start writing your own low-level provable methods. When doing so, you enter expert territory, and there are many new pitfalls to be aware of. We plan to dedicate [a section to writing your own provable methods](#rolling-your-own-provable-methods) below. If there is just one take away from this post, it should be to always keep an adversarial mindset. Be paranoid about your zkApp's security! In the next section, we demonstrate the attack model of zkApps with a concrete example. ## Example: An insecure token contract Take a look at the following snippet of a token contract. The contract has a method called `mintOrBurn()` which is supposed to approve an account update that mints or burns tokens. The skeleton of `mintAndBurn()` exists: We read address and balance change (positive or negative) from the update, and we also call `this.approve()` so the update can use our token. However, as the TODO comment says, we still need to call `assertCanMint()` or `assertCanBurn()` to check if the minting or burning is allowed for this account. ```ts class FlawedTokenContract extends TokenContract { // ... @method async mintOrBurn(update: AccountUpdate) { // read mint/burn properties from the update let amount = update.balanceChange; let address = update.publicKey; // TODO: only allow minting and burning under certain conditions // approve the account update this.approve(update); // ... other actions related to minting or burning // like updating the total supply based on `amount` ... this.updateTokenSupply(amount); } assertCanMint(amount: Int64, address: PublicKey) { // ... logic asserting that minting is allowed for this account ... } assertCanBurn(amount: Int64, address: PublicKey) { // ... logic asserting that burning is allowed for this account ... } updateTokenSupply(amount: Int64) { // ... logic updating the total supply ... } } ``` :::note The pattern of passing in the full `AccountUpdate` here, and not just amount and address, is good practice and more flexible than creating the account updates inline: It allows the method to be used by zkApps, not just typical end-user accounts. zkApps need to put their own proof on the account update to authorize a spend. ::: ### Creating an insecure contract We need to use either `assertCanMint()` or `assertCanBurn()`, but how do we know which one? Well, let's just add a parameter to the method that tells us whether this is a mint or a burn. Then let's call the appropriate method based on that parameter. Github Copilot fills this out nicely for us: ```ts @method async mintOrBurn(update: AccountUpdate, isMint: Bool) { // read mint/burn properties from the update let amount = update.balanceChange; let address = update.publicKey; // only allow minting and burning under certain conditions if (isMint) { this.assertCanMint(amount, address); } else { this.assertCanBurn(amount, address); } // approve the account update this.approve(update); // ... other actions related to minting or burning // like updating the total supply based on `amount` ... this.updateTokenSupply(amount); } ``` LGTM! However, in tests this doesn't seem to work, and after some debugging we find the problem: `isMint`, being a `Bool` and not a JS boolean, is always truthy, so this always checks the mint condition and never the burn condition. Seems like we have to coerce it to a boolean first: ```diff - if (isMint) { + if (isMint.toBoolean()) { this.assertCanMint(amount, address); } else { this.assertCanBurn(amount, address); } ``` When compiling this contract, there's the next unpleasant surprise: A complicated error about not being able to call `.toBoolean()`. ``` Error: b.toBoolean() was called on a variable Bool `b` in provable code. ... To inspect values for debugging, use Provable.log(b). For more advanced use cases, there is `Provable.asProver(() => { ... })` which allows you to use b.toBoolean() inside the callback. Warning: whatever happens inside asProver() will not be part of the zk proof. ``` At least there is a hint at the end that this might work when wrapped inside `Provable.asProver()`: ```diff + Provable.asProver(() => { if (isMint.toBoolean()) { this.assertCanMint(amount, address); } else { this.assertCanBurn(amount, address); } + }); ``` With that change, compiling finally works and our tests do as well. Progress! 🚀 However, the statement about `asProver()` not being part of the zk proof is concerning. So maybe we should check that this actually prevents invalid minting and burning. After creating a test that tries to mint or burn tokens for an account that is not allowed to, we confirm that it fails. So we're good to go. Right? Unfortunately, not at all. The security of our contract is thoroughly broken. We ignored both [attack surfaces described above](#attack-model): _Adversarial environment_ and _underconstrained proofs_. ### First problem: we didn't prove everything The first problem was moving essential logic inside `Provable.asProver()`. It can be generalized as: - **Security advice #1: Don't move your logic outside the proof.** Other APIs that let you do this are `Provable.witness()` and `Provable.witnessFields()`. They are essential in advanced provable code, but you have to use them carefully! Checks that are not part of the proof can be bypassed. In our case, a bad actor could simply get our source code and delete the entire `Provable.asProver()` block. From that, they can call our contract without the `assertCanMint()` and `assertCanBurn()` checks, and mint any amount of tokens they like. In particular, negative tests that fail on invalid actions are not enough to show that these actions are impossible, under the attack model that our code can be changed. A second thing to note is that we had to fight o1js quite hard to make our insecure code work. This should be a red flag in general. - **Security advice #2: Don't try to trick o1js.** The fact that o1js doesn't allow you to call `.toBoolean()` on a `Bool` inside provable code is a security feature. It's hard to circumvent for a reason. There are tons of vulnerable patterns that would be introduced if we allowed going back and forth between provable variables (the `Bool`) and JS values (the `boolean`), and doing so is a frequent source of issues in lower-level frameworks like arkworks. If o1js makes something really hard to do and puts warnings in front of it, it's best to assume this is for a reason and not try to hack around it. And of course, reach out on [our discord](https://bit.ly/MinaDiscord) when in doubt about your code's security. ### Fix: Adding the missing constraints Let's see how to solve the `asProver()` issue. In provable code, we can't do assertions conditionally, so we have to do all of them at the same time. In our case, we could refactor the mint and burn checks so that they can be applied conditionally. The result could look like this: ```ts async mintOrBurn(update: AccountUpdate, isMint: Bool) { // ... // only allow minting and burning under certain conditions this.assertCanMint(isMint, amount, address); this.assertCanBurn(isMint.not(), amount, address); // ... } assertCanMint(enabledIf: Bool, amount: Int64, address: PublicKey) { // ... logic asserting that minting is allowed for this account ... } assertCanBurn(enabledIf: Bool, amount: Int64, address: PublicKey) { // ... logic asserting that burning is allowed for this account ... } ``` ### Second problem: we trusted the caller However, our contract is still insecure, because we forgot that it's called in an adversarial environment. Our contract just takes the `isMint` parameter for granted, even though the `update` could be either minting or burning tokens. A bad actor could easily call `mintOrBurn()` with a positive balance change on the `update` and `isMint = false`. This would bypass the `assertCanMint()` check and only do `assertCanBurn()` instead, which might mean they can mint tokens without much restrictions. - **Security advice #3: Don't trust the caller of a zkApp method.** In a sense, this is the same issue as moving logic outside the proof: Method inputs originate from an unconstrained source. If our logic relies on correlations between variables, those correlations must be put into constraints. ### Fix: Removing assumptions on method inputs The issue with `isMint` is, of course, simple to fix. Instead of letting the caller pass it in, we can compute it inside our method, as `amount.isPositive()`: ```diff - async mintOrBurn(update: AccountUpdate, isMint: Bool) { + async mintOrBurn(update: AccountUpdate) { // read mint/burn properties from the update let amount = update.balanceChange; + let isMint = amount.isPositive(); let address = update.publicKey; ``` This concludes our example of fixing an insecure token contract. ## Best practices for zkApp security In the last section, we already gave three pieces of advice concerning zkApp security. - **Don't move your logic outside the proof.** - **Don't try to trick o1js.** - **Don't trust the caller of a zkApp method.** This section collects more recommendations and describes more complex attacks on a zkApp that you might not be aware of. - [**Lock down permissions as much as possible**](#lock-down-permissions-as-much-as-possible) - [**Only call external contracts with locked down permissions**](#only-call-external-contracts-with-locked-down-permissions) - [**Don't deadlock your zkApp by interacting with unknown accounts**](#dont-deadlock-your-zkapp-by-interacting-with-unknown-accounts) :::info The list above is intended to grow over time. If you have a security tip that you think should be included, [please let us know](https://github.com/o1-labs/docs2/edit/main/docs/zkapps/writing-a-zkapp/introduction-to-zkapps/secure-zkapps.mdx)! ::: ### Lock down permissions as much as possible Like every account on Mina, zkApps have permissions that restrict what account updates are possible and what authorization they need. The default permissions on deployment include the following (leaving out some permissions that are not relevant for most zkApps): ```ts { editState: Permission.proof(), send: Permission.proof(), receive: Permission.none(), setDelegate: Permission.signature(), setPermissions: Permission.signature(), setVerificationKey: Permission.VerificationKey.signature(), setZkappUri: Permission.signature(), editActionState: Permission.proof(), setTokenSymbol: Permission.signature(), incrementNonce: Permission.signature(), setVotingFor: Permission.signature(), setTiming: Permission.signature(), access: Permission.none(), } ``` If you don't know what these permissions mean, we recommend to read the [permissions docs](https://docs.o1labs.org/o1js/zkapps/permissions) first. Two of these defaults stand out as highly problematic: - `setVerificationKey: signature`. This means that the account owner (zkApp developer) can change the code and redeploy the zkApp. In a sense, the zkApp is upgradable in arbitrary ways. This makes it hard to trust the zkApp from a user perspective. - `setPermissions: signature`. In a sense, this overrides all other permissions, since the zkApp developer can arbitrarily change the permissions themselves. For example, if they change the `editState` permission back to `signature`, they can reset zkApp state to any value they want. They can even do this, change the state to their favor and reset the permission back to `proof` atomically in a single transaction, hoping that no one notices. You should view these permissions as training wheels. They are useful for iterating on the zkApp during development. We thought it was a better default to let developers redeploy their zkApp in the early stages, as they find bugs or have to redesign some aspect of the zkApp. However, it means that these zkApps essentially have to be viewed as a trusted service, not a permissionless protocol. If you are confident that your zkApp code is final, you should lock down permissions: Set both `setVerificationKey` and `setPermissions` to `impossible`. Alternatively, set `setVerificationKey` to `proof` and add a method that can upgrade the zkApp according to a permissionless, open protocol. More generally, we recommend to follow the _principle of least authority_: Remove any way to update the account that is not necessary for your application. For example: - `setTiming`: The timing field allows you to [lock the funds](/zkapps/writing-a-zkapp/feature-overview/time-locked-accounts) in an account for a certain amount of time. If you don't plan on using this feature, then it poses an unnecessary risk. Change it to `setTiming: impossible`. - `setTokenSymbol`: Similarly, if your zkApp is a token, and its token symbol is not supposed to ever change, you could use `setTokenSymbol: impossible`. For some permissions, `signature` might be a good choice: - `setDelegate`: for most zkApps, setting the delegate (the block producer that zkApp balance is staked with) can be seen as an administrative decision that is independent of the zkApp's main function. It's fine to keep this as `signature`, unless your zkApp logic specifically deals with setting and updating the delegate. - `incrementNonce`: typically, incrementing the account nonce is itself only done when signing a transaction. Similar to `setDelegate`, if the nonce doesn't play a special role in your zkApp logic, it should be fine to keep this as `signature`. However, incrementing the nonce can be useful to make any action non-repeatable. If you want to leverage this for both zkApp methods and administrative actions, you can set it to `proofOrSignature`. ### Only call external contracts with locked down permissions This is the flipside of the previous advice. The permissions of third-party zkApps you call into are an important factor for the security of your own zkApp. The most obvious reason is simply to guarantee that you will always be _able_ to call the external contract. Imagine one of the following scenarios: - The called contract has `setPermissions: signature`. One day, the contract's maintainer decides to shut down their contract. Maybe not even in their own will, but because they are pressured to do so. They can simply change their `access` permission to `impossible`, which means no one will ever be able to call their contract again. - The called contract has `setPermissions: impossible`, but still allows verification key upgrades with `setVerificationKey: signature`. Similarly, this gives them a trivial way to make their contract unusable: Just replace the verification key with one where all methods prove a contradictory statement, like `x === 0 && x === 1`. In either of these scenarios, the unusable third-party contract makes your own zkApp unusable as well. For this reason alone, you should only call external contracts that have locked down verification key changes as well as made changes to the permissions themselves impossible. Apart from the deadlock risk described above, there can be other attacks enabled by an upgradable external contract. You should be mindful of those whenever your own zkApp relies on particular behaviour of the external contract. For example, calling a DEX might involve spending your own token A and _trusting the DEX_ to give you a fair amount of token B in return. If the DEX is upgradable, its maintainer might modify the code you trusted and rob you or your users of tokens. ### Don't deadlock your zkApp by interacting with unknown accounts In the [previous section](#only-call-external-contracts-with-locked-down-permissions), we described how calling a contract which sets its `access` permission to `impossible` can deadlock your zkApp. It was fairly easy to defend against because we assumed that you know the contract account up front, and can manually check its permissions. There is a more complicated version of this problem when interacting with accounts that you _can't_ check a priori, or can't expect to have locked-down permissions. It typically arises in the scenario where you create account updates from a [reducer](https://docs.o1labs.org/o1js/zkapps/actions-and-reducers) call. #### A problematic token airdrop To have a concrete example, consider a token airdrop. As the token contract developer, you precompute a [Merkle map](https://docs.o1labs.org/o1js/basic-types/merkle-trees) containing eligible accounts and their airdrop amounts, and store the Merkle root onchain. _Claiming_ an airdrop has to involve updating the tree and onchain root, because otherwise the same account could claim the airdrop multiple times. To scale payouts to multiple concurrent users per block, you approach the problem with [actions and reducer](https://docs.o1labs.org/o1js/zkapps/actions-and-reducers). To claim, a user dipatches a "claim" action that contains their address and airdrop amount. On top of that, every block, you run a reducer method which contains the following logic: 1. For every pending "claim" action, you check whether it's really contained in the Merkle map (i.e., you either prove inclusion or non-inclusion). 2. If the claim is valid, you create an account update that mints the airdrop amount to the user. 3. You remove the claiming account from your Merkle map. This should work well unless a single eligible user doesn't like your token and decides to dispatch a valid "claim" action while also setting either their `access` or `receive` permission to `impossible` (or `signature`, or `proof`). This makes the reducer fail at step 2: The account update it is creating does not have the necessary authorization, and the entire reducer transaction fails. At this point, the reducer is stuck because actions can only be processed in order. No reducer call will ever succeed again, your contract is deadlocked. #### Fixed airdrop: lock down all token account permissions A solution for this particular application scenario is to not even allow users to create token accounts with problematic `access` and `receive` permissions. This is possible since a token contract already has logic that approves on every single account update on every single token account. In its `approveBase()` method, the token contract asserts that `access` and `receive` permissions on every account update are not updated to anything else than the default (`none`). This prevents the attack. #### Be careful with creating account updates from a reducer The fix above was possible because user accounts were using a token that we controlled ourselves. The behavior of preventing bad permissions is also part of Mina's upcoming [fungible token standard](https://github.com/MinaFoundation/mina-fungible-token), so the issue won't exist at all for tokens following that standard. There will be cases where a similar fix is not applicable; but more complicated mitigations are possible. In any case, you should be careful whenever you create account updates for unknown accounts from a reducer, or in any other scenario where a single invalid child update deadlocks your zkApp. ### When developing a token, extend a standard token contract When developing a token contract, a number of security considerations come into play. First and foremost, it is important to implement token approvals correctly. The [`access` permission](https://docs.o1labs.org/o1js/zkapps/permissions) exists so that token contracts are able to have every token interaction approved by one of the contract's methods. When a token is built off of the default `SmartContract` and doesn't change the `access` permission from its `none` default, users can get any token interaction approved. Simply by including a dummy account update of the token contract in their transaction, they can mint an arbitrary number of tokens to themselves. Even creating the token owner account before deploying the contract there, and thus leaving it in a temporary state where the `access` permission is not set, could allow this attack. The base `TokenContract` exported from o1js avoids all these pitfalls and gives you tools that abstract away considerable complexity to implement general-purpose token approval logic. We highly recommend extending `TokenContract` or a token standard that is based on it. ## Rolling your own provable methods :::caution This section is not written yet. When developing your own provable methods, make sure to [prove everything](#first-problem-we-didnt-prove-everything) you need, and [not to trick o1js](#first-problem-we-didnt-prove-everything). ::: --- url: /zkapps/writing-a-zkapp/introduction-to-zkapps/testing-zkapps-lightnet --- :::caution Use of the **Lightnet** is appropriate for the **local development and testing** only. It is **not** intended to replicate all aspects of the real public networks. ::: # Testing zkApps with Lightnet ## What is Lightnet? It is a fast, resource-efficient solution to launch a lightweight Mina network and associated tools in a single Docker container. It lets you test zkApps locally on an accurate representation of Mina blockchain before you test same zkApps against the public testnet. Lightnet provides the following benefits: - Reduces the time from ideation to launch by letting you test zkApps against the close-to-real Mina network locally. - Provides the resource-efficient blockchain network with fast startup and syncing times. - Supports `multi-mode` networks. (single-node network managed by multi-purpose Mina Daemon or multi-node network with diverse participant types) - Creates and funds accounts so that you can deploy and interact with your zkApps. The genesis ledger is configured with `1000` pre-funded accounts with the `1550 MINA` balance on each. - Runs the archive data tools like [Mina archive process](/node-operators/archive-node), `PostgreSQL RDBMS`, [Archive-Node-API](/zkapps/writing-a-zkapp/feature-overview/fetch-events-and-actions) (can be disabled if there is no need) - Provides the Mina accounts manager helper tool so you can automate accounts retrieval using, for example, the `Lightnet` [o1js API namespace](https://github.com/o1-labs/o1js/blob/23cdfa3e17a8e8132b70895d34aab711cebd676f/src/lib/mina/fetch.ts#L804). - Simplifies zkApps and network state monitoring by - providing convenient access to detailed services logs - launching the [lightweight Mina explorer](#lightweight-mina-explorer) web application ## Prerequisites `Docker Engine` is required to be installed, see [Install Docker Engine](https://docs.docker.com/engine/install/) official documentation. Lightnet requires minimum hardware resources to operate properly. - Default `single-node` mode - `4.5 GB` of RAM to start up - `1.5-2 GB` of RAM to operate Fewer resources are required if you start the Lightnet without the archive data tools. See [start the network without the archive data tools](#start-the-network-without-the-archive-data-tools). - Closer-to-real `multi-node` mode - More than `16 GB` of RAM See [start the multi node network](#start-the-multi-node-network). When you use Lightnet via the [`zkapp-cli`](/zkapps/writing-a-zkapp/introduction-to-zkapps/install-zkapp-cli) application, the mentioned resources availability is checked automatically. ## High-level workflow for Lightnet 1. [Write tests for your smart contract](https://docs.o1labs.org/o1js/zkapps/local-development) and test locally on a simulated local blockchain 1. Start the `Docker Engine` 1. [Start the Lightnet](#start-the-single-node-network) 1. [Configure and deploy your zkApp to Lightnet](#configure-your-zkapp) 1. Explore the Docker container processes [log files](#log-files) 1. Use [lightweight Mina explorer](#lightweight-mina-explorer) to visualize the network state 1. Develop, iterate, celebrate, [monitor and troubleshoot](#monitor-and-troubleshoot-the-network-state) 1. [Stop the Lightnet](#stop-the-network) The best way to experience Lightnet is by using it via the [`zkapp CLI`](/zkapps/writing-a-zkapp/introduction-to-zkapps/install-zkapp-cli). ## Start the Lightnet Most of your zkApp testing can be done on a single node network. `Docker Engine` must be running before you can start the Lightnet. ### Start the single node network To start a single node network with default configuration: ```sh $ zk lightnet start ``` This command performs the following operations: - Pulls the latest Docker image for your environment from the [Docker Hub](https://hub.docker.com/r/o1labs/mina-local-network) repository - Prepares the file system - Uses the artifacts built from the `berkeley` branch of the Mina GitHub [repository](https://github.com/MinaProtocol/mina) - Configures the network properties to achieve fast startup, syncing and operation times - Disables the blockchain `SNARK` proofs - Sets the Mina processes logging level to `Trace` - Properly configures the `CORS` settings of the `Nginx reverse proxy` that will serve communications with the Mina Daemon's GraphQL endpoint - Forms the network using `multi-purpose single Mina Daemon` - Starts the `PostgreSQL RDBMS`, `Mina archive process` and the [Archive-Node-API](https://github.com/o1-labs/Archive-Node-API) application - Waits for the network to reach the `synchronized` state ### Use `--no-` prefix for boolean sub-commands To see the options for a sub-commands, use the `--help` (or `-h`) parameter. For example: ```sh $ zk lightnet start --help ``` Some of the `zk lightnet` sub-commands have `boolean` values that default to `true`. For these sub-commands, the option is active when present. For example, the default value for `--sync` is `true`, so using `zk lightnet start` is the same as `zk lightnet start --sync`. For sub-commands that show the option as (`[boolean] [default: true]`), negation happens by adding the `--no-` prefix to the option. For example, to start Lightnet without waiting for the network to reach the `synchronized` state, use: ```sh $ zk lightnet start --no-sync ``` ### Start the network with other settings To see the options to start the blockchain network with other-than-default settings: ```sh $ zk lightnet start --help ``` You can configure different network properties as appropriate to your testing requirements. ### Start the network without the archive data tools By default, the Lightnet blockchian network starting up also launches the archive data tools such as the `Mina archive process`, the `PostgreSQL RDBMS` and the `Archive-Node-API` application. To use fewer resources when your testing does not require the archive data tools, you can start the network without them. To disable the archive data tools use the `--no-archive` option: ```sh $ zk lightnet start --no-archive ``` ### Keep the current product versions New `Docker` images are built and published to the [`Docker Hub`](https://hub.docker.com/r/o1labs/mina-local-network) repository every night. You might not always want to get the latest product versions. For example, when your zkApp relies on the well-defined APIs and you want to continue developing in your current environment. To keep your current working versions of tools provided by the Lightnet, use the `--no-pull` option: ```sh $ zk lightnet start --no-pull ``` ### Start the multi node network You can start the network with multiple participants. Please keep in mind that such the network uses more resources. To start the network in `multi-node` mode with `closer-to-real-world` properties use the following command: ```sh $ zk lightnet start --mode multi-node --type real --proof-level full ``` ### Restart the network for a clean slate To reinstantiate Lightnet to a clean state, stop the network and start it again: ```sh $ zk lightnet stop $ zk lightnet start ``` ## Stop the network To stop the network, remove the Docker container, and clean up the environment use the following command: ```sh $ zk lightnet stop ``` When the Lightnet is being stopped, the log files for Docker container services are saved to the host file system at `${HOME}/.cache/zkapp-cli/lightnet/logs/`. To disable saving of log files you can use the `--no-save-logs` option: ```sh $ zk lightnet stop --no-save-logs ``` ## Configure your zkApp When you first build your zkApp, you test it locally and create the deploy alias as described in [Tutorial 3: Deploy to a Live Network](/zkapps/tutorials/deploying-to-a-network#deploy-alias) to later use it duting zkApp deployment to the public network. With Lightnet the deploy alias is automatically configured to be compatible with the lightweight Mina blockchain network. Now that you have Lightnet running, you can execute a single command to configure your zkApp deploy alias in non-interactive mode: ```sh $ zk config --lightnet ``` No extra steps are required. ## Monitor and troubleshoot the network state Tools that help you monitor and troubleshoot the network state. ### Lightweight Mina explorer To visualize the network state, launch the lightweight Mina explorer with the following command: ```sh $ zk lightnet explorer ``` By default, this command downloads (if needed) and launches the latest version of [lightweight Mina explorer](https://github.com/o1-labs/mina-lightweight-explorer) web application. To list versions, their published dates, and show the version in use: ```sh $ zk lightnet explorer --list ``` To use a specific version of the lightweight Mina explorer: ```sh $ zk lightnet explorer use ``` ### Log files Log files for various processes are saved inside the Docker container as: - `/root/logs/*.log` - `/root/.mina-network/mina-local-network-2-1-1/nodes/**/logs/*.log` To save the log files that are produced by Docker container processes to the host machine file system use the following command: ```sh $ zk lightnet logs save ``` You can stream the Docker container processes logs in real time for debugging and monitoring purposes. Try the following command: ```sh $ zk lightnet logs follow ``` Then select the Docker container process to follow logs for. Press `Ctrl+C` to stop streaming. ### Lightnet status To get the network status use the following command: ```sh $ zk lightnet status ``` The network status is returned, including HTTP endpoints, network propertis and state, code snippet of a zkApp using o1js API, and more. ## Blockchain accounts Each Docker image is packaged with the `genesis ledger` that is configured with `1000` pre-funded accounts with the `1550 MINA` balance on each. The Mina [`accounts manager`](https://github.com/shimkiv/mina-accounts-manager) helper tool provides the random key pair from the genesis ledger. By default it is available at the [http://localhost:8181/](http://localhost:8181/). This endpoint is the same for all users and is available when the Lightnet is up and running. Use HTTP endpoints to manage accounts: ```text HTTP GET: http://localhost:8181/acquire-account Supported Query params: isRegularAccount=, default: true Useful if you need to get non-zkApp account. unlockAccount=, default: false Useful if you need to get unlocked account. Returns JSON account key-pair: { pk:"", sk:"" } ``` ```text HTTP PUT: http://localhost:8181/release-account Accepts JSON account key-pair as request payload: { pk:"", sk:"" } Returns JSON status message ``` ```text HTTP GET: http://localhost:8181/list-acquired-accounts Returns JSON list of acquired accounts key-pairs: [ { pk:"", sk:"" }, ... ] ``` ```text HTTP PUT: http://localhost:8181/lock-account Accepts JSON account key-pair as request payload: { pk:"", sk:"" } Returns JSON status message ``` ```text HTTP PUT: http://localhost:8181/unlock-account Accepts JSON account key-pair as request payload: { pk:"", sk:"" } Returns JSON status message ``` **Pro tip**: the genesis ledger configuration file is named `daemon.json`. You can manually access the Docker container file system to manage this file. In default Lightnet configuration it can be found at `/root/.mina-network/mina-local-network-2-1-1/daemon.json` path. ### Lightnet o1js API namespace The `acquireKeyPair()`, `releaseKeyPair()`, and `listAcquiredKeyPairs()` methods in the `Lightnet` o1js API namespace handle the communication with the running Mina accounts manager helper tool. For details, see the source code comments of the correspointing [namespace](https://github.com/o1-labs/o1js/blob/23cdfa3e17a8e8132b70895d34aab711cebd676f/src/lib/mina/fetch.ts#L804) methods. For the real-world example of using Lightnet and o1js API, see [run-live.ts](https://github.com/o1-labs/o1js/blob/main/src/examples/zkapps/hello-world/run-live.ts) example file. ## Feedback and contributions Share your feedback, submit feature requests, and report issues with Lightnet at the [zkapp-cli GitHub repository](https://github.com/o1-labs/zkapp-cli). Remember to use the `lightnet` label. --- url: /zkapps/zkapp-development-frameworks --- :::info To protect end users and ensure your zkApps are secure, consider the information at [Security and zkApps](/zkapps/writing-a-zkapp/introduction-to-zkapps/secure-zkapps) while architecting your solution and consider a third-party security audit before deploying to Mina mainnet. ::: # zkApp Development Frameworks Developers building zkApps in the Mina ecosystem can leverage two different frameworks, each tailored to optimize different types of solutions. Explore the options below to find the perfect fit for your project. If you are unsure about any of the information presented here and need guidance on choosing the most suitable framework for you, drop by [Discord](https://discord.gg/minaprotocol) and let us help! ## [o1js](/zkapps/o1js) o1js is the framework for building **zkApps on the Mina L1** and new infrastructure such as rollups. o1js is TypeScript based for ease of use, comes with a host of built-in features, is extensible to suit various use cases, and takes full advantage of the unique aspects of the Mina protocol. o1js is also the **zkDSL** used for: - Writing general-purpose zk circuits. - Constructing new primitives and data structures. There are some key considerations when choosing to build a zkApp with o1js on Mina L1: - zkApps are subject to protocol throughput limitations. - At present, zkApps that require support for multiple concurrent users require specific architecture to avoid race conditions: - Where more than the 32 on-chain field elements are required to manage state, and access to that state is not shared between users, the experimental [Offchain Storage API](/zkapps/writing-a-zkapp/feature-overview/offchain-storage) offers a solution. - Where concurrent access to _shared global state_ is required, the required architecture is available **out of the box** when using the Protokit framework to build your zkApp as an zkApp-chain (L2). There is currently no easy-to-use equivalent for shared state in o1js L1 contracts. Start here: - [Developer documentation](/zkapps/o1js) - [o1js repository](https://github.com/o1-labs/o1js) - [Discord](https://discord.gg/minaprotocol) ## [Protokit](https://protokit.dev/) Protokit is a powerful framework designed to build **ZK appchains and smart contracts** that are user-facing, privacy-preserving, interoperable. It offers a familiar developer experience similar to Solidity dApps, making it easier and intuitive for developers to leverage ZK in their blockchain solutions. It provides a full set of tools necessary for: - zkApps that require high throughput or multiple concurrent users. - zkApps that require shared or global state access. - Developers familiar with execution environments such as EVM. - Developers who wish to leverage the modular architecture of Protokit. Start here: - [Developer documentation](https://protokit.dev/docs/what-is-protokit) - [Protokit repository](https://github.com/proto-kit) - [Starter Kit](https://github.com/proto-kit/starter-kit) - [Discord](https://discord.gg/bEGZTWRy) ## Framework comparison || o1js SmartContract | Protokit | |--|--|--| |**Production readiness**|v1.0 released, internal audit complete, 3rd party audit in progress.|Beta release, internal audit in progress, 3rd party audit not started. Testnet only.| |**Censorship resistance**|Decentralized and censorship resistant.|Censorship resistance via hybrid sequencing model.| |**Support for multi-user apps**|Many multi-user use cases require sophisticated architecture and are limited by L1 throughput.|Capable of handling higher throughput and multiple concurrent users, thanks to Protokit's modular sequencer.| |**Execution environment**|Proving off-chain, verification on-chain, transaction ordering possible on-chain.|Hybrid execution model, both on-chain (sequencer) and off-chain thanks to recursive zk-proofs, verification on-chain (MINA L1).| |**DX**|New programming model, distinct from traditional web3.0 development.|Module oriented app-chain development, similiar to Substrate Pallets, Cosmos SDK Modules or EVM smart contracts.| |**Composability**|Fully composable. Contracts can call other contracts directly within a single transaction.|Protokit supports bi-directional L2 ↔ L1 messaging out of the box.|